Samsung UN32J4000 Скачать руководство пользователя страница 6

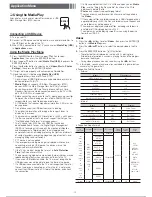
6. Configuring the Basic Settings with Plug & Play

When you turn the TV on for the first time, a sequence of prompts and screens will assist you in configuring basic 
settings. Before you begin, make sure you have connected the TV to an antenna or a cable connection and that the TV 
is plugged in. See "Connections" for instructions. To begin Plug and Play, press the 

POWER

 button on your remote. 

Then, follow the instructions on the TV screen to configure the TV's basic settings.


If you are not using a cable box or satellite box, make sure you have connected the TV to an antenna or cable 
connection before you turn on the TV.


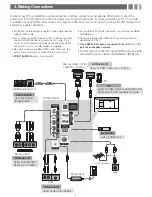
To connect the power cord and antenna, refer to 

'4. Making Connections'

.

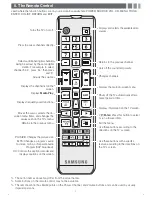
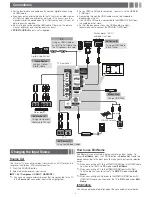
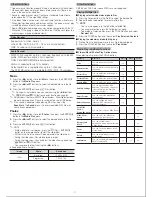
7. Changing the Input Source

Source List

When you are watching TV and you want to watch a movie on your DVD player or Blu-ray player or switch to your cable 
box or STB satellite receiver, you need to change the Source.

1. 

Press the 

SOURCE

 button on your remote.

2. 

Use the 

Ÿź

 buttons to select an external input source.


TV / AV / Component / HDMI1 / HDMI2 / DVI


You can only choose external devices that are connected to the TV. In the 

Source List

, connected inputs are 

highlighted.

How to Use Edit Name

Edit Name lets you associate a device name to an input source. To access 

Edit Name

, press the 

TOOLS

 button when 

the 

Source List

 is displayed The following selections appear under 

Edit Name

:


VCR / DVD / Cable STB / Satellite STB / PVR STB / AV Receiver / Game / Camcorder / PC / DVI PC / DVI / TV / 
IPTV / Blu-ray / HD DVD / DMA

: Select the name of the device connected to specific input jacks to make your input 

source selection easier.


If you connect a PC to the 

HDMI IN 2 (DVI)

 port with an HDMI cable, assign 

PC

 to HDMI 1 in 

Edit Name

.


If you connect a PC to the 

HDMI IN 2 (DVI)

 port with an HDMI to DVI cable, assign 

DVI PC

 to HDMI 1 in 

Edit 

Name

.


If you connect an AV device to the 

HDMI IN 2 (DVI)

 port with an HDMI to DVI cable, assign 

DVI

 to HDMI 1 in 

Edit 

Name

.

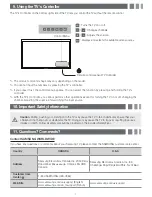
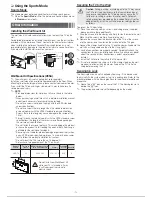
8. Accessing and Using the Main Menu

Your TV's Main menu contains functions that let you control many of the TV's features. For example, in the Main menu 
you can change the size and configuration of the picture, its brightness, its contrast and so on. There are also functions 
that let you control the TV's sound, channel configuration, energy use, and a host of other features. To access the main, 
on-screen menu, press the 

MENU

 (

m

) button on your remote.

To use the Main menu, press the 

Ÿź

buttons to move between the main option categories: Picture, Sound, Channel, 

etc. Each time you press a 

Ÿź

button, the main category name on the left side of the menu changes.

To select a menu option in one of the categories, press the 

Ź

 button or the 

ENTER

E

 button. Press it again or press 

ENTER

E

 to see the values or choices associated with that option. Usually, you would then press 

ENTER

E

 to select 

a value or choice. Press the 

RETURN 

button or the 

Ż

 button to return to a previous screen or selection.

- 6 -

Содержание UN32J4000

Страница 1: ...bles to connect your TV to your antenna or cable outlet and your peripheral devices Blu ray players DVD players etc t Audio t HDMI t HDMI DVI t Component t Composite AV t Coaxial RF Make sure you have...

Страница 2: ...f the outlet if the TV is to remain unused or if you are to leave the house for an extended period of time especially when children elderly or disabled people will be left alone in the house Accumulat...

Страница 3: ...facturer may cause difficulties with the product or result in injury caused by the product falling Be careful when you contact the TV because some parts can be somewhat hot Installation with a stand I...

Страница 4: ...cable Otherwise the picture may not display or a connection error may occur y PC DVI AUDIO IN input is not supported y For an HDMI to DVI cable connection you must use the HDMI IN 2 DVI jack y Connect...

Страница 5: ...od of time Displays the main on screen menu Changes channels Cuts off the sound temporarily Returns to the previous channel Displays and selects the available video sources PIC SIZE Changes the pictur...

Страница 6: ...s appear under Edit Name VCR DVD Cable STB Satellite STB PVR STB AV Receiver Game Camcorder PC DVI PC DVI TV IPTV Blu ray HD DVD DMA Select the name of the device connected to speci c input jacks to m...

Страница 7: ...sure that your children do not hang over or destabilize the TV Doing so may cause the TV to tip over resulting in serious injuries or death Follow all safety precautions provided on the included Safet...

Страница 8: ...T TO THIS PRODUCT SHALL BE BINDING ON SAMSUNG SAMSUNG SHALL NOT BE LIABLE FOR LOSS OF REVENUE OR PROFITS FAILURE TO REALIZE SAVINGS OR OTHER BENEFITS OR ANY OTHER SPECIAL INCIDENTAL OR CONSEQUENTIAL D...

Страница 9: ...center Country Customer Care Center Web Site MEXICO 01 800 SAMSUNG 726 7864 www samsung com mx support Direcci n General Mariano Escobedo 476 Piso 8 Col Anzures Delegaci n Miguel Hidalgo Distrito Fede...

Страница 10: ...er or service center Be sure to pull the power plug out of the outlet if the TV is to remain unused or if you are to leave the house for an extended period of time especially when children elderly or...

Страница 11: ...The product color and shape may vary depending on the model You cannot input the numbers by pressing the TV s controller If you press it first the control menu appears You can select the function by p...

Страница 12: ...evices that are connected to the TV In the Source List connected inputs will be highlighted How to use Edit Name Edit Name lets you associate a device name to an input source To access Edit Name press...

Страница 13: ...ct the performance of the remote control Avoid use when nearby uorescent lights or neon signs t The Color and shape may vary depending on the model Remote Control Press to select additional channels d...

Страница 14: ...his function lters out scrambled channels after Auto Program is completed This process may take up to 20 30 minutes Press the ENTERE button to stop the Clear Scrambled Channel This function is only av...

Страница 15: ...each external device you have connected to an input on the TV Picture Sizes available by Input Source Input Source Picture Size ATV AV Component 480i 480p 16 9 Zoom1 Zoom2 4 3 DTV 1080i Component 1080...

Страница 16: ...audio to help the visually impaired Dolby Digital Comp Set Dolby Digital compression mode Sound Reset Reset All Resets all sound settings to the factory defaults Setup Menu Language Set the menu lang...

Страница 17: ...f the letter The default is White Background Color Options include Default White Black Red Green Blue Yellow Magenta and Cyan You can change the background color of the caption The default is Black Fo...

Страница 18: ...g the time set in Auto Protection Time the Screensaver will run x The power saving mode of some external hard disk drives may be released automatically when your connect them to the TV x If you use a...

Страница 19: ...remote control to start the slide show All files in the file list section will be displayed in the slide show During the slide show files are displayed in order During the slide show you can adjust t...

Страница 20: ...sed or the consumer fails to follow the product installation instructions x Do not mount the TV at more than a 15 degree tilt x Always have two people mount the TV on a wall Product Family TV size in...

Страница 21: ...there are a number of things to check before making a call to the service department y If you happen to be using the TV as a monitor and the stand by light only blinks for a few seconds when you press...

Страница 22: ...y Make sure your connected devices are powered on y Be sure to select the TV s correct source by pressing the SOURCE button on the remote control y Reboot the connected device by reconnecting the dev...

Страница 23: ...the product can get scratched during cleaning Be sure to wipe the exterior and screen carefully using a soft cloth to prevent scratches Do not spray water directly onto the product Any liquid that goe...

Страница 24: ...nches 745 4 x 442 2 x 69 0 mm 29 3 x 18 2 x 5 9 inches 745 4 x 463 1 x 150 5 mm Weight Without Stand With Stand 8 1 lbs 3 7 kg 8 3 lbs 3 8 kg Power Requirements Mexico Only DC 19V Power Consumption Me...

Отзывы: