background image

English - 23

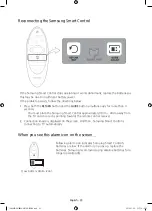
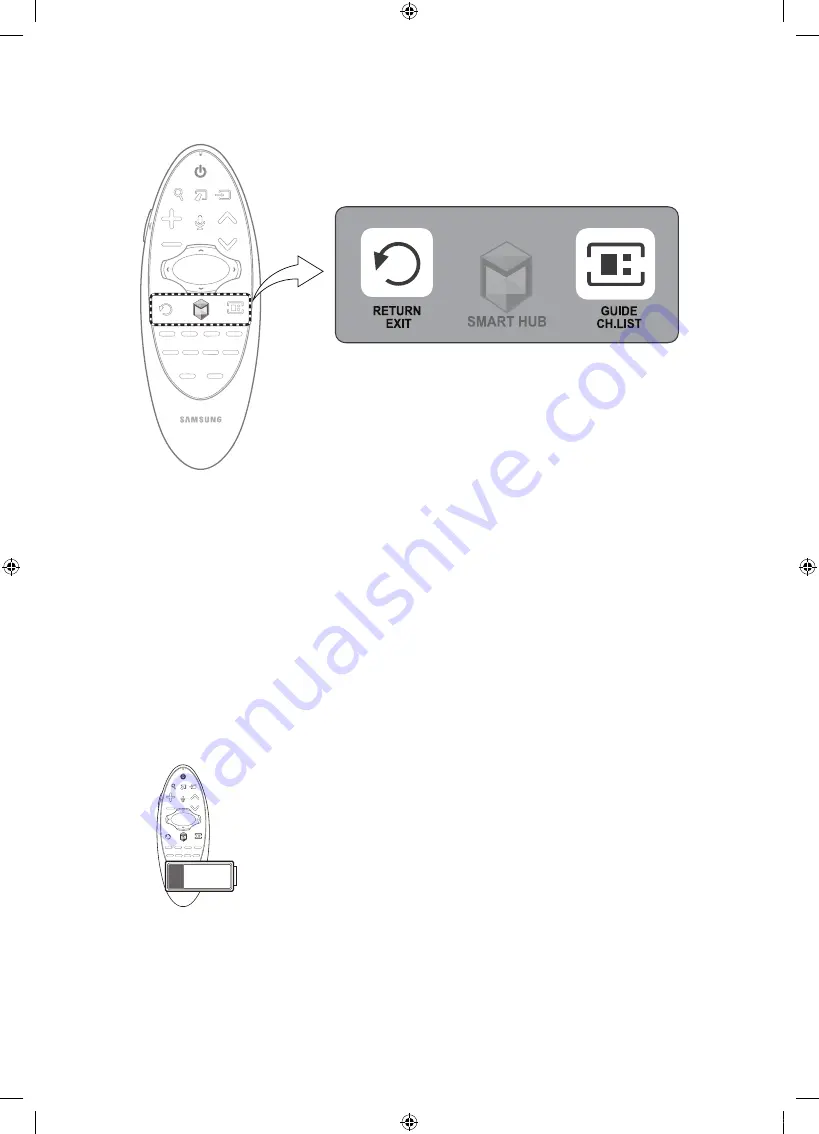
Reconnecting the Samsung Smart Control

If the Samsung Smart Control stops operating or works abnormally, replace the batteries as 
this may be due to insufficient battery power.
If the problem persists, follow the directions below:

1. 

Press both the 

RETURN

 button and the 

GUIDE

 button simultaneously for more than 3 

seconds.


-

You must place the Samsung Smart Control approximately 30cm ~ 40cm away from 
the TV and ensure it is pointing towards the remote control receiver.

2. 

Connection image is displayed on the screen. And then, Samsung Smart Control is 
connecting to TV automatically.

When you see this alarm icon on the screen...

Following alarm icon indicates Samsung Smart Control's 
batteries are low. If the alarm icon pops up, replace the 
batteries. Samsung recommends using alkaline batteries for a 
longer operating life.

<Low battery Alarm Icon>

[UH6850-XU]BN68-06710G-01ENG.indb   23

2014-11-20   �� 6:18:35

Содержание UE48H6850

Страница 1: ...o Ltd All rights reserved BN68 06710G 01 Contact SAMSUNG WORLD WIDE If you have any questions or comments relating to Samsung products please contact the SAMSUNG customer care centre Country Customer Care Centre Web Site EIRE 0818 717100 www samsung com ie support UK 0330 SAMSUNG 7267864 www samsung com uk support This Nanum Gothic Eco font is provided by NAVER UH6850 XU BN68 06710G 01ENG indb 1 2...

Страница 2: ...ation of the DC adaptor corresponds to the local electrical supply Never insert anything metallic into the open parts of this apparatus Doing so may create a danger of electric shock To avoid electric shock never touch the inside of this apparatus Only a qualified technician should open this apparatus Make sure to plug the power cord in until it is firmly inserted When removing the power cord make...

Страница 3: ...b Browser On TV On TV recommends TV programmes based on their popularity or your personal preferences Depending on the country FILMS AND TV SHOWS Purchase and watch movies and series without a separate external device Depending on the country MULTIMEDIA Play photo video and music files from all compatible devices Anynet HDMI CEC This allows you to control all connected Samsung devices that support...

Страница 4: ...TV to the Wall 10 Arrange the cables using the Cable Holder 03 Connections and Remote Control 11 Connecting devices to your TV 12 Connecting to a Network 14 Connecting to a COMMON INTERFACE slot Your TV viewing Card Slot 17 Remote Control 18 Samsung Smart Control 04 Performing the initial setup 19 Turning on the TV 20 Initial setup 05 Selecting Connected Devices UH6850 XU BN68 06710G 01ENG indb 4 ...

Страница 5: ...7 Getting more details 27 Viewing more TV features 08 Troubleshooting and Maintenance 29 Troubleshooting 30 Cautions about the Eco Sensor and Screen Brightness 31 What is Remote Support 31 Storage and Maintenance 08 Specifications and other information 32 TV Specifications 33 Licences 35 Warranty Card UH6850 XU BN68 06710G 01ENG indb 5 2014 11 20 6 18 24 ...

Страница 6: ...den behind or in the packing materials when opening the box An administration fee may be charged if either a an engineer is called out at your request and there is no defect with the product i e where the user manual has not been read b you bring the unit to a repair centre and there is no defect with the product i e where the user manual has not been read You will be informed of the administratio...

Страница 7: ...foam that came with the TV s packaging to protect it Lay the TV down and attach the screws To mount both of a soundbar and the TV using the wall mount make sure to mount the soundbar onto the TV first then mount the TV For detailed information see the instructions provided with the soundbar The soundbar installation with the wall mount may not be supported for the specific region or model For deta...

Страница 8: ...e standard dimension or do not comply with the VESA standard screw specifications Screws that are too long may cause damage to the inside of the TV set For wall mounts that do not comply with the VESA standard screw specifications the length of the screws may differ depending on the wall mount specifications Do not fasten the screws that are too strongly this may damage the product or cause the pr...

Страница 9: ...nother manufacturer it may cause difficulties with the product or result in injury caused by the product falling Whether you install your TV using a stand or a wall mount we strongly recommend you use parts provided by Samsung Electronics only Installation with a stand 10 cm 10 cm 10 cm Installation with a wall mount 10 cm 10 cm 10 cm 10 cm Other Cautions The actual appearance of the TV may differ...

Страница 10: ...ve the screws from the centre back of the TV put the screws into the clamps and then fasten the screws into the TV again Screws may not be supplied with the product In this case please purchase screws of the following specifications Screw Specifications For a 48 55 inches M8 3 Connect the clamps fixed into the TV and the clamps fixed onto the wall with a strong cable and then tie the string tightl...

Страница 11: ... your TV You can connect various external devices using the connectors located at the back of the product Check the connectors and then refer to the Quick Guide for more instructions on supported external devices UH6850 XU BN68 06710G 01ENG indb 11 2014 11 20 6 18 30 ...

Страница 12: ...ng a standard router or modem Wireless IP Router or Modem with a DHCP Server LAN Cable Not Supplied The LAN Port on the Wall Network Connection Wired There are three main ways to connect your TV to your network using cable depending on your network setup They are illustrated starting below Modem Cable Not Supplied LAN Cable Not Supplied TV Rear Panel External Modem ADSL VDSL Cable TV The Modem Por...

Страница 13: ...al Modem ADSL VDSL Cable TV IP Router with a DHCP Server The Modem Port on the Wall The LAN Port on the Wall LAN Cable Not Supplied TV Rear Panel The TV does not support network speeds less than or equal to 10Mbps Use Cat 7 cable for the connection UH6850 XU BN68 06710G 01ENG indb 13 2014 11 20 6 18 31 ...

Страница 14: ...efore installing the wall mount or inserting the CI or CI CARD 1 Insert the CI CARD Adapter into the two holes on the product 1 Please locate the two holes at the back of the TV next to the COMMON INTERFACE port 2 Connect the CI CARD Adapter to the COMMON INTERFACE port on the product 2 3 Insert the CI or CI CARD We recommend that you attach the CI Card adapter and insert the CI card viewing card ...

Страница 15: ...s displayed indicating the channel list is updated NOTE You must obtain a CI or CI CARD from a local cable service provider When removing the CI or CI CARD carefully pull it out as dropping the CI or CI CARD may damage it Insert the CI or CI CARD in the direction marked on the card The location of the COMMON INTERFACE slot may differ depending on the model A CI or CI CARD is not supported in some ...

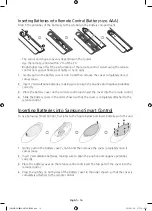
Страница 16: ... on the remote control and insert the cover into the remote control 4 Slide the battery cover in the order shown so that the cover is completely attached to the remote control Inserting Batteries into Samsung Smart Control To use Samsung Smart Control first refer to the figure below and insert batteries into the unit 1 Gently pull on the battery cover s notch and then remove the cover completely o...

Страница 17: ...lays programme information on the TV screen Turns the TV on and off Gives direct access to channels Adjusts the volume Displays a channel list for quick and convenient channel selection Alternately selects Teletext ON Double Mix or OFF REC When the external HDD is connected you can watch and record programmes at the same time E MANUAL Displays the e Manual AD SUBT Displays the Accessibility Shortc...

Страница 18: ...e Samsung Smart Control is moved Press the touchpad to run the focused item page 24 Moves the pointer or focus RETURN Returns to the previous menu Additionally when you press this button while watching TV you can return to the previous channel EXIT Press and hold this button to exit all currently running applications Use these buttons with specific features Use these buttons according to the direc...

Страница 19: ...oduct colour and shape may vary depending on the model The TV s Controller a small joystick like button at the right back of the TV lets you control the TV without the remote control m R P Remote control sensor When you use the Samsung Smart Control the standby LED does not work except the P button Function menu TV Controller UH6850 XU BN68 06710G 01ENG indb 19 2014 11 20 6 18 34 ...

Страница 20: ...elect the TV source to be used for On TV Aerial Freeview Freesat DVB T C S Set top box External Cable Box External Satellite Box 2 Auto tuning channels This step only occurs if Aerial was selected in step 1 3 Select a Service Provider To select your preferred programme provider for On TV enter your postcode and select your Freeview Freesat or external satellite television provider from the display...

Страница 21: ...rt connected to an external device and press and hold the Enter button The following functions are available Available options for each connector may vary Edit Name Rename devices connected to the TV for easier identification of external sources For example you can designate a computer connected to the TV via an HDMI DVI cable as DVI PC Alternatively simply designate a computer connected to the TV...

Страница 22: ...m the existing models We recommend using Samsung Smart Control at a distance of less than 6m A usable distance may differ depending on the wireless environmental conditions Pairing the Samsung Smart Control To control the TV with Samsung Smart Control you need to pair Samsung Smart Control to the TV via Bluetooth Pair Samsung Smart Control to the TV Samsung Smart Control can only be paired to a si...

Страница 23: ...Samsung Smart Control approximately 30cm 40cm away from the TV and ensure it is pointing towards the remote control receiver 2 Connection image is displayed on the screen And then Samsung Smart Control is connecting to TV automatically When you see this alarm icon on the screen Following alarm icon indicates Samsung Smart Control s batteries are low If the alarm icon pops up replace the batteries ...

Страница 24: ...y the Samsung Smart Control is moved It s also possible to scroll up and down on scrollable screens If you remove the finger from touchpad the screen pointer disappears Using the TV with the Touchpad Navigate to the Menu Support menu and select the Smart Control Tutorial option to learn how to use the touchpad following the on screen instructions Refer to the e Manual Moving the Focus Pointer Pres...

Страница 25: ...he Smart Hub screen The Options menu available to the selected item appears The Options menu depends on the context Moving to the Smart Hub panel On the Smart Hub screen drag left or right on the touchpad This will move the Smart hub panels left or right Scrolling on the Web Browser Drag up down on the touchpad in the web browser screen This scrolls through the web screen UH6850 XU BN68 06710G 01E...

Страница 26: ...R output connector as shown in the diagram Place the transmitter end within 10 cm of the external device s receiver pointing in the direction of the remote receiver However there must be no obstacles between the IR extender cable and the external device The presence of obstacles interferes with the transmission of the remote control signal When you use an external device registered with the Univer...

Страница 27: ... e Manual from Samsung s website and read it on your computer or print it out Yellow words indicate a menu item white bold words indicate remote control buttons Arrows are used to indicate the menu path Example Picture Picture Mode 1 Select e Manual The e Manual loads 2 Select a category from the side of the screen Once a selection has been made the contents of the selected category appear 3 Selec...

Страница 28: ... Manual from the Menu If you want to read an e Manual entry on a specific screen menu feature Using Samsung Smart Control Press the KEYPAD button and select e Manual Using the remote control Press the E MANUAL button Certain menu options cannot be used Loading Reference Pages Select Link from the side of a feature description page to access the corresponding reference page Press the RETURN button ...

Страница 29: ...TV Make sure your connected devices are powered on Be sure to select the correct input source Reboot the connected device by unplugging it and then reconnecting the device s power cable The remote control does not work Replace the remote control batteries Make sure the batteries are installed with their polarities in the correct direction Clean the sensor s transmission window on the remote Try po...

Страница 30: ...sor Do not block the sensor with any material This may decrease the picture brightness 1 Eco Sensor This power saving feature automatically adjusts the screen brightness of the TV according to the ambient light detected by the Light Sensor 2 To enable or disable the Eco Sensor go to System Eco Solution Eco Sensor and select On or Off 3 Please note If the screen is too dark while watching TV in a d...

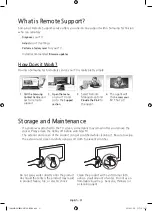
Страница 31: ... agent 4 The agent will then access your TV That s it Storage and Maintenance If a sticker was attached to the TV screen some debris may remain after you remove the sticker Please clean the debris off before watching TV The exterior and screen of the product can get scratched while cleaning it Be sure to wipe the exterior and screen carefully using a soft cloth to prevent scratches Do not spray wa...

Страница 32: ...agonal 48 inches 55 inches Dimensions W x H x D Body With stand 1078 6 x 625 9 x 79 2 mm 1078 6 x 673 1 x 294 9 mm 1232 8 x 713 3 x 90 6 mm 1232 8 x 762 0 x 294 9 mm Weight Without Stand With Stand 13 5 kg 16 4 kg 17 7 kg 20 6 kg The design and specifications are subject to change without prior notice For information about the power supply and about power consumption refer to the label attached to...

Страница 33: ...low Avoid displaying the same TV channel for long periods Always try to display any image in full screen Use the TV set s picture format menu for the best possible match Reduce brightness and contrast to avoid the appearance of after images Use all TV features designed to reduce image retention and screen burn Refer to the e Manual for more details Recommendation EU Only Hereby Samsung Electronics...

Страница 34: ... Cd or Pb indicate that the battery contains mercury cadmium or lead above the reference levels in EC Directive 2006 66 If batteries are not properly disposed of these substances can cause harm to human health or the environment To protect natural resources and to promote material reuse please separate batteries from other types of waste and recycle them through your local free battery return syst...

Страница 35: ... considered to be defective in materials nor workmanship by reason that it requires adaptation in order to conform to national or local technical or safety standards in force in any country other than the one for which the product was originally designed and manufactured 5 This warranty covers none of the following a Periodic check ups maintenance and repair or replacement of parts due to normal w...

Страница 36: ...sult your dealer for assistance However if there is no alternative but to cut off the plug remove the fuse and then safely dispose of the plug Do NOT connect the plug to a mains socket as there is a risk of shock hazard from the bared flexible cord IMPORTANT The wires in the mains lead are coloured in accordance with the following code BLUE NEUTRAL BROWN LIVE As these colours may not correspond to...

Страница 37: ...This page is intentionally left blank UH6850 XU BN68 06710G 01ENG indb 37 2014 11 20 6 18 40 ...

Отзывы: