background image

English - 19

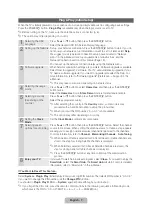
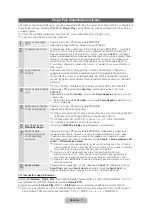
List of Features

Excellent Digital Interface & Networking: With a built-in HD digital tuner, nonsubscription HD broadcasts can be 
viewed without a cable box / STB (Set-Top-Box) satellite receiver.

3D

This exciting new feature enables you to view 3D content.

SMART HUB

The Gateway to all content integrated in one place


It’s all integrated to guide you to easier and diverse entertainment choices.


Control your entertainment life with easy and simple user friendly UI.


Access to diverse Apps that are adding up every day.


Customize your TV, by App grouping & sorting to your taste.

AllShare™

AllShare™ connects your TV and compatible Samsung mobile phones/devices through a network.

(HDMI-CEC)

Allows you to control all connected Samsung devices that support with your Samsung TV’s remote.

Storage and Maintenance


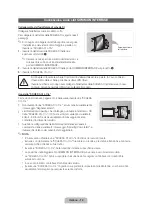
If you attached some stickers on the TV screen, it remains some debris after removing the sticker. Please 
clean it to watch TV.

Do not spray water or a cleaning agent directly onto 
the product. Any liquid that goes into the product may 
cause a failure, ire, or electric shock.

Clean the product with a soft cloth dapped in a small 
amount of water.

[UD6500-ZT]BN68-03776C-00L04.indb   19

2011-05-09   오후 3:01:25

Содержание UE32D6500

Страница 1: ...NY 01805 SAMSUNG 726 7864 0 14 Min www samsung com GREECE 2106293100 www samsung com HUNGARY 06 80 SAMSUNG 726 7864 www samsung com ITALIA 800 SAMSUNG 726 7864 www samsung com KOSOVO 381 0113216899 LUXEMBURG 261 03 710 www samsung com MACEDONIA 023 207 777 MONTENEGRO 020 405 888 NETHERLANDS 0900 SAMSUNG 0900 7267864 0 10 Min www samsung com NORWAY 815 56 480 www samsung com POLAND 0 801 1SAMSUNG 1...

Страница 2: ...peed up the burnout process Frequently use all TV features designed to reduce image retention and screen burnout refer to e Manual for details Securing the Installation Space Keep the required distances between the product and other objects e g walls to ensure proper ventilation Failing to do so may result in ire or a problem with the product due to an increase in the internal temperature of the p...

Страница 3: ...ctions Power cord Warranty Card Not available in some locations Safety Guide Holder Ring 4 EA Holder Wire Stand CI Card Adapter AV Component Adapter Scart Adapter An administration fee may be charged if either a an engineer is called out at your request and there is no defect in the product i e where you have failed to read this user manual b you bring the unit to a repair centre and there is no d...

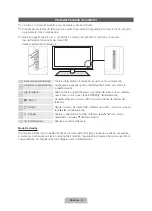
Страница 4: ...ut sources In the on screen menu use this button as you would use the ENTERE button on the remote control m Menu Displays an on screen menu the OSD on screen display of your TV s features o Volume Adjusts the volume In the OSD use the wv buttons as you would use the and buttons on the remote control k Channel Changes the channels In the OSD use the buttons as you would use the and buttons on the r...

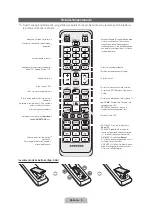
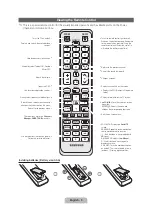
Страница 5: ... Exits the on screen menu Have direct access to channels Adjusts the volume Alternately select Teletext ON Double Mix or OFF Opens the OSD Quickly select frequently used functions Link to various application services Returns to the previous menu Selects the on screen menu items and changes the values seen on the menu These buttons are for the Channel Manager SMART HUB menu etc Use these buttons in...

Страница 6: ...the TV to PC mode under Edit Name When connecting a PC to the HDMI IN 1 DVI port with HDMI to DVI cable you should set the TV to DVI PC mode under Edit Name When connecting an AV devices to the HDMI IN 1 DVI port with HDMI to DVI cable you should set the TV to DVI Devices mode under Edit Name Edit Favourites In the Source press the TOOLS button to select Edit Favourites You can set an external inp...

Страница 7: ...then press the ENTERE button Select the appropriate country After selecting the country in the Country menu some models may proceed with an additional option to setup the pin number When you input the PIN number 0 0 0 0 is not available The option may differ depending on country 6 Setting the Clock Mode Set the Clock Mode automatically or manually 7 Selecting search options for auto tuning Press t...

Страница 8: ...urs ask the manufacturer of the external device about the HDMI version and if out of date request an upgrade x Be sure to use an HDMI cable with a thickness of 14 mm or less x Be sure to purchase a certified HDMI cable Otherwise the picture may not display or a connection error may occur x A basic high speed HDMI cable or one with ethernet is recommended This product does not support the ethernet ...

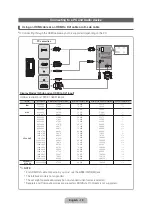
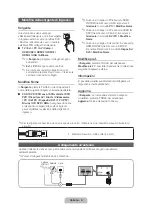
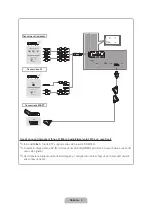
Страница 9: ...f the AV IN VIDEO jack green will not match the video cable yellow To obtain the best picture quality the Component connection is recommended over the A V connection AUDIO OUT R AUDIO L PR PB Y COMPONENT OUT EXT AUDIO OUT R AUDIO L VIDEO OUT Y R W Y R W R R B B G G R R W W Component connection AV connection SCART connection UD6500 ZT BN68 03776C 00L04 indb 9 2011 05 09 오후 3 01 01 ...

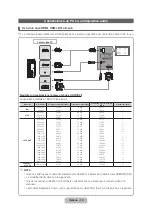
Страница 10: ... 1280 x 960 1360 x 768 1440 x 900 1440 x 900 1680 x 1050 31 469 37 861 37 500 37 879 48 077 46 875 48 363 56 476 60 023 67 500 63 981 79 976 49 702 62 795 60 000 47 712 55 935 70 635 65 290 59 940 72 809 75 000 60 317 72 188 75 000 60 004 70 069 75 029 75 000 60 020 75 025 59 810 74 934 60 000 60 015 59 887 74 984 59 954 25 175 31 500 31 500 40 000 50 000 49 500 65 000 75 000 78 750 108 000 108 00...

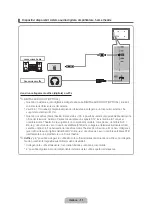
Страница 11: ...n the source is a digital component such as a DVD Blu ray player cable box STB Set Top Box satellite receiver and is connected to the TV via HDMI only 2 CH audio will be heard from the home theatre receiver If you want to hear 5 1 CH audio connect the digital audio out jack from your DVD Blu ray player cable box STB satellite receiver directly to an amplifier or home theatre Headphones H You can c...

Страница 12: ...ome channels will display the message Scrambled Signal The pairing information containing a telephone number the CI or CI CARD ID the Host ID and other information will be displayed in about 2 3 minutes If an error message is displayed please contact your service provider When the coniguration of channel information has inished the message Updating Completed is displayed indicating the channel lis...

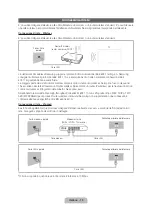
Страница 13: ...nt or wireless router typically a wireless IP Sharer to transmit an encrypted security code called an access key If Pure High throughput Greenield 802 11n mode is selected and the Encryption type is set to WEP TKIP or TKIP AES WPS2Mixed for your wireless router Samsung TVs will not support a connection in compliance with new Wi Fi certiication speciications Network Connection Wired There are two m...

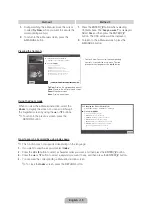
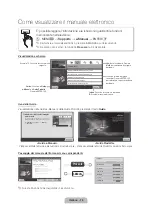
Страница 14: ...index screen X Exit the e Manual Return Changing the Preset Picture Mode You can read the introduction and instructions about the TV features stored in your TV O MENUm Support e Manual ENTERE Basic Features Changing the Preset Picture Mode Adjusting Picture Settings Changing the Picture Size Changing the Picture Options Setting up the TV with Your PC Index Help Return Sync media from multiple devi...

Страница 15: ...Manual instruction screen To close the Index screen press the RETURN button Basic Features Changing the Preset Picture Mode 5 10 Help Try Now Home Zoom Index Changing the Preset Picture Mode O MENUm Picture Picture Mode ENTERE Picture Mode t Select your preferred picture type Dynamic Suitable for a bright room Standard Suitable for a normal environment Natural Suitable for reducing eye strain Movi...

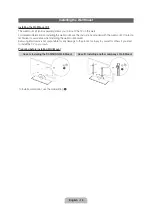
Страница 16: ...tact a technician for assistance when installing the wall mount bracket Samsung Electronics is not responsible for any damage to the product or injury to yourself or others if you elect to install the TV on your own Preparing before installing Wall Mount Case A Installing the SAMSUNG Wall Mount Case B Installing another company s Wall Mount To install a wall mount use the Holder Ring 1 1 1 UD6500 ...

Страница 17: ...ith the VESA standard screw specifications the length of the screws may differ depending on the wall mount speciications x Do not fasten the screws that are too strongly this may damage the product or cause the product to fall leading to personal injury Samsung is not liable for these kinds of accidents x Samsung is not liable for product damage or personal injury when a non VESA or non specified ...

Страница 18: ...n HDMI input on the TV Make sure your connected devices are powered on Be sure to select the TV s correct source by pressing the SOURCE button on the remote control Reboot the connected device by reconnecting the device s power cable The remote control does not work Replace the remote control batteries with the poles in the right direction Clean the sensor s transmission window on the remote Try p...

Страница 19: ... up every day Customize your TV by App grouping sorting to your taste AllShare AllShare connects your TV and compatible Samsung mobile phones devices through a network Anynet HDMI CEC Allows you to control all connected Samsung devices that support anynet with your Samsung TV s remote Storage and Maintenance If you attached some stickers on the TV screen it remains some debris after removing the s...

Страница 20: ...ly 2 Remove the screws from the back centre of the TV put the screws into the clamps and then fasten the screws onto the TV again Screws may not be supplied with the product In this case please purchase the screws of the following specifications Screw Specifications x For a 19 27 inch M4 x For a 32 75 inch M8 3 Connect the clamps ixed onto the TV and the clamps ixed onto the wall with a strong cab...

Страница 21: ...9 9 X 548 8 mm 933 0 X 255 0 X 608 2 mm Weight Without Stand With Stand 7 1 kg 9 8 kg 9 1 kg 12 4 kg 10 7 kg 14 0 kg Model Name UE46D6500 UE46D6510 UE46D6530 UE46D6540 UE46D6570 UE55D6500 UE55D6510 UE55D6530 UE55D6540 UE55D6570 UE60D6500 Screen Size 46 inches 55 inches 60 inches Sound Output 10 W X 2 15 W X 2 Dimensions WxDxH Body With stand 1068 4 X 29 9 X 625 2 mm 1068 4 X 275 0 X 683 6 mm 1258 ...

Страница 22: ...are il processo di bruciatura dello schermo Usare frequentemente tutte le funzioni TV progettate per ridurre la ritenzione delle immagini e la bruciatura dello schermo Per maggiori informazioni consultare la relativa sezione del manuale elettronico Messa in sicurezza della posizione di installazione Mantenere le distanze indicate tra il prodotto e gli altri elementi presenti per esempio le pareti ...

Страница 23: ...te Cavo di alimentazione Scheda di garanzia non disponibile in tutti i paesi Guida alla sicurezza Anello di ritenuta 4 EA Ferma cavo piedistallo Adattatore scheda CI AV Adattatore component Adattatore Scart Può essere richiesto un rimborso se a l uscita del tecnico in seguito a una chiamata non rileva difetti nel prodotto per es nel caso l utente abbia omesso di leggere il presente manuale b l ute...

Страница 24: ...so disponibili Nel menu a video utilizzare questo tasto come si usa il tasto ENTERE del telecomando m Menu Visualizza attraverso un menu OSD on screen display le funzioni del televisore o Volume Regola il volume Nel menu OSD utilizzare i tasti wv così come si usano i tasti e del telecomando k Canale Cambia i canali Nel menu OSD utilizzare i tasti così come si userebbero i tasti e del telecomando P...

Страница 25: ...esso diretto ai canali Regola il volume Seleziona alternativamente le modalità Teletext ON Doppia Mista o OFF Apre il menu OSD Scelta rapida delle funzioni usate più di frequente Link a vari servizi e applicazioni Ritorna al menu precedente Seleziona le voci del menu OSD e cambia i valori visualizzati sul menu Usare questi tasti per i menu Gestione canali SMART HUB ecc Utilizzare quesi tasti per f...

Страница 26: ...MI impostare il televisore in modalità PC in Modifica Nome Quando si collega un PC alla porta HDMI IN 1 DVI tramite cavo HDMI DVI impostare il televisore in modalità DVI PC in Modifica Nome Quando si collega un dispositivo AV alla porta HDMI IN 1 DVI tramite cavo HDMI DVI impostare il televisore in modalità Dispositivi DVI in Modifica Nome Modiica pref In Sorgente premere TOOLS per selezionare Mod...

Страница 27: ... il tasto o quindi premere ENTERE Selezionare la nazione appropriata Dopo aver selezionato il paese nel menu Nazione alcuni modelli potrebbero richiedere un opzione aggiuntiva per l impostazione del pin All inserimento del codice PIN l opzione 0 0 0 0 non è disponibile L opzione può differire a seconda del paese 6 Impostazione della Modalità orologio Impostare la Modalità orologio automaticamente ...

Страница 28: ...essere riprodotto In questo caso chiedere al produttore del dispositivo esterno informazioni sulla versione HDMI supportata e se obsoleta richiedere un aggiornamento x Usare un cavo HDMI di max 14 mm di spessore x Acquistare un cavo HDMI certificato In caso contrario l immagine potrebbe non apparire sullo schermo oppure potrebbe verificarsi un errore di connessione x Si consiglia l uso di un cavo ...

Страница 29: ...IN VIDEO verde non corrisponderà a quello del cavo video giallo Per ottenere la migliore qualità delle immagini si consiglia l uso della connessione Component rispetto alla connessione A V AUDIO OUT R AUDIO L PR PB Y COMPONENT OUT EXT AUDIO OUT R AUDIO L VIDEO OUT Y R W Y R W R R B B G G R R W W Connessione Component Connessione AV Connessione SCART UD6500 ZT BN68 03776C 00L04 indb 9 2011 05 09 오후...

Страница 30: ...1440 x 900 1440 x 900 1680 x 1050 31 469 37 861 37 500 37 879 48 077 46 875 48 363 56 476 60 023 67 500 63 981 79 976 49 702 62 795 60 000 47 712 55 935 70 635 65 290 59 940 72 809 75 000 60 317 72 188 75 000 60 004 70 069 75 029 75 000 60 020 75 025 59 810 74 934 60 000 60 015 59 887 74 984 59 954 25 175 31 500 31 500 40 000 50 000 49 500 65 000 75 000 78 750 108 000 108 000 135 000 83 500 106 50...

Страница 31: ...rgente è un componente digitale come per es un lettore DVD Blu ray ricevitore via cavo ricevitore satellitare STB ed è collegata al televisore mediante HDMI saranno udibili solo 2 canali audio dal ricevitore Home Theater Per un audio a 5 1 canali collegare il jack dell uscita audio digitale del lettore DVD Blu ray ricevitore via cavo ricevitore satellitare STB direttamente a un amplificatore o un ...

Страница 32: ...SCHEDA CI o CI alcuni canali visualizzeranno il messaggio Segnale criptato Le informazioni di pairing che contengono un numero telefonico l ID della SCHEDA CI o CI l ID host e altri dati verranno visualizzate entro 2 3 minuti Se viene visualizzato un messaggio di errore contattare il fornitore del servizio Quando la conigurazione delle informazioni relative al canale è completata viene visualizzat...

Страница 33: ...verso un Router wireless tipicamente un router IP wireless per la trasmissione di un codice di sicurezza crittografato denominato chiave di accesso Selezionando la modalità Pure High throughput Greenield 802 11n con crittograia di tipo WEP TKIP o TKIP AES WPS2Mixed per il proprio Router wireless i televisori Samsung non supporteranno una connessione conforme alle nuove speciiche di certiicazione W...

Страница 34: ... Esce dal manuale elettronico Ritorna Modiica della Modalità immagine preimpostata E possibile leggere l introduzione e le istruzioni riguardanti le funzioni memorizzate nel televisore O MENUm Supporto e Manual ENTERE Funzioni base Modiica della Modalità immagine preimpostata Regolazione delle impostazioni delle immagini Modiica del Formato immagine Modiica delle Opzioni immagine Conigurazione del...

Страница 35: ...mere RETURN Funzioni base Modiica della Modalità immagine preimpostata 5 10 Guida Prova ora Home Zoom Indice Modiica della Modalità immagine preimpostata O MENUm Immagine Modalità immagine ENTERE Modalità immagine t Selezionare il tipo di immagine preferita Dinamica Adatta per un ambiente illuminato Standard Adatta per condizioni di luce normali Naturale Adatta per ridurre l affaticamento della vi...

Страница 36: ...cnico per il montaggio della staffa a parete Samsung Electronics non può essere ritenuta responsabile per eventuali danni al prodotto o infortuni causati da una installazione autonoma del televisore da parte dell utente Preparazione per l installazione di un supporto a parete Esempio A Installazione del supporto a parete SAMSUNG Esempio B Installazione di un supporto a parete di altra marca Per in...

Страница 37: ...viti potrebbe differire in base alle loro specifiche x Non serrare le viti con eccessiva forza poiché ciò potrebbe danneggiare il prodotto o causarne la caduta provocando lesioni personali Samsung non può essere ritenuta responsabile per tali incidenti x Samsung non può essere ritenuta responsabile per eventuali danni o lesioni personali qualora vengano usati kit di supporto a parete non conformi ...

Страница 38: ...n ingresso HDMI sul televisore Veriicare che il dispositivo collegato sia acceso Selezionare la corretta sorgente del televisore premendo il tasto SOURCE sul telecomando Riavviare il dispositivo dopo aver scollegato e ricollegato il cavo di alimentazione Il telecomando non funziona Sostituire le batterie prestando attenzione a rispettare le polarità Pulire la inestra di trasmissione del sensore su...

Страница 39: ...ero cresce giorno per giorno Personalizzazione del televisore raggruppando e ordinando le Apps in base ai propri gusti AllShare AllShare collega televisore e cellulare Samsung dispositivi compatibili attraverso una rete Anynet HDMI CEC Anynet è una funzione che permette di controllare mediante il telecomando del televisore Samsung tutti i dispositivi Samsung collegati che supportano Anynet Conserv...

Страница 40: ... Rimuovere le viti dal centro del pannello posteriore del televisore inserirle nei ganci quindi avvitarle nuovamente al televisore Le viti potrebbero non essere fornite insieme al prodotto In questo caso acquistare le viti separatamente in base alle specifiche qui riportate Specifiche delle viti x Per i modelli da 19 27 pollici M4 x Per i modelli da 32 75 pollici M8 3 Collegare i ganci issati al t...

Страница 41: ...08 2 mm Peso Senza piedistallo Con piedistallo 7 1 kg 9 8 kg 9 1 kg 12 4 kg 10 7 kg 14 0 kg Nome modello UE46D6500 UE46D6510 UE46D6530 UE46D6540 UE46D6570 UE55D6500 UE55D6510 UE55D6530 UE55D6540 UE55D6570 UE60D6500 Dimensione schermo 46 pollici 55 pollici 60 pollici Suono Uscita 2 x 10 W 2 x 15 W Dimensioni Lar x Pro x Alt Corpo Con piedistallo 1068 4 X 29 9 X 625 2 mm 1068 4 X 275 0 X 683 6 mm 12...

Страница 42: ...Italiano 22 Diagrammi a blocchi UD6500 ZT BN68 03776C 00L04 indb 22 2011 05 09 오후 3 01 53 ...

Страница 43: ...This page is intentionally left blank UD6500 ZT BN68 03776C 00L04 indb 23 2011 05 09 오후 3 01 53 ...

Страница 44: ...igkeits und Kontrastwerte soweit wie möglich um immer noch die gewünschte Bildqualität zu erreichen Zu hohe Werte können das Ausbrennen beschleunigen Verwenden Sie regelmäßig alle Funktionen Ihres Fernsehgeräts die dazu dienen das Einbrennen von Bildern und das Ausbrennen des Bildschirms zu reduzieren Weitere Informationen hierzu inden Sie im e Manual Absichern des Aufstellbereichs Halten Sie die ...

Страница 45: ...edienung und 2 Batterien Typ AAA Reinigungstuch Bedienungsanleitung Netzkabel Garantiekarte nicht überall verfügbar Sicherheitshinweise Haltering 4 Stk Standfuß mit Kabelhalter CI Kartenadapter AV Komponentenadapter Scart Adapter Verwaltungskosten werden abgerechnet wenn a auf Ihren Wunsch ein Ingenieur zu Ihnen geschickt wird und es liegt kein Defekt des Geräts vor d h wenn Sie dieses Benutzerhan...

Страница 46: ...ildschirmmenü können Sie diese Taste wie die Eingabetaste ENTERE auf der Fernbedienung verwenden m Menü Hiermit zeigen Sie die Funktionen des Fernsehgeräts in einem Bildschirmmenü an o Lautstärke Einstellen der Lautstärke Im Bildschirmmenü können Sie die wv Schaltlächen wie die Tasten und auf der Fernbedienung verwenden k Sender Wechseln des Senders Im Bildschirmmenü können Sie die Schaltlächen wi...

Страница 47: ...m Bildschirmmenü schließen Direkter Zugriff auf die Sender Einstellen der Lautstärke Alternativ wählen Sie Videotext ein Doppel Mix oder Aus Das Bildschirmmenü wird geöffnet Hiermit können Sie häuig verwendete Funktionen schnell auswählen Verbindung zu verschiedenen Anwendungsdiensten Zurück zum vorherigen Menü Auswählen von Optionen im Bildschirmmenü und Ändern von Menüwerten Verwenden Sie diese ...

Страница 48: ...should set the TV to PC mode under Edit Name When connecting a PC to the HDMI IN 1 DVI port with HDMI to DVI cable you should set the TV to DVI PC mode under Edit Name Beim Anschließen von AV Geräten an den HDMI IN 1 DVI Anschluss über ein HDMI DVI Kabel müssen Sie unter Name bearb den Modus DVI Geräte des Fernsehgeräts aktivieren Favorit bearb Wählen Sie im Fenster Quelle mit der Taste TOOLS die ...

Страница 49: ...ste oder und drücken Sie dann auf die Eingabetaste ENTERE Wählen Sie das gewünschte Land aus Nachdem Sie im Menü Land das Land eingestellt haben werden Sie bei manchen Modellen aufgefordert die PIN Nummer einzurichten Die Ziffernkombination 0 0 0 0 dürfen Sie als PIN Nummer nicht eingeben Diese Option kann je nach Land unterschiedlich sein 6 Einstellen des Uhrmodus Stellen Sie den Uhrmodus automat...

Страница 50: ...fragen Sie die HDMI Version beim Hersteller des externen Geräts und bitten Sie wenn veraltet um ein Upgrade x Verwenden Sie auf jeden Fall ein HDMI Kabel mit einer Dicke von maximal 14 mm x Achten Sie darauf nur ein zertifiziertes HDMI Kabel zu kaufen Andernfalls kann es passieren dass kein Bild angezeigt wird oder ein Verbindungsfehler auftritt x Es wird ein einfaches Hochgeschwindigkeits HDMI Ka...

Страница 51: ...t die Farbe des Anschlusses AV IN VIDEO grün nicht mit der des Videokabels gelb überein Um die beste Bildqualität zu erhalten wird eine Komponentenverbindung über den A V Anschluss empfohlen AUDIO OUT R AUDIO L PR PB Y COMPONENT OUT EXT AUDIO OUT R AUDIO L VIDEO OUT Y R W Y R W R R B B G G R R W W Komponentenanschluss AV Anschluss SCART Anschluss UD6500 ZT BN68 03776C 00L04 indb 9 2011 05 09 오후 3 ...

Страница 52: ...0 x 900 1680 x 1050 31 469 37 861 37 500 37 879 48 077 46 875 48 363 56 476 60 023 67 500 63 981 79 976 49 702 62 795 60 000 47 712 55 935 70 635 65 290 59 940 72 809 75 000 60 317 72 188 75 000 60 004 70 069 75 029 75 000 60 020 75 025 59 810 74 934 60 000 60 015 59 887 74 984 59 954 25 175 31 500 31 500 40 000 50 000 49 500 65 000 75 000 78 750 108 000 108 000 135 000 83 500 106 500 108 000 85 5...

Страница 53: ...s Wenn es sich bei der Signalquelle um eine digitale Komponente wie beispielsweise einen DVD Player Blu Ray Player Kabel Satellitenreceiver Set Top Box handelt der über HDMI an das Fernsehgerät angeschlossen ist kann der Receiver des Heimkinosystems nur Zweikanalton wiedergeben Wenn Sie 5 1 Kanalton wünschen müssen Sie den digitalen Ausdioausgang am DVD Blu Ray Player Kabel Satellitenreceiver Set ...

Страница 54: ... CI Karte einsetzen wird bei einigen Kanälen die Meldung Gestörtes Signal angezeigt Die Verbindungsinformationen mit Telefonnummer Kennung der CI oder CI Karte Hostkennung und anderen Angaben wird nach ungefähr 2 bis 3 Minuten angezeigt Wenn eine Fehlermeldung angezeigt wird wenden Sie sich bitte an Ihren Dienstanbieter Wenn die Kanalinformationskoniguration abgeschlossen ist wird die Meldung Udat...

Страница 55: ...auf das Netzwerk zugreifen wollen einen verschlüsselten Sicherheitscode den so genannten Zugriffsschlüssel übertragen müssen Wenn Sie im 802 11n Modus Pure High throughput Greenield wählen und als Verschlüsselungstyp ist für Ihren Zugangspunkt WEP TKIP oder TKIP AES WPS2Mixed eingestellt so unterstützt das Samsung Fernsehgerät eine Verbindung gemäß der Speziikation für die neue Wi Fi Zertiizierung...

Страница 56: ...ntermenü auszuwählen Index Anzeigen des Index Fensters X Schließen des e Manuals Zurück Ändern des voreingestellten Bildmodus Hier erhalten Sie eine Einführung sowie Anweisungen zur Verwendung der TV Funktionen Ihres Fernsehgeräts O MENUm Unterstützung e Manual ENTERE Grundfunktionen Ändern des voreingestellten Bildmodus Anpassen der Bildeinstellungen Ändern des Bildformats Ändern der Bildoptionen...

Страница 57: ...entsprechenden Anweisung im e Manual anzeigen Drücken Sie die Taste RETURN um das Index Fenster zu schließen Grundfunktionen Ändern des voreingestellten Bildmodus 5 10 Hilfe Jetzt test Start Zoom Index Ändern des voreingestellten Bildmodus O MENUm Bild Bildmodus ENTERE Bildmodus t Wählen Sie Ihren bevorzugten Bildtyp aus Dynamisch Für helle Zimmer geeignet Standard Für normale Umgebungen geeignet ...

Страница 58: ...ng enthalten sind Lassen Sie sich beim Anbringen der Wandhalterung von einem Techniker helfen Samsung Electronics haftet nicht für Schäden an Gerät oder Personen wenn die Montage vom Kunden selbst durchgeführt wird Vorbereiten für den Einbau der Wandhalterung Fall A Anbringen der SAMSUNG Wandhalterung Fall B Anbringen der Wandhalterung eines anderen Unternehmens Beim Einbau einer Wandhalterung ver...

Страница 59: ...ntsprechen hängt die Länge der Schrauben von der Spezifikation der Wandhalterung ab x Ziehen Sie die Schrauben nicht zu fest an weil Sie auf diese Weise das Gerät beschädigen könnten oder weil das Gerät dadurch herunterfallen und damit Verletzungen verursachen könnte Samsung haftet nicht bei derartigen Unfällen x Samsung haftet nicht für Geräteschäden oder Verletzungen wenn eine Wandhalterung verw...

Страница 60: ...ehers an Stellen Sie sicher dass die angeschlossenen Geräte eingeschaltet sind Vergewissern Sie sich dass die richtige Signalquelle für den Fernseher eingestellt ist Drücken Sie dazu die Taste SOURCE auf der Fernbedienung Schießen Sie das Netzkabel an um das angeschlossene Gerät neu zu starten Die Fernbedienung funktioniert nicht Ersetzen Sie die Batterien der Fernbedienung und achten Sie dabei au...

Страница 61: ...ie die Anwendungen gemäß Ihren Vorlieben gruppieren und sortieren AllShare AllShare verbindet Ihr Fernsehgerät und Ihre Samsung Mobiltelefone bzw Geräte über ein Netzwerk miteinander Anynet HDMI CEC Dabei handelt es sich um eine Funktion mit der Sie alle angeschlossenen Samsung Geräte die Anynet unterstützen mit der Fernbedienung für Ihr Samsung Fernsehgerät steuern können Lagerung und Wartung Wen...

Страница 62: ...fernen Sie die Schrauben in der Mitte auf der Rückseite des Fernsehgeräts Setzen Sie diese Schrauben in die Halterungen ein und befestigen Sie die Schrauben dann wieder am Fernsehgerät Die Schrauben werden möglicherweise nicht zusammen mit dem Gerät geliefert Kaufen Sie in diesem Fall Schrauben entsprechend den folgenden Angaben Daten der Schrauben x Bei einem 19 27 Zoll Gerät M4 x Bei einem 32 75...

Страница 63: ...X 255 0 X 608 2 mm Gewicht Ohne Fuß Mit Fuß 7 1 kg 9 8 kg 9 1 kg 12 4 kg 10 7 kg 14 0 kg Modellname UE46D6500 UE46D6510 UE46D6530 UE46D6540 UE46D6570 UE55D6500 UE55D6510 UE55D6530 UE55D6540 UE55D6570 UE60D6500 Bildschirmgröße 46 Zoll 55 Zoll 60 Zoll Ton Ausgang 10 W x 2 15 W x 2 Abmessungen BxTxH Gehäuse Mit Fuß 1068 4 X 29 9 X 625 2 mm 1068 4 X 275 0 X 683 6 mm 1258 8 X 29 9 X 731 7 mm 1258 8 X 3...

Страница 64: ...our obtenir la qualité d image souhaitée L utilisation de valeurs trop élevées risque d accélérer le processus de brûlure Utilisez fréquemment toutes les fonctions du téléviseur conçues pour réduire le phénomène de rémanence et la brûlure d écran Pour plus d informations à ce sujet consultez la section appropriée du mode d emploi Sécurisation de l espace d installation Maintenez les distances requ...

Страница 65: ...rantie non disponible dans certains pays Manuel de sécurité Anneau de support 4 EA Support du serre câble Adaptateur de carte CI AV Adaptateur composant Adaptateur Scart Des frais d administration peuvent vous être facturés si a un technicien intervient à votre demande et que le produit ne comporte aucun défaut c à d si vous n avez pas pris la peine de lire le présent manuel d utilisation b vous a...

Страница 66: ...du téléviseur ce bouton a la même fonction que le bouton ENTERE de la télécommande m Menu Afiche un menu à l écran OSD on screen display reprenant les fonctions de votre téléviseur o Volume Règle le volume Dans le menu à l écran OSD utilisez les boutons et de la même façon que les boutons wv de la télécommande k Canal Permet de modiier les chaînes Dans le menu à l écran OSD utilisez les boutons de...

Страница 67: ...nes Règle le volume Choisissez Teletext Activé Double Mix ou ARRET Permet d ouvrir l afichage à l écran Permet de sélectionner rapidement les fonctions fréquemment utilisées Permet d accéder à divers services d applications Permet de revenir au menu précédent Permettent de sélectionner les éléments des menus à l écran et de modiier les valeurs des menus Ces boutons sont utilisés dans les menus Ges...

Страница 68: ...ous devez définir le TV en mode PC dans Modif Nom Lorsque vous connectez un PC au port HDMI IN 1 DVI avec un câble HDMI vous devez définir le TV en mode DVI PC dans Modif Nom Lorsque vous connectez un périphérique AV au port HDMI IN 1 DVI avec un câble HDMI DVI vous devez définir le téléviseur en mode Périph DVI dans Modif Nom Modiier favoris Dans Source appuyez sur le TOOLS pour sélectionner Modi...

Страница 69: ...un usage en magasin 5 Sélection d un pays En fonction du pays Appuyez sur le bouton ou puis sur le bouton ENTERE Sélectionnez le pays de votre choix Après la sélection du pays dans le menu Pays certains modèles peuvent demander en plus le code PIN Lors de l entrée du code PIN 0 0 0 0 n est pas disponible L option peut varier en fonction du pays 6 Réglage du Mode Horloge Réglez le Mode Horloge auto...

Страница 70: ...u périphérique externe de vous communiquer la version HDMI et dans l hypothèse où elle serait obsolète demandez lui une mise à niveau x Veillez à utiliser un câble HDMI de 14 mm de diamètre maximum x Veillez également à acheter un câble HDMI certifié Dans le cas contraire il se peut que l écran n affiche aucune image ou qu une erreur de connexion se produise x Il est recommandé d employer un câble...

Страница 71: ...a couleur de la prise AV IN VIDEO verte ne correspond pas à celle du câble vidéo jaune Pour obtenir une qualité d image optimale il est préférable d opter pour la connexion Composante plutôt que la connexion A V AUDIO OUT R AUDIO L PR PB Y COMPONENT OUT EXT AUDIO OUT R AUDIO L VIDEO OUT Y R W Y R W R R B B G G R R W W Connexion à composantes Connexion AV Connexion SCART UD6500 ZT BN68 03776C 00L04...

Страница 72: ...x 960 1360 x 768 1440 x 900 1440 x 900 1680 x 1050 31 469 37 861 37 500 37 879 48 077 46 875 48 363 56 476 60 023 67 500 63 981 79 976 49 702 62 795 60 000 47 712 55 935 70 635 65 290 59 940 72 809 75 000 60 317 72 188 75 000 60 004 70 069 75 029 75 000 60 020 75 025 59 810 74 934 60 000 60 015 59 887 74 984 59 954 25 175 31 500 31 500 40 000 50 000 49 500 65 000 75 000 78 750 108 000 108 000 135 ...

Страница 73: ...i la source est un composant numérique par exemple un lecteur DVD un lecteur Blu ray un décodeur câble ou un récepteur satellite connecté au téléviseur en HDMI le récepteur home cinéma émet uniquement du son sur 2 canaux Pour obtenir un son en mode 5 1 reliez la prise de sortie audio numérique du lecteur DVD du lecteur Blu ray du décodeur câble ou du récepteur satellite boîtier externe directement...

Страница 74: ...Les informations de pairage contenant un numéro de téléphone l ID de la carte d interface commune CARTE CI ou CI l ID de l hôte et d autres informations s aficheront après 2 ou 3 minutes Si un message d erreur s afiche contactez votre fournisseur d accès Lorsque la coniguration des informations sur les canaux est terminée le message Mise à jour terminée s afiche indiquant que la liste des chaînes ...

Страница 75: ...e ou sans il pour transmettre un code de sécurité crypté appelé code de sécurité ou clé d accès Si le mode Pure High throughput Greenield 802 11n est sélectionné et que le type de cryptage est déini sur WEP TKIP ou TKIP AES WPS2Mixed pour votre point d accès les téléviseurs Samsung ne prendront pas en charge la connexion conformément aux nouvelles spéciications de certiication Wi Fi Connexion rése...

Страница 76: ...dex X permet de quitter le manuel électronique Retour Changement du Mode Image prédéini Vous pouvez lire l introduction et les instructions relatives aux fonctions de votre TV O MENUm Assistance e Manual ENTERE Fonctions de base Changement du Mode Image prédéini Réglages des paramètres de l image Changement de la taille de l image Modiication des options d image Coniguration du téléviseur avec le ...

Страница 77: ...ons correspondant du manuel électronique Pour fermer l écran Index appuyez sur le bouton RETURN Fonctions de base Changement du Mode Image prédéini 5 10 Aide Essayer Accueil Zoom Index Changement du Mode Image prédéini O MENUm Image Mode Image ENTERE Mode Image t Sélectionnez le type d image que vous préférez Dynamique adapté à un environnement lumineux Standard adapté à un environnement normal Na...

Страница 78: ...pour installer la ixation murale Samsung Electronics ne saurait être tenu pour responsable d un endommagement du produit ou d une blessure si vous choisissez d effectuer vous même l installation murale Préparation avant l installation d un dispositif de ixation murale Cas A Installation du dispositif de ixation murale SAMSUNG Cas B Installation du support mural d un autre fabricant Pour installer ...

Страница 79: ...n conformes aux caractéristiques des vis VESA standard la longueur des vis peut varier selon les caractéristiques de la fixation murale x Ne serrez pas trop les vis cela pourrait endommager le produit ou provoquer sa chute entraînant des blessures corporelles Samsung ne peut être tenue responsable de ce type d accident x Samsung ne peut être tenue responsable de tout dommage au produit ou toute bl...

Страница 80: ...DMI vous devez établir une connexion avec une entrée HDMI du téléviseur Vériiez que les appareils connectés sont sous tension Veillez à sélectionner la source appropriée du téléviseur en appuyant sur la touche SOURCE de la télécommande Redémarrez le périphérique connecté en rebranchant le câble d alimentation du périphérique La télécommande ne fonctionne pas Vériiez que la polarité des piles de la...

Страница 81: ...upant ou en triant vous applications en fonction de vos goûts AllShare AllShare connecte votre téléviseur et vos téléphones portables appareils Samsung compatibles via un réseau Anynet HDMI CEC Vous permet de contrôler tous les appareils Samsung connectés compatibles Anynet à l aide de votre télécommande Samsung Stockage et entretien Si des autocollants sont appliqués sur l écran du téléviseur leu...

Страница 82: ... les vis situées sur la partie centrale arrière du téléviseur placez les vis dans les bagues puis ixez les à nouveau sur le téléviseur Il se peut que les vis ne soient pas fournies avec le produit Dans ce cas achetez des vis présentant les caractéristiques suivantes Caractéristiques des vis x Pour un téléviseur de 19 à 27 pouces M4 x Pour un téléviseur de 32 à 75 pouces M8 3 Reliez les colliers ix...

Страница 83: ...5 0 X 608 2 mm Poids Sans socle Avec socle 7 1 kg 9 8 kg 9 1 kg 12 4 kg 10 7 kg 14 0 kg Nom du modèle UE46D6500 UE46D6510 UE46D6530 UE46D6540 UE46D6570 UE55D6500 UE55D6510 UE55D6530 UE55D6540 UE55D6570 UE60D6500 Taille de l écran 46 pouces 55 pouces 60 pouces Son Sortie 10 W X 2 15 W X 2 Dimensions L x P x H Corps Avec socle 1068 4 X 29 9 X 625 2 mm 1068 4 X 275 0 X 683 6 mm 1258 8 X 29 9 X 731 7 ...

Страница 84: ...This page is intentionally left blank UD6500 ZT BN68 03776C 00L04 indb 22 2011 05 09 오후 3 02 43 ...

Отзывы: