background image

English - 12

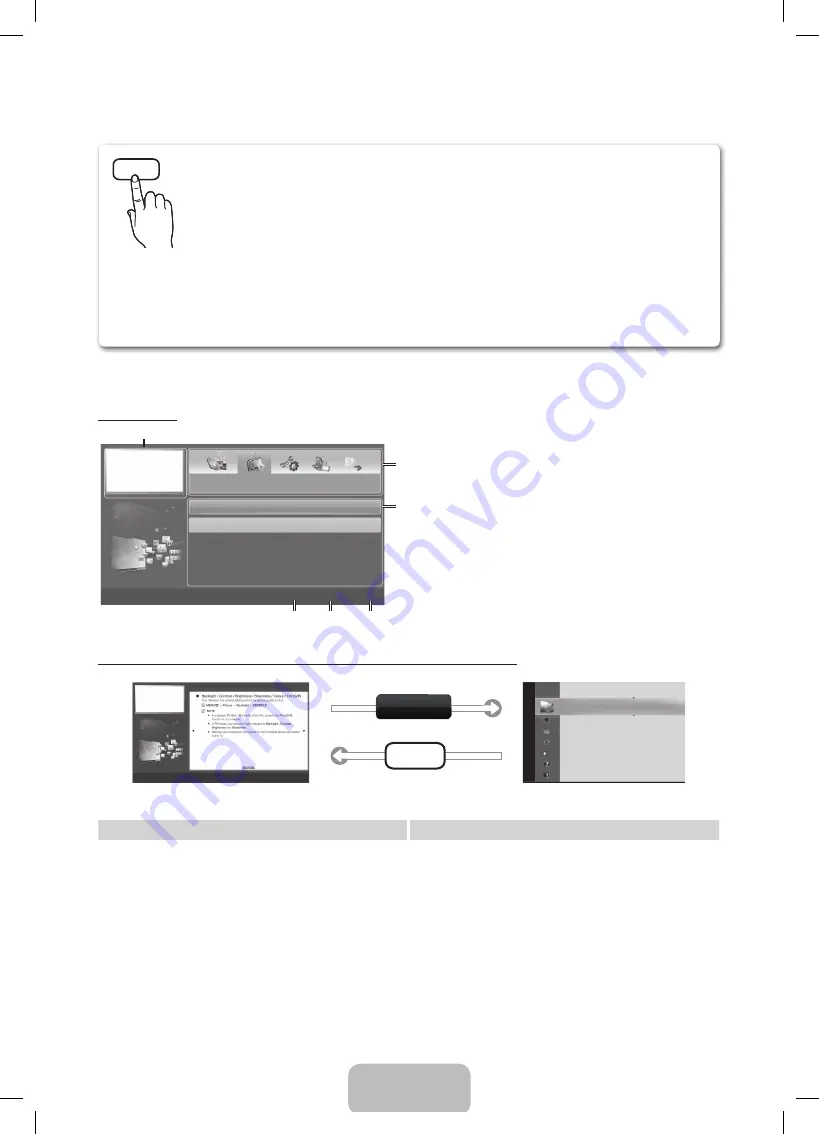
How to view the e-Manual

Screen Display

1

4

5

6

2

3

Basic Features

Picture Menu

Sound Menu

}

 Index   

E

 Enter   

e

 Exit 

Currently displayed video, TV Programme, etc.

The category list. Press 

 or 

 button to select 

category you want.

Displays the sub-menu list. Use the arrow buttons on 
your remote to move the cursor. Press 

ENTER

E


button to select the sub-menu you want.

}

 Blue (

Index

): Displays the index screen.

E

 Enter

: Selects a category or sub-menu.

6


e

 Exit

: Exit the 

e-Manual

.

How to toggle between an e-Manual topic and the corresponding OSD menu(s).

Pic

tur

e

Picture Mode 

: Standard         

Backlight 

: 7

Contrast 

: 95

Brightness 

: 45

Sharpness 

: 50

Colour 

: 50

Tint (G/R) 

: G50/R50

Screen Adjustment

E-MANUAL

a


Try Now

Basic Features > Picture Menu (3/17)

a

 Try Now   

b

 Home   

{

 Zoom  

}

 Index   

L

 Page   

e

 Exit 


This function is not enabled in some menus.

Method 1

Method 2

1. 

If you want to use the menu that corresponds to an 

e-Manual

 topic, press the red button to select 

Try Now

.

2. 

To return to the 

e-Manual

 screen, press the 

E-MANUAL


button.

1. 

Press the 

ENTER

E

 button when a topic is displayed. 

Are you sure?

” appears. Select 

Yes,

 and then press the 

ENTER

E

 button. The OSD window appears.

2. 

To return to the 

e-Manual

 screen, press the 

E-MANUAL


button.

E-MANUAL

You can find instructions about your TV’s features in the 

e-Manual

 in your TV. To 

use, press the 

E-MANUAL

 button on your remote. Move the cursor using the up/

down/right/left buttons to highlight a category, then a topic, and then press the 

ENTER

E

 button. The 

e-Manual

 displays the page you want to see.

You can also access it through the menu:


O

MENU

m


Support


e-Manual


ENTER

E


To return to the 

e-Manual

 main menu, press the 

E-MANUAL

 button on the remote.


You cannot use 

Try Now

 directly if the TV is set to an external input source. 

BN68-03432T-Eng.indd   12

2011-4-28   13:11:47

Содержание UE22D5000

Страница 1: ... No ______________ E MANUAL 2011 Samsung Electronics Co Ltd All rights reserved Contact SAMSUNG WORLDWIDE If you have any questions or comments relating to Samsung products please contact the SAMSUNG customer care centre Country Customer Care Centre Web Site EIRE 0818 717 100 www samsung com U K 0330 SAMSUNG 7267864 www samsung com BN68 03432T BN68 03432T 03 UD5000 XU BN68 03432T indb 1 2011 4 27 ...

Страница 2: ...ceeded values may speed up the burnout process Frequently use all TV features designed to reduce image retention and screen burnout refer to proper user manual section for details Securing the Installation Space Keep the required distances between the product and other objects e g walls to ensure proper ventilation Failing to do so may result in fire or a problem with the product due to an increas...

Страница 3: ... y y Owner s Instructions y y Power Cord y y Cleaning Cloth y y Component AV Adapter y y Scart Adapter y y CI Card Adapter An administration fee may be charged if either a an engineer is called out at your request and there is no defect in the product i e where you have failed to read this user manual b you bring the unit to a repair centre and there is no defect in the product i e where you have ...

Страница 4: ... control MENU Displays an on screen menu the OSD on screen display of your TV s features Y Adjusts the volume In the OSD use the Y buttons as you would use the and buttons on the remote control z Changes the channels In the OSD use the z buttons as you would use the and buttons on the remote control P Power Turns the TV on or off Standby mode Do not leave your TV in standby mode for long periods o...

Страница 5: ... Selects the on screen menu items and changes the values seen on the menu Buttons used in the Channel List Channel Manager My Downloads menu interactive TV MHEG features etc Use these buttons in a specific feature For details refer to the e Manual P MODE Selects picture mode SRS Selects the TruSurround HD mode DUAL I II Select Dual sound mode E MANUAL Displays the e Manual guide P SIZE Selects the...

Страница 6: ...tional option to setup the pin number When you input the PIN number 0 0 0 0 is not available The option may differ depending on country 4 Setting the Clock Mode Set the Clock Mode automatically or manually Auto Select the time zone depending on the country where you are located Manual Allows you to manually set the current date and time 5 Selecting an antenna Press the or button then press the ENT...

Страница 7: ...digital device that does not support HDMI output use an HDMI DVI and audio cables x x The picture may not display normally if at all or the audio may not work if an external device that uses an older version of HDMI mode is connected to the TV If such a problem occurs ask the manufacturer of the external device about the HDMI version and if out of date request an upgrade x x Be sure to use an HDMI...

Страница 8: ...onent connection AV connection SCART connection Using a Component up to 1080p or Audio Video 480i only and Scart Cable In Ext mode DTV Out supports MPEG SD Video and Audio only To obtain the best picture quality the Component connection is recommended over the A V connection UD5000 XU BN68 03432T indb 8 2011 4 27 12 24 37 ...

Страница 9: ...a DTV signal the TV will send 5 1 CH sound to the home theatre receiver When the source is a digital component such as a DVD Blu ray player cable box STB Set Top Box satellite receiver and is connected to the TV via HDMI only 2 CH audio will be heard from the home theatre receiver If you want to hear 5 1 CH audio connect the digital audio out jack from your DVD Blu ray player cable box STB satelli...

Страница 10: ...80 37 500 75 000 31 500 800 x 600 37 879 60 317 40 000 800 x 600 48 077 72 188 50 000 800 x 600 46 875 75 000 49 500 1024 x 768 48 363 60 004 65 000 1024 x 768 56 476 70 069 75 000 1024 x 768 60 023 75 029 78 750 1152 x 864 67 500 75 000 108 000 1280 x 1024 63 981 60 020 108 000 1280 x 1024 79 976 75 025 135 000 1280 x 800 49 702 59 810 83 500 1280 x 800 62 795 74 934 106 500 1280 x 960 60 000 60 ...

Страница 11: ...er as shown in the right To connect the CI CARD Adapter follow these steps Make sure that you attach the adaptor before you mount the TV on a wall 1 Insert the CI CARD Adapter into the two holes on the product 1 Please find the two holes on the rear of the TV The two holes are beside the COMMON INTERFACE port Press it firmly at center of adapter to ensure it is fully lock 2 Connect the CI CARD Ada...

Страница 12: ...not enabled in some menus Method 1 Method 2 1 If you want to use the menu that corresponds to an e Manual topic press the red button to select Try Now 2 To return to the e Manual screen press the E MANUAL button 1 Press the ENTERE button when a topic is displayed Are you sure appears Select Yes and then press the ENTERE button The OSD window appears 2 To return to the e Manual screen press the E M...

Страница 13: ...t page Using the Zoom mode UMove R Return Select the Zoom and then press ENTERE to magnify the screen You can scroll through the magnified screen by using the or buttons To return to the screen to normal size press the RETURN button How to search for a topic on the index page This function may not be supported depending on the language 1 If you want to search a keyword press the blue button to sel...

Страница 14: ...kit a detailed installation manual and all parts necessary for assembly are provided x x Do not use screws that do not comply with the VESA standard screw specifications x x Do not use screws longer than the standard dimension as they may cause damage to the inside of the TV set x x For wall mounts that do not comply with the VESA standard screw specifications the length of the screws may differ d...

Страница 15: ... reconnecting the device s power cable The remote control does not work Replace the remote control batteries with the poles in the right direction Clean the sensor s transmission window on the remote Try pointing the remote directly at the TV from 5 6 feet away The cable set top box remote control doesn t turn the TV on or off or adjust the volume Program the Cable Set top box remote control to op...

Страница 16: ...lied with the product In this case please purchase the screws of the following specifications Screw Specifications x x For a 22 27 Inch LED TV M4 3 Connect the clamps fixed onto the TV and the clamps fixed onto the wall with a strong string and then tie the string tightly NOTE x x Install the TV near to the wall so that it does not fall backwards x x It is safe to connect the string so that the cl...

Страница 17: ...System BG DK L NICAM MPEG1 DD DD HEAAC HDMI IN Video 1080 24p 1080p 1080i 720p 576p 480p Audio 2Ch Linear PCM 32 44 1 48kHz 16 20 24bits Model Name UE22D5000 UE22D5010 UE22D5020 UE27D5000 UE27D5010 UE27D5020 Screen Size 22 inches 27 inches Sound Output 3 W X 2 5 W X 2 Dimensions WxDxH Body With stand 522 0 X 29 9 X 323 1 mm 522 0 X 144 8 X 377 0 mm 645 X 29 9 X 393 2 mm 645 X 176 3 X 453 3 mm Weig...

Страница 18: ... never touch the inside of this apparatus Only a qualified technician should open this apparatus Make sure to plug the power cord in until it is firmly inserted When removing the power cord make sure to hold the power plug when pulling the plug from the outlet Do not touch the power cord with wet hands If this apparatus does not operate normally in particular if there are any unusual sounds or sme...

Страница 19: ...duct is warranted for a period of twelve 12 months from the original date of purchase against defective materials and workmanship In the event that warranty service is required you should return the product to the retailer from whom it was purchased However Samsung Authorised Dealers and Authorised Service Centres in other EC Countries will comply with the warranty on the terms issued to purchaser...

Отзывы: