2-24
2. Product specifications
2-3-6. Built in Wi-Fi
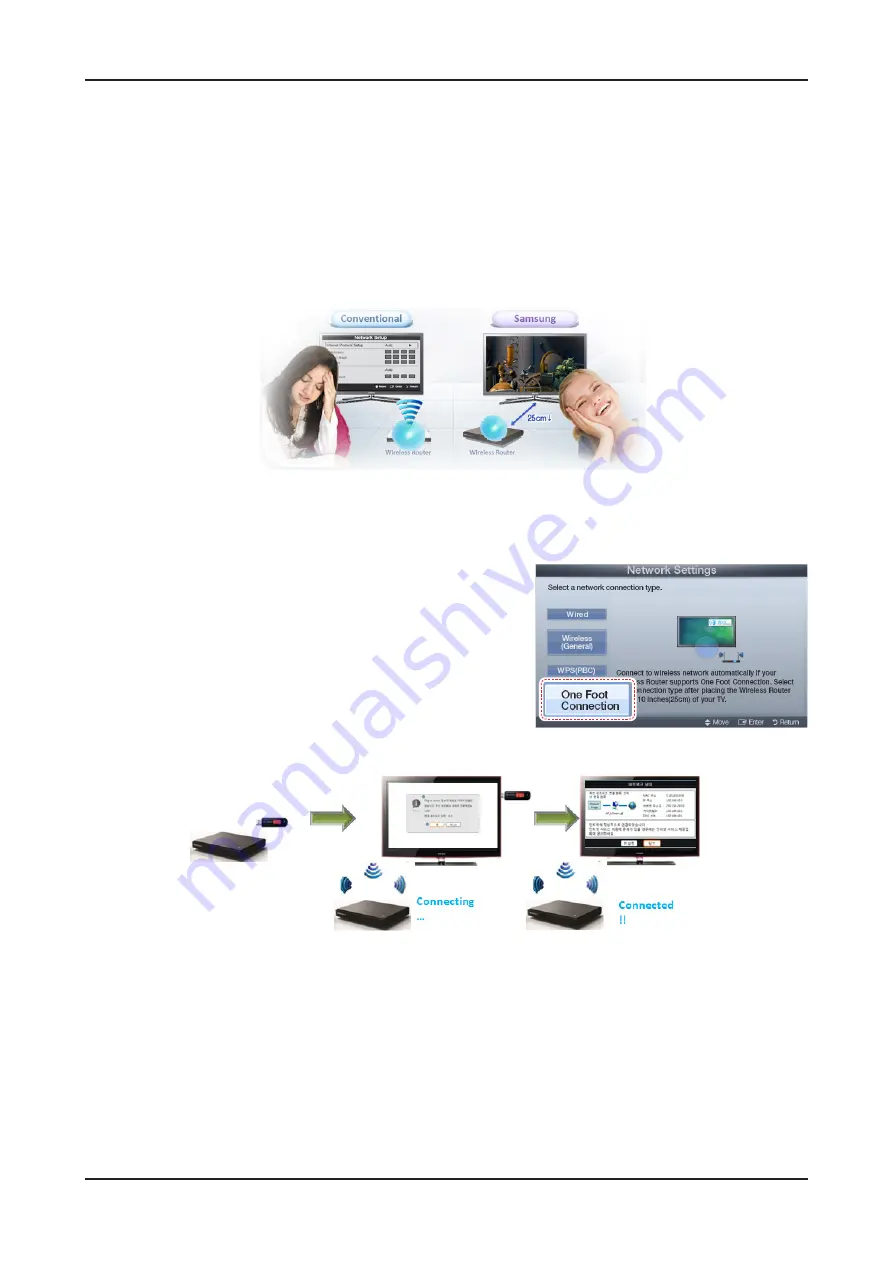
Built in Wi-Fi
Gives more convenient set-up and optimize to use Ethernet.
Smart TV Accessory - Wireless Router
01.
Easy Set-up & Optimized Solution for using Ethernet
•
One Foot Connection
Establish a Wi-Fi connection to any compatible device placed within 25 cm distance
(Samsung Patent pending)
•
USB configuration
Insert USB to router Insert USB to Samsung TV
Configurations is safely stored on USB drive and restored on TV
Network Settings (OFC, One Foot Connection
The One Foot Connection function lets you connect your Samsung TV automatically to Samsung wireless APs.
If your non-Samsung AP does not support One Foot Connection, you must connect using one of the other methods.
How to set up using One Foot Connection
01.
Go to Network Settings screen.
1.
To enter it, follow the directions of Network Settings.
Select the One Foot Connection.
2.
Place the AP in parallel with the Samsung Wireless LAN Adapter giving
3.
a gap no larger than 25 cm.
Wait until the connection is automatically established.
4.
The network test screen appears, and network setting is done.
5.
Place the AP in a desired location.
6.
Network Settings (Plug & Access)
Plug & Access
function lets you connect your Samsung wireless Router to Samsung TV easily by using USB memory. If
your non-Samsung AP does not support
Plug & Access
, you must connect using one of the other methods.
* You can check for equipment that supports Plug & Access on www.samsung.com.
How to set up using Plug & Access Function
Turn on the power of AP and TV.
1.
Insert USB memory stick into our Samsung wireless APs and checking AP’s LED status (blinking on).
Then take USB memory out and insert your USB memory into Samsung TV.
2.
Wait until the connection is automatically established.
3.
If
4.
Plug & Access
does not connect your TV to your AP, a pop-up window appears on the screen notifying you of the failure. If you
want to try using Plug&Access again, reset the AP, disconnect the Samsung Wireless LAN Adapter and then try again from
Step 1
.
You can also choose one of the other connection setup methods.
The network test screen appears, and network setting is done.
5.
Place the AP in a desired location.
6.
If the AP settings change or you install a new AP, you must perform the
7.
Plug & Access
procedure again, beginning
from
Step 1
.
Содержание UE D65 V Series
Страница 45: ...4 7 4 Troubleshooting Location Main B A Detail A CN401 B IC801...
Страница 46: ...4 8 4 Troubleshooting WAVEFORMS 1 PC input V sink H sink R G B 2 LVDS output...
Страница 48: ...4 10 4 Troubleshooting Location Main B C A Detail A IC1001 B IC601 C CN1601...
Страница 49: ...4 11 4 Troubleshooting WAVEFORMS 1 PC input V sink H sink R G B 2 LVDS output...
Страница 51: ...4 13 4 Troubleshooting Location Main B C A Detail A IC1001 B TU702_FN C CN1601...
Страница 52: ...4 14 4 Troubleshooting WAVEFORMS 1 CVBS OUT Grey Bar 2 LVDS output...
Страница 54: ...4 16 4 Troubleshooting Location Main B C A Detail A IC1001 B TU702_FN C CN1601...
Страница 55: ...4 17 4 Troubleshooting WAVEFORMS 1 LVDS output 2 CH_CLK CH_VALID...
Страница 57: ...4 19 4 Troubleshooting Location Main C A B Detail A IC1001 B CN503_EU R505 C CN1601...
Страница 58: ...4 20 4 Troubleshooting WAVEFORMS 1 CVBS OUT Grey Bar 2 LVDS output...
Страница 60: ...4 22 4 Troubleshooting Location Main C A B Detail A IC1001 B COMP1_PR COMP1_PB COMP1_Y C CN1601...
Страница 61: ...4 23 4 Troubleshooting WAVEFORMS 1 Compnent_Y Gray scale Pb Pr Color bar 2 LVDS output...
Страница 64: ...4 26 4 Troubleshooting WAVEFORMS 1 MCLK LRCLK PCM_I2C_DATA 2 Speaker Monitor OUT SPDIF OUT...
Страница 100: ...Exploded Views and Parts List 1 Exploded View Part List Exploded View Copyright 1995 2011 SAMSUNG All rights reserved 1...


