background image

Basic functions

  27

Taking photos

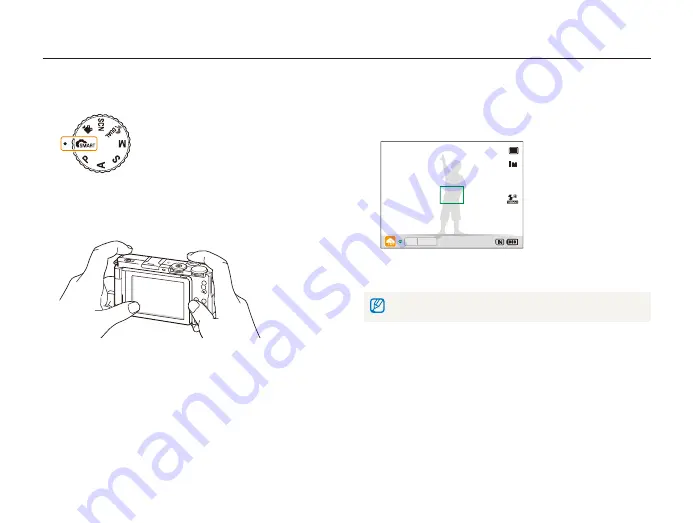
Learn basic actions to take photos easily and quickly in the Smart Auto mode.

Rotate the mode dial to 

t

.

Swing the screen and rotate it up or down properly.

Align your subject in the frame.

Fold the screen back against the body of the camera for 

t

normal use.

Half-press [

Shutter

] to focus.

A green frame means the subject in focus.

t

A red frame means the subject is out of focus.

t

00001

F2.4  1/60

Press [

Shutter

] to take a photo.

See page 30 for tips to get clearer photos.

Содержание TL500

Страница 1: ...ed usage instructions for your camera Please read this manual thoroughly Common questions Quick reference Contents Basic functions Extended functions Shooting options Playback Editing Appendixes Index...

Страница 2: ...e reach of small children and animals Small parts may cause choking or serious injury if swallowed Moving parts and accessories may present physical dangers as well Prevent damage to subjects eyesight...

Страница 3: ...iately and consult a doctor Safety precautions Handle and store your camera carefully and sensibly Do not allow your camera to get wet liquids can cause serious t damage Do not handle your camera with...

Страница 4: ...teries from making contact with metal objects as t this can create a connection between the and terminals of your battery and lead to temporary or permanent battery damage Also this may cause a re or...

Страница 5: ...tery and charger life Overcharging batteries may shorten battery life After charging is t nished disconnect the cable from your camera Over time unused batteries will discharge and must be t recharged...

Страница 6: ...e License information refer to the t OpenSourceInfo pdf in the provided CD ROM Organization of the user manual Basic functions 13 Learn about your camera s layout icons and basic functions for shootin...

Страница 7: ...d Movie modes Icons used in this manual Icon Function Additional information Safety warnings and precautions Camera buttons For example Shutter represents the shutter button Page number of related inf...

Страница 8: ...imal or still life Background t the objects around the subject Composition t the combination of a subject and background Background Subject Composition Exposure Brightness The amount of light that ent...

Страница 9: ...t Shutter halfway down to make sure the subject is focused p 30 Use the t d mode p 41 Photos are blurred when shooting at night As the camera tries to let in more light the shutter speed slows This ca...

Страница 10: ...f the same scene with different exposure settings f 50 ISO speed to adjust the sensitivity to light t f 55 EV t to adjust exposure f 65 Metering t f 66 Applying a different effect PSS BKT t to take 9...

Страница 11: ...rding voice memos 45 Recording a voice memo 45 Adding a voice memo to a photo 45 Basic functions 13 Unpacking 14 Camera layout 15 Using the screen 18 Attaching a strap 18 Attaching a lens cap 19 Inser...

Страница 12: ...selection focus 57 Using tracking auto focus 58 Adjusting the focus area 59 Using face detection 60 Detecting faces 60 Taking a self portrait shot 61 Taking a smile shot 61 Detecting eye blinking 62 U...

Страница 13: ...Playing voice memos 83 Editing a photo 84 Resizing photos 84 Rotating a photo 84 Applying photo styles 85 Applying smart lter effects 86 Correcting exposure problems 87 Creating a print order DPOF 88...

Страница 14: ...rging the battery 21 Turning on your camera 21 Performing the initial setup 22 Learning icons 23 Selecting options 24 Setting the display and sound 26 Changing the information displayed 26 Setting the...

Страница 15: ...oftware CD ROM User Manual included AD46 00335A Quick Start Manual AD68 04860A Rechargeable battery 4302 001226 Strap AD63 04468A Lens cap Lens cap strap AD97 19036A AD63 02591A Optional accessories C...

Страница 16: ...memory card and battery Tripod mount Camera ring Remove the ring and mount an optional conversion lens AF assist light Timer lamp EV dial POWER button Remote control sensor Flash Eyelet for camera str...

Страница 17: ...n option or menu t Adjust aperture value in Shooting mode t Scroll through les in Playback mode t o Con rm the highlighted option or menu Playback Enter Playback mode Function Access options in Shooti...

Страница 18: ...er speed d DUAL IS Take a photo using options suitable for reducing camera shake s Scene Take a photo using options preset for a speci c scene v Movie Check the con gured settings to record a video Dr...

Страница 19: ...onveniently Using the screen Swing the screen outwards 180 and rotate it up or down for high and low angle photos or self portraits You can rotate the screen a maximum of 90 downward or 180 upward 180...

Страница 20: ...Basic functions 19 Camera layout Attaching a lens cap Attach a lens cap with a lens cap strap to protect the camera lens...

Страница 21: ...tly until the card disengages from the camera and then pull it out of the slot Push the lock up to release the battery The internal memory can be used as a temporary storage device when the memory car...

Страница 22: ...ack mode Press P The camera turns on and accesses Playback mode immediately When you turn on your camera by pressing and holding P for about 5 seconds the camera does not emit any camera sounds Chargi...

Страница 23: ...or o Press 8 F or I to select an item Menu 2010 Year Month Date Hour Min 01 01 10 00 Off Exit Move Press 9 D or c to set the date and time or select a date format and then press o Press 1 POWER The i...

Страница 24: ...Learning icons The icons displayed will change according to the mode you select or the options you set B Icons on the right Icon Description Single shot Continuous shots Timer Bracketing Remote contr...

Страница 25: ...s will not be available Going back to the previous menu Press m again to go back to the previous menu Press Shutter to return to Shooting mode In Shooting mode press 1 m Press or rotate the navigation...

Страница 26: ...ate the navigation button or press 5 F or I to scroll to the white balance option Move Adjust Press 6 o to save your settings Press 7 m to switch to Shooting mode E g Selecting the white balance optio...

Страница 27: ...operate your camera In Shooting or Playback mode press 1 m Select 2 Beep Sound an option Option Description Off The camera does not emit any sounds 1 2 3 The camera emits sounds Changing the informati...

Страница 28: ...n and rotate it up or down properly 2 Align your subject in the frame 3 Fold the screen back against the body of the camera for t normal use Half press 4 Shutter to focus A green frame means the subje...

Страница 29: ...m is not available when using t d s in some scenes and v modes and when using Face Detection Manual Focus Smart Filter and Tracking AF It may take longer to save a photo when using the digital zoom Zo...

Страница 30: ...be blurred t by the vibration of the OIS sensor Deactivate the OIS function when you use a tripod If the camera is impacted the display will be blurry In this case turn t off the camera and turn it on...

Страница 31: ...ame and half press t Shutter again if displayed in red Reducing camera shake Set the Optical Image Stabilization option to t reduce camera shake optically p 29 Select the t d mode to reduce camera sha...

Страница 32: ...d the subject is too bright The subject is shiny The subject includes horizontal patterns such as blinds The subject is not positioned in the center of the frame Use the focus lock Half press Shutter...

Страница 33: ...Using the Aperture Priority mode 39 Using the Shutter Priority mode 39 Using the Manual mode 40 Using the DUAL IS mode 41 Recording a video 42 Using the Smart Scene Detection mode 43 Recording voice m...

Страница 34: ...traits of people Appears when the camera and subject are stable for a while This is available only when you are shooting in the dark Appears when taking photos of actively moving subjects Appears when...

Страница 35: ...default settings are used Even if there is a face detected the camera may not select a portrait t mode depending on the subject s position or lighting The camera may not select the correct scene depe...

Страница 36: ...t 4 a Face Tone an option Select a higher setting to make skin tone appear lighter t Menu OK Menu OK Face Tone Face Retouch Face Detection Smart FR Edit Photo Size Quality Focus Area Back Set Level 1...

Страница 37: ...greater number of t imperfections Menu OK Face Tone Face Retouch Face Detection Smart FR Edit Photo Size Quality Focus Area Level 1 Level 2 Level 3 Back Set Press 6 m to switch to Shooting mode Align...

Страница 38: ...ous options except the shutter speed and aperture value which the camera sets automatically Rotate the mode dial to 1 p Set options For a list of options refer to 2 Shooting options Align your subject...

Страница 39: ...shutter speed the photo will appear darker However a faster shutter speed will also reduce the blurring if your subject or the camera is in motion Slow shutter speed Fast shutter speed Aperture value...

Страница 40: ...tions refer to 3 Shooting options Align your subject in the frame and half press 4 Shutter to focus Press 5 Shutter to take the photo Using the Aperture Priority mode The Aperture Priority mode allows...

Страница 41: ...gn your subject in the frame and half press 5 Shutter to focus Press 6 Shutter to take the photo Using the Manual mode The Manual mode allows you to manually adjust both the aperture value and the shu...

Страница 42: ...your subject in the frame and half press 2 Shutter to focus Press 3 Shutter to take the photo The digital zoom will not work in this mode t The photo will be corrected optically only when taken with...

Страница 43: ...00001 AEL STBY 00 00 10 Set other options as desired 5 For options refer to Shooting options Press 6 Recorder to start recording Press 7 Recorder again to stop recording You do not need to rotate the...

Страница 44: ...art Scene Detection On Press 3 m to switch to Shooting mode Align your subject in the frame 4 The camera selects a scene automatically An appropriate t scene mode icon appears at the bottom left of th...

Страница 45: ...os of sunsets Press 5 Recorder to start recording Press 6 Recorder again to stop recording If the camera does not recognize a proper scene mode t will not change and the default settings are used The...

Страница 46: ...in the frame and take a photo 4 The camera begins to record a voice memo right after t you take the photo Record a short voice memo 10 seconds maximum 5 Press t Shutter to stop recording a voice memo...

Страница 47: ...usting the focus area 59 Using face detection 60 Detecting faces 60 Taking a self portrait shot 61 Taking a smile shot 61 Detecting eye blinking 62 Using smart face recognition 62 Registering faces as...

Страница 48: ...displayed on a larger screen When you use a high resolution the le size will also increase When taking a photo In Shooting mode press 1 m Select 2 a Photo Size an option Option Description 3648 X 2736...

Страница 49: ...and calibrate exposures white balances tones contrasts and colors of the RAW les use the Samsung RAW Converter program supplied in the software CD ROM See page 97 Selecting image quality Photos you t...

Страница 50: ...al to 1 or Take a photo in 2 seconds Take a photo in 10 seconds Press 2 Shutter to start the timer The AF assist light timer lamp blinks The camera will t automatically take a photo at the speci ed ti...

Страница 51: ...us photos Rotate the drive mode dial to 1 C Press and hold 2 Shutter While you are pressing t Shutter the camera takes photos continuously The maximum number of photos depends on the capacity of t you...

Страница 52: ...T Take 3 photos with selected exposures Adjust the color for the selected light source or select an 4 exposure value Press 5 OK to save your settings Taking bracketed photos Rotate the drive mode dial...

Страница 53: ...just Select an option 2 Option Description Off The ash does not re t Camera shake warning t will be displayed when shooting in low light Auto The camera will select a proper ash setting for the detect...

Страница 54: ...ash res when the subject or background is t dark The camera reduces red eyes t Fill in The ash always res t Light intensity is adjusted automatically t Slow Sync The ash res and the shutter stays ope...

Страница 55: ...he selected option While not in use keep the ash unit closed to prevent damage t Forcing open the ash unit may cause damage to your camera t Press down gently to close Adjust the intensity 4 OK Back S...

Страница 56: ...on ISO The higher ISO speed you select the more sensitive to light your camera becomes With a higher ISO speed you can get a better photo without using the ash In Shooting mode press 1 I OK OK Move Se...

Страница 57: ...cus on a subject 5 80 cm away 50 80 cm away when using zoom Auto Macro Focus on a subject farther than 5 cm farther than 50 cm away when using zoom Manual Focus Focus on a subject by manually adjustin...

Страница 58: ...to Press t o to change the focus area If you use this function you cannot set face detection photo style options and smart lter effects p A S M d Adjusting the focus distance manually In Shooting mode...

Страница 59: ...the focus the focus frame changes to a red t single line frame If you use this function you cannot set face detection photo style t options and smart lter effects Using tracking auto focus Tracking A...

Страница 60: ...the scene In Shooting mode press 1 m Select 2 a Focus Area an option Option Description Center AF Focus on the center suitable when subjects are located in the center Multi AF Focus on one or more of...

Страница 61: ...nk Detection It is too bright or too dark The subject is not facing the camera The subject is wearing sunglasses or a mask The subject is in backlighting or the lighting condition is unstable The subj...

Страница 62: ...hen the camera detects the smiling face it takes a photo t automatically When your subject smiles broadly your camera can detect t the smile more easily Taking a self portrait shot Take photos of your...

Страница 63: ...tection Smart Face Recognition The nearest face appears in a white focus frame and the rest t of the faces appear in gray focus frames t Indicates favorite faces To register favorite faces see page 63...

Страница 64: ...frame will not appear You can take photos of a subject s face directly from the front t to the left side to the right side from above or from below Take photos of one person at a time when registering...

Страница 65: ...a t on the face list You can register up to 8 favorite faces t The ash option will be set to t Off Viewing your favorite faces In Shooting mode press 1 m Select 2 a Smart FR Edit Face List To change t...

Страница 66: ...be too bright or dark In these cases you can adjust the exposure to get a better photo Darker Neutral 0 Brighter In Shooting mode press 1 m Select 2 a EV Select a value to adjust the exposure 3 Press...

Страница 67: ...ove Set Select an option 2 Option Description Spot Your camera measures only the light intensity of the t very center of the frame If a subject is not in the center of the scene your t photo may be im...

Страница 68: ...olor temperature manually You can also adjust color for the preset light sources so that the colors of the photo match the actual scene under mixed lighting conditions Auto WB Daylight Cloudy Tungsten...

Страница 69: ...ct 2 a White Balance an option Option Description Auto WB Use automatic settings depending on the lighting conditions Daylight Select when taking outdoor photos on a sunny day Cloudy Select when takin...

Страница 70: ...roll to 3 Color Temperature Rotate 4 Zoom right Press or rotate the navigation button to adjust the color 5 temperature OK 3900K Back Set Press 6 o to save your settings De ning your own white balance...

Страница 71: ...Kelvin that indicates the hue of a speci c type of light source As the color temperature increases the color distribution becomes cooler Alternatively as the color temperature decreases the color dis...

Страница 72: ...n B Blue 5 OK R G B Back Set Adjust the amount of the selected color 6 less or more Press 7 o to save your settings Applying photo styles Apply a different photo style to your photos such as Soft Vivi...

Страница 73: ...e Distort close objects to imitate the visual effect of a sheye lens If you select t Miniature when recording a video the miniature recording time is displayed with the icon and is shorter than the re...

Страница 74: ...contrast sharpness and saturation of your photos In Shooting mode press 1 m Select 2 a Image Adjust Select an adjustment option 3 Contrast t Sharpness t Saturation t Select a value to adjust the sele...

Страница 75: ...art range effect In Shooting mode press 1 m Select 2 a Smart Range Select an option 3 Option Description Off The smart range effect is off On The smart range effect is on The smart range effect may be...

Страница 76: ...o 92 Transferring les by connecting the camera as a removable disk 94 Disconnecting the camera for Windows XP 95 Transferring les to your computer for Mac 96 Using Samsung RAW Converter 97 Installing...

Страница 77: ...et DPOF Protected le Photo includes a registered face Available only when you use a memory card Starting Playback mode View photos or play videos and voice memos stored in your camera Press 1 P The mo...

Страница 78: ...tar Scroll to a face and press 3 o Press 4 f Select 5 Yes Ranking your favorite faces You can change the ranking of your favorite faces This feature is available only when you use a memory card In Pla...

Страница 79: ...t may take some time for the camera to open Smart Album or to change the category and recognize les Rotate the navigation button or press 4 F or I to scroll through les Press and hold t F or I to scro...

Страница 80: ...o again to cancel your selection Fn OK Select Set Press 4 f While viewing a le you can protect the le by pressing E Viewing les as thumbnails Scan thumbnails of les In Playback mode rotate Zoom left...

Страница 81: ...s 1 m Select 2 u Copy to Card Select 3 Yes to copy les Deleting les Delete single les or all les at once You cannot delete protected les To delete a single le In Playback mode select a le and press 1...

Страница 82: ...lide show Interval Set the interval between photos t This is available when t Off is selected in the effect option Effect Select a transition effect t Select t Off for no effects Music Select a backgr...

Страница 83: ...Zoom right Press 2 o to resume playback Press 3 o at the point where you want the new video to end and rotate Zoom right Select 4 Yes The original video should be at least 10 seconds long t The edited...

Страница 84: ...ollowing buttons to control playback 2 Press To F Scan backward o Pause or resume playback I Scan forward c Stop playback Zoom left or right Adjust the volume level Adding a voice memo to a photo In P...

Страница 85: ...2 y Rotate an option OK Move Set The rotated photo will be saved as the same le not a new le Resizing photos In Playback mode select a photo and press 1 m Select 2 y Resize an option Select t to save...

Страница 86: ...ck Set Adjust the amount of the selected color 6 less or more Applying photo styles Apply a different photo style to the photo such as Soft Vivid or Forest The edited photo will be saved as a new le b...

Страница 87: ...us lter effects to your photos to create unique images The edited photo will be saved as a new le but it could be resized to a lower resolution Miniature Vignetting Fish eye In Playback mode select a...

Страница 88: ...press 1 m Select 2 y Image Adjust Add Noise Correcting exposure problems Remove red eye hide facial imperfections adjust brightness contrast or saturation or add noise to the photo The edited photo wi...

Страница 89: ...Because the customized options are saved in the MISC folder of the memory card you can print photos conveniently by taking only the memory card to a print shop without your camera The memory card can...

Страница 90: ...gs You can capture photos or videos while the camera is connected t to a TV In Shooting or Playback mode press 1 m Select 2 n Video Out Select a video signal output according to your country or 3 regi...

Страница 91: ...MI cable Turn on your camera 6 The HDTV turns on automatically and the camera screen is t displayed If you turn Anynet off the HDTV does not turn on t automatically View les using the buttons on your...

Страница 92: ...e program t You must use Windows XP Vista 7 or Mac OS 10 4 or later to t connect the camera as a removable disk Using a self assembled PC or a PC and OS that are not supported may void your warranty R...

Страница 93: ...ows Vista and Windows 7 select Run iStudio exe from the AutoPlay window Transferring les using Intelli studio Intelli studio starts automatically when you connect the camera to your computer with the...

Страница 94: ...If you install Intelli studio on your computer the program launches more quickly To install the program select t Tool Install Intelli studio on PC You cannot edit les directly on the camera Transfer...

Страница 95: ...ny loss of data Number Description 1 Open menus 2 Display les in the selected folder 3 Change to the Photo edit mode 4 Change to the Video edit mode 5 Change to the Sharing mode You can send les by em...

Страница 96: ...ttom right of your PC screen Click the pop up message 3 Remove the USB cable 4 The camera can not be removed safely when Intelli studio is running End the program before disconnecting the camera Turn...

Страница 97: ...ra 2 The computer recognizes the camera automatically and a t removable disk icon is displayed If you set the USB option to Select Mode select Computer from the pop up window Double click the removabl...

Страница 98: ...for Macintosh from the Samsung website t The Samsung RAW Converter program supplied on the CD ROM is compatible only with Windows XP and Vista t Select 3 Samsung RAW Converter from the program selecti...

Страница 99: ...the Samsung RAW Converter Interface For details about using Samsung RAW Converter click Help Open software manual 4 3 2 1 Number Description 1 Menu 2 Toolbar Number Description 3 Editing tools 4 Open...

Страница 100: ...F format les To adjust the exposure of of an image Select 1 File Open le and open a le From the editing tools select 2 Adjust the exposure with the scroll bar 3 Original image p Mode Aperture f 8 Shut...

Страница 101: ...elect 2 File Development Select a le format JPEG or TIFF and select 3 Save To adjust the tone of an image Select 1 File Open le and open a le From the editing tools select 2 Adjust the tone with the s...

Страница 102: ...Layout Create thumbnail prints Type Select the type of paper Quality Set the printing quality Date Set to print the date File Name Set to print the name of the le Reset Reset the print options Some op...

Страница 103: ...a 109 About memory cards 110 About the battery 111 Using optional accessories 114 Using optional ash units 114 Using an optional conversion lens 115 Using an optional remote control 116 Before contact...

Страница 104: ...m to return to the previous screen Accessing the settings menu In Shooting or Playback mode press 1 m Select a menu 2 Menu Menu Volume Start Sound Shutter Sound Beep Sound AF Sound Exit Move Medium O...

Страница 105: ...ge can be saved in the internal t memory If you select a new photo as a start image or reset t your camera the current image is deleted A wide image or image in 3 2 ratio cannot be set t as a start im...

Страница 106: ...when you reset the camera or when you return to your home country from another time zone Visit t If you are visiting a different time zone use this option to set the time zone as a secondary clock Th...

Страница 107: ...a Austria Belgium China Denmark Finland Germany England Italy Kuwait Malaysia New Zealand Singapore Spain Sweden Switzerland Thailand Norway Item Description Date Time Set the date and time and select...

Страница 108: ...nversion lens Set to use an optional conversion lens with your camera Off On Remote Set to use an optional remote control with your camera Off On Anynet HDMI CEC Set to control the camera connected to...

Страница 109: ...amera Insert a SD or SDHC memory card DCF Full Error File names do not match the DCF standard Transfer the les on the memory card to your computer and format the card p 105 File Error Delete the damag...

Страница 110: ...solutions can damage the camera or cause it to malfunction Do not press on the lens cover or use a blower brush on the lens t cover Cleaning your camera Camera lens and display Use a blower brush to r...

Страница 111: ...42 43 645 967 1 161 45 41 43 44 1 056 1 331 1 458 46 43 44 44 Size 30 FPS 15 FPS V i d e o s Approx 25 50 Approx 48 36 Approx 68 47 Approx 99 53 The recordable time may vary if you use the zoom Severa...

Страница 112: ...t 3 Perform steps 1 and 2 for 30 seconds and repeat for 5 minutes Then turn off the camera for 1 minute 4 Repeat steps 1 to 3 Videos Approx 100 min Record videos at 640 X 480 resolution and 30 fps The...

Страница 113: ...the indicator light is off make sure that the battery is inserted t correctly Turn off your camera when charging t Turn on your camera after charging the battery for more than 10 t minutes Using the a...

Страница 114: ...relessly or improperly For your safety follow these instructions for proper battery handling The battery can ignite or explode if not handled properly t If you notice any deformities cracks or other a...

Страница 115: ...ry shoe cover and mount the ash unit on the accessory shoe For details about the ash unit see the manual provided with the t ash unit Your camera is compatible with the following types of ash units t...

Страница 116: ...turning it 1 counter clockwise Mount the conversion lens by turning it clockwise until it 2 locks into place In Shooting or Playback mode press 3 m Select 4 n Conversion lens On After setting to use...

Страница 117: ...ptional remote control The camera takes a photo 2 seconds after you press the shutter button on the remote control You can use the remote control only when the drive mode dial is rotated to g In Shoot...

Страница 118: ...work The ash option may be set to t Off p 52 You cannot use the ash in the t d v or some s modes The ash res unexpectedly The ash may re due to static electricity This is not a malfunction of the cam...

Страница 119: ...ake sure that your memory card t contains photos Situation Suggested remedies The date and time are incorrect Set the date and time in the display settings menu p 106 The display or buttons do not wor...

Страница 120: ...osure value by pressing E You cannot lock the exposure value in t mode Situation Suggested remedies An optional ash unit does not re Make sure that the optional ash unit is t turned on Make sure that...

Страница 121: ...ake reduction DUAL IS Optical Image Stabilization OIS Digital Image Stabilization DIS Image sensor Type 1 1 7 Approx 10 9 mm High Sensitive CCD Effective pixels Approx 10 mega pixels Total pixels Appr...

Страница 122: ...ye Fix Face Retouch Brightness Contrast Saturation Add Noise Smart Filter t Normal Miniature Vignetting Fish eye Effect Shooting mode Photo Style Selector t Normal Sketch Defog Soft Vivid Forest Retro...

Страница 123: ...g on shooting conditions and camera settings Interface Digital output connector USB 2 0 Audio output Mono Internal speaker Mono Microphone Video output A V NTSC PAL selectable t HDMI 1 4 NTSC PAL sele...

Страница 124: ...0 mAh The power source may differ depending on your region Dimensions W x H x D 114 4 x 64 6 x 30 mm Weight 356 g without battery and memory card Operating temperature 0 40 C Operating humidity 5 85 S...

Страница 125: ...the instructions may cause harmful interference to radio communications However there is no guarantee that interference will not occur in a particular installation If this equipment does cause harmfu...

Страница 126: ...rait 61 Smart Face Recognition 62 Smile Shot 61 Facial brightness 35 Beauty Shot mode 35 Blink detection 62 C Camera shake 30 Capturing an image from a video 83 Cleaning Body 109 Display 109 Lens 109...

Страница 127: ...Registering faces 63 N Navigation button 16 O Opening ash 52 Opening screen 18 Optical Image Stabilization OIS 29 41 Intelli studio 93 ISO speed 55 L Light source White balance 67 Locking exposure 66...

Страница 128: ...cording 42 Video Out 106 Service center 117 Settings Accessing 103 Camera 105 Display 104 Sound 104 Shooting mode Aperture Priority 39 Dual IS 41 Manual 40 Movie 42 Program 37 Scene 35 Shutter Priorit...

Страница 129: ...Please refer to the warranty that came with your product or visit our website http www samsung com for after sales service or inquiries...

Отзывы: