background image

C

HAPTER

T

WO

: I

NSTALLATION

2

.7

I

N S TA L L AT I O N

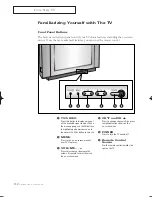
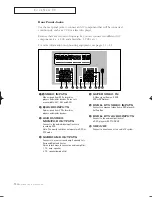
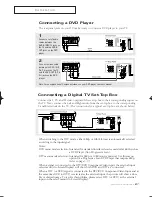
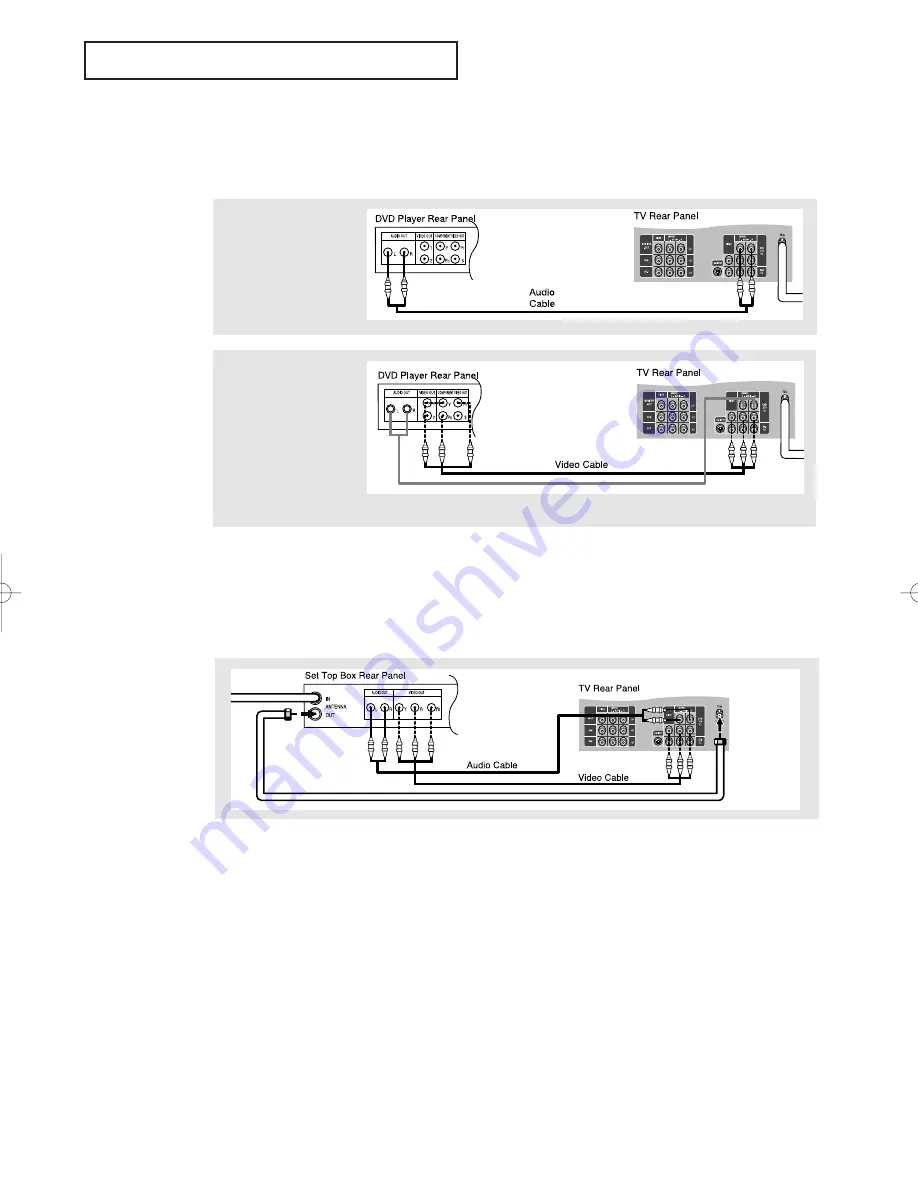
Connecting a Digital TV Set-Top Box

Connect the Y, Pb, and Pr video outputs of the set-top box to their corresponding inputs on
the TV.  Next, connect the Left and Right audio from the set-top box to the corresponding 
L and R terminals on the TV. (The connections for a typical set-top box are shown below.)

When switching to the DTV mode, either 480p or 1080i format is automatically selected
according to the input signal.
Notes:
DVD menu mode selection- Intended for standard interlaced source material at 480i such as

a DVD Player (Non Progressive Scan).

DTV menu mode selection- Intended for 480p or 1080i source material. Use this menu

option for a Progressive Scan DVD Player that outputs 480p
(refer to page 3.17).

When a signal is connected to the DTV/DVD Component Video input, the external input
select menu (On-Screen Display) will show both DVD and DTV as “connected”.
When a DTV (or DVD) signal is connected to the DTV/DVD Component Video Input and at
the same time DVD (or DTV) is selected as the external input, the picture will show a dou-
ble or skewed image. To resolve this problem, please select DTV (or DVD) as the external
input on the select menu (On Screen Display).

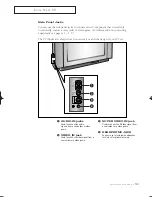
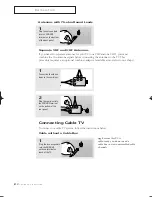
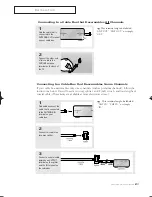
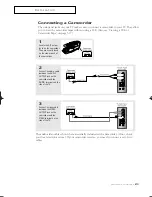
Connecting a DVD Player 

The rear panel jacks on your TV make it easy to connect a DVD player to your TV.

1

Connect a set of audio
cables between the
AUDIO INPUT 2 jacks on
the TV and the AUDIO
OUT jacks on the DVD
player.

2

Connect a video cable
between the DVD-IN (Y,
Pb, Pr) jacks on the TV
and the DVD-OUT (Y, Pb,
Pr) jacks on the DVD
player. 

Note: For an explanation of Component video, see your DVD player's owner's manual.  

01066D(E)-CHAPTER  2    4/12/05    9:24  AM    Page  7

Содержание Tantus TSK 3092WF

Страница 1: ...Owner s Instructions COLOR TELEVISION TSK2792F TSK2790F TSK3292F TSK3290F TSK3092WF TSL3294HF TSL3095WHF TSL3295HF TSL2795HF AA68 01066D ENG 01066D E FRONT COVER 4 12 05 9 37 AM Page 1 ...

Страница 2: ...le entry as practical Caution FCC CSA regulations state that any unauthorized changes or modifica tions to this equipment may void the user s authority to operate it Caution To prevent electric shock match the wide blade of plug to the wide slot and fully insert the plug Attention pour eviter les chocs electriques introduire la lame le plus large de la fiche dans la borne correspondante de la pris...

Страница 3: ...acket or table where it can fall A falling TV can cause serious injury to a child or adult and serious damage to the appliance Use only with a cart stand tripod bracket or table recommended by the manu facturer or sold with the TV Follow the manufacturer s instruc tions when mounting the unit and use a mounting accessory rec ommended by the manufacturer Move the TV and cart with care Quick stops e...

Страница 4: ...trode Do not attempt to service the TV yourself Refer all servicing to qualified service personnel Unplug the unit from the wall outlet and refer servicing to qualified service personnel under the following conditions when the power supply cord or plug is damaged if liquid has been spilled on the unit or if objects have fallen into the unit if the TV has been exposed to rain or water if the TV doe...

Страница 5: ...7 Connecting a Surround Speakers 2 8 Connecting a Speakers Variable Autio output 2 8 Connecting a Camcorder 2 9 Installing Batteries in the Remote Control 2 10 Chapter 3 Operation 3 1 Turning the TV On and Off 3 1 Plug Play Feature 3 1 Viewing the Menus and On Screen Displays 3 3 Viewing the Menus 3 3 Viewing the Display 3 3 Selecting a Menu Language 3 4 Memorizing the Channels 3 5 Selecting the V...

Страница 6: ...eep Timer 4 16 Viewing Closed Captions 4 17 Viewing Picture in Picture 4 18 Activating Picture in Picture 4 18 Selecting a Signal Source External A V for PIP 4 19 Swapping the Contents of the PIP image and Main image 4 19 Changing the PIP Channel 4 19 Changing the Location Rotating the PIP Window 4 19 Changing the Size of the PIP Window 4 19 Scanning the Available Channels 4 19 Using the V Chip Op...

Страница 7: ...ble picture and sound settings that can be stored in the TV s memory Automatic channel tuning for up to 181 channels A special filter to reduce or eliminate reception problems Fine tuning control for the sharpest picture possible A built in multi channel sound decoder for stereo and bilingual listening Built in dual channel speakers A special sleep timer Double screen Headphone jack for private li...

Страница 8: ...he available signal sources When the menu appears use the CH buttons to highlight a particular source and then press the VOL button to select it MENU Press to see an on screen menu of your TV s features ˇ VOLUME Press to increase or decrease the volume Also used to select items on the on screen menu CH and CH Press to change channels Also press to highlight various items on the on screen menu ˆ PO...

Страница 9: ... to connect an S Video signal from a camcorder or a video game HEADPHONE JACK Connect a set of external headphones to this jack for private listening Side Panel Jacks You can use the side panel jacks to connect an A V component that is used only occasionally such as a camcorder or video game For information on connecting equipment see pages 2 1 2 9 The TV illustration shown does not necessary matc...

Страница 10: ... AV3 AUDIO INPUTS Audio signals from VCRs laserdisc players and similar devices ˇ AUDIO VIDEO MONITOR OUTPUTS Connect to the audio video input jacks of a recording VCR Note The monitor out does not operate in DVD or DTV mode SURROUND OUTPUTS Connects to a rear surround amp Surround Left Surround Right and Center Here are two ways to connect an audio amplifier 1 TV amp speaker 2 TV speaker amp buil...

Страница 11: ...the action during a particular scene Press again to resume normal video Ø P Mode Adjust the TV picture by selecting one of the preset factory settings or select your personal customized picture settings S Mode Adjust the TV sound by selecting one of the preset factory settings or select your personal customized sound settings VCR controls Stop Press to stop a tape in your VCR REW Rewind Press to r...

Страница 12: ... signal sources for the PIP window Swap Exchanges the video signal that is currently displayed on the main screen with the signal in the PIP window Size Press to make the PIP window double large or small CH Displays the available channels in sequence These buttons change channels in the PIP win dow only R surf Press the R surf button to auto matically return to a preferred channel after a user pre...

Страница 13: ...ve two antennas see Separate VHF and UHF Antennas on page 2 2 Chapter Two INSTALLATION Antennas with 300 ohm Flat Twin Leads If you are using an off air antenna such as a roof antenna or rabbit ears that has 300 ohm twin flat leads follow the directions below 1 Place the wires from the twin leads under the screws on the 300 75 ohm adaptor not sup plied Use a screwdriv er to tighten the screws 2 Pl...

Страница 14: ...ug the combiner into the VHF UHF terminal on the bottom of the rear panel INSTALLATION Antennas with 75 ohm Round Leads 1 Plug the antenna lead into the VHF UHF terminal on the bottom of the back panel Separate VHF and UHF Antennas If you have two separate antennas for your TV one VHF and one UHF you must combine the two antenna signals before connecting the antennas to the TV This procedure requi...

Страница 15: ...scrambles Some Channels If your cable box descrambles only some channels such as premium channels follow the instructions below You will need a two way splitter an RF A B switch and four lengths of coaxial cable These items are available at most electronics stores 1 Find and disconnect the cable that is connected to the ANTENNA IN terminal on your cable box This terminal might be labeled ANT IN VH...

Страница 16: ... the RF A B switch 6 Connect the last coaxial cable between the OUT terminal on the RF A B switch and the VHF UHF terminal on the rear of the TV INSTALLATION After you ve made this connection set the A B switch to the A position for normal viewing Set the A B switch to the B position to view scrambled channels When you set the A B switch to B you will need to tune your TV to the cable box s output...

Страница 17: ...cable is usually included with a VCR If not check your local electronics store If you have a mono non stereo VCR use the Y connector not supplied to hook up to the left and right audio input jacks of the TV If your VCR is stereo you must con nect two cables Connecting a VCR These instructions assume that you have already connected your TV to an antenna or a cable TV system according to the instruc...

Страница 18: ...re 2 Connect a video cable between the VIDEO OUT jack on the TV and the VIDEO IN jack on the VCR Refer to your VCR s instructions for more information about how to record using this kind of connection The VCR input jacks might be either on the front or on back of the VCR 1 To begin follow steps 1 3 in the previous section to connect the antenna or cable to your VCR and your TV Connecting an S VHS ...

Страница 19: ...yer that outputs 480p refer to page 3 17 When a signal is connected to the DTV DVD Component Video input the external input select menu On Screen Display will show both DVD and DTV as connected When a DTV or DVD signal is connected to the DTV DVD Component Video Input and at the same time DVD or DTV is selected as the external input the picture will show a dou ble or skewed image To resolve this p...

Страница 20: ...onnecting a Speakers Variable Audio Output 1 The VARIABLE AUDIO OUT terminals cannot be used for external speakers You must hook them up to an amplifien When an audio amplifier is connected to the VARIABLE AUDIO OUT terminals Decrease the gain volume of the audio amplifier and adjust the volume level with the vol ume control on the TV See page 4 14 ...

Страница 21: ...s on the camcorder They are usually found on the side or back of the camcorder Connecting a Camcorder The side panel jacks on your TV make it easy to connect a camcorder to your TV They allow you to view the camcorder tapes without using a VCR Also see Viewing a VCR or Camcorder Tape on page 3 17 The audio video cables shown here are usually included with a Camcorder If not check your local electr...

Страница 22: ...using the remote control for a long time The remote control can be used up to about 23 feet from the TV Assuming typical TV usage the Batteries last for about one year 2 Install two AAA size batteries Make sure to match the and ends of the batteries with the diagram inside the compartment Installing Batteries in the Remote Control 1 Slide the cover out com pletely ...

Страница 23: ...t check Auto program Clock 1 Press the Power button on the remote control The message Plug Play is displayed It flickers for a little while and then the Language menu is automatically displayed 2 Press the VOL or VOL buttons to select the desired language Press the Menu button to enter the language and then the Clock set menu is automati cally displayed 3 Press the VOL or VOL buttons to move to th...

Страница 24: ...splayed 4 Press the VOL or VOL buttons to select the desired video sig nal source Press the Menu button to enter the video signal source and then Ant Input check is automatically dis played 7 If you want to reset this feature 1 Press the Menu button 2 Press the CH button three times to highlight the FUNC TION menu and press the VOL button 3 Press the CH button five times to select the Plug Play an...

Страница 25: ...side has five icons PICTURE SOUND CHANNEL FUNCTION and DOUBLE SCREEN The on screen menus disappear from the screen after about thirty seconds You can also use the Menu CHANNEL and VOLUME buttons on the control panel of the TV to make selections 1 Press the Display button on the remote control The TV will display the channel the type of sound and the status of certain picture and sound settings 2 U...

Страница 26: ...on to select the appropriate language English Spanish or French 4 Press the Menu button twice to exit 2 Press the VOL button to display the FUNC TION menu Press the CH button twice to select Language 1 Press the Menu button to display the menu Press the CH button twice to select FUNC TION ...

Страница 27: ... Video Signal source Before your television can begin memorizing the available channels you must specify the type of signal source that is connected to the TV i e an antenna or a cable system 1 Press the Menu button to display the menu 2 Press the CH button twice to highlight CHANNEL 3 Press the VOL button ANT CATV will be selected 4 Repeatedly press the VOL button to cycle through these choices A...

Страница 28: ... interrupt the memorization process and return to the CHANNEL menu 2 Press the CH button to select the Auto pro gram 1 First select the correct signal source ANT STD HRC IRC See steps 1 4 on previous page Press the Menu button then press the CH but ton twice to highlight CHANNEL Press the VOL button to access the CHANNEL sub menu 4 After all the available channels are stored the Auto program menu ...

Страница 29: ...re either erased or not memorized To select a channel over 100 press the 100 button For channel 122 press 100 then 2 then 2 To change to single digit channels 0 9 faster press 0 before the single digit For channel 4 press 0 then 4 2 Press the Add Erase button Repeatedly pressing this button will alternate between Channel added and Channel erased You can view any channel including an erased channel...

Страница 30: ...ase or decrease the volume 1 Press Mute and the sound cuts off The word Mute will appear in the lower left corner of the screen 2 To turn mute off press the Mute button again or simply press either the VOL or VOL button Using Mute At any time you can temporarily cut off the sound using the Mute button ...

Страница 31: ...wice to highlight CHANNEL Press the VOL button 3 Press the CH button five times to select Labeling Press the VOL button to begin labeling The left most field will be highlighted Each label has four fields See top paragraph 4 Press the CH or CH but ton to select a letter anumber or a blank Pressing the CH button results in this sequence A B Z blank 0 1 9 Note You cannot select Labeling in the A V m...

Страница 32: ...ss the CH button to select Clock 3 Press the VOL button again the hours digits will be highlighted Press the CH or CH buttons repeatedly until the correct hour appears After the hour is entered press the VOL button at this point the minutes digits will be highlighted When selecting the hours be sure to select the proper time of day AM or PM You can change the hours by pressing the CH or CH buttons...

Страница 33: ...highlight FUNCTION Press the VOL button 2 Press the VOL button to select Clock set Auto 3 Press the CH button to select Auto clock set and press the VOL button to select Auto clock set On 4 Press the CH button to select PBS channel While PBS channel is selected press the VOL button Press the CH button to select your local PBS channel Press the VOL button to set continued OPERATION ...

Страница 34: ...ne is selected press either the VOL or VOL buttons to change the Time zone Sequence ATL EAST CEN MTN PAC ALAS HAW 6 Press the CH button to select DST Daylight Saving Time While DST is selected press VOL or VOL buttons to indicate Yes or No The clock is set Press the Menu button three times to exit ...

Страница 35: ...rence Alternatively you can use one of the automatic settings See next page 3 Press the VOL or VOL buttons to increase or decrease the value of a particular item For example if you select Brightness pressing VOL increases it Press the Menu button twice to exit After adjusting an item the gauge will automatically disappear after about 5 seconds 2 Press the CH or CH buttons to highlight a particular...

Страница 36: ...the standard factory settings Choose Mild Mild Contrast when viewing the TV in low light or when playing video games Choose Custom if you want to adjust the settings accordings to personal preference see Customizing the Picture page 3 13 1 Press the Menu button to display the menu PICTURE icon will be highlighted blinking Press the VOL button to display the PICTURE menu 2 Press the VOL or VOL butt...

Страница 37: ...t the SOUND icon starts blinking Customizing the Sound The sound settings can be adjusted to suit your personal perferences Alternatively you can use one of the automatic settings See next page 3 Press the VOL or VOL buttons to highlight a particular item to be changed Press the CH or CH buttons to increase or decrease the value of a particular item Press the Menu button twice to exit ...

Страница 38: ...ard for the standard factory settings Choose Music when watching music videos or concerts Choose Speech when watching a show that is mostly dialogue i e news Choose Movie when watching movies Choose Custom to recall your personalized settings 2 Press the VOL or VOL buttons repeatedly to select the Standard Music Speech Movie or Custom sound settings 1 Press the Menu button to display the menu Pres...

Страница 39: ...order signal on the TV When you press the TV Video button the on screen display identifies all the active video sources and their corresponding input jacks Notes DVD menu mode selection Intended for standard interlaced source material at 480i such as a DVD Player Non Progressive Scan DTV menu mode selection Intended for 480p or 1080i source material Use this menu option for a Progressive Scan DVD ...

Страница 40: ...switch the remote control to the VCR or DVD mode 4 Enter 3 digits of the VCR or DVD code listed on the next page for your brand of VCR or DVD Make sure you enter 3 digits of the code even if the first digit is a 0 If more than one code listed try the first one 5 Press the Power button on the remote control Your VCR or DVD should turn on If your VCR or DVD turns on your remote control is now set co...

Страница 41: ...13 015 020 023 027 034 041 042 047 049 057 062 065 067 068 070 002 012 018 019 043 048 058 015 000 007 008 032 053 007 014 005 015 035 036 008 002 005 007 008 014 016 030 035 051 053 008 002 014 016 030 046 002 014 088 089 002 014 016 030 046 073 009 014 046 060 015 031 015 008 029 053 056 002 008 014 016 029 030 046 061 009 008 008 009 012 015 027 032 005 035 005 027 035 040 006 007 015 007 015 0...

Страница 42: ...e box code 000 through 077 6 Once your remote control is set up press the MODE button any time you want to use the remote to operate your cable box When your remote control is in the CABLE mode the volume buttons still control your TV s vol ume Also the VCR control buttons PLAY PAUSE etc will still operate your VCR 3 On your Samsung remote control press Set 2 Press the MODE button and make sure th...

Страница 43: ... CHANNEL 3 Press the VOL button to select CHANNEL menu Press the CH button twice to select Fine tune 4 Press the VOL and VOL buttons to adjust the fine tuning After you adjust the fine tuning the heart icon will appear when you press Display while watching this channel 5 To store the fine tuning setting in the TV s memory press the CH button A heart icon will appear To reset the fine tuning to 00 ...

Страница 44: ...oming signal 2 Press the CH button three times to select LNA 3 Press the VOL or VOL button to select LNA on Press the Menu button twice to exit 1 Press the MENU button to display the menu Press the CH button twice to highlight the CHANNEL menu Press the VOL button to select the CHANNEL menu Pressing VOL or VOL will alternate between On and Off 4 5 CHAPTER FOUR SPECIAL FEATURES ...

Страница 45: ...educe any static and ghosting that may appear on the screen 1 Press the Menu button to display the menu Press the CH button three times to highlight FUNCTION 2 Press the VOL button Press the CH button three times to select Digital NR 3 Press the VOL or VOL buttons to select Digital NR On Press the Menu button twice to exit Pressing the VOL or VOL but tons will alternate between On and Off ...

Страница 46: ...lt depending on the TV s location When this occurs follow the steps below 2 Press the VOL button Press the CH four times to select Tilt 3 Press the VOL or VOL buttons to adjust the Tilt Press the Menu but ton to exit 1 Press the MENU button to display the menu Press the CH button three times to highlight the FUNCTION menu ...

Страница 47: ...al Sets the picture to 4 3 normal mode This is a standard TV screen size Wide Sets the picture to 16 9 wide mode Zoom Sets the picture to Zoom mode For models TSK3092WF TSL3095WHF 1 Press the Aspect button to chang the screen size Wide Sets the picture to 16 9 wide mode Panorama Use this mode for the wide aspect ratio of a panoramic picture Zoom Magnifies the size of the picture on screen Before P...

Страница 48: ...he R Surf 1 While you are watching the channel to which you want to return press the R surf button The on screen display will read Surf off 2 Press the R surf button again to set the timer in thirty second intervals up to five minutes 3 The time you set will begin counting down on the screen When the time runs out the TV will return to the channel you were watching when you set the timer SPECIAL F...

Страница 49: ... center speaker is either not present or not used In Phantom Mode the center sound is output through both left and right speakers Normal Selected when the center speaker is smaller than the left and right speakers and can not reproduce bass sounds effectively In Normal Mode the bass frequencies of the center channel are reproduced by the left and right speakers Wide Selected when the center speake...

Страница 50: ...ss the Menu button twice to exit The text at the bottom of the menu tells you if the incoming audio is stereo SAP or mono 1 Press the Menu button to display the menu Press the CH button once to highlight the SOUND menu Choose Stereo for channels that are broadcasting in stereo Choose Mono for channels that are broadcasting in mono or if you are having difficulty receiving a stereo signal Choose SA...

Страница 51: ...utton five times to select the Headphone and press the VOL button Note Headphones must be purchased separately 3 Press the VOL or VOL buttons to select Main or Sub Note You can select either Main or Sub during PIP On 4 Press the CH or CH button to select the partic ular item to be changed Press the VOL or VOL buttons to increase or decrease the value of a particular item Note When you want to list...

Страница 52: ...usts the volume of the desired channel by lowering the sound output when the modulation sig nal is high or by raising the sound output when the modulation signal is low 2 Press the VOL but ton to select the SOUND menu Press the CH button four times to select Auto volume 3 Press the VOL button to select On Press the Menu button twice to exit 1 Press the Menu button to display the menu Press CH once...

Страница 53: ...the internal speakers are switched off all the sound is routed to the external speakers 1 Press the Menu button to display the menu Press the CH button once to highlight SOUND and press the VOL button 2 Press the CH button six times to select Speaker Press the VOL or VOL button to select On or Off ...

Страница 54: ...TION sub menu 3 Press the CH button to select On time Press the VOL button to highlight the On time hours The hours digits will start blinking Press the CH or CH buttons repeatedly to select the appropriate hours i e the hour when the TV will turn on When you set the hours make sure the correct time of day AM or PM appears to the left of the hour 4 Press the VOL button to highlight the On time min...

Страница 55: ...nd set the hours and minutes Follow the same procedure as in steps 1 6 above 8 When finished setting the timer press the Menu button three times to exit 1 Press the Sleep button on the remote control 2 Press Sleep repeatedly until the appropriate time interval appears any of the preset values from Off to 360 After about 5 seconds the sleep display will disappear from the screen and the time interv...

Страница 56: ...d the closed caption signal from television programs so home recorded video tapes also provide closed captions Most pre recorded commercial video tapes provide closed captions as well Check for the closed caption symbol in your television schedule and on the tape s packaging Note The Caption feature does not work with DVD or DTV signals 1 Press the Menu button to display the menu Press the CH butt...

Страница 57: ...ess the Menu button to display the menu Press the CH four times to highlight the PIP menu Press the VOL button to select the PIP menu 2 Press the VOL button to select PIP On If you turn TV off while watching and turn it on again the PIP window will disappear 3 Press the Menu button twice to exit Note Picture in Picture does not function when the V chip is active Quick way to access the PIP menu Si...

Страница 58: ...l Source External A V for PIP Press the PIP CH or CH button to change the channel that appears in the PIP window Changing the PIP Channel When you press the Locate button repeatedly the PIP win dow moves from corner to corner on the TV screen Changing the Location Rotating the PIP Window Press the Size button to alternate between a smaller and larg er PIP window Changing the Size of the PIP Window...

Страница 59: ...ntering a valid PIN number the V chip mode screen will appear Press the CH button three times and highlight Change pin 4 While the Change pin field is selected press the VOL button The Change pin screen will appear Choose any 4 digits for your PIN and enter them Note If you forget the PIN press the remote control buttons in the following sequence which resets the pin to 0 0 0 0 POWER OFF MUTE 8 2 ...

Страница 60: ...to select the FUNCTION menu Press the VOL button 2 Press the CH button six times to highlight the V chip menu Press the VOL button The Enter pin screen will appear Enter your 4 digit PIN number 3 The V Chip mode screen will appear and V Chip lock will be highlighted turns blue color To enable the V Chip feature press the VOL button so that the V Chip lock field is YES Pressing the VOL button will ...

Страница 61: ...ill be highlighted and no letters will blink To exit this screen press the Menu again To select a different TV Rating press the CH or CH buttons and then repeat the process Note 1 The TV Y7 TV PG TV 14 and TV MA have additional options See the next step to change any of the following sub ratings FV Fantasy violence D Dialog L L S Sexual situation V Violence Note 2 The V Chip will automatically blo...

Страница 62: ...rating While the U or B is blinking press the CH or CH buttons to change the sub rating Press Menu once to save the TV guidelines A TV Rating will be highlighted and no letters will blink To exit this screen press the Menu button again To select a different TV Rating press the CH or CH buttons and then repeat the process Note The V chip will automatically block certain categories that are More res...

Страница 63: ...ed its color changes to blue Pressing the CH button will cycle through the MPAA categories G General audience no restrictions PG Parental guidance suggested PG 13 PG 13 Parents strongly cautioned R R Restricted Children under 17 should be accompanied by an adult NC 17 No children under age 17 X X Adults only NR Not rated 3 The V chip mode screen will appear Press the CH button twice and highlight ...

Страница 64: ...nother channel Adjust the antenna No picture or sound Try another channel Press the TV VIDEO button Make sure the TV is plugged in Check the antenna connections No color wrong colors or tints Make sure the program is broadcast in color Adjust the picture settings Picture rolls vertically Adjust the antenna Check all wire connections The TV operates eratically Unplug the TV for 30 seconds then try ...

Страница 65: ...cals Do not put heavy objects on top of the cabinet Temperature If your TV is suddenly moved from a cold to a warm place unplug the power cord and allow at least two hours for moisture that may have formed inside the unit to dry completely Using Your TV in Another Country If you plan to take your TV with you to a foreign country please be aware of the different television systems that are in use a...

Отзывы: