background image

1-5

Installing the Product

1-5

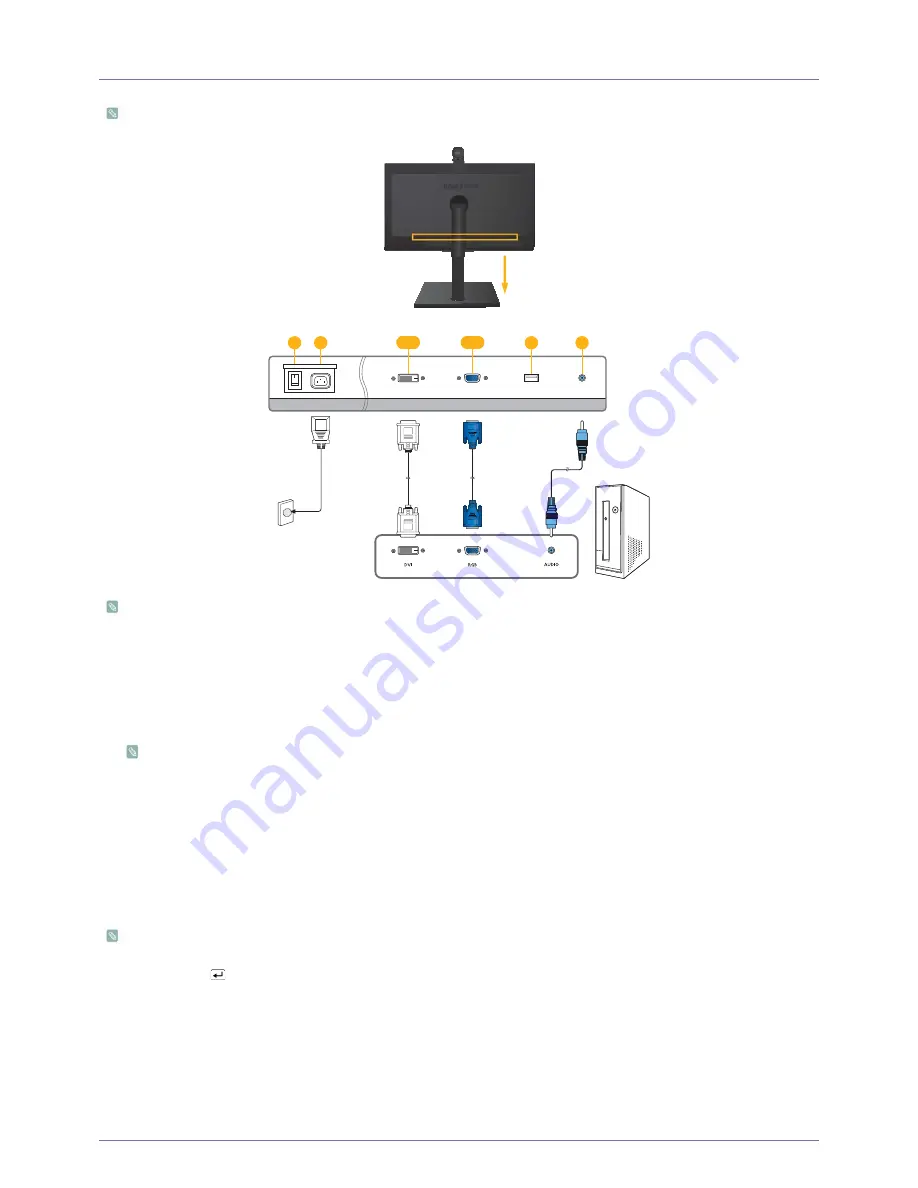
Connecting with a PC


The connecting parts may differ depending on the product model.


Connect the monitor to your PC as illustrated when you intend to use the monitor as a computer display only, and do not 
intend to use the video call function.

To connect the monitor and use it as a computer display only, follow these steps:


1.

POWER S/W : Turns the product on and off.

2.

Connect one end of the power cord to the [POWER] port of the product and connect the other end of the power cord to the 
220V or 110V wall outlet.


The monitor recognizes the input voltage and switches automatically.


3.

Connect the product to a PC depending on the video output supported by the PC.

3-1.

 When the graphics card provides DVI (Digital) output
 Connect the [DVI IN] port of the product to the DVI port of the PC with the DVI cable.

3-2.

 When the graphics card provides D-Sub (Analog) output
 Connect the [RGB IN] port of the product to the [RGB IN] port of the PC with the D-Sub cable.

4.

SERVICE : Dedicated to A/S

5.

Connect the [AUDIO IN] port on the rear side of the monitor to the sound card of the PC.


After the product is connected to a PC, you can turn the product on and use it.

When both the DVI (<DVI>) and D-Sub (<PC>) cables are connected, you can select the input signal <PC or DVI> by 
pressing the [ 

/SOURCE] button.


Computer

DVI IN

POWER

POWER S/W

RGB IN

AUDIO IN

SERVICE

1

3-1

3-2

4

5

2

Содержание SyncMaster VC240

Страница 1: ...SyncMaster VC240 Video Conference Monitor quick start guide...

Страница 2: ...the Product later If any items are missing contact your dealer Contact a local dealer to purchase optional items Monitor The cleaning cloth is supplied with black high glossy models only CONTENTS Inst...

Страница 3: ...d carefully Place a soft cloth over a flat sturdy table and then place the product onto the cloth so that the screen is facing downwards Turn the stand in the direction indicated by the arrow Do not r...

Страница 4: ...ully so that it is completely fixed After installation of the base is complete stand the product up Remove the stopper pin Adjust the height of the screen to your specifications Caution Avoid lifting...

Страница 5: ...event damage place the monitor down gently and carefully Place a soft cloth over a table to protect the product and then place the product onto the cloth so that the front of the product is facing dow...

Страница 6: ...mounts that are not compatible with the standard VESA specifications the length of the screw may differ depending on the corresponding specifications Do not use screws that are incompatible with the s...

Страница 7: ...d switches automatically 3 Connect the product to a PC depending on the video output supported by the PC 3 1 When the graphics card provides DVI Digital output Connect the DVI IN port of the product t...

Страница 8: ...d switches automatically 3 Connect between the LAN port on the product and your network using a LAN cable 4 Connect the LAN cable between the LAN port on the product and the LAN port on your PC You do...

Страница 9: ...1 6 Installing the Product Ferrite Core The ferrite cores are used to shield the cables from interference When connecting a cable open the ferrite core and clip it around the cable near the plug...

Страница 10: ...on You must purchase the Kensington Lock separately To lock the product follow these steps 1 Wrap the Kensington lock cable around a large stationary object such as a desk or chair 2 Slide the end of...

Страница 11: ...ontrol sensor Receives signals from the remote control Speaker Outputs sound from the remote party during a video call Outputs sound from the PC when the product is connected to a PC by an audio cable...

Страница 12: ...left of the screen To select Digital DVI mode you must connect the product to your PC with a DVI cable Press this button to turn the product on or off Power LED This LED is turned on when the product...

Страница 13: ...Self Diagnosis function To run a Self Diagnosis on your monitor follow these steps 1 Turn the monitor and the PC off 2 Separate the D Sub cable from the product 3 Turn the monitor on 4 If the monitor...

Страница 14: ...ey Did you connect with a DVI cable If you connect the DVI cable while the PC is booting up or if you reconnect the DVI cable after disconnecting the cable while the PC is on the screen may not displa...

Страница 15: ...for installing the driver in this manual Check if all the Plug Play VESA DDC functions are sup ported referring to the User Manual of the graphics card If your graphcs card supports the Plug Play fun...

Страница 16: ...anual of the com puter or the graphics card How can I change the resolution Windows XP Change the resolution by selecting Control Panel Appearance and Themes Display Settings Windows ME 2000 Change th...

Отзывы: