background image

English - 3

Teletext Language

You can set the Teletext language by selecting the language type.

English is the default in cases where the selected language is unavailable in the broadcast.

Preference

Primary Audio Language

 /

 Secondary Audio Language 

Primary Subtitle Language 

/

 Secondary Subtitle Language 

Primary Teletext Language 

/

 Secondary Teletext Language

Using this feature, users can select one of the languages. The language selected here is the default when the user selects a 

channel.

If you change the language setting, the Subtitle Language, Audio Language, and the Teletext Language of the Language menu are 

automatically changed to the selected language.

The Subtitle Language, Audio Language, and the Teletext Language of the Language menu show a list of languages supported 

by the current channel and the selection is highlighted. If you change this language setting, the new selection is only valid for the 

current channel. The changed setting does not change the setting of the Primary Subtitle Language, Primary Audio Language, or 

the Primary Teletext Language of the Preference menu.

Digital Text → Disable

 /

 Enable

If the programme is broadcast with digital text, this feature is enabled.

MHEG (Multimedia and Hypermedia Information Coding Experts Group)


An International standard for data encoding systems used in multimedia and 

hypermedia. This is at a higher level than the MPEG system which includes  

data-linking hypermedia such as still images, character service, animation, graphic 

and video files as well as multimedia data. MHEG is user runtime interaction 

technology and is being applied to various fields including VOD (Video-On-

Demand), ITV (Interactive TV), EC (Electronic Commerce), tele-education,  

tele-conferencing, digital libraries and network games.

Melody → ��� �� Low �� Medium �� High

The TV power on / off melody sound can be adjusted.

The Melody does not play


When no sound is output from the TV because the 

M

MUTE

 button has been pressed.

When no sound is output from the TV because the – 

 (Volume) button has been pressed.

When the TV is turned off by 

Sleep Timer

 function.

Energy Saving

This feature adjusts the brightness of the TV in order to reduce power consumption. When watching TV at night, set the  

Energy Saving

 mode option to 

High

 to reduce eye fatigue as well as power consumption.

Off

: Turns off the energy saving function. 

Low

: Sets the TV to low energy saving mode.

Medium

: Sets the TV to medium energy saving mode.

High

: Sets the TV to high energy saving mode.

Press the 

TOOLS

 button to display 

Tools

 menu.  

You can also set the Energy Saving option by selecting 

Tools → Energy Saving

.

T

Common Interface

Installing the CI Card
1.

 Purchase the CI CAM module by visiting your nearest dealer or by phone.

.

 Insert the CI CARD into the CAM in the direction of the arrow until it fits.

3.

 Insert the CAM with the CI CARD installed into the common interface slot.

Insert the CAM in the direction of the arrow, right up to the end so that it is parallel 

with the slot.

4.

 Check if you can see a picture on a scrambled signal channel.

CI Menu

This enables the user to select from the CAM-provided menu. 

Select the CI Menu based on the menu PC Card.

Application Info.

This contains information on CAM inserted in the CI slot and displays it. 

The Application Info inserting is about the CI CARD. You can install the CAM anytime whether the TV is ON or OFF.

CAM is not supported in some countries and regions,check with your authorized dealer.

N

N

N

-

-

-

N

N

Setup

Teletext Language 

: ----

Preference

Digital Text  

: Enable 

Melody 

: Medium

Energy Saving      

: Off

Common Interface   : Off 

BN68-02011F-Eng.indd   23

2009-03-09   오후 3:39:56

Содержание SYNCMASTER PS42B430P

Страница 1: ...istration Модель_______Серийный номер_________ BN68 02011F 00 Связывайтесь с SAMSUNG по всему миру Если у вас есть предложения или вопросы по продуктам Samsung связывайтесь с информационным центром Samsung Country Customer Care Centre Web Site RUSSIA 8 800 555 55 55 www samsung ru UKRAINE 8 800 502 0000 www samsung ua Плазменный телевизор руководство пользователя PS42B430P PS50B430P ...

Страница 2: ...vent this effect reduce the brightness and contrast when displaying still images Warranty Warranty does not cover any damage caused by image retention Burn in is not covered by the warranty Installation Be sure to contact an authorized service centre when installing your set in a location with heavy dust high or low temperatures high humidity chemical substance and where it operates continually su...

Страница 3: ...e 9 Viewing the Menus 10 Using the TOOLS Button 10 Plug Play Feature 11 Channel Control Storing Channels 12 Managing Channels 15 Picture Control Changing the Picture Settings 17 Sound Control Changing the Sound Setting 20 Selecting the Sound Mode 21 Function Description Configuring the Setup Menu 22 Setting the Time 24 Source List Edit Name 25 PC Display 26 Supported Program 27 Recommendations for...

Страница 4: ...nnection part using two screws for hiding Warning Firmly secure the stand to the TV before moving it as the stand may fall and could cause serious injury Two or more people should carry the TV Never lay the TV on the floor because of possible damage to the screen Always store the TV upright N 20 20 Checking Parts Owner s Instructions Remote Control AAA Batteries 2ea Power Cord Cloth Clean Warranty...

Страница 5: ...he remote control 2 MENU Press to see an on screen menu of your TV s features 3 Press to increase or decrease the volume In the on screen menu use the buttons as you would use the and buttons on the remote control N 4 CH Press to change channels In the on screen menu use the CH buttons as you would use the and buttons on the remote control 5 POWER INDICATOR Lights up when the power is on 6 POWER P...

Страница 6: ...om the TV to an external source such as Audio equipment 7 HDMI IN 1 2 DVI No additional Audio connection is needed for an HDMI to HDMI connection When using an HDMI DVI cable connection you must use the HDMI IN 2 DVI jack What is HDMI High Definition Multimedia interface allows the transmission of high definition digital video data and multiple channels of digital audio The HDMI DVI terminal suppo...

Страница 7: ...rror message is displayed please contact your service provider When the channel information configuration has finished the message Updating Completed is displayed indicating that the channel list is now updated Insert the CI Card in the direction marked on it CAM is not supported in some countries and regions check with your authorized dealer N N 2 AV IN VIDEO AUDIO L R Video and audio inputs for ...

Страница 8: ...l the cursor in the menu Use to see information on the current broadcast Use these buttons in the Channel list etc Previous channel Next channel Previous channel Displays the main on screen menu Press to switch to your Favourite channels Returns to the previous menu Exit the on screen menu Electronic Program Guide EPG display a Digital subtitle display Teletext Functions 2 Exit from the teletext d...

Страница 9: ...o can press the POWERP button or the TV button on the remote control to turn the TV on The programme that you were watching last is reselected automatically 3 Press the numeric button 0 9 or channel up down button on the remote control or CH button on your set When you switch the set on for the very first time you will be asked to choose language in which the menus are to be displayed 4 To switch ...

Страница 10: ...menu changes depending on which external input mode you are viewing 1 Press the TOOLS button The Tools menu will appear 2 Press the or button to select a menu then press the ENTERE button 3 Press the ENTERE buttons to display change or use the selected items For a more detailed description of each function refer to the corresponding page Picture Mode see page 17 Sound Mode see page 20 Sleep Timer ...

Страница 11: ...ENTERE button to select Start Digital Analogue Digital and Analogue channels Digital Digital channels Analogue Anal ogu e channels For more detailed description of selecting Cable mode refer to page 12 The channel search will start and end automatically Press the ENTERE button at any time to interrupt the memorization process After all the available channels are stored the message Set the Clock Mo...

Страница 12: ...for the channel Modulation Displays available modulation values Symbol Rate Displays available symbol rates Search Mode Displays the search mode Full Network Frequency Start Stop Displays the frequency for the channel Modulation Displays available modulation values Symbol Rate Displays available symbol rates You can memorize the Channel source Digital Analogue Digital and Analogue channels Digital...

Страница 13: ...ency range until the first channel or the channel that you selected is received on the screen Store When you store the channel and associated programme number Set to OK by pressing the ENTERE button Channel mode C Air channel mode You can select a channel by entering the assigned number to each air broadcasting station in this mode S Cable channel mode You can select a channel by entering the assi...

Страница 14: ...ist Added Ch Channels will be switched within the memorized channel list Favourite Ch Channels will be switched within the favourite channel list Fine Tune only analogue channels If the reception is clear you do not have to fine tune the channel as this is done automatically during the search and store operation If the signal is weak or distorted you may have to fine tune the channel manually Fine...

Страница 15: ... up the channel lists Channel List Tools Menu in All Channels Added Channels Favourites Press the TOOLS button to use the tools menu Option menu items may differ depending on the channel status Add Delete You can delete or add a channel to display the channels you want All deleted channels will be shown on All Channels menu A gray coloured channel indicates the channel has been deleted The Add men...

Страница 16: ...N number input screen appears Enter your 4 digit PIN number The default PIN number of a new TV set is 0 0 0 0 You can change the PIN by selecting Change PIN from the menu The symbol will be displayed and the channel will be locked Select All Deselect All Select All You can select all the channels in the channel list Deselect All You can deselect all the selected channels in the channel list You ca...

Страница 17: ...if the level of brightness of the picture is reduced and then this will reduce the overall running cost Advanced Settings Samsung s new TVs allow you to make even more precise picture settings than previous models See below to adjust detailed picture settings Advanced Settings is available in Standard or Movie mode Black Tone Off Dark Darker Darkest You can select the black level on the screen to ...

Страница 18: ...e vertical direction Then press the ENTERE button After selecting Screen Fit in HDMI 1080i 1080p or Component 1080i 1080p mode Select Position by pressing the or button Use the or button to move the picture Reset Press the or button to select Reset then press the ENTERE button You can initialize the setting If you use the Screen Fit function with HDMI 720p input 1 line will be cut at the top botto...

Страница 19: ... Horizontal Vertical Time Optimum condition for pixel shift Item TV Ext AV Component HDMI Horizontal 0 4 2 Vertical 0 4 2 Time minute 1 4 min 3 min The Pixel Shift value may differ depending on the monitor size inches and mode This function is not available in the Screen Fit mode Scrolling This function helps remove after images on the screen by moving all the pixels on the PDP according to a patt...

Страница 20: ...logy is incorporated under license from SRS Labs Inc Audio Language only digital channel You can change the default value for audio languages Displays the language information for the incoming stream You can only select the language among the actual languages being broadcast Audio Format MPEG Dolby Digital only digital channel When sound is emitted from both the main speaker and the audio receiver...

Страница 21: ...AV Component HDMI TV Speaker Speaker Output Sound Output External Speaker Mute Sound Output Video No Signal Mute Mute Sound Reset Reset All Reset Sound Mode Cancel You can restore the Sound settings to the factory defaults N N Selecting the Sound Mode When you set to Dual l ll the current sound mode is displayed on the screen Type of broadcast On screen indication NICAM Stereo Regular broadcast St...

Страница 22: ...fore the setup screen appears the PIN number input screen appears Enter your 4 digit PIN number The default PIN number of a new TV set is 0 0 0 0 If you forget the PIN code press the remote control buttons in the following sequence which resets the PIN to 0 0 0 0 POWER Off MMUTE 8 2 4 POWER On Parental Lock This feature allows you to prevent unauthorized users such as children from watching unsuit...

Страница 23: ...ectronic Commerce tele education tele conferencing digital libraries and network games Melody Off Low Medium High The TV power on off melody sound can be adjusted The Melody does not play When no sound is output from the TV because the MMUTE button has been pressed When no sound is output from the TV because the Volume button has been pressed When the TV is turned off by Sleep Timer function Energ...

Страница 24: ...Three different on off timer settings can be made On Time Set the hour minute and Activate Inactivate To activate timer with the setting you ve chosen set to Activate Off Time Set the hour minute and Activate Inactivate To activate timer with the setting you ve chosen set to Activate Volume Set the required volume level Antenna Select ATV or DTV Channel Select the desired channel Repeat Select Onc...

Страница 25: ...e with the Source list T TOOLS Tools Displays the Edit Name and Information menus Press the SOURCE button on the remote control to view an external signal source TV mode can be selected by pressing the TV button number buttons 0 9 and the P button on the remote control Edit Name You can name the device connected to the input jacks to make your input source selection easier VCR DVD Cable STB Satell...

Страница 26: ...interlace mode is not supported The set might operate abnormally if a non standard video format is selected N N N PC Display Setting Up Your PC Software Based on Windows XP The Windows display settings for a typical computer are shown below The actual screens on your PC will probably be different depending upon your particular version of Windows and your particular video card However even if your ...

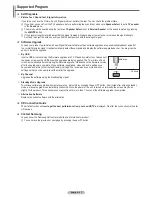
Страница 27: ...not disconnect the power or remove the USB drive while upgrades are being applied The TV will turn off and turn on automatically after completing the firmware upgrade Please check the firmware version after the upgrades are complete When software is upgraded video and audio settings you have made will return to their default factory settings We recommend you write down your settings so that you ca...

Страница 28: ...ess it twice to overlap the teletext with the current broadcasting screen 7 1 sub page Used to display the available sub page 8 2 page up Used to display the next teletext page 9 3 page down Used to display the previous teletext page 0 0 mode Press to select the teletext mode LIST FLOF If you press it in the LIST mode it switches into the List save mode In the List save mode you can save teletext ...

Страница 29: ... provided the standard dimensions for wall mount kits as shown in the table above When purchasing our wall mount kit a detailed installation manual and all parts necessary for assembly are provided Do not use screws longer than the standard dimension as they may cause damage to the inside of the TV set For wall mounts that do not comply with the VESA standard screw specifications the length of the...

Страница 30: ...ed onto the wall You may need additional material such as an anchor depending on the type of wall Since the necessary clamps screws and string are not supplied please purchase these additionally 2 Remove the screws from the center back of the TV put the screws into the clamps and then fasten the screws onto the TV again Screws may not be supplied with the product 3 Connect the clamps fixed onto th...

Страница 31: ...red or snowy picture distorted sound Check the direction location and connections of your aerial This interference often occurs due to the use of an indoor aerial Remote control malfunctions Replace the remote control batteries Clean the upper edge of the remote control transmission window Check that the and ends of the batteries are inserted correctly Check that the batteries are drained Screen i...

Страница 32: ...316 mm 1230 x 756 x 73 mm 1230 x 817 x 316 mm Weight Body With stand 24 kg 28 kg 32 kg 36 kg Environmental Considerations Operating Temperature Operating Humidity Storage Temperature Storage Humidity 50 F to 104 F 10 C to 40 C 10 to 80 non condensing 4 F to 113 F 20 C to 45 C 5 to 95 non condensing This device is a Class B digital apparatus Design and specifications are subject to change without p...

Страница 33: ......
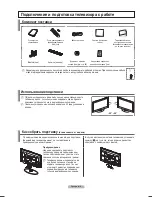
Страница 34: ...няется на повреждения вызванные вышеописанными эффектами Остаточное изображение на экране Отображение неподвижных изображений видеоигр и компьютера дольше определенного периода времени может привести к появлению остаточного изображения на экране Для предотвращения этого эффекта при воспроизведении неподвижных изображений уменьшите значения яркости и контраста Гарантия Гарантия не распространяется ...

Страница 35: ...авление каналами 15 Управление изображением Изменение и сброс настроек изображения 17 Управление звуком Изменение стандарта звука 20 Выбор режима звука 21 Описание функций Меню настройки 22 Установка времени 24 Список источн Редактир назв 25 Экран компьютера 25 Режимы экрана 26 Поддерживаемая программа 27 Рекомендации по эксплуатации Функция телетекста 28 Характеристики набора для настенного монта...

Страница 36: ...евизор на пол поскольку можно повредить экран Храните плазменную панель только в вертикальном положении Плазменную панель можно поворачивать на 20 градусов влево и вправо N N Как собрать подставку в зависимости от модели С помощью 4 винтов надежно закрепите монитор на подставке Внешний вид телевизора может не соответствовать приведенному на иллюстрации В случае настенного монтажа телевизора устано...

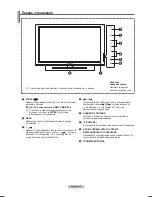
Страница 37: ...пульте дистанционного управления N 4 CH Используется для смены каналов В экранном меню используйте кнопки CH которые выполняют те же функции что и кнопки и на пульте дистанционного управления 5 ИНДИКАТОР ПИТАНИЯ Мигает и отключается при включенном питании и загорается в режиме ожидания 6 ПИТАНИЕ Используется для включения и выключения телевизора 7 ДАТЧИК ПРИЕМА СИГНАЛА ПУЛЬТА ДИСТАНЦИОННОГО УПРАВЛ...

Страница 38: ... DVI При соединении двух устройств с помощью разъема HDMI дополнительный аудиокабель не требуется При использовании кабеля HDMI DVI необходимо выполнить подключение к гнезду HDMI IN 2 DVI Что такое HDMI High Definition Multimedia interface позволяет передавать цифровые видеоданные высокого разрешения и многоканальные цифровые аудиосигналы Разъем HDMI DVI обеспечивает DVI соединение с дополнительны...

Страница 39: ...Если появится сообщение об ошибке обратитесь к поставщику услуг Интернета После завершения настройки сведений о канале на экране отобразится сообщение Обновление завершено означающее что список каналов обновлен Вставьте карту стандартного интерфейса в направлении указанном на ней Во многих странах и регионах модуль CAM не поддерживается Уточните данную информацию у официального дилера N N 2 AV IN ...

Страница 40: ...еню Просмотр информации о текущей станции вещания Используйте эти кнопки в списке Channel режиме т д Предыдущий канал Следующий канал Предыдущий канал Отображение главного экранного меню Нажмите для переключения на любимые каналы Возврат к предыдущему меню Отображение списка избранных каналов Отображение электронного справочника по программам EPG a Отображение субтитров Функции телетекста 2 Выход ...

Страница 41: ... на телевизоре Можно также нажать кнопку POWERP или кнопку TV на пульте дистанционного управления чтобы включить телевизор Автоматически выбирается программа которая просматривалась последней 3 Нажмите цифровую кнопку 0 9 или кнопку увеличения уменьшения номера канала на пульте дистанционного управления или кнопку CH на телевизоре При первом включении телевизора появится меню выбора языка который ...

Страница 42: ...ости от того какой режим входящего внешнего сигнала используется при просмотре 1 Нажмите кнопку TOOLS Отобразится меню Инструменты 2 Нажмите кнопку или для выбора меню затем нажмите кнопку ENTERE 3 Нажмите кнопку ENTERE для отображения изменения или использования выбранного элемента Более подробное описание каждой функции см на соответствующей странице Режим изображения см стр 17 Режим звука см ст...

Страница 43: ...E для выбора пункта Пуск Цифровые и Аналоговые Цифровые и аналоговые каналы Цифр Цифровые каналы Аналог аналоговые каналы Для получения подробной информации по режиму поиска см стр 12 Поиск каналов начнется и закончится автоматически Нажмите кнопку ENTERE в любой момент времени чтобы прервать процесс сохранения После сохранения всех доступных каналов на экране отобразится меню Устан режима Часы 6 ...

Страница 44: ...тупных значений модуляции Скорость передачи отображение допустимых значений скорости передачи Режим поиска отображение режима поиска Полный Сеть Частота начальная конечная отображение частоты канала Модуляция отображение доступных значений модуляции Скорость передачи отображение допустимых значений скорости передачи Можно сохранить источник канала Цифровые и Аналоговые Цифровые и аналоговые каналы...

Страница 45: ...ен странный звук или звук не слышен вообще еще раз выберите стандарт звука Поиск если номера каналов неизвестны Чтобы начать поиск нажмите кнопку или Тюнер будет вести поиск в диапазоне частот пока изображение первого канала или выбранного канала не отобразится на экране Сохранение при сохранении канала и соответствующего номера программы Выберите OK нажав кнопку ENTERE Режимы каналов C Режим ради...

Страница 46: ...ы каналы будут переключаться в пределах сохраненного списка Любимые каналы переключение каналов сохраненных в списке избранных каналов Точная настройка только для аналоговых каналов Если принимается четкий сигнал без помех то нет необходимости производить точную настройку т к это уже было выполнено автоматически во время поиска и сохранения каналов Если сигнал слабый или искаженный то можно выполн...

Страница 47: ...ь список каналов Меню инструментов списка каналов в меню Все каналы Добавленные каналы Избранное Для использования меню инструментов нажмите кнопку TOOLS Элементы меню параметров могут отличаться в зависимости от состояния каналов Добавить Удалить Можно удалять или добавлять каналы в список для отображения желаемых каналов Все удаленные каналы можно найти в списке Все каналы Каналы выделенные серы...

Страница 48: ...т выбрать и смотреть Эта функция доступна только если для параметра Замок установлено значение Вкл см стр 22 Отобразится окно ввода PIN кода Введите 4 значный PIN код По умолчанию на новом телевизоре установлен PIN код 0 0 0 0 Можно изменить PIN код выбрав в меню пункт Изменение PIN Для заблокированного канала будет отображаться символ Выбрать все Отменить все Выбрать все Выбор всех каналов в спис...

Страница 49: ...ественно уменьшить если уменьшить уровень яркости изображения Это приведет к уменьшению общих расходов Дополнительные параметры Новые телевизоры Samsung позволяют делать более точные настройки чем в моделях выпускавшихся ранее Для выполнения более точных настроек см описание ниже Функция Дополнительные параметры доступна в режиме Стандартный или Кино Черный тон Выкл Темный Темнее Самый темный Для ...

Страница 50: ...ите кнопку или для увеличения или уменьшения размера изображения по вертикали Затем нажмите кнопку ENTERE Выбрав пункт По размеру экрана в режиме HDMI 1080i 1080p или Компонентный 1080i 1080p выполните следующее Выберите пункт Позиция нажав кнопку или С помощью кнопок или переместите изображение Сброс Нажмите кнопку или для выбора пункта Сброс затем нажмите кнопку ENTERE Также можно установить исх...

Страница 51: ...емя Оптимальные условия для сдвига пикселов Элемент TB Внешний AV Компонентный HDMI Горизонтальная 0 4 2 Вертикальная 0 4 2 Время минут 1 4 мин 3 мин Значение сдвига пикселов может отличаться в зависимости от размера монитора в дюймах и режима Эта функция недоступна в режиме По размеру экрана Прокрутка эта функция помогает устранить остаточные изображения с экрана посредством перемещения всех пикс...

Страница 52: ...ются товарными знаками корпорации SRS Labs Inc Технология TruSurround HD использована по лицензии корпорации SRS Labs Inc Язык аудио только для цифровых каналов Можно изменить установленный по умолчанию язык аудио Отображение сведений о языке входящего потока Можно выбрать язык только среди языков на которых транслируются программы Аудиоформат MPEG Dolby Digital только для цифровых каналов При выв...

Страница 53: ...ный HDMI Динамик ТВ Выход громкоговорителя Вывод звука Внешний громкогов Отключение звука Вывод звука Отсутствие видеосигнала Отключение звука Отключение звука Сброс настроек звука Сброс все Сброс реж звука Отмена Можно восстановить заводские настройки по умолчанию для параметров звука N N Выбор режима звука При выборе параметра Двойной l ll на экране отобразится текущий режим звука Тип отображени...

Страница 54: ...мый для установки телевизора Перед отображением экрана настройки появится экран для ввода PIN кода Введите 4 значный PIN код По умолчанию на новом телевизоре установлен PIN код 0 0 0 0 Если вы забыли PIN код нажимайте кнопки пульта дистанционного управления в следующей последовательности для возвращения значения по умолчанию 0 0 0 0 POWER Выкл M MUTE 8 2 4 POWER Вкл Родит блокировка С помощью этой...

Страница 55: ...сокий Можно настроить звук мелодии включения выключения питания телевизора Мелодия не воспроизводится Когда звук не воспроизводится на телевизоре поскольку нажата кнопка MMUTE Когда звук на телевизоре не воспроизводится поскольку нажата кнопка громкость Когда телевизор выключается с Таймер сна таймера Экон энергии С помощью этой функции настраивается яркость телевизора для снижения потребления эне...

Страница 56: ... различные настройки параметра Вкл Выкл Таймер Время вкл Установка часов минут и включение отключение Чтобы включить таймер с выбранными параметрами задайте значение Активный Время выкл Установка часов минут и включение отключение Чтобы включить таймер с выбранными параметрами задайте значение Активный Громкость Установка необходимого уровня громкости Антенна Выберите ATV или DTV Канал выберите не...

Страница 57: ...ресивер Игра Камера ПК DVI PC DVI Поиск USB Blu ray HD DVD DMA Если к порту HDMI IN 2 DVI подключен компьютер с разрешением PS42B430P 640 x 480 при частоте 60 Гц PS50B430P 1280 x 720 при частоте 60 Гц необходимо выбрать для режима HDMI2 DVI значение ПК в поле Редактир назв режима Вход N N O Список источн Редактир назв Вход Экран компьютера Установка программного обеспечения компьютера на основе Wi...

Страница 58: ...9 70 086 25 175 720 x 400 31 469 70 087 28 322 MAC 640 x 480 35 000 66 667 30 240 832 x 624 49 726 74 551 57 284 VESA DMT 640 x 480 31 469 59 940 25 175 37 861 72 809 31 500 37 500 75 000 31 500 800 x 600 37 879 60 317 40 000 48 077 72 188 50 000 46 875 75 000 49 500 1024 x 768 48 363 60 004 65 000 56 476 70 069 75 000 60 023 75 029 78 750 1360 x 768 47 712 60 015 85 500 VESA CVT 720 x 576 35 910 ...

Страница 59: ...Не отсоединяйте питание и не извлекайте диск USB когда выполняется обновление После завершения обновления микропрограммы телевизор автоматически выключится и снова включится После выполнения обновления проверьте версию микропрограммы По завершении обновления для всех настроек видео и аудио будут восстановлены значения по умолчанию заводские Рекомендуется записывать свои настройки чтобы их можно бы...

Страница 60: ...ку дважды чтобы наложить телетекст на изображение на телеэкране 7 1 дополнительная страница Используется для отображения доступной дополнительной страницы 8 2 страница вверх Используется для отображения следующей страницы телетекста 9 3 страница вниз Используется для отображения предыдущей страницы телетекста 0 0 режим Нажмите чтобы выбрать режим телетекста LIST FLOF При выборе режима LIST устанав...

Страница 61: ...ьку это может привести к повреждению продукта или быть причиной его падения что может повлечь за собой получение травмы Samsung не несет ответственности за подобные несчастные случаи Samsung не несет ответственности за повреждение продукта или получение травм при использовании настенного крепления не соответствующего стандартам VESA или не предназначенного для этих целей а также в случае несоблюде...

Страница 62: ... в зажимы и надежно закрепите их настене Убедитесь что винты надежно закреплены встене В зависимости от типа стены может потребоватьсядополнительный материал например дюбель Поскольку необходимые зажимы винты и тросне входят в комплект поставки их необходимоприобретать отдельно 2 Удалите винты из середины задней панели телевизора вставьте винты в зажимы затем снова закрепите винты на телевизоре Ви...

Страница 63: ... к другой сетевой розетке Размытое или рябящее изображение и искаженный звук Проверьте направление месторасположение и подключение своей антенны Помехи часто возникают при использовании комнатной антенны Неисправности в работе пульта дистанционного управления Замените батареи в пульте дистанционного управления Почистите верхнюю грань пульта дистанционного управления окно передачи сигнала Проверьте...

Страница 64: ...ес Корпус С подставкой 24 kg 28 kg 31 kg 35 kg Условия окружающей среды Рабочая температура Относительная влажность при работе Температура хранения Влажность воздуха в помещении для хранения От 50 F до 104 F от 10 C до 40 C 10 80 без конденсации От 4 F до 113 F от 20 C до 45 C 5 95 без конденсации Данное устройство является цифровым устройством класса В Конструкция и характеристики устройства могу...

Отзывы: