background image

1-3

Major Safety Precautions

 Caution

Installation Related 

 Warning

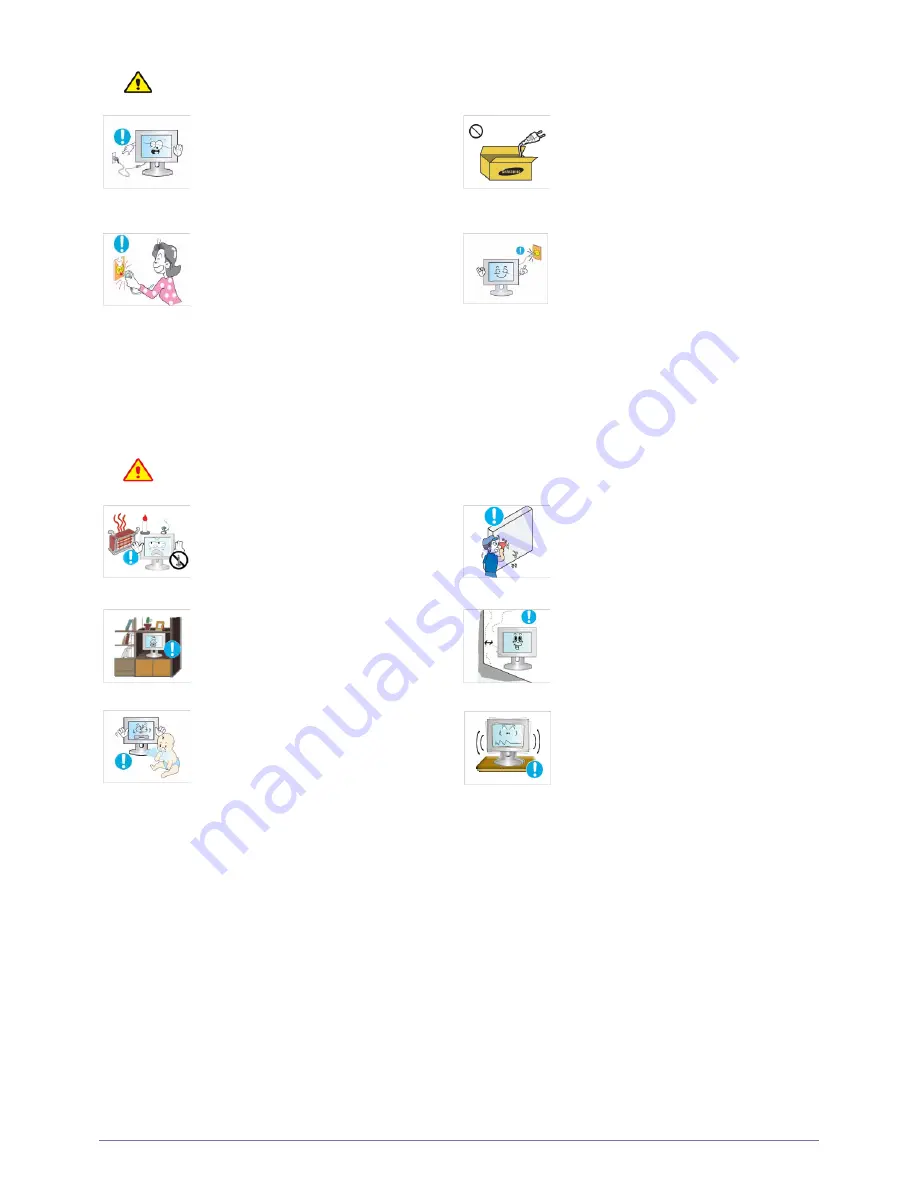
Avoid unplugging the power plug while the 
product is operating.

Otherwise, it may damage the product 
due to electric shock.

Make sure to use only the power cord sup-
plied by our company. In addition, do not 
use the power cord of another electric appli-
ance. 

Otherwise, it may result in electric shock 
or fire. 

When unplugging the power plug from the 
wall outlet, make sure to hold it by the plug 
and not by the cord. 

Otherwise, it may result in electric shock 
or fire. 

Connect the power plug to a wall outlet that 
can be easily reached. 

When a problem occurs with the 
product, you must unplug the power 
plug to cut the power off completely. You 
cannot cut the power off completely 
using only the power button on the 
product. 

Avoid placing burning candles, mosquito-
repellent or cigarettes on the product and 
installing the product near a heater. 

Otherwise, it may result in fire.

Ask an installation engineer or relevant 
company to install the product onto the wall.

Otherwise, it may result in injury. 

Make sure to use the specified wall 
mount.

Avoid installing the product in a badly-venti-
lated location such as inside a bookshelf or 
closet.

Otherwise, it may result in fire due to 
internal over-heating.

Keep a distance of at least 10 cm from the 
wall when installing the product for ventila-
tion.

Otherwise, it may result in fire due to 
internal over-heating.

Keep the plastic bags used to pack the 
product away from children.

If children place the plastic bags over 
their heads, they may suffocate.

Avoid installing the product in a location that 
is unstable or exposed to excessive vibra-
tions such as on an unstable or slanted 
shelf.

The product may fall and this may result 
in damage to the product or injury.

If you use the product in a location 
exposed to excessive vibrations, it may 
result in a problem with the product or 
fire.

Содержание SyncMaster Magic P2570

Страница 1: ...SyncMaster XL2370 P2570 LCD Monitor User Manual The appearance and the color may differ depending on the model...

Страница 2: ......

Страница 3: ...DUCT Setting the Optimal Resolution 3 1 Standard Signal Mode Table 3 2 Installing the Device Driver 3 3 Product Operating Buttons 3 4 Using the Screen Adjustment Menu OSD On Screen Display 3 5 INSTALL...

Страница 4: ......

Страница 5: ...y form without the written permission of Samsung Electronics Co Ltd The SAMSUNG logo and SyncMaster are the registered trademarks of Samsung Electronics Co Ltd Microsoft Windows and Windows NT are the...

Страница 6: ...olution x 3 Example If the maximum resolution is 1680 x 1050 the number of sub pixels is 1680 x 1050 x 3 5 292 000 Clean the product with a soft dry cloth Do not clean the product with an inflammable...

Страница 7: ...ay result in electric shock or fire Avoid connecting multiple electric appli ances to a single wall outlet Otherwise it may result in fire due to overheating of the wall outlet Avoid plugging in or un...

Страница 8: ...es on the product and installing the product near a heater Otherwise it may result in fire Ask an installation engineer or relevant company to install the product onto the wall Otherwise it may result...

Страница 9: ...ke sure that the front of the product does not protrude out of the console or shelf Otherwise this may cause the product to fall off and result in a malfunction or injury Make sure to use a cabinet or...

Страница 10: ...ns ing cloth Use the cleansing cloth with a small amount of water However if the cloth is contaminated by alien substances it may result in scratches to the exterior therefore shake off any alien subs...

Страница 11: ...ting metal objects such as a chopsticks coins or hairpins or inflamma ble objects into the product the vents ports etc If water or an alien substance enters the product turn the power off unplug the p...

Страница 12: ...ewing the prod uct screen for long periods of time This will alleviate any eye strain Since the display panel is hot after using it for a long time do not touch the product Keep small accessories away...

Страница 13: ...been included Store the packaging box in case you need to move the Product at a later stage Monitor The cleaning cloth is supplied with black high glossy models only CONTENTS Installation Manual Produ...

Страница 14: ...heck if the Stand Connector is firmly connected Turn the connecting screw at the bottom of the stand fully so that it is completely fixed Place a soft cloth over the table to protect the product and p...

Страница 15: ...Installing the Product 2 2 Caution Avoid lifting the product holding only the stand...

Страница 16: ...and place the product onto the cloth so that the front of the product faces downwards Hold the main body of the product with your hand as shown by the figure Pull the stand in the direction of the ar...

Страница 17: ...A to D Sub cable When the graphics card provides DVI Digital output Connect the DVI IN port of the product to the DVI port of the PC with the DVI cable 2 Connect one end of the power cord to the DC A...

Страница 18: ...t using the HDMI cable 2 Connect a speaker to the AUDIO OUT port of the product This product won t make any sound when only the HDMI cable is connected without a speaker connected When all the connect...

Страница 19: ...OUT terminal of your monitor to the optical input of your amplifier using an optical cable If no sound is emitted from the monitor you need to use an amplifier For information on how to connect a spea...

Страница 20: ...r for more information refer to the User Manual supplied with the locking device You have to purchase an additional locking device Locking the product 1 Insert the locking part of the locking device i...

Страница 21: ...message appears up to 3 times if the resolution has not been set to the optimal resolution To set the resolution to the optimal resolution When the PC is turned off connect the product and the PC and...

Страница 22: ...ken to scan one line from the left most position to the right most position on the screen is called the horizontal cycle and the reciprocal of the horizontal cycle is called the horizontal frequency T...

Страница 23: ...or Samsung Electronics website http www samsung com and download the driver 1 Insert the driver installation CD ROM into the CD ROM drive 2 Click on Windows Driver 3 Select the model of your product f...

Страница 24: ...d to the Use these buttons to navigate the menu or to adjust a value in the OSD Users can set the Customized Key to one of the following functions If the user presses the Customized Key after setting...

Страница 25: ...this button to turn the product on or off The buttons on the right of the product are touch type buttons Touch the buttons lightly with your finger Power LED This LED is turned on when the product wo...

Страница 26: ...Off Off Timer Setting Auto Source PC AV Mode Display Time Customized Key INFORMA TION PC signals AV signals MENU DESCRIPTION Brightness Controls the screen brightness This menu is unavailable when Ma...

Страница 27: ...or has four automatic picture settings Custom Dynamic Standard and Movie that are preset at the factory You can activate either Custom Dynamic Standard or Movie You can select Custom which automatical...

Страница 28: ...When a DVD or set top box is connected to your TV via HDMI it may cause a degradation in the screen quality such as an increase in the black level a low contrast or discoloration etc depending on the...

Страница 29: ...color value of pictures according to your preference This menu is unavailable when MagicColor is set to Full mode or Intelligent mode Color Tone You can set the color temperature according to your pr...

Страница 30: ...set to the optimal resolution the aspect ratio does not change whether the Image Size is set to Auto or Wide AV signals 4 3 Displays pictures at the 4 3 aspect ratio 16 9 Displays pictures at the 16...

Страница 31: ...s reached Auto Source Auto The monitor automatically selects an input signal Manual Users have to manually select an input signal PC AV Mode Set to PC when connected to a PC Set to AV when connected t...

Страница 32: ...e displayed colors on the product and matches the colors on the product with the colors of the printed pictures For more information refer to the online help of the software F1 The Natural Color is pr...

Страница 33: ...nstallation The MagicTune icon may not appear depending on the computer system and the product specifications If the shortcut icon does not appear press the F5 key Restrictions and Problems with the I...

Страница 34: ...tware 5 Select Yes to start removing MagicTune 6 Wait until a message box appears informing you that the software has been removed completely For technical support the FAQ frequently asked questions o...

Страница 35: ...not restart the computer after the installation The MultiScreen icon may not appear depending on the computer system and the product specifications If the shortcut icon does not appear press the F5 k...

Страница 36: ...d the PC are properly connected perform the self diagnosis function according to the procedures below 1 Turn the product and the PC off 2 Separate the D Sub cable from the product 3 Turn the product o...

Страница 37: ...while using a PC the screen may not be displayed because some graphics cards do not output the video signal In this case reboot the PC while the DVI cable is connected THE ON SCREEN ADJUSTMENT MENU OS...

Страница 38: ...tall the device driver referring to the descriptions about the driver installation Check if all the Plug Play VESA DDC functions are sup ported referring to the User Manual of the graphics card Instal...

Страница 39: ...tings Windows ME 2000 Change the resolution by selecting Con trol Panel Display Settings For more information refer to the User Manual of the com puter or the graphics card How can I use the power sav...

Страница 40: ...tion 1920 x 1080 60 Hz 1920 x 1080 60 Hz Input Signal Terminated DVI I Analog Digital HDMI Audio Out Optical Out 0 7 Vp p 5 Separate H V sync Composite TTL Level V high 2 0 V V low 0 8 V Maximum Pixel...

Страница 41: ...er saving mode the power is not turned off and you can turn the screen on again by pressing any key or clicking the mouse However the power saving function only works when the product is connected to...

Страница 42: ...1 800 299 0013 http www samsung com latin HONDURAS 800 7919267 http www samsung com latin JAMAICA 1 800 234 7267 http www samsung com latin NICARAGUA 00 1800 5077267 http www samsung com latin PANAMA...

Страница 43: ...67864 http www samsung com uk CIS ESTONIA 800 7267 http www samsung com ee LATVIA 8000 7267 http www samsung com lv LITHUANIA 8 800 77777 http www samsung com lt KAZAKHSTAN 8 10 800 500 55 500 http ww...

Страница 44: ...samsung com sg THAILAND 1800 29 3232 02 689 3232 http www samsung com th TAIWAN 0800 329 999 http www samsung com tw VIETNAM 1 800 588 889 http www samsung com vn MIDDLE EAST AFRICA SOUTH AFRICA 0860...

Страница 45: ...possible harm to the environment or human health from uncontrolled waste disposal please sepa rate these items from other types of waste and recycle them responsibly to promote the sustainable reuse...

Страница 46: ...6 4 More Information...

Отзывы: