background image

Great user manuals database on 

UserManuals.info

78

INFORMATION Menu and Others

8

8 INFORMATION Menu and Others

8.3

Configuring Volume in the Startup Screen

Adjust 

Volume

 using the [

] button in the startup screen where there is no on screen display menu 

available. 


Only available in 

HDMI

 mode.


1

Press [

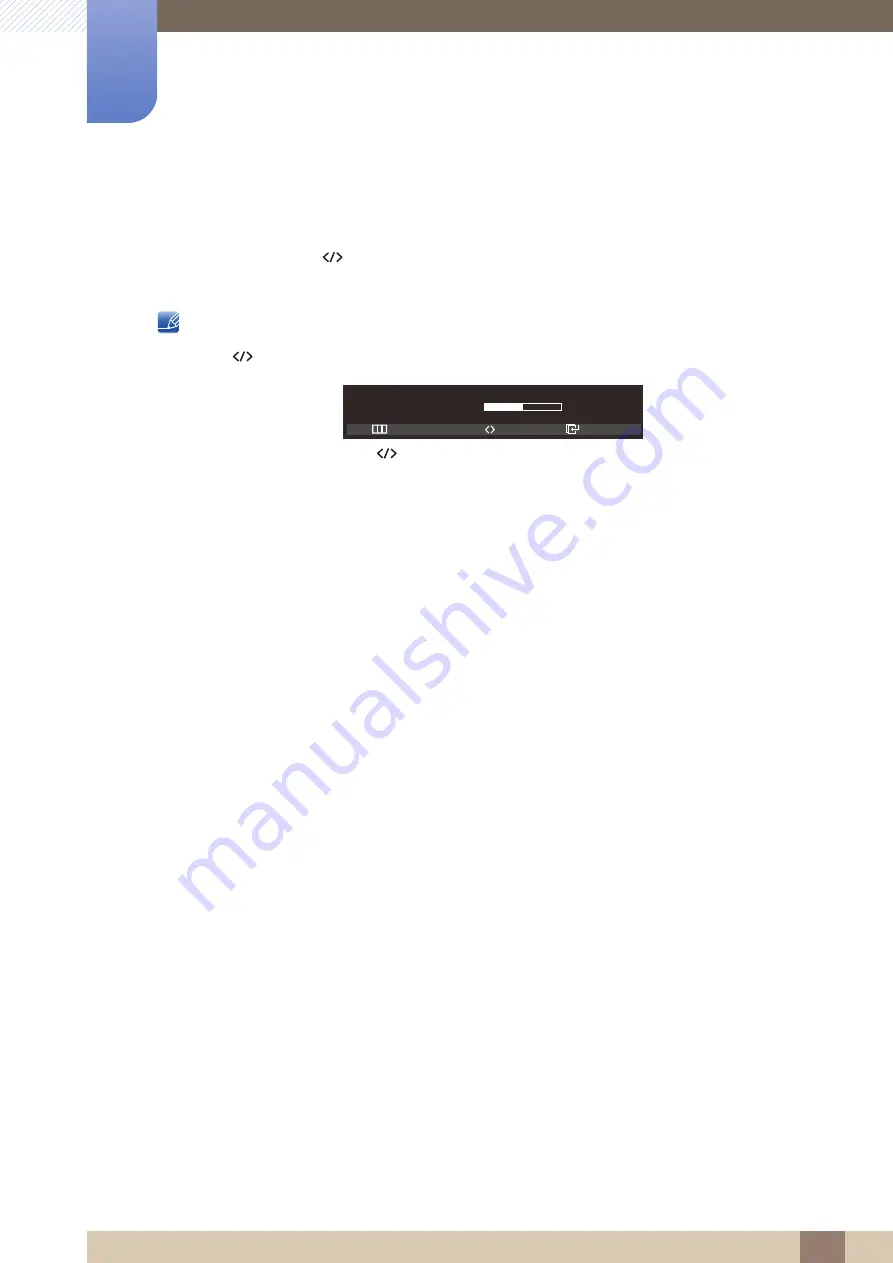
] in the startup screen. The following screen will appear.

2

Adjust the 

Volume

 using the [

] button.

Volume

50

Exit

Enter

Adjust

Содержание SyncMaster C23A750X

Страница 1: ...ase on UserManuals info User Manual C23A750X C27A750X The color and the appearance may differ depending on the product and the specifications are subject to change without prior notice to improve the performance BN46 00037F 01 ...

Страница 2: ...trademarks of Samsung Electronics Microsoft Windows and Windows NT are registered trademarks of Microsoft Corporation VESA DPM and DDC are registered trademarks of the Video Electronics Standards Association Icons used in this manual Symbols for safety precautions The following images are for reference only Real life situations may differ from what is shown in the images Warning A serious or fatal...

Страница 3: ...he monitor Hold the power cable by the plug and do not touch the cable with wet hands Otherwise an electric shock may result 3 Wipe the monitor with a clean soft and dry cloth z Do not apply a cleaning agent that contains alcohol solvent or surfactant to the monitor z Do not spray water or detergent directly on the product 4 Wet a soft and dry cloth in water and wring thoroughly to clean the exter...

Страница 4: ...se in the internal temperature The appearance may differ depending on the product Precautions for storage High glossy models can develop white stains on the surface if an ultrasonic wave humidifier is used nearby Be sure to contact Samsung Customer Service Center page89 if the inside of the monitor needs cleaning service fee will be charged Safety Precautions Electricity and Safety The following i...

Страница 5: ...lt Insert the power plug all the way in so it is not loose z An unstable connection may cause a fire Connect the power plug to a grounded power socket type 1 insulated devices only z An electric shock or injury may result Do not bend or pull the power cord with force Do not weigh the power cord down with a heavy object z A damaged power cord may cause an electric shock or fire Do not place the pow...

Страница 6: ...g the power cable to completely cut the power to the product Power to the product cannot be completely cut off with the power button Hold the plug when disconnecting the power cord from the power socket z An electric shock or fire may result DO NOT PLACE CANDLES INSECT REPELLANTS OR CIGARETTES ON TOP OF THE PRODUCT DO NOT INSTALL THE PRODUCT NEAR HEAT SOURCES z Otherwise a fire may result Avoid in...

Страница 7: ...esult Do not expose the product to direct sunlight heat or a hot object such as a stove z Otherwise the product lifespan may be reduced or a fire may result Do not install the product within the reach of young children z The product may fall and injure children Take care not to drop the product when moving it z Otherwise product failure or personal injury may result Do not set down the product on ...

Страница 8: ...fy the product on your own z An electric shock or fire may result Contact Samsung Customer Service Center page89 for repair Before you move the product be sure to turn off the power switch and remove all the cables connected to the product including the power cord and the antenna cable z Otherwise the power cord may be damaged and a fire or electric shock may result If the product generates a stra...

Страница 9: ...d or any cable z Otherwise the power cable may be damaged and product failure an electric shock or fire may result If a gas leakage is found do not touch the product or power plug Also ventilate the area immediately z Sparks can cause an explosion or fire z During a lightning or thunderstorm do not touch the power cord or antenna cable Do not lift or move the product by the power cord or any cable...

Страница 10: ...er cord and contact Samsung Customer Service Center page89 z Product failure an electric shock or fire may result Leaving the screen fixed on a stationary image for an extended period of time may cause afterimage burn in or defective pixels z If you are not going to use the product for an extended period of time activate power saving mode or a moving picture screen saver Disconnect the power cord ...

Страница 11: ...p the DC power adapter in a well ventilated area Looking at the screen too close for an extended period of time can deteriorate your eyesight Do not hold the monitor upside down or move it by holding the stand z The product may fall and break or cause a personal injury Do not use humidifiers or stoves around the product z An electric shock or fire may result Rest your eyes for more than 5 minutes ...

Страница 12: ...ilure or personal injure may result Use the product in the correct posture as follows z Straighten your back z Allow a distance of 45 to 50cm between your eye and the screen and look slightly downward at the screen Keep your eyes directly in front of the screen z Adjust the angle so light does not reflect on the screen z Keep your forearms perpendicular to your upper arms and level with the back o...

Страница 13: ...t PREPARATIONS 18 Checking the Contents 18 Removing the Packaging 19 Checking the Components 21 Parts 21 Frontal Buttons 23 Reverse Side 24 Left Side View 25 Right Side View 26 Adjusting the Product Tilt and Height USING CENTRAL STATION 27 About Central Station 27 Software Installation for Using Central Station 27 Installing SAMSUNG Central Station Setup 28 Connecting the Product to a PC to Use Ce...

Страница 14: ...1 Connecting and Using a PC 41 Connecting to a PC 43 Driver Installation 44 Setting Optimum Resolution 45 Changing the Resolution Using a PC 48 Connecting to a Video Device 48 Connection Using an HDMI Cable 48 Connecting Headphones SCREEN SETUP 49 MAGIC 49 SAMSUNG MAGIC Angle 50 SAMSUNG MAGIC Bright 51 Configuring SAMSUNG MAGIC Color 52 Brightness 52 Configuring Brightness 53 Contrast 53 Configuri...

Страница 15: ...e 58 Configuring Blue 59 Color Tone 59 Configuring the Color Tone Settings 60 Gamma 60 Configuring Gamma RESIZING OR RELOCATING THE SCREEN 61 Auto Adjustment 61 Configuring the Auto Adjustment Settings 61 Size 61 Changing the Picture Size 62 Horizontal Position 62 Configuring H Position 63 Vertical Position 63 Configuring V Position 64 Menu H Position 64 Configuring Menu H Position 65 Menu V Posit...

Страница 16: ... Menu Transparency 71 Changing Menu Transparency 71 Language 71 Changing the Language 72 PC AV Mode 72 Configuring PC AV Mode 73 Auto Source 73 Configuring Auto Source 73 Display Time 73 Configuring Display Time 74 Key Repeat Time 74 Configuring Key Repeat Time 75 Off Timer On Off 75 Configuring Off Timer On Off 75 Off Timer Setting 75 Configuring Off Timer Setting 76 Reset 76 Initializing Setting...

Страница 17: ...uring HUB in the Initial Screen TROUBLESHOOTING GUIDE 80 Requirements Before Contacting Samsung Customer Service Center 80 Testing the Product 80 Checking the Resolution and Frequency 80 Check the followings 83 Q A SPECIFICATIONS 85 General 86 PowerSaver 87 Standard Signal Mode Table 88 PC Dongle Specification UWB Ultra Wide Band APPENDIX 89 Contact SAMSUNG WORLDWIDE 91 Terminology INDEX ...

Страница 18: ...t to damage the product when you open the packaging with a sharp instrument 2 Remove the Styrofoam from the product 3 Check the components and remove the Styrofoam and plastic bag z The appearance of actual components may differ from the image shown z This image is for reference only 4 Store the box in a dry area so that it can be used when moving the product in the future ...

Страница 19: ... shown Components z Components may differ in different locations z The cleaning cloth is only supplied with the black high glossy model USB gender changer When the wireless connection dongle cannot connect to your notebook PC connect it using the USB gender changer Quick Setup Guide Warranty Card Not available In some locations User Manual Wireless Connection Dongle Power cable DC power adapter US...

Страница 20: ...Great user manuals database on UserManuals info 20 Preparations 1 1 Preparations Items sold separately The following items can be purchased at your nearest retailer LAN cable HDMI DVI cable USB cable ...

Страница 21: ...is is a touch type button Tap the button lightly with a finger z The printed board assembly PBA inside this product may heat the stand A hot stand does not indicate a problem with the product z If the MENU button is not visible lightly tap the area around the button The MENU button will become visible z The onscreen display menu only appears when the MENU button light is lit z The lit MENU button ...

Страница 22: ...aver for details about the power saving function z To reduce power consumption it is best to remove the power cable when you will not be using the product for an extended period of time Confirm a menu selection Pressing the button when the OSD menu is not displayed will change the input source Analog HDMI Wireless USB USB If you power on the product or change the input source by pressing the butto...

Страница 23: ... shape of parts may differ from what is shown Specifications are subject to change without notice to improve quality Port Description Connects to a PC using the D SUB cable Connects to a network using the LAN cable Connects to a PC via a USB cable This port can only connect to a PC Connects to the DC power adapter ...

Страница 24: ...to change without notice to improve quality Port Description Connects to an audio output device such as headphones HDMI IN Connects to a source device using an HDMI cable Connects to a source device via a USB cable Compatible with a USB cable version 3 0 or lower z The USB 3 0 port is blue in color z If 1 Port is selected for USB Super Charging only the port is enabled HDMI IN 2 1 2 1 1 ...

Страница 25: ...ight Side View The color and shape of parts may differ from what is shown Specifications are subject to change without notice to improve quality Port Description Connects to a source device via a USB cable Compatible with a USB cable version 2 0 or lower The USB 2 0 port is black in color ...

Страница 26: ...sting the Product Tilt and Height The color and shape of parts may differ from what is shown Specifications are subject to change without notice to improve quality z The monitor tilt and height can be adjusted z Hold the top center of the product and adjust the tilt carefully 100 52 30 2 5 52 ...

Страница 27: ...ted number of input output ports In particular the high tech Wireless USB feature allows you to connect a notebook PC to the product wirelessly and from the product enjoy various multimedia contents stored on the notebook PC You can also use triple monitors by configuring the display settings 2 2 Software Installation for Using Central Station Install on your PC the software provided with the prod...

Страница 28: ...nel and double click Add or Remove Programs on the PC Select Samsung Wireless Central Station and Samsung Wireless Monitor from the list and click Change Remove 2 3 Connecting the Product to a PC to Use Central Station Connect the product to a PC via Wireless USB and the USB cable Connecting the product and PC via Wireless USB and the USB cable will allow you to hear audio when you plug headphones...

Страница 29: ...n monitor different signals may output depending on the system specifications of the PC 2 3 1 Connecting to a PC via Wireless USB To use the Wireless USB function the wireless connection dongle provided as a component should be connected to the USB port on the PC The wireless connection dongle allows a wireless connection between the product and a PC The dongle connected to a PC should point at th...

Страница 30: ...degraded z Using the Central Station monitor on a steel table will degrade wireless performance z Do not place any object that can obstruct the signal transmission in front of the product Such objects may decrease signal reception z This product cannot connect to multiple PCs wirelessly at the same time and vice versa Connecting to a PC via Wireless USB 1 Install Samsung Central Station Setup on t...

Страница 31: ...reless between the product and PC z Set as default Give first priority to the product to connect to the PC once a Wireless signal is detected A star will appear beside the monitor icon if the product is set as the default monitor Ensure the wireless ID below Monitor device matches the wireless ID on the HUB menu screen Wireless ID is a unique ID assigned to a monitor The SAMSUNG Central Station Se...

Страница 32: ...Off press to switch to Wireless USB mode The Connecting to PC message will be displayed while connection is attempted Deactivating the Wireless USB mode will automatically restore the previous mode 2 3 2 Connecting to a PC via the USB Cable Connect the USB cable to on the back of the product and USB on the PC The product is compatible with a USB 2 0 cable However it is best to use a USB 3 0 cable ...

Страница 33: ...lowing you to connect multiple source devices to the USB ports on the product at the same time without connecting them to a PC z The product is compatible with a USB 2 0 cable However your PC should support USB 3 0 for the HUB function to work fully z If you experience a communication problem with a PC that provides the USB 3 0 function download and install the latest driver version from the PC ma...

Страница 34: ...evice to the blue USB 3 0 port on the left side of the product z Battery charging is available in power saving mode but not available when the product is powered off z Note that the battery will not be charged if the power cable is disconnected from the power socket Connect multiple source devices to the product and use the device you want by changing the input source 2 4 2 Connecting to a LAN Cen...

Страница 35: ... two devices are displayed a The user PC s network device b The Central Station monitor s network device USB to Ethernet adapter The two devices above refer to your PC s LAN network device and your Central Station monitor s network device To use the Internet using the Central Station monitor s LAN network configure the network settings as follows according to the type of IP you will be using 2 5 1...

Страница 36: ...on monitor s or notebook PC s LAN network ensure you insert a LAN cable into only one device Otherwise a system crash may occur Dynamic IP User 1 To use a dynamic IP address connect a LAN to your Central Station monitor 2 Next go to the network settings menu and activate the Central Station monitor s network device select Use Go to Control Panel Network and Internet Network and Sharing Center Chan...

Страница 37: ...r and generally is not used except under such special circumstances When using your Central Station monitor s or notebook PC s LAN network ensure you insert a LAN cable into only one device Otherwise a system crash may occur Static IP User 1 Set the LAN network for the notebook PC to Disable 2 Go to Control Panel Network and Internet Network and Sharing Center Change adapter settings Next right cl...

Страница 38: ...llowing message will appear A static IP must be allotted to only one network device The following message will appear if the same static IP is allotted to the network devices of both the notebook PC and Central Station monitor Ensure the network device that is not in use is set to Do not use Select No in the message window To use the notebook PC s LAN network set the Central Station monitor s netw...

Страница 39: ... Also for playing Game and Movie clips on Windows XP or VISTA is not supported 2 When Wireless USB USB Mode is used for first time or PC power saving mode is disconnected it may take some time to acknowledge for Wireless USB USB Mode 3 Either it is Wireless USB or USB Mode USB2 0 supported by PC we recommend to connect to USB2 0 port for USB HUB function black colored connector 4 When you use Wire...

Страница 40: ...kpoints z Before connecting a source device read the user manual provided with it The number and locations of ports on source devices may differ from device to device z Do not connect the power cable until all connections are completed Connecting the power cable during connection may damage the product z Check the types of ports at the back of the product you want to connect ...

Страница 41: ...ort on the back of the product and the RGB port on the PC 2 Connect the DC power adapter to the product and a power socket and turn on the power switch on the PC Audio is not available if the PC and product are connected via the D SUB port Connection Using an HDMI DVI Cable 1 Connect an HDMI DVI cable to the HDMI port on the side of the product and the DVI port on the PC 2 Connect the DC power ada...

Страница 42: ...ing an HDMI Cable Digital Type 1 Connect an HDMI cable to the HDMI port on the side of the product and the HDMI port on the PC 2 Connect the DC power adapter to the product and a power socket and turn on the power switch on the PC Be sure to connect an audio output device such as headphones or speakers to on the product to hear audio HDMI IN ...

Страница 43: ...the instructions given on the screen to proceed with installation 4 Select your product model from the list of models 5 Go to Display Properties and check that the resolution and refresh rate are appropriate Refer to your Windows OS manual for further details PC System Requirements for Using the Product Your Central Station monitor is designed for notebook PC users consider the following PC system...

Страница 44: ...and change the resolution to the optimum value 1 Press to move to the language you want and press the 2 To hide the information message press z If the optimum resolution is not selected the message will appear up to three times for a specified time even when the product is turned off and on again z The optimum resolution 1920 x 1080 can also be selected in Control Panel on your PC The optimal reso...

Страница 45: ...4 Changing the Resolution Using a PC z Adjust the resolution and refresh rate in Control Panel on your PC to obtain optimum picture quality z The picture quality of TFT LCDs may degrade if the optimum resolution is not selected Changing the Resolution on Windows XP Go to Control Panel Display Settings and change the resolution 1 2 3 ...

Страница 46: ... on UserManuals info 46 Connecting and Using a Source Device 3 3 Connecting and Using a Source Device Changing the Resolution on Windows Vista Go to Control Panel Personalization Display Settings and change the resolution 1 2 3 4 ...

Страница 47: ...abase on UserManuals info 47 Connecting and Using a Source Device 3 3 Connecting and Using a Source Device Changing the Resolution on Windows 7 Go to Control Panel Display Screen Resolution and change the resolution 1 2 3 4 ...

Страница 48: ...ection Using an HDMI Cable 1 Connect an HDMI cable to the HDMI ports on the product and video device 2 Press to change the input source to HDMI Be sure to connect an audio output device such as headphones or speakers to on the product to hear audio 3 4 Connecting Headphones z Connect an audio output device such as headphones or speakers to on the product Headphones will function properly if the pr...

Страница 49: ...h viewing angle z This option is not available when Bright is in Cinema or Dynamic Contrast mode z This option is not available when Color is enabled Configuring Angle 1 Press on the product 2 Press to move to Picture and press on the product 3 Press to move to MAGIC and press on the product 4 Press to move to Angle and press on the product The following screen will appear z Off Select this option...

Страница 50: ...is menu is not available when Angle is enabled z Sub options under Bright may vary depending on the settings of PC AV Mode See 7 5 PC AV Mode Configuring Bright 1 Press on the product 2 Press to move to Picture and press on the product 3 Press to move to MAGIC and press on the product 4 Press to move to Bright and press on the product The following screen will appear In PC mode z Adjusting Contras...

Страница 51: ...eye fatigue z Custom Customize the contrast and brightness as required 5 Press to move to the option you want and press the 6 The selected option will be applied 4 1 3 Configuring SAMSUNG MAGIC Color Color is a new picture quality improvement technology developed independently by Samsung which delivers vivid natural colors without picture quality degradation z This menu is not available when Angle...

Страница 52: ...nt and press the 6 The selected option will be applied 4 2 Brightness Adjust the general brightness of the picture Range 0 100 A higher value will make the picture appear brighter 4 2 1 Configuring Brightness 1 Press on the product 2 Press to move to Picture and press on the product 3 Press to move to Brightness and press on the product The following screen will appear 4 Adjust the Brightness usin...

Страница 53: ...o move to Contrast and press on the product The following screen will appear 4 Adjust the Contrast using the button 4 4 Sharpness Make the outline of objects more clear or blurry Range 0 100 A higher value will make the outline of objects clearer z This option is not available when Bright is in Cinema or Dynamic Contrast mode z This option is not available when Color is in Full or Intelligent mode...

Страница 54: ... in Analog mode 4 5 1 Adjusting Coarse 1 Press on the product 2 Press to move to Picture and press on the product 3 Press to move to Coarse and press on the product The following screen will appear 4 Adjust the Coarse using the button Return Enter Adjust PICTURE MAGIC Brightness Contrast Sharpness Coarse Fine Response Time 50 60 75 2200 0 Faster m Return Enter Adjust PICTURE MAGIC Brightness Contr...

Страница 55: ...ar 4 Adjust the Fine using the button 4 7 Response Time Accelerate the panel response rate to make video appear more vivid and natural z It is best to set Response Time to Normal or Faster when you are not viewing a movie z The functions available on the monitor may vary depending on the model Refer to the actual product 4 7 1 Configuring Response Time 1 Press on the product 2 Press to move to Pic...

Страница 56: ...ress to move to Picture and press on the product 3 Press to move to HDMI Black Level and press on the product The following screen will appear z Normal Set the brightness darkness of the darkest parts of the screen to Normal z Low Set the brightness darkness of the darkest parts of the screen to be darker than Normal 4 Press to move to the option you want and press the 5 The selected option will b...

Страница 57: ...mode 5 1 1 Configuring Red 1 Press on the product 2 Press to move to COLOR and press on the product 3 Press to move to Red and press on the product The following screen will appear 4 Adjust the Red using the button 5 2 Green Adjust the value of the color green in the picture Range 0 100 A higher value will increase the intensity of the color This option is not available when Color is in Full or In...

Страница 58: ...alue will increase the intensity of the color This option is not available when Color is in Full or Intelligent mode 5 3 1 Configuring Blue 1 Press on the product 2 Press to move to COLOR and press on the product 3 Press to move to Blue and press on the product The following screen will appear 4 Adjust the Blue using the button COLOR Red Green Blue Color Tone Gamma Mode1 50 50 Normal 50 Return Adj...

Страница 59: ...to move to Color Tone and press on the product The following screen will appear z Cool2 Set the color temperature to be cooler than Cool1 z Cool1 Set the color temperature to be cooler than Normal mode z Normal Display the standard color tone z Warm1 Set the color temperature to be warmer than Normal mode z Warm2 Set the color temperature to be warmer than Warm1 z Custom Customize the color tone 4...

Страница 60: ...en Angle is enabled 5 5 1 Configuring Gamma 1 Press on the product 2 Press to move to COLOR and press on the product 3 Press to move to Gamma and press on the product The following screen will appear 4 Press to move to the option you want and press the 5 The selected option will be applied m Return Enter Adjust COLOR Red Green Blue Color Tone Gamma Mode1 Mode2 Mode3 50 50 50 Normal ...

Страница 61: ... Analog mode 6 1 1 Configuring the Auto Adjustment Settings 1 Press on the product 2 Press to move to SIZE POSITION and press on the product 3 Press to move to Auto Adjustment and press on the product The following screen will appear 6 2 Size Change the picture size 6 2 1 Changing the Picture Size 1 Press on the product 2 Press to move to SIZE POSITION and press on the product 3 Press to move to I...

Страница 62: ... with the original aspect ratio without cutting off z PC AV Mode is only available in HDMI mode z H Position or V Position can be adjusted if Size is set to Screen Fit z Refer to 7 5 PC AV Mode for details about PC AV Mode 4 Press to move to the option you want and press the 5 The selected option will be applied 6 3 Horizontal Position Move the screen to the left or right z Only available in Analo...

Страница 63: ...ition can be adjusted if Size is set to Screen Fit 6 4 1 Configuring V Position 1 Press on the product 2 Press to move to SIZE POSITION and press on the product 3 Press to move to V Position and press on the product The following screen will appear 4 Adjust the V Position using the button Return Enter Adjust SIZE POSITION Auto Adjustment Image Size H Position V Position Menu H Position Menu V Posi...

Страница 64: ... 6 5 1 Configuring Menu H Position 1 Press on the product 2 Press to move to SIZE POSITION and press on the product 3 Press to move to Menu H Position and press on the product The following screen will appear 4 Adjust the Menu H Position using the button m Return Enter Adjust SIZE POSITION Auto Adjustment Image Size H Position V Position Menu H Position Menu V Position 10 Wide 50 50 50 ...

Страница 65: ...1 Configuring Menu V Position 1 Press on the product 2 Press to move to SIZE POSITION and press on the product 3 Press to move to Menu V Position and press on the product The following screen will appear 4 Adjust the Menu V Position using the button m Return Enter Adjust SIZE POSITION Auto Adjustment Image Size H Position V Position Menu H Position Menu V Position Wide 50 50 50 10 ...

Страница 66: ...and press on the product The following screen will appear z Off Deactivate the auto wireless detection mode z On Automatically detect a Wireless USB signal and change the input source to Wireless USB mode 5 Press to move to the option you want and press the 6 The selected option will be applied 7 1 2 Wireless Connection You can view the status of the Wireless USB connection between the product and...

Страница 67: ...rce is not USB mode z Selecting the USB Connection option when a USB cable is connected will change the input source to USB mode Configuring USB Connection 1 Press on the product 2 Press to move to SETUP RESET and press on the product 3 Press to move to HUB and press on the product A message will appear indicating that a USB cable is connected or disconnected 4 If a USB cable is connected press to...

Страница 68: ...ed 4 If an analog cable is connected press to move to Analog and press The input source will change to Analog mode 7 1 5 HDMI You can view the HDMI connection status between the product and an AV device z The connection status will be shown even when the input source is not HDMI mode z Selecting the HDMI option when an HDMI cable is connected will change the input source to HDMI mode Configuring H...

Страница 69: ...rging and press on the product The following screen will appear z Off Disable USB Super Charging z 1 Port Enable a single USB 3 0 port marked with a charging icon for quick battery charging Quick battery charging is available only through one USB 3 0 port it is found on the left side and is the port closest to you when facing the front of the monitor z 2 Ports Enable two USB 3 0 ports for quick ba...

Страница 70: ...product to save energy 7 2 1 Configuring Eco Saving 1 Press on the product 2 Press to move to SETUP RESET and press on the product 3 Press to move to Eco Saving and press on the product The following screen will appear z 75 Reduce the power consumption of the product to 75 z 50 Reduce the power consumption of the product to 50 z Off Deactivate power saving mode 4 Press to move to the option you wa...

Страница 71: ...ing screen will appear 4 Press to move to the option you want and press the 5 The selected option will be applied 7 4 Language Set the menu language z A change to the language setting will only be applied to the onscreen menu display z It will not be applied to other functions on your PC 7 4 1 Changing the Language 1 Press on the product 2 Press to move to SETUP RESET and press on the product m Re...

Страница 72: ... 1 Configuring PC AV Mode 1 Press on the product 2 Press to move to SETUP RESET and press on the product 3 Press to move to PC AV Mode and press on the product The following screen will appear 4 Press to move to the option you want and press the 5 The selected option will be applied Return Enter Move SETUP RESET ଞ HUB Eco Saving Menu Transparency Language PC AV Mode Auto Source Display Time HXWVFK...

Страница 73: ...select an input source 4 Press to move to the option you want and press the 5 The selected option will be applied 7 7 Display Time Set the on screen display OSD menu to automatically disappear if the menu is not used for a specified period of time Display Time can be used to specify the time after which you want the OSD menu to disappear 7 7 1 Configuring Display Time 1 Press on the product 2 Pres...

Страница 74: ...to SETUP RESET and press on the product 3 Press to move to Key Repeat Time and press on the product The following screen will appear z Acceleration 1 sec or 2 sec can be selected If No Repeat is selected a command responds only once when a button is pressed 4 Press to move to the option you want and press the 5 The selected option will be applied Return Enter Adjust SETUP RESET Off On English HUB ...

Страница 75: ...uct does not power off automatically z On Activate the off timer so that the product powers off automatically 4 Press to move to the option you want and press the 5 The selected option will be applied 7 10 Off Timer Setting The off timer can be set within a range of 1 to 23 hours The product will automatically power off after the specified number of hours This option is only available when Off Tim...

Страница 76: ...1 Initializing Settings Reset 1 Press on the product 2 Press to move to SETUP RESET and press on the product 3 Press to move to Reset and press on the product The following screen will appear 4 Press to move to the option you want and press the 5 The selected option will be applied SETUP RESET Acceleration On Key Repeat Time Off Timer On Off Off Timer Setting Reset 10 h Adjust Enter Return m SETUP...

Страница 77: ...ON The current input source frequency and resolution will appear 8 2 Configuring Brightness in the Startup Screen Adjust Brightness using the button in the startup screen where there is no on screen display menu available 1 Press in the startup screen The following screen will appear 2 Adjust the Brightness using the button m SETUP RESET Analog 48 2kHz 60Hz NN 1024 x 768 Exit Enter Adjust PICTURE ...

Страница 78: ...ers 8 3 Configuring Volume in the Startup Screen Adjust Volume using the button in the startup screen where there is no on screen display menu available Only available in HDMI mode 1 Press in the startup screen The following screen will appear 2 Adjust the Volume using the button Volume 50 Exit Enter Adjust ...

Страница 79: ...e stand when the initial screen that displays no OSD menu is displayed 1 Press the button when the initial screen is displayed You can configure the settings for Auto Wireless Detection Wireless Connection USBConnection Analog HDMI or USB Super Charging You can also view the wireless ID Wireless ID 2 Configure the settings as required using the buttons Refer to 7 1HUB for further details on how to...

Страница 80: ...essage appears the product is working normally If the screen remains blank check the PC system video controller and cable 9 1 2 Checking the Resolution and Frequency For a mode that exceeds the supported resolution refer to 10 3 Standard Signal Mode Table the message Not Optimum Mode will appear for a short time 9 1 3 Check the followings Installation issue PC mode The screen keeps switching on an...

Страница 81: ...for the PC are within the range of resolution and frequency compatible with the product and if required change the settings referring to Standard Signal Mode Table page87 in this manual and the INFORMATION menu on the product There are shadows or ghost images left on the screen The screen is too bright The screen is too dark Adjust Brightness page52 and Contrast page53 Screen color is inconsistent...

Страница 82: ... is too low Adjust the volume If the volume is still low after turning it up to the maximum level adjust the volume on your PC sound card or software program Source device issue A beeping sound is heard when my PC is booting If a beeping sound is heard when your PC is booting have your PC serviced Sound issue ...

Страница 83: ...t Refresh rate under Monitor settings z Windows ME 2000 Select Control Panel Display Settings Advanced Monitor and adjust Refresh rate under Monitor settings z Windows Vista Select Control Panel Appearance and Personalization Personalization Display Settings Advanced Settings Monitor and adjust Refresh rate under Monitor settings z Windows 7 Select Control Panel Appearance and Personalization Disp...

Страница 84: ...djust the resolution z Windows 7 Go to Control Panel Appearance and Personalization Display Adjust Resolution and adjust the resolution How do I set power saving mode z Windows XP Set power saving mode in Control Panel Appearance and Themes Display Screen Saver Settings or BIOS SETUP on the PC z Windows ME 2000 Set power saving mode in Control Panel Display Screen Saver Settings or BIOS SETUP on t...

Страница 85: ...MI D sub Dimensions W x H x D Weight 550 4 x 433 9 x 232 8 mm 21 7 x 17 1 x 9 2 inches 4 4 kg 9 7 Ibs 638 6 x 485 4 x 232 8 mm 25 1 x 19 1 x 9 2 inches 5 2 kg 11 5 Ibs Environme ntal considerat ions Operating Operating Temperature 50 F 104 F 10 C 40 C Humidity 10 80 non condensing Storage Operating Temperature 4 F 140 F 20 C 60 C Humidity 5 95 non condensing Plug and Play This monitor can be insta...

Страница 86: ...ng function C23A750X C27A750X z The displayed power consumption level can vary in different operating conditions or when settings are changed z To reduce the power consumption to 0 watts turn off the power switch on the back of the product or disconnect the power cable Be sure to disconnect the power cable when you will not be using the product for an extended period of time To reduce the power co...

Страница 87: ...eferring to the graphics card user manual z Horizontal Frequency The time required to scan a single line from the left to the right side of the screen is called a horizontal cycle The reciprocal number of a horizontal cycle is called horizontal frequency Horizontal frequency is measured in kHz z Vertical Frequency Repeating the same picture dozens of times per second allows you to view natural pic...

Страница 88: ...equency Range 3 1GHz 10 6Ghz Operating 3 16GHz 8 97Ghz BG1 BG2 BG6 Security AES128 Data Rate 53 3 to 480 Mbps Sensitivity Output Power Transmitted signal PSD 41 3 dBm MHz Regulatory limit is 41 3dBm Mhz Power Consumption 1 18Watt Typical Receiving 4095 length packet TFC1 Band Group 3 480 Mbps Supported Models C24A650X C27A650X C24A650U C27A650U C23A750X C27A750X Dimension 7 mm x 19 mm x 24 5 mm ...

Страница 89: ...tp www samsung com COSTA RICA 0 800 507 7267 http www samsung com DOMINICA 1 800 751 2676 http www samsung com ECUADOR 1 800 10 7267 http www samsung com EL SALVADOR 800 6225 http www samsung com GUATEMALA 1 800 299 0013 http www samsung com HONDURAS 800 27919267 http www samsung com JAMAICA 1 800 234 7267 http www samsung com NICARAGUA 00 1800 5077267 http www samsung com PANAMA 800 7267 http www...

Страница 90: ... THAILAND 1800 29 3232 02 689 3232 http www samsung com TAIWAN 0800 329 999 http www samsung com VIETNAM 1 800 588 889 http www samsung com MIDDlE EAST IRAN 021 8255 http www samsung com http www samservice com OMAN 800 SAMSUNG 726 7864 http www samsung com KUWAIT 183 2255 http www samsung com BAHRAIN 8000 4726 http www samsung com EGYPT 08000 726786 http www samsung com JORDAN 800 22273 http www ...

Страница 91: ...acles more easily and can travel farther but it transmits a smaller amount of data The Coarse menu allows you to manually adjust the frequency to obtain the optimum picture quality Adjust Coarse referring to Standard Signal Mode Table page87 according to the performance of your product and enjoy improved picture quality Gamma The Gamma menu adjusts the grey scale that represents middle tones on th...

Страница 92: ...y One image is made of numerous horizontal lines The vertical frequency is measured in Hz and represents how many images can be created per second by those horizontal lines A vertical frequency of 60 means that an image is transmitted 60 times per second The vertical frequency is also called refresh rate and affects screen flicker Resolution Resolution is the number of horizontal pixels and vertic...

Страница 93: ...ecting and Using a PC 41 Connecting Headphones 48 Connecting the Product to a PC to Use Central Station 28 Connecting to a Video Device 48 Contact SAMSUNG WORLDWIDE 89 Contrast 53 Copyright 2 Correct posture to use the product 12 D Display Time 73 E Eco Saving 70 F Fine 55 G Gamma 60 General 85 Green 57 H HDMI Black Level 56 Horizontal Position 62 HUB 66 I INFORMATION 77 K Key Repeat Time 74 L Lan...

Страница 94: ... Before Contacting Samsung Customer Service Center 80 Reset 76 Response Time 55 S Safety Precautions 4 Sharpness 53 Size 61 Software Installation for Using Central Station 27 Standard Signal Mode Table 87 T Terminology 91 U Utilizing Central Station 33 V Vertical Position 63 ...

Отзывы: