background image

14

When prompted by the operating system for the monitor driver, insert the CD-ROM 
included with this monitor. Driver installation is slightly different from one operating sys
tem to another. Follow the directions as appropriate for the operating system you have.

Prepare a blank disk and download the driver program file at the Internet web site shown here.

Internet web site : http://www.samtron.com/

Installing the Video Driver


User’s Manual

Setup

Windows ME/98/95

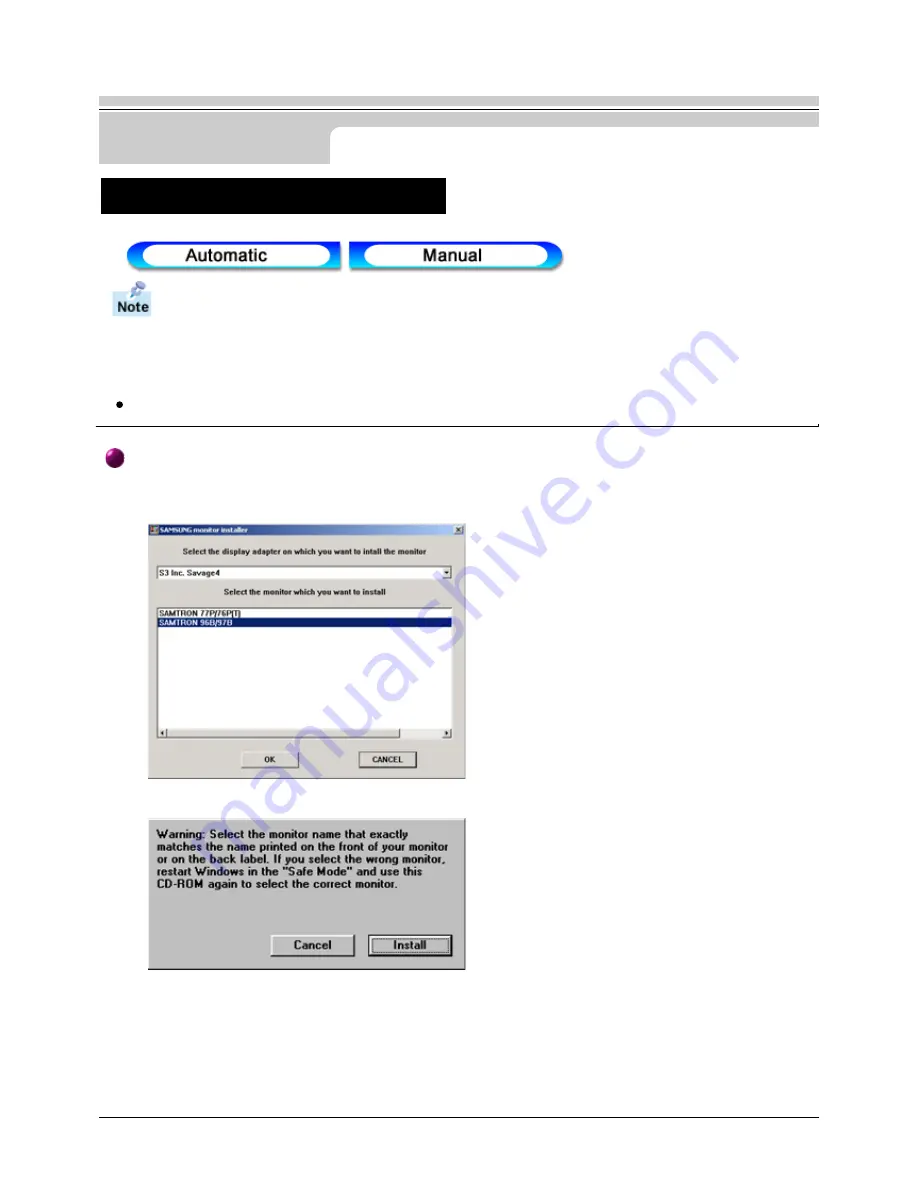
1. Insert CD into the CD-ROM driver.
2. Click "

Windows ME/98/95 Driver

".

3. Choose your monitor model in the model list, then click the "

OK

" button.


4. Click the "

Install

" button in the "

Warning

" window. 


5. Monitor Driver installation is completed.

Содержание SyncMaster 56B

Страница 1: ...SAMTRON 76E 76V 56B ...

Страница 2: ...2 Site Map User s Manual Automatic Manual ...

Страница 3: ...tions Failure to follow directions noted by this symbol could result in bodily harm or damage to equipment Prohibited Do not disassemble Do not touch Important to read and understand at all times Disconnect the plug from the outlet Grounding to prevent an electric shock ...

Страница 4: ... for long periods of time you may see afterimages due to damage to the flourescent substance on the inside of the CDT Do not pull the plug out by the wire nor touch the plug with wet hands This may cause an electric shock or fire Use only a properly grounded plug and recepticle An improper ground may cause electric shock or equipment damage Do not excessively bend the plug and wire nor place heavy...

Страница 5: ...nnect the plug from the outlet during storms or lightening or if it is not used for a long period of time Failure to do so may cause an electric shock or fire Do not connect too many extension cords or plugs to an outlet This may cause a fire ...

Страница 6: ...t This may cause damage to the product or human body Place the monitor on a flat and stable surface The monitor can cause injury by falling Set down the monitor carefully It could be damaged or broken Do not place the monitor face down on the screen The CRT surface may be damaged Do not use the monitor without the monitor stand It could break down or cause a fire due to bad ventilation If the moni...

Страница 7: ...age electric shock or a fire If a foreign substance gets into the monitor disconnect the plug and then contact a service center When cleaning the monitor case or the surface of the CRT wipe with a slightly moistened soft fabric Do not clean Flat monitor with water Use a water diluted mild detergent Some detergents contain significant amounts of alcohol based solvents which can damage color change ...

Страница 8: ...t an authorized dealer or service This may cause an electric shock or a fire Do not place any heavy objects on the monitor This may cause an electric shock or a fire For each hour of looking at the monitor you should let your eyes rest for 5 minutes This will reduce eye fatigue Do not use or store inflammable substances near the monitor This may cause an explosion or fire Do not try to move the mo...

Страница 9: ...ble This may cause a breakdown electric shock or a fire due to damage to the cable Never insert anything metallic into the monitor openings This may cause an electric shock fire or injury Keep the monitor away from any magnetic substances This may cause discoloring or distortion of the image 9 ...

Страница 10: ...ck Setup Guide Warranty card Not available in all locations User s Guide and Driver Installation CD Please make sure the following items are included with your monitor If any items are missing contact your dealer Your monitor is shipped with the base detached Unpacking ...

Страница 11: ...is button to open the OSD and activate a highlighted menu item 5 Power indicator Indicates normal or Power Saving Mode 6 Power button Use this button to turn the monitor on and off Note See PowerSaver described in the manual for further information regarding power saving functions For energy conversation turn your monitor OFF when it is not needed or when leaving it unattended for long periods Fro...

Страница 12: ...Signal cable Connect the end of the signal cable to your computer s video port video board video card or graphics card 2 Power port Connect the power cord for your monitor to the power port on the back of the monitor 3 Tilt Swivel Base You can separate the base from the monitor Note See Connecting Your Monitor for further information regarding cable connections The configuration at the back of the...

Страница 13: ...e signal cable to your computer s video port video board video card or graphics card 3 If you are using a Macintosh computer connect the cable to a Macintosh adapter and set the pins on your adapter Adapter not included A PC compatible computer does not need an adapter Note Turn on your computer and monitor If your monitor displays an image installation is complete Connecting Your Monitor ...

Страница 14: ... system you have Prepare a blank disk and download the driver program file at the Internet web site shown here Internet web site http www samtron com Installing the Video Driver User s Manual Setup Windows ME 98 95 1 Insert CD into the CD ROM driver 2 Click Windows ME 98 95 Driver 3 Choose your monitor model in the model list then click the OK button 4 Click the Install button in the Warning windo...

Страница 15: ...CD into the CD ROM driver 2 Click Windows XP 2000 Driver 3 Choose your monitor model in the model list then click the OK button 4 Click the Install button in the Warning window 5 If you can see following Message window then click the Continue Anyway button Then click OK button ...

Страница 16: ...s Manual Setup 6 Monitor Driver installation is completed This monitor driver is under certifying MS logo and this installation don t damage your system The certifide driver will be posted on Samtron Monitor Homepage http www samtron com ...

Страница 17: ... to another Follow the directions as appropriate for the operating system you have Prepare a blank disk and download the driver program file at the Internet web site shown here Internet web site http www samtron com Microsoft Windows XP Operating System 1 Insert CD into the CD ROM driver 2 Click Start Control Panel then click the Appearance and Themes Icon 3 Click Display icon and choose the Setti...

Страница 18: ...the Video Driver 4 Click the Properties button on the Monitor tab and select Driver tab 5 Click Update Driver and select Install from a list or then click Next button 6 Select Don t search I will then click Next and then click Have disk ...

Страница 19: ...ck the Next button 8 If you can see following Message window then click the Continue Anyway button Then click OK button This monitor driver is under certifying MS logo and this installation don t damage your system The certified driver will be posted on Samtron Monitor Homepage http www samtron com 9 Click the Close button then click OK button continually ...

Страница 20: ...click on Update Driver then click on the Next button 6 Choose Display a list of the known drivers for this device so that I can choose a specific driver then click Next and then click Have disk 7 Click the Browse button then choose A D Driver 8 Click the Open button then click OK button 9 Choose your monitor model and click the Next button then click Next button 10 Click the Finish button then the...

Страница 21: ...ange button in the Monitor Type area then click Next button 6 Choose Display a list of all the driver then click Next button 7 Click the Have Disk button then click browse button 8 Specify A D driver then click OK button 9 The Select Device dialogue box will appear Select Show all devices then choose the monitor that corresponds to the one you connected to your computer and click OK 10 Continue ch...

Страница 22: ...and then click OK 4 Click Apply button if you see the screen working normally after clicking Test If the screen is not normal change to a different mode lower mode of resolution colors or frequency Note If there is no Mode at All Display Modes select the level of resolution and vertical frequency by referring to the Preset Display Modes Linux Operating System To execute X Window you need to make t...

Страница 23: ...Tilt Swivel Base With the built in pedestal you can tilt and or swivel the monitor for the most comfortable viewing angle Note The base is detachable Your monitor is shipped with the base detached Tilt Swivel Base Installation ...

Страница 24: ... the monitor upside down on a flat work surface Remove the twist tie before attaching the base to the monitor 2 Align the tabs on the base with the corresponding slots on the bottom of the monitor 3 Press the base onto the monitor until the tabs are fully engaged in the slots 4 Push the base toward the front of the monitor until the release latch clicks into the locked position Do not bend the sna...

Страница 25: ...off the monitor and unplug it from the electrical outlet 2 Place the monitor upside down on a stable flat work surface 3 Squeeze and pull up on the release latch on the base 4 Push the base toward the back of the monitor and lift up to remove the base ...

Страница 26: ...to open the OSD and activate a highlighted menu item 2 3 Use these buttons to highlight and adjust items using the On Screen Display These buttons are also direct access buttons for the contrast and brightness feature 4 Use this button to Exit the active menu or the OSD ...

Страница 27: ...ightness Contrast Contrast of screen image Decreases contrast Increases contrast Horizontal Position Horizontal screen position Moves screen left Moves screen right Vertical Position Vertical screen position Moves screen down Moves screen up Horizontal Size Horizontal screen size Decreases size Increases size Menu How to adjust ...

Страница 28: ...htens screen vertical edges Curves image inward Curves image outward Geometry Adjust the Trapezoid Parallelogram Rotation Pinbalance V Linearity of the screen image Trapezoid Width of top and bottom of screen Widens bottom of screen Widens top of screen Parallelogram Skews screen image left Skews screen image right Menu How to adjust ...

Страница 29: ...presses image at top of screen Compresses image at bottom of screen Language and scroll through on screen language options English Deutsch Francais Italiano Português Español Svenska Russian Korean Note The language chosen affects only the language of the OSD It has no effect on any software running on the computer On Screen Display OSD Menu System Menu How to adjust ...

Страница 30: ...on screen moiré pattern and clear horizontal moiré V Moire Corrects for on screen moiré pattern and clear vertical moiré Video Input Level Selects the video signal level Select 0 7 V Select 1 0 V On Screen Display OSD Menu System Menu How to adjust ...

Страница 31: ...just Color Temperature 9300k more blue 6500k more red Zoom Reduces view of display area Enlarges view of display area Degauss Removes color distortion caused by magnetic fields Do not use more than once in 30 minutes Recall Returns monitor to original settings No Yes ...

Страница 32: ...ck Allows you to secure the current control settings so that they cannot be inadvertently changed You can unlock the OSD controls at any time by using the same procedure Push and hold in the Menu button for 10 seconds or more to Lock or to Unlock On Screen Display OSD Menu System Menu How to adjust ...

Страница 33: ... or your dealer You can see this message when the signal from the video card exceeds the maximum resolution and frequency that the monitor can properly handle Adjust the maximum resolution and frequency applicable to the monitor The monitor is in PowerSave mode Press a key on the keyboard or move the mouse to activate the monitor and restore the image on the screen Unlock the OSD by pressing the M...

Страница 34: ...lors become strange after running a program or due to a crash between applications Has the video card been set properly Have you changed the video card or the driver Have you adjusted the resolution or frequency to the monitor Have you adjusted the resolution or frequency on the monitor Adjust the resolution and frequency of the video card Refer to the Preset Display Modes The signal from the vide...

Страница 35: ...r from product to product Have the Windows colors been set properly For Windows 98 95 Set the colors properly at the Control Panel Display Settings There is a message that reads Unrecognized monitor Plug Play VESA DDC monitor found Have you installed the monitor driver Install the monitor driver according to the Driver Installation Instructions See the video card manual to see if the Plug Play VES...

Страница 36: ...apter video driver and the monitor driver 4 Check if the scanning ratio of the video screen is set at 75Hz or 85Hz Do not exceed 60Hz when using the maximum resolution 5 If you have problems in installing the adapter video driver boot the computer in Safe Mode remove the Display Adapter at the Control Panel System Device Administrator and then reboot the computer to reinstall the adapter video dri...

Страница 37: ...s using the VGA Utility provided by the video card Contact the video card manufacturer for details Windows 95 98 Set the function at BIOS SETUP of the computer or the screen saver Refer to Windows Computer Manual Windows 3 1 Set the function using the VGA Utility provided by the video card This is normal as some sound may be generated when the metal case and the electromagnet which are installed t...

Страница 38: ... and reconnect the video cable then turn on both your computer and the monitor If your monitor is functioning properly you will see a box with a red border and blue text inside as shown in the following illustration The three boxes inside the border are red green and blue Failure of any of the boxes to appear indicates a problem with your monitor This box also appears during normal operation if th...

Страница 39: ...egauss the monitor if any devices were removed from the area A monitor recreates visual signals received from the PC Therefore if there is trouble with the PC or the video card this can cause the monitor to become blank have poor coloring noise Sync Out of Range etc In this case first check the source of the problem and then contact a service center or your dealer Judging the monitor s working con...

Страница 40: ...al 50 160 Hz Input Signal Terminated Analog 0 7 Vpp positive at 75 ohms Separate Sync TTL level positive or negative Display Color Unlimited Maximum Pixel Clock 110 MHz Power Supply AC 110 240V 10 60Hz 50 Hz 3Hz Power Consumption 90W Maximum 75W Nominal Dimensions WxDxH 398 x 412 x 400 mm with base Weight 15 0 kg Plug and Play Capability This monitor can be installed on any Plug Play compatible sy...

Страница 41: ...60 Hz Input Signal Terminated Analog 0 7 Vpp positive at 75 ohms Separate Sync TTL level positive or negative Display Color Unlimited Maximum Pixel Clock 110 MHz Power Supply AC 100 240V 10 60Hz 50 Hz 3Hz Power Consumption 90W Maximum 75W Nominal Dimensions WxDxH 398 x 412 x 400 mm Weight 15 0 kg Plug and Play Capability This monitor can be installed on any Plug Play compatible system Interaction ...

Страница 42: ...nput Signal Terminated Analog 0 7 Vpp positive at 75 ohms Separate Sync TTL level positive or negative Display Color Unlimited Maximum Pixel Clock 110 MHz Power Supply AC 100 240V 10 60Hz 50 Hz 3Hz Power Consumption 75 W Maximun 65W Nominal Dimensions WxDxH 356 x 379 x 369 5 mm with Base Weight 11 5 kg Plug and Play Capability This monitor can be installed on any Plug Play compatible system Intera...

Страница 43: ...75 000 31 500 VESA 640 X 480 43 269 85 008 36 000 VESA 800 X 600 46 875 75 000 49 500 VESA 800 X 600 53 674 85 061 56 250 VESA 1024 X 768 60 023 75 029 78 750 VESA 1024 X 768 68 677 84 997 94 500 Horizontal Frequency The time to scan one line connecting the right edge to the left edge of the screen horizontally is called Horizontal Cycle and the inverse number of the Horizontal Cycle is called Hor...

Страница 44: ...ed in your computer Use a software utility installed on your computer to set up this feature State Normal Operation Power Indicator Green Green Blinking 1 sec interval Power 75W Nominal Less than 3W Consumption 90W Maximum This monitor is EPA ENERGY STAR compliant and ENERGY2000 compliant when used with a computer equipped with VESA DPMS functionality As an ENERGY STAR Partner SAMSUNG has determin...

Страница 45: ...180 5121214 DM 0 24 MIN SAMTRON TOKYO 17TH HAMACHO CENTER BLDG 2 31 1 NIHONBASHI HAMACHO CHOU KU TOKYO 103 JAPAN TEL 81 3 5641 9860 FAX 81 3 5641 9861 SAMTRON SWEDEN SAMSUNG ELECTRONICS SYENSKA AB BOX 713 S 194 27 UPPLANDS VASBY TEL 468 590 966 00 FAX 468 590 966 50 SAMTRON MEXICO SAMSUNG ELECTRONICS MEXICO S A DE C V Mina No 200 ESQ GAVILANCOL GUADALUPE DEL MORAL IZTAPALAPA MEXICO D F C P 09300 T...

Страница 46: ... Horizontal Frequency Unit KHz Interlace and Non Interlace Methods Showing the horizontal lines of the screen from the top to the bottom in order is called the Non Interlace method while showing odd lines and then even lines in turn is called the Interlace method The Non Interlace method is used for the majority of monitors to ensure a clear image The Interlace method is the same as that used in T...

Страница 47: ...he equipment and receiver Connect the equipment into an outlet on a circuit different from that to which the receiver is connected Consult the dealer or an experienced radio TV technician for help User Information Changes or modifications not expressly approved by the party responsible for compliance could void the user s authority to operate the equipment If necessary consult your dealer or an ex...

Страница 48: ...ce Notice This Class B digital apparatus meets all requirements of the Canadian Interference Causing Equipment Regulations of ICES 003 Cet appareil Numérique de classe B respecte toutes les exigences du Règlemont ICES 003 sur les équipements produisant des interférences au Canada MPR II Compliance This monitor complies with SWEDAC MPR II recommendations for reduced electric and magnetic fields Eur...

Страница 49: ...which provides for international environmental labelling of monitors The labelling scheme was developed as a joint effort by the TCO The Swedish Confederation of Professional Employees Naturskyddsforeningen The Swedish Society for Nature Conservation and NUTEK The National Board for Industrial and Technical Development in Sweden The requirements cover a wide range of issues environment ergonomics ...

Страница 50: ...atteries relays and switches Mercury damages the nervous system and is toxic in high doses TCO 95 requirement states that batteries may not contain more than 25 ppm parts per million of mercury It also demands that no mercury is present in any of the electrical or electronics components concerned with the display unit CFCs freons CFCs freons are sometimes used for washing printed circuit boards an...

Страница 51: ...e complete environmental criteria document may be ordered from TCO Development SE 114 94 Stockholm Sweden Fax 46 8 782 92 07 Email Internet development tco se Current information regarding TCO 99 approved and labelled products may also be obtained via the Internet using the address http www tco info com Environmental requirements Flame retardants Flame retardants are present in printed circuit boa...

Страница 52: ...sed reception on earth of ultraviolet light with e g increased risks of skin cancer malignant melanoma as a consequence Lead Lead can be found in picture tubes display screens solders and capacitors Lead damages the nervous system and in higher doses causes lead poisoning The relevant TCO 99 requirement permits the inclusion of lead since no replacement has yet been developed Bio accumulative is d...

Страница 53: ...ce or use of this material The Samsung logo and Samtron are registered trademarks of Samsung Electronics Co Ltd Microsoft Windows and Windows NT are registered trademarks of Microsoft Corporation VESA DPMS and DDC are registered trademarks of Video Electronics Standard Association the ENERGY STAR name and logo are registered trademarks of the U S Environmental Protection Agency EPA As an ENERGY ST...

Страница 54: ...http www samtron com ...

Отзывы: