background image

5.

120

6.

150

7.

180

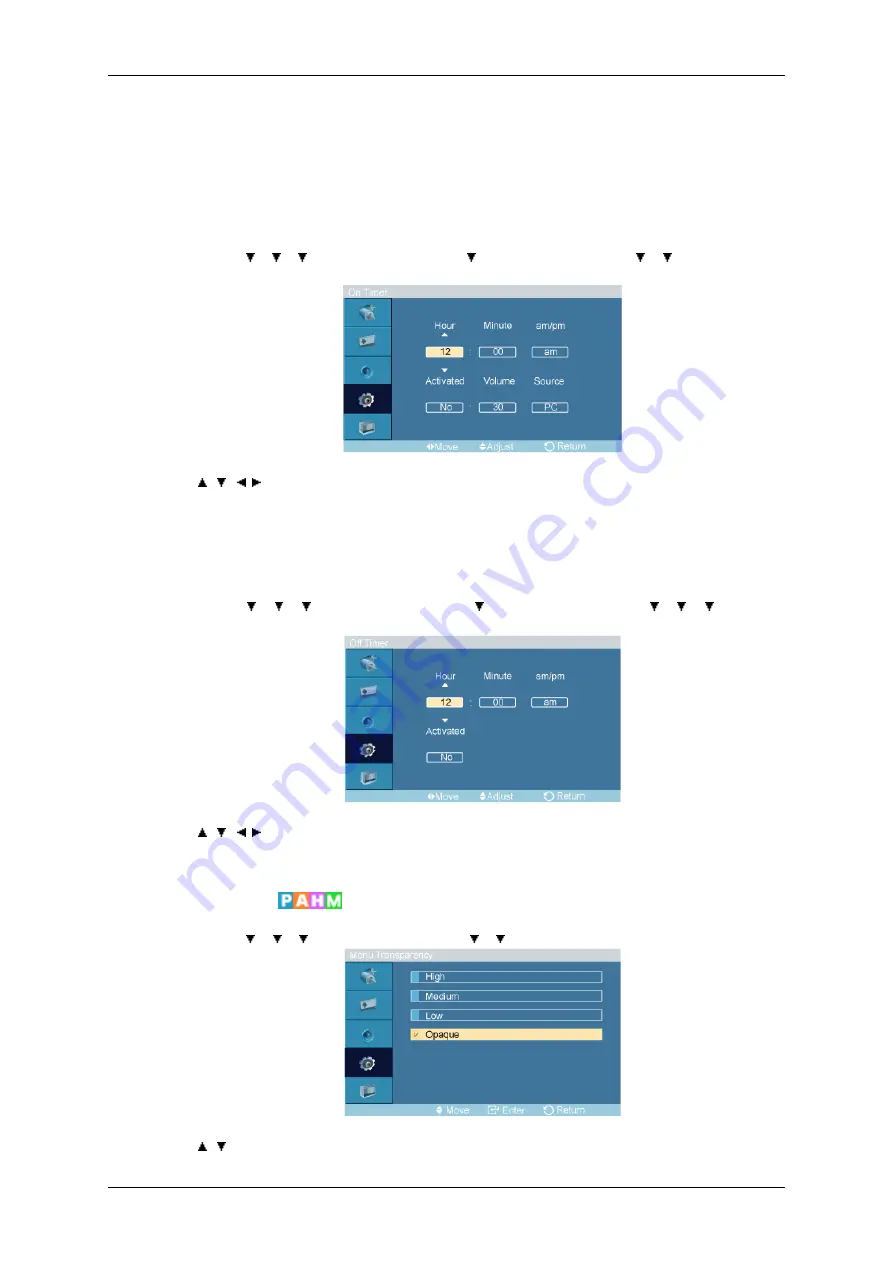
On Timer

MENU 


 ENTER 

 [

Setup


 ENTER 

 [

Time 


 ENTER

 [

On

Timer

]

   ,   /  ,   

 ENTER

Turns the LCD Display on automatically at a preset time. Controls the mode and the volume level at
the time the LCD Display turns on automatically.

Off Timer

MENU 


 ENTER 

 [

Setup


 ENTER 

 [

Time 


 ENTER

 [

Off Timer

]

   ,   /  ,   

 ENTER

Turns the LCD Display off automatically at a preset time.

Menu Transparency

MENU 


 ENTER 

 [

Setup


 ENTER 

 [

Menu Transparency

]

   ,   

 ENTER

Adjusting the LCD Display

Содержание SyncMaster 400TSn

Страница 1: ...SyncMaster 400TSn 460TSn LCD Monitor User Manual ...

Страница 2: ...ed for extended period of time set your computer to DPM If using screen saver set it to active screen mode The images here are for reference only and are not applicable in all cases or countries Shortcut to Anti Afterimage Instructions Do not use a damaged power cord or plug or a damaged or loose power outlet Otherwise this may result in electric shock or fire Do not touch the power plug with wet ...

Страница 3: ...ed Service Center when installing your monitor in a location with heavy dust high or low temperatures high humidity and exposed to chemical substances and where it operates for 24 hours such as at airports train stations etc Failure to do so may cause serious damage to your monitor Ensure that at least two persons lift and move the product Otherwise it may be dropped and cause personal injury and ...

Страница 4: ...ernal tem perature Ensure that the packaging vinyl is kept away from children Otherwise it may result in serious harm suffocation if children play with it If the height of your monitor is adjustable do not place any object or part of your body on the stand when lowering it This may cause damage to the product or the person carrying it Clean When cleaning the monitor case or the surface of the TFT ...

Страница 5: ...oduct and that it is not wet Otherwise this may result in electric shock fire or a malfunction Others The product is a high voltage product Ensure that users do not disas semble repair or modify the product themselves Otherwise this may result in electric shock or fire If the product needs to be repaired contact a Service Center If there is a strange smell or a strange sound or smoke is coming fro...

Страница 6: ...alfunction electric shock or fire Do not use or keep combustible spray or flammable material near the product Otherwise this may result in an explosion or fire Do not insert any metal such as chopsticks coins pins and steels or inflammable objects such as matches or paper inside the product through the ventilating openings input and output terminals etc If water or foreign material enters the prod...

Страница 7: ...etc that may attract the attentions of children and to the product Your children may hang onto the product causing it to fall and this may result in personal injury or death Be careful that children do not place the battery in their mouths when removed from the remote control Place the battery in a location that children or infants cannot reach If children have had the battery in their mouths cons...

Страница 8: ...or fire If the product has been turned on for a long time the display panel becomes hot Do not touch it Keep the small accessories in a location out of the reach of children Be careful when adjusting the angle of the product or the height of the stand This may result in personal injury as your hand or fingers may be come caught Also if you tilt the product too far it may fall and cause personal in...

Страница 9: ...LCD Display If any items are missing contact your dealer Contact a local dealer to buy optional items Note This stand is not for the Floor Standing Type Unpacking LCD Display Manuals Quick Setup Guide Warranty Card Not available in all loca tions User s Guide Cables D Sub Cable Power Cord Others ...

Страница 10: ...can purchase and connect a separate network box or TV tuner box For information on how to use these refer to their respective user manuals You can only connect one external box Your LCD Display Front MENU button MENU Opens the on screen menu and exits from the menu Also use to exit the OSD menu or return to the previous menu Navigate buttons Up Down buttons Introduction ...

Страница 11: ... a TV tuner box is installed Power button Use this button for turning the LCD Display on and off Brightness Sensor The product s Brightness Sensor function automatically detects the surrounding brightness using a brightness sensor and adjusts its brightness accordingly Power indicator Shows PowerSaver mode by blinking green Note See PowerSaver described in the manual for further information regard...

Страница 12: ...DMI AUDIO IN PC DVI HDMI Audio Connection Terminal Input DVI PC HDMI IN HDMI Connect the HDMI terminal at the back of your LCD Display to the HDMI terminal of your dig ital output device using a HDMI cable DVI PC HDMI IN RGB PC Video Con nection Terminal Using a D Sub Cable 15 pin D Sub PC mode Analog PC DVI PC HDMI IN DVI PC Video Con nection Terminal Using a DVI Cable DVI D to DVI D DVI mode Dig...

Страница 13: ...O R LCD Display Audio Connection Terminal Input AV AUDIO OUT L AUDIO R LCD Dis play Audio Connection Terminal Output RGB OUT LAN LAN Connection Terminal USB USB Connection Terminal Keyboard Mouse Mass Storage Device Com patible Note The number of LCD Displays that can be con nected to loopout may differ depending on the cables signal source etc With cables where there is no degradation or signal s...

Страница 14: ...if ferent depending on its model Using the Anti Theft Kensington Lock 1 Insert the locking device into the Kensington slot on the Monitor and turn it in the locking direction 2 Connect the Kensington Lock cable 3 Fix the Kensington Lock to a desk or a heavy stationary object Note See Connecting Cables for further information regarding cable connections Remote Control Note The performance of the re...

Страница 15: ...TTONS TTX MIX STILL AUTO S MODE MDC LOCK SOURCE ENTER PRE CH CH P D MENU GUIDE RETURN Up Down Left Right buttons EXIT SRS MagicInfo P MODE DUAL MTS PIP SWAP 1 POWER Turns the product On 2 Off Turns the product Off 3 Number Buttons Press to change the channel Introduction ...

Страница 16: ...o freeze the screen Press it again to un freeze 14 AUTO AdjuststhescreendisplayautomaticallyinPC mode Bychanging the resolution in the control panel auto function is performed 15 S MODE When pressing this button the current mode is displayed at the bottom centre of the screen The LCD Display has a built in high fidelity stereo amplifier Then press the button again to circle through available preco...

Страница 17: ...ntents of the image you are watching Then push button again to circle through available preconfigured modes Entertain Internet Text Custom 29 DUAL MTS DUAL STEREO MONO DUAL l DUAL ll and MONO NICAM MONO NICAM STEREO can be operated depending on the broadcasting type by using the DUAL button on the remote control while watching TV MTS You can select MTS Multichannel Television Stereo mode Audio Typ...

Страница 18: ... Please contact your nearest SAMSUNG Distributor to place an order After your order is placed installation professionals will visit you and install the bracket At least 2 persons are needed in order to move the LCD Display SAMSUNG is not responsible for any product damage or any injury caused by installation at customer s discretion Dimensions Introduction ...

Страница 19: ...uct is for installing on cement walls The product may not stay in place when installed on plaster or wood Components Only use the components and accessories shipped with the product Wall Bracket 1 Hinge Left 1 Right 1 Plastic Hanger 4 Screw A 11 Screw B 4 Anchor 11 Wall Bracket Assembly Note There are two hinges left and right Use the correct one 1 Insert and tighten the Captive Screw in the direc...

Страница 20: ...Length between the two locking holes 3 Check the installation diagram and mark the drill points on the wall Use the 5 0 mm bit to drill holes deeper than 35 mm Fix each anchor in the corresponding hole Match each of the brackets and hinge holes to the corresponding anchor holes and insert and tighten the 11 screws A To mount the product on the wall bracket The shape of the product may vary dependi...

Страница 21: ...ght in the holes Make sure the wall bracket is securely fixed to the wall or the product may not stay in place after installation 3 Tighten the 4 screws in step 2 plastic hanger screw B to the rear holes of the product 4 Remove safety pin 3 and insert the 4 product holders into the corresponding bracket holes 1 Then place the product 2 so that it is firmly fixed to the bracket Make sure to re inse...

Страница 22: ...oduct to the wall bracket 2 Hold the product at the top in the center and pull it forward direction of the arrow to adjust the angle 3 You can adjust the bracket angle between 2 and 15 Make sure to use the top center and not the left or the right side of the product to adjust the angle Mechanical Layout 460TSn Mechanical Layout Introduction ...

Страница 23: ...place an order After your order is placed installation professionals will visit you and install the bracket At least 2 persons are needed in order to move the LCD Display SAMSUNG is not responsible for any product damage or any injury caused by installation at customer s discretion Dimensions Notice For securing the bracket on a wall use only machine screws of 6 mm diameter and 8 to 12 mm length I...

Страница 24: ...alled on plaster or wood Components Only use the components and accessories shipped with the product Wall Bracket 1 Hinge Left 1 Right 1 Plastic Hanger 4 Screw A 11 Screw B 4 Anchor 11 Wall Bracket Assembly Note There are two hinges left and right Use the correct one 1 Insert and tighten the Captive Screw in the direction of the arrow When done mount the wall bracket on the wall There are two hing...

Страница 25: ...llation diagram and mark the drill points on the wall Use the 5 0 mm bit to drill holes deeper than 35 mm Fix each anchor in the corresponding hole Match each of the brackets and hinge holes to the corresponding anchor holes and insert and tighten the 11 screws A To mount the product on the wall bracket The shape of the product may vary depending on the model The assemblies of the plastic hanger a...

Страница 26: ...re the wall bracket is securely fixed to the wall or the product may not stay in place after installation 3 Tighten the 4 screws in step 2 plastic hanger screw B to the rear holes of the product 4 Remove safety pin 3 and insert the 4 product holders into the corresponding bracket holes 1 Then place the product 2 so that it is firmly fixed to the bracket Make sure to re insert and tighten the safet...

Страница 27: ... the wall 1 Fix the product to the wall bracket 2 Hold the product at the top in the center and pull it forward direction of the arrow to adjust the angle 3 You can adjust the bracket angle between 2 and 15 Make sure to use the top center and not the left or the right side of the product to adjust the angle Introduction ...

Страница 28: ...information on connecting AV input devices refer to the contents under Adjusting Your LCD Display Connect the power cord for your LCD Display to the power port on the back of the LCD Display Turn on the power switch There are 2 ways to connect the D sub to your LCD Display Choose one of the following Using the D sub Analog connector on the video card Connect the D sub to the 15 pin RGB port on the...

Страница 29: ... sure to disconnect the AC power in advance Note AV input devices such as DVD players VCRs or camcorders as well as your computer can be connected to the LCD Display For detailed information on connecting AV input devices refer to the contents under Adjusting Your LCD Display Connecting AV Devices 1 Connect the port of the DVD VCR DVD DTV Set Top Box to the R AUDIO L port of the LCD Display 2 Then...

Страница 30: ...splay 3 Select AV for the Camcorder connection using the Source button on the front of the LCD Display or on the remote control 4 Then start the Camcorders with a tape inserted Note The audio video cables shown here are usually included with a Camcorder If not check your local electronics store If your camcorder is stereo you need to connect a set of two cables Connecting Using a HDMI Cable Note I...

Страница 31: ...nnect a set of audio cables between the AUX L R jacks on the AUDIO SYSTEM and AUDIO OUT L AUDIO R on LCD Display Connecting a LAN Cable Using a Power cord with Earth In the event of failure the earth lead may cause electric shock Make sure to wire the earth lead in correctly before connecting the AC power When un wiring the earth lead make sure to disconnect the AC power in advance Note AV input d...

Страница 32: ...ecting the AC power When un wiring the earth lead make sure to disconnect the AC power in advance Note AV input devices such as DVD players VCRs or camcorders as well as your computer can be connected to the LCD Display For detailed information on connecting AV input devices refer to the contents under Adjusting Your LCD Display Note You can connect USB devices such as a mouse or keyboard Connecti...

Страница 33: ...rating system you have Prepare a blank disk and download the driver program file at the Internet web site shown here Internet web site http www samsung com Worldwide Installing the Monitor Driver Automatic 1 Insert CD into the CD ROM drive 2 Click Windows 3 Choose your monitor model in the model list then click the OK button 4 If you can see following message window then click the Continue Anyway ...

Страница 34: ...ert your Manual CD into your CD ROM drive 2 Click Start and Control Panel Then double click on Appearance and Personalization 3 Click Personalization and then Display Settings 4 Click Advanced Settings 5 Click Properties in the Monitor tab If the Properties button is deactivated it means the configuration for your monitor is completed The monitor can be used as is If the message Windows needs is d...

Страница 35: ...posted on Samsung Monitor homepage 6 Click Update Driver in the Driver tab 7 Check the Browse my computer for driver software checkbox and click Let me pick from a list of device drivers on my computer 8 Click Have Disk and select the folder for example D Drive where the driver setup file is located and click OK Using the Software ...

Страница 36: ...l that matches your monitor from the list of monitor models on the screen and click Next 10 Click Close Close OK OK on the following screens displayed in sequence Microsoft Windows XP Operating System Using the Software ...

Страница 37: ... Click Display icon and choose the Settings tab then click Advanced 4 Click the Properties button on the Monitor tab and select Driver tab 5 Click Update Driver and select Install from a list or then click Next button 6 Select Don t search I will then click Next and then click Have disk Using the Software ...

Страница 38: ...lowing message window then click the Continue Anyway button Then click OK button Note This monitor driver is under certifying MS logo and this installation doesn t damage your system The certified driver will be posted on Samsung Monitor homepage http www samsung com 9 Click the Close button then click OK button continually Using the Software ...

Страница 39: ...on is active click the Properties button then follow next steps continually 5 Click Driver and then click on Update Driver then click on the Next button 6 Choose Display a list of the known drivers for this device so that I can choose a specific driver then click Next and then click Have disk 7 Click the Browse button then choose A D Driver 8 Click the Open button then click OK button 9 Choose you...

Страница 40: ...r clicking Test If the screen is not normal change to a different mode lower mode of resolution colors or frequency Note If there is no Mode at All Display Modes select the level of resolution and vertical frequency by referring to the Preset Timing Modes in the user guide Linux Operating System To execute X Window you need to make the X86Config file which is a type of system setting file 1 Press ...

Страница 41: ...le 3 When the Install Shield Wizard window appears click Next 4 Select I agree to the terms of the license agreement to accept the terms of use 5 You are required to log in to the MagicInfo Pro Server program Please enter the password to login The password cannot be changed when you are logged in Using the Software ...

Страница 42: ...6 Choose a folder to install the MagicInfo Pro program 7 Click Install Using the Software ...

Страница 43: ...8 The Installation Status window appears 9 It is recommended restarting the system for the normal operation of the MagicInfo Pro Server program Click Finish Using the Software ...

Страница 44: ...lication Minimum P1 8 256M 100M 1G Windows XP Windows 2000 Serv ice Pack 4 WMP 9 or later Recommen ded P3 0GHz 512M IRTOUCH IRTouch Screen Control Panel Double click the mark on the tabletop as the following indication or follow Start All programs IRTouchSystems and then click IR TouchScreen Control Panel and go to the Control Panel of the touchscreen as following Using the Software ...

Страница 45: ...t mark will appear on the center of each monitor screen in master slave sequence operated by program after user clicks Select Monitor If does so use may click the center of the butt mark so as to ac knowledge the mounted touchscreen If there is no information of touchscreen on the monitor user is required to press Esc or wait for 15 seconds then program will pass the current the setting of touchsc...

Страница 46: ...e by clicking on 4 calibration points so that user only clicks the center of the bull s eye in sequence If failing to hit the bull s eye user may move the pointer or fingers to the center of it again and lift based on the utilization of Click on Release when calibration Press Esc button to exit calibration After calibration the recalibrate OK can cel buttons will show up ReCalibrate means recalibr...

Страница 47: ...n of mouse functions including left button click moving lifting and dragging if writing drawing or dragging map are required this mode is well suitable to the above application 4 Enable Touch Enable default disable touchscreen 5 Hide Cursor Hide cursor without closedown of the mouse function because Mouse cursor is not used in some applications but always is applied to such filed as big button pla...

Страница 48: ...ouch Setting prop erties can be set selectively The higher the value unit millisecond the longer the touch delay time area is utilized to regulate the effective area in which finger maintains on the touch plane The higher the value unit pixel the wider the effective area 9 Prevent System to Standby Unable default this function may prevent System from Standby When the IR touchscreen is provided wit...

Страница 49: ... of touchscreen Select Mouse Emulation mode then choose Enable Touch Send Right ClickEnable DoubleClick In general functions of Enable Delay Touch and False touch rejection may not selected to avoidslowing the touch response It is proved null if you quickly click or drag the touch point Using the Software ...

Страница 50: ...t is at 500 to 550 Area unit is 32px 3 Drag Delay The function show the amount of millisecond Drag Delay will take to be enabled after you click that Drag Delay may be adjuste d to the correct value if theobject can not be precisely selected or if jitter happens to cursor when you touch The unit is millisecond Setting of touchscreen in strong light rain and snow condition The snow and rain drop wi...

Страница 51: ...mes you click to approach the setting value within 3 seconds Then driver will install the function of False touch rejection where quick click or scratch will be considered void except the touch point on the active area for quite a while 3 Leave count False touch rejection is no longer effective when the click times within 5 seconds is less than the setting number Using the Software ...

Страница 52: ... Input ENTER Source List ENTER Use to select PC DVI or other external input sources connected to the LCD Display Use to select the screen of your choice 1 PC 2 DVI 3 AV 4 HDMI 5 MagicInfo Note The direct button on the remote control is the SOURCE button For PC and DVI this is deactivated if the cable is disconnected Edit Name MENU ENTER Input ENTER Edit Name ...

Страница 53: ...t MENU ENTER Picture ENTER MagicBright ENTER MagicBright is a feature providing the optimum viewing environment depending on the contents of the image you are watching Currently four different modes are available Entertain Internet Text and Custom Each mode has its own pre configured brightness value You can easily select one of the four settings by simply pressing the MagicBright control button N...

Страница 54: ...nding on your taste If this is the case adjust the brightness and contrast by using the OSD menu Custom By using the on screen menus the contrast and brightness can be changed to your personal preference MENU ENTER Picture ENTER Custom Not available in Dynamic Contrast mode of On Note By adjusting the picture using the Custom function MagicBright will change to Custom mode Contrast MENU ENTER Pict...

Страница 55: ...tom Note If you set the Color Tone to Cool Normal Warm or Custom the Color Temp function is disabled If you set the Color Tone to Off the Color Control function is disabled Color Control Adjusts individual Red Green Blue color balance MENU ENTER Picture ENTER Color Control Not available in Dynamic Contrast mode of On Note If you adjust the picture by using the Color Control function Color Tone wil...

Страница 56: ... available in Dynamic Contrast mode of On Note This function is only enabled if the Color Tone is set to Off Image Lock Image Lock is used to fine tune and get the best image by removing noise that creates unstable images with jitters and shakiness If satisfactory results are not obtained using the Fine adjustment use the Coarse adjustment and then use Fine again Available in PC mode only Not avai...

Страница 57: ...en after Fine tuning repeat it after adjusting the frequency clock speed H Position MENU ENTER Picture ENTER Image Lock ENTER H Position ENTER Adjusts the screen location horizontally V Position MENU ENTER Picture ENTER Image Lock ENTER V Position ENTER Adjusts the screen location vertically Auto Adjustment MENU ENTER Picture ENTER Auto Adjustment The values of Fine Coarse Position are adjusted au...

Страница 58: ...only Not available in Dynamic Contrast mode of On Signal Balance MENU ENTER Picture ENTER Signal Balance ENTER Signal Balance ENTER Selects either On or Off with the signal control Signal Control MENU ENTER Picture ENTER Signal Balance ENTER Signal Control 1 R Gain MENU ENTER Picture ENTER Signal Bal ance ENTER Signal Control ENTER R Gain ENTER 2 G Gain MENU ENTER Picture ENTER Signal Bal ance ENT...

Страница 59: ...NTER R Offset ENTER 5 G Offset MENU ENTER Picture ENTER Signal Bal ance ENTER Signal Control ENTER G Offset ENTER 6 B Offset MENU ENTER Picture ENTER Signal Bal ance ENTER Signal Control ENTER B Offset ENTER Size MENU ENTER Picture ENTER Size ENTER The Size can be switched Not available in Dynamic Contrast mode of On 1 16 9 2 4 3 Adjusting the LCD Display ...

Страница 60: ...ontrast 1 Off 2 On Picture AV HDMI Mode Available Modes PC DVI AV HDMI MagicInfo Note The TV menu is available when a TV tuner box is installed Mode MENU ENTER Picture ENTER Mode ENTER The LCD Display has four automatic picture settings Dynamic Standard Movie and Cus tom that are preset at the factory Dynamic Standard Movie or Custom can be activated Adjusting the LCD Display ...

Страница 61: ...personal preference MENU ENTER Picture ENTER Custom Not available in Dynamic Contrast mode of On Contrast MENU ENTER Picture ENTER Custom ENTER Contrast ENTER Adjusts the Contrast Brightness MENU ENTER Picture ENTER Custom ENTER Bright ness ENTER Adjusts the Brightness Sharpness MENU ENTER Picture ENTER Custom ENTER Sharpness ENTER Adjusts the picture Sharpness Color MENU ENTER Picture ENTER Custo...

Страница 62: ...one ENTER The color tones can be changed The individual Color components are also user adjustable Not available in Dynamic Contrast mode of On 1 Off 2 Cool2 3 Cool1 4 Normal 5 Warm1 6 Warm2 Note If you set the Color Tone to Cool2 Cool1 Normal Warm1 or Warm2 the Color Temp function is disabled Color Temp MENU ENTER Picture ENTER Color Temp Adjusting the LCD Display ...

Страница 63: ...olor Tone is set to Off Size MENU ENTER Picture ENTER Size ENTER The Size can be switched 1 16 9 2 Zoom 1 3 Zoom 2 4 4 3 5 Just Scan Not available in Dynamic Contrast mode of On Note The Zoom1 Zoom2 are not available HDMI The Just Scan are available in HDMI Digital NR Digital Noise Reduction MENU ENTER Picture ENTER Digital NR Adjusting the LCD Display ...

Страница 64: ...ure offers you a theater quality viewing experience In HDMI mode this function can be available when the input signal is interlaced scan it cannot be available with progressive scan signal 1 Off 2 On Dynamic Contrast MENU ENTER Picture ENTER Dynamic Contrast ENTER Dynamic Contrast automatically detects the distribution of the visual signal and adjusts to create an optimum contrast 1 Off 2 On Adjus...

Страница 65: ...r the standard factory settings 2 Music Selects Music when watching music videos or concerts 3 Movie Selects Movie when viewing movies 4 Speech Selects Speech when watching a show that is mostly dialogue i e news 5 Custom Selects Custom if you want to adjust the settings according to your personal preferences Custom The sound settings can be adjusted to suit your personal preferences MENU ENTER So...

Страница 66: ...s low frequency audio Treble MENU ENTER Sound ENTER Custom ENTER Treble ENTER Emphasizes high frequency audio Balance MENU ENTER Sound ENTER Custom ENTER Bal ance ENTER Allows you to Adjusts the sound balance between the left and right speakers Auto Volume MENU ENTER Sound ENTER Auto Volume ENTER Reduces the difference in volume control between broadcasters 1 Off 2 On Adjusting the LCD Display ...

Страница 67: ...rround sound experience through any two speaker playback system including internal television speakers It is fully compatible with all multichannel formats 1 Off 2 On Note The direct button on the remote control is the SRS button Setup Available Modes PC DVI AV HDMI MagicInfo Note The TV menu is available when a TV tuner box is installed Language MENU ENTER Setup ENTER Language ENTER Adjusting the...

Страница 68: ...e Selects from one of 4 time settings Clock Set Sleep Timer On Timer and Off Timer MENU ENTER Setup ENTER Time Clock Set MENU ENTER Setup ENTER Time ENTER Clock Set ENTER Current Time Setting Sleep Timer MENU ENTER Setup ENTER Time ENTER Sleep Timer ENTER Turns the LCD Display off automatically at certain times 1 Off 2 30 3 60 4 90 Adjusting the LCD Display ...

Страница 69: ... at a preset time Controls the mode and the volume level at the time the LCD Display turns on automatically Off Timer MENU ENTER Setup ENTER Time ENTER Off Timer ENTER Turns the LCD Display off automatically at a preset time Menu Transparency MENU ENTER Setup ENTER Menu Transparency ENTER Adjusting the LCD Display ...

Страница 70: ...MENU ENTER Setup ENTER Energy Saving ENTER This feature adjusts the power consumption of the unit in order to save energy 1 Off 2 On Note If you want to reduce the standby power consumption set Energy Saving to On However when Energy Saving is On you cannot use the remote Power On function of the MDC and the WOL Wake On LAN function of MagicInfo HDMI Black Level MENU ENTER Setup ENTER HDMI Black L...

Страница 71: ... of video screens connected together so that each screen shows a part of the whole picture or where the same picture is repeated on each screen When the Video Wall is on you can adjust the Video Wall screen setting MENU ENTER Setup ENTER Video Wall Note When Video Wall is running the Auto Adjustment Image Lock and Size functions are not available Video Wall does not operate in MagicInfo mode Video...

Страница 72: ...without any margins 2 Natural Displays a natural image with the original aspect ratio intact Horizontal MENU ENTER Setup ENTER Video Wall ENTER Horizontal ENTER Sets how many parts the screen should be divided horizontally Five adjustment levels 1 2 3 4 and 5 Vertical MENU ENTER Setup ENTER Video Wall ENTER Vertical Adjusting the LCD Display ...

Страница 73: ... selected mode Safety Screen The Safety Screen function is used to prevent afterimages that may appear when a still picture is displayed on the screen over a long time The Safety Screen function scrolls the screen for the specified period of time This function is not available when the power is turned off MENU ENTER Setup ENTER Safety Screen Pixel Shift Pixel Shift MENU ENTER Setup ENTER Safety Sc...

Страница 74: ...0 1 2 3 and 4 Vertical Line MENU ENTER Setup ENTER Safety Screen ENTER Pixel Shift ENTER Vertical Line ENTER Sets how many pixels the screen moves vertically Five adjustment levels 0 1 2 3 and 4 Time MENU ENTER Setup ENTER Safety Screen ENTER Pixel Shift ENTER Time ENTER Set the time interval for performing the horizontal or vertical movement respectively Adjusting the LCD Display ...

Страница 75: ... erase any residual image the operation will be performed for the set period of time and then automatically finish 1 Off 2 On Mode MENU ENTER Setup ENTER Safety Screen ENTER Timer ENTER Mode ENTER You can change the Safety Screen Type 1 Scroll 2 Bar 3 Eraser Period MENU ENTER Setup ENTER Safety Screen ENTER Timer ENTER Period ENTER Adjusting the LCD Display ...

Страница 76: ...etup ENTER Safety Screen ENTER Scroll This function prevents after images on the screen by moving all the pixels on the PDP according to a pattern Use this function when there are remaining after images or symbols on the screen especially when you displayed a still image on the screen for a long time Bar MENU ENTER Setup ENTER Safety Screen ENTER Bar This function prevents after images on the scre...

Страница 77: ...puter to 1024 x 768 60Hz 1280 x 768 60Hz 1360 x 768 60Hz or 1366 x768 60Hz by using this function Resolution Select you can have the picture displayed on the screen in the specified resolution Note Available in PC mode only 1 Off 2 1024 X 768 3 1280 X 768 4 1360 x 768 5 1366 X 768 Note Selecting the menu is only allowed when the graphics resolution is set to 1024 x 768 60Hz 1280 x 768 60Hz 1360 x ...

Страница 78: ...ENTER Side Gray ENTER Select the brightness of the grey for the screen background 1 Off 2 Light 3 Dark Reset Reverts the product settings to factory defaults The Reset function is only available when PC DVI is being used MENU ENTER Setup ENTER Reset Image Reset MENU ENTER Setup ENTER Reset ENTER Image Reset ENTER Adjusting the LCD Display ...

Страница 79: ...rol MENU ENTER Setup ENTER Lamp Control ENTER Adjusts the inverter lamp in order to reduce energy consumption Note This function does not operate when Dynamic Contrast is set to On in PC DVI AV HDMI TV modes Multi Control Available Modes PC DVI AV HDMI MagicInfo Multi Control Assigns an individual ID to the SET MENU ENTER Multi Control ENTER Adjusting the LCD Display ...

Страница 80: ...may stop If you do unplug the cable restart the system Do not unplug the LAN cable used by an USB device ex video display Otherwise the program MagicInfo may stop To access other sources press the SOURCE button in MagicInfo The preset password for the LCD Display is 000000 The server program s Power On option works only if the LCD Display s power is completely shut off Please make sure not to use ...

Страница 81: ...ontents of Setup have been changed when EWF is in the Enable state to save the changes in the disk you must Commit them By selecting Disable Enable or Commit the system is restarted MagicInfo 1 Select MagicInfo in the Source List menu 2 The MUISetup screen appears Select the language you want to use 3 Press the Install button If you select Do not show again and click the Install button the Schedul...

Страница 82: ...he notification area double click the MagicInfo icon on the window desktop The icon will appear 6 Right click on the MagicInfo pro icon the image will be inserted and select Program Player from the displayed menu 7 The Player screen of MagicInfo pro is displayed Note To finish the MagicInfo press ALT F12 Photo The JPEG BMP file format are supported Adjusting the LCD Display ...

Страница 83: ...Auto Automatically fits the image to the window Original Shows the properties of the original file Slide Show Displays the properties of the original file as they are Adjusting the LCD Display ...

Страница 84: ...nterval Controls the time intervals between image files for a slide show 5 Sec 10 Sec 20 Sec 30 Sec 60 Sec Rotation Displays an image file by turning it clockwise by 90 degrees Adjusting the LCD Display ...

Страница 85: ...Zoom Displays a reduced picture Close Closes the image control Menu Adjusting the LCD Display ...

Страница 86: ...Music The MP3 file format is supported Movie The MPEG1 WMV file format are supported Play Plays a movie file Adjusting the LCD Display ...

Страница 87: ...full screen OFFICE HTML PPT Power Point DOC MS Word XLS MS Excel PDF HTML HTM files are displayed Note Install the proper viewer freeware program to see the MS Office Word Excel Power Point or PDF doucuments Adjusting the LCD Display ...

Страница 88: ...Internet Connects to the Internet Setup Sets various functions in MagicInfo mode A password must be entered to access Setup mode Schedule View Displays a schedule Adjusting the LCD Display ...

Страница 89: ...TCP IP Changes the TCP IP settings Connection Modifies the network settings Adjusting the LCD Display ...

Страница 90: ...rmat If you enter the wrong password three times the setup configuration is reset and a warning message appears from the server If you forget the password enter Info 8 2 and 4 on the remote control to initialize the password This will reset the previous settings of Setup mode File Local You can delete or copy files on both local and removable disks Adjusting the LCD Display ...

Страница 91: ...Sets the screen resolution to 1366x768 pixels Portrait Sets the screen resolution to 1366x768 pixels EWF Enhanced Write Filter Prevents change to and loss of the data saved on the disk Disable Disables EWF to allow saved data to be changed data on the protected disk drive C When switching from the Enable to the Disable state you can select Commit Enable Enables EWF to prevent saved data to be chan...

Страница 92: ...econnect the video cable then turn on both your computer and the LCD Display If your LCD Display screen remains blank after using the previous procedure check your video con troller and computer system your LCD Display is functioning properly Warning Messages You can even view the screen at a resolution of 1360 1920 x 768 1080 However you will receive the following message for a minute You can cho...

Страница 93: ...ore than 3 times when booting If it does request an a service for the main board of the computer 3 If you installed a new video card or if you assembled the PC check if you installed the Adaptor video 4 Check if the scanning ratio of the video screen is set to between 50 Hz 85 Hz Do not exceed 60Hz when using the maximum resolution 5 If you have problems in installing the Adaptor video driver boot...

Страница 94: ...signal cable is securely connected Re connect it if necessary Refer to Connecting a Computer Q The image is not clear picture is blurred A Run Frequency Coarse and Fine tuning A Turn on again after removing all accessories video extension cable etc A Set the resolution and frequency to the recommended ranges Q The picture image is unstable and shakes A Check if the resolution and frequency set for...

Страница 95: ...nd the computer to ensure that the con nector is properly connected Problems related to Audio Note Problems related to audio signals and their solutions are listed below Q No sound A Ensure that the audio cable is firmly connected to both the audio in port on your LCD Display and the audio out port on your sound card Refer to the Connecting a Computer A Check the volume level Q The sound level is ...

Страница 96: ...exe and choose Local Partition From Image from the menu Choose the ghost image to update your USB disk with and choose the target disk A 6 When the ghost image update finishes the set will be rebooted automatically Q A Q How can I change the frequency A The frequency can be changed by reconfiguring the video card Note That video card support can vary depending on the version of the driver used Ref...

Страница 97: ...er Do not leave any detergent or scratches on the case Do not let any water enter the LCD Display Q How can I play the video A The video supports the MPEG1 and WMV codecs only Install the corresponding codec to play the video Note that some of the codecs can be incompatible Note Before calling for assistance check the information in this section to see if you can remedy any prob lems yourself If y...

Страница 98: ... resolution 1920 x 1080 60 Hz RB Input Signal Terminated RGB Analog DVI Digital Visual Interface Compliant Digital RGB 0 7 Vp p 5 Separate H V sync Composite SOG TTL level V high 2 0 V V low 0 8 V Maximum Pixel Clock 165 MHz Analog Digital Power Supply AC 100 240 V 10 50 60 Hz 3 Hz Signal Cable 15pin to 15pin D sub cable Detachable DVI D to DVI D connector Detachable Dimensions W x H x D Without S...

Страница 99: ...lation will proceed auto matically unless the user wishes to select alternate settings Dot Acceptable TFT LCD panels manufactured by using advanced semiconductor technology with preci sion of 1ppm one millionth above are used for this product But the pixels of RED GREEN BLUE and WHITE color appear to be bright sometimes or some black pixels may be seen This is not from bad quality and you can use ...

Страница 100: ...or energy conservation turn your LCD Display OFF when it is not needed or when leaving it unattended for long periods The PowerSaver system operates with a VESA DPM compliant video card installed in your computer Use the software utility installed on your computer to set up this feature State Normal Operation Power saving mode Power off Power switch Power Indicator Green Green Blinking Off Power C...

Страница 101: ...9 976 75 025 135 000 VESA 1360 x 768 47 712 60 015 85 500 VESA 1600 x 1200 75 000 60 000 162 000 VESA 1920 x 1080 66 587 59 934 138 500 Horizontal Frequency The time to scan one line connecting the right edge to the left edge of the screen horizontally is called the Horizontal Cycle and the inverse number of the Horizontal Cycle is called the Horizontal Frequency Unit kHz Vertical Frequency Like a...

Страница 102: ...sions W x H x D Weight With Stand 1104 2 x 658 4 x 134 3 mm 43 5 x 25 9 x 5 3 inch Dimensions W x H x D Weight Without Stand 1104 2 x 720 0 x 311 0 mm 43 5 x 28 3 x 12 2 inch 34 3 kg 75 6 lbs VESA Mounting Interface 600 mm x 400 mm Environmental considerations Operating Temperature 50 F 104 F 10 C 40 C Humidity 10 80 non condensing Storage Temperature 4 F 113 F 20 C 45 C Humidity 5 95 non condensi...

Страница 103: ...duct are 6 220 800 Note Design and specifications are subject to change without prior notice MagicInfo Client Item Specification Remarks LAN 1 Gbps USB Keyboard Mouse Mass Stor age Device Compatible USB removable storage can be supported Contents Photo Supported File Format BMP JPEG 2274x1704 or less Music Supported File Format MP3 Sound bandwidth 50 Hz to 15 kHz Movie MPEG1 WMV Max 1280 x 720 30 ...

Страница 104: ...the signal differs the screen may go blank while the power LED is on Refer to the video card manual and adjusts the screen as follows Display Mode Horizontal Frequency kHz Vertical Fre quency Hz Pixel Clock MHz Sync Polarity H V IBM 640 x 350 31 469 70 086 25 175 IBM 640 x 480 31 469 59 940 25 175 IBM 720 x 400 31 469 70 087 28 322 MAC 640 x 480 35 000 66 667 30 240 MAC 832 x 624 49 726 74 551 57 ...

Страница 105: ...al Cycle and the inverse number of the Horizontal Cycle is called the Horizontal Frequency Unit kHz Vertical Frequency Like a fluorescent lamp the screen has to repeat the same image many times per second to display an image to the user The frequency of this repetition is called the Vertical Frequency or Refresh Rate Unit Hz Specifications ...

Страница 106: ...If you are not satisfied with the picture quality you can get better quality of picture by performing the Auto Adjustment function in display screen that is appeared as window termination button is pressed If there s still noise after the automatic adjustment use the Fine Coarse adjustment function When viewing a fixed screen for an extended period of time a residual image or blur riness may appea...

Страница 107: ...12 hours in use Set the Monitor to power off with the PC Display Properties Power Scheme Use a Screen saver if possible Screen saver in one color or a moving image is recom mended Change the Color Information periodically Note Use Two different colors Rotate the Color Information with 2 different colors every 30 minutes Information ...

Страница 108: ...splay Moving image together with Logo periodically Cycle Display moving image together with Logo for 60 seconds after 4 hours in use The best way to protect your monitor from Image retention is to turn Power off or set your PC or System to operate a Screen Saver program when you are not using it Also Warranty service will be limited based on instruction guide Apply the Screen Scroll function on Pr...

Страница 109: ... 1 Time Period 10 50 second Recommend 50 Apply the Screen Bar function Symptom Horizontal Vertical Bar with Black Color move up and down Select method Instruction Guide OSD Menu Set Up Safety Screen Bar Time Interval 1 10 hours Recommend 1 Time Period 10 50 second Recommend 50 Note Please check CD s User Guide at OSD Function some model s will not available Apply the Screen Erasing function on Pro...

Страница 110: ...truction Guide OSD Menu Set Up Safety Screen Eraser Time Interval 1 10 hours Recommend 1 Time Period 10 50 second Recommend 50 Note Please check CD s User Guide at OSD Function some model s will not available Information ...

Страница 111: ...http www samsung com latin GUATEMALA 1 800 299 0013 http www samsung com latin HONDURAS 800 7919267 http www samsung com latin JAMAICA 1 800 234 7267 http www samsung com latin NICARAGUA 00 1800 5077267 http www samsung com latin PANAMA 800 7267 http www samsung com latin PUERTO RICO 1 800 682 3180 http www samsung com latin REP DOMINICA 1 800 751 2676 http www samsung com latin TRINIDAD TO BAGO 1...

Страница 112: ...SWITZERLAND 0848 SAMSUNG 7267864 CHF 0 08 min http www samsung com ch U K 0845 SAMSUNG 7267864 http www samsung com uk CIS ESTONIA 800 7267 http www samsung ee LATVIA 8000 7267 http www samsung com lv LITHUANIA 8 800 77777 http www samsung lt KAZAKHSTAN 8 10 800 500 55 500 http www samsung com kz_ru KYRGYZSTAN 00 800 500 55 500 RUSSIA 8 800 555 55 55 http www samsung ru TADJIKISTAN 8 10 800 500 55...

Страница 113: ... the same light repeats itself 60 times per second this is regarded as 60 Hz Horizontal Frequency The time to scan one line connecting the right edge to the left edge of the screen horizontally is called the Horizontal Cycle The in verse number of the Horizontal Cycle is called Horizontal Fre quency Unit kHz Interlace and Non Interlace Methods Showing the horizontal lines of the screen from the to...

Страница 114: ...product or their local government of fice for details of where and how they can take this item for environmentally safe recycling Business users should contact their supplier and check the terms and conditions of the purchase contract This prod uct should not be mixed with other commercial wastes for disposal Authority Information in this document is subject to change without notice 2008 Samsung E...

Страница 115: ...Appendix ...

Отзывы: