background image

Содержание SV-5000W

Страница 1: ...WORLDWIDE VIDEO CASSETTE RECORDER SV 5OOOW Owner s Instructions Code No AC68 00402A ...

Страница 2: ...ected to the grounding system of the building as close to the point of cable entry as practical Caution FCC regulations state that any unauthorized changes or modifications to this equipment may void the user s authority to operate it Caution To prevent electric shock match wide blade of plug to wide slot fully insert Attention pour eviter les chocs electriques introduire la lame la plus large de ...

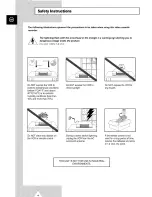
Страница 3: ...polarized alternating current line plug a plug having one blade wider than the other This plug will fit into the power outlet only one way This is a safety feature If you are unable to insert the plug fully into the outlet try reversing the plug If the plug should still fail to fit contact your electrician to replace your obsolete outlet Do not defeat the safety put pose of the polarized plug 13 P...

Страница 4: ...ions Adjust only those controls that are covered by the operating instructions as an improper adjustment of other controls may result in damage and will often require extensive work by a qualified technician to restore the product to its normal operation e If the product has been dropped or damaged in any way f When the product exhibits a distinct change in performance this indicates a need for se...

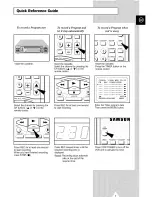
Страница 5: ...ing remote control Insert the cassette Press the TIMER button an the remote control CLOCK I JAN WED 12 32 CH DAY STANT4STOP Av SET _ DELETE CLR RST MENU Enter the Timer program data Then press the MENU button qlml I i Press REC for at east one second to start recording When you have finished recording press STOP m Press REC several times until the required recording time is displayed Result Record...

Страница 6: ...ing the VCR RE out System Setting the RF OUT CHANNEL Presetting the Stations Automatically Presetting the Stations Manually RECORDING TELEVISION BROADCASTS Selecting the Cassette Type Selecting the Recording Speed Protecting a Recorded Cassette Recording a Program Stopping a Recording Temporarily Recording a Program with Automatic Stop Using the Timer Programming Feature VCR Plus Recording AMERICA...

Страница 7: ...iiiiiiiiiiiiiiiiiiiiiiiii iiiiiiiiiiiiiiiiiiiiiiiiiiiii iiiiiiiiiiiiiiiiiiiiiiiiiiiii iiiiiiiiiiiiiiiiiiiiiiiiiiiii iiiiiiiiiiiiiiiiiiiiiiiiiiiii iiiiiiiiiiiiiiiiiiiiiiiiiiiii iiiiiiiiiiiiiiiiiiiiiiiiiiiii iiiiiiiiiiiiiiiiiiiiiiiiiiiii iiiiiiiiiiiiiiiiiiiiiiiiiiiii iiiiiiiiiiiiiiiiiiiiiiiiiiiii iiiiiiiiiiiiiiiiiiiiiiiiiiiii iiiiiiiiiiiiiiiiiiiiiiiiiiiii iiiiiiiiiiiiiiiiiiiiiiiiiiiii iiiiiiiiiiiiii...

Страница 8: ...iiiiiiiiiiiiiiiii humidity conditions less than iiiiiiiiiiiiiiiiiiiiiiii 10 andmorethan75 iiiiiiiiiiiiiiiiiiiiiiii iiiiiiiiiiiiiiiiiiiiiiii iiiiiiiiiiiiiiiiiiiiiiii iiiiiiiiiiiiiiiiiiiiiiii iiiiiiiiiiiiiiiiiiiiiiii iiiiiiiiiiiiiiiiiiiiiiii iiiiiiiiiiiiiiiiiiiiiiii iiiiiiiiiiiiiiiiiiiiiiii iiiiiiiiiiiiiiiiiiiiiiii iiiiiiiiiiiiiiiiiiiiiiii DO NOT place anyobjectson iiiiiiiiiiiiiiiiiiiiiiii theVCRorr...

Страница 9: ...proceduresforeachfunctionavailableformsthemainbodyofthe manual Youcanconsulttheglossaryonpage49 toobtainanexplanationofthemaintechnicalterms used throughout this manual On pages 6 and 7 you will find illustrations of the VCR front and rear the display and the remote control unit to help you find the buttons and understand the symbols displayed Preparing Your Video Cassette Recorder Before being ab...

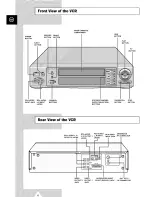
Страница 10: ...ANNEL iNPUT JACK L R INPUT BUTTONS JACKS SYSTEM STANDARD PAUSE STILL STOP OUTPUT SELECTION BUTTON BUTTON BUTTONS Rear View of the VCR 0 RCA AUDIO L R OUTPUT2JACKS RCA AUDIO RCA AUDIO RC A VIDEO ANTENNAIN L_R OUTPUT1 L_RIHPUT INPUTJACK RF CONNECTOR JACKS VIDEO VIDEO AUDIO VIDEOIN OUT OUT TO TV OUTPUT2 OUTPUT1 SCART EURO 21 JACK RFCONHECTOR JACK JACK ...

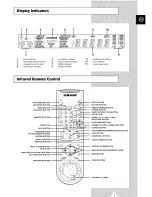
Страница 11: ...n display 2 Recording speed ir_dicator 6 Output select indicator 10 Hi Fi indicator 3 Cassette in out indicator 7 SQPB Indicator 11 Audio Level meter 4 Input select indicator 8 INDEX Indicator Infrared Remote Control VCR POWER B REC SPEED BUTTON PICTURE SEARCH BUTTON SAMSUNG I ...

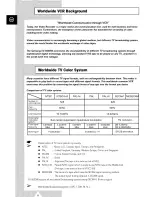
Страница 12: ...iiiiiiiiiiiiii_ _c_oo o0 oos iiiiiiiiiiiiiiiiiiiiiiiiiiiiiField iiiiiiiiiiiiiiiiiiiiiiiiiiii_ frequency iiiiiiiiiiiiiiiiiiiiiiiiiiii_ L ootro_uooo_ Color signal iiiiiiiiiiiiiiiiiiiiiiiiiiiiimodulation iiiiiiiiiiiiiiiiiiiiiiiiiiii _y_tem iiiiiiiiiiiiiiiiiiiiiiiiiiii Colorsignal frequency iiiiiiiiiiiiiiiiiiiiiiiiiiii_ Borst_ 0oo iiiiiiiiiiiiiiiiiiiiiiiiiiii_ iiiiiiiiiiiiiiiiiiiiiiiiiiiii _e iiiiiiii...

Страница 13: ...ape being iiiiiiiiiiiiiiiiiiiiiii Tape duplication with system conversion eg NTSC to PAL is iiiiiiiiiiiiiiiiiiiiiii no_o _ _ o iiiiiiiiiiiiiiiiiiiiii iiiiiiiiiiiiiiiiiiiiii _V _OOO_or _i_oW_ iiiiiiiiiiiiiiiiiiiiii iiiiiiiiiiiiiiiiiiiiii iiiiiiiiiiiiiiiii iiiiiiiiiiiiiiiii iiiiiiiiiiiiiiiii iiiiiiiiiiiiiiiii iiiiiiiiiiiiiiiii iiiiiiiiiiiiiiiii iiiiiiiiiiiiiiiii _ iiiiiiiiiiiiiiiii iiiiiiiiiiiiiiiii...

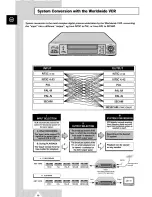
Страница 14: ...iiiiiiiiiiiiiiiiiii SECAM SECAM iiiiiiiiiiiiiiiiiiiiiiiii iiiiiiiiiiiiiiiiiiiiiiiii MESECAM TAPE ONLY iiiiiiiiiiiiiiiiiiiiiiiii iiiiiiiiiiiiiiiiiiiiiiiii iiiiiiiiiiiiiiiiiiiiiiiii iiiiiiiiiiiiiiiiiiiiiiiii J VCR digitally converts scanning VCR automatically selects the selected in step II lines frequency 5e_ds and color correct TV broadcast system of _ signal into the desired system as iiiiiiiiiii...

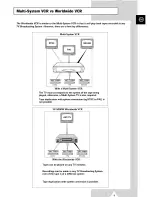
Страница 15: ...e user to copy for example a SECAM tape and simultaneously convert it to PAL or NTSC This is particularly useful for duplicating home video camcorder recordings and sending them to friends or relatives abroad SV_5000W ASA PLAYBACKVCR SAMSUNG Worldwide VCR m 2ridVCR ASA RECORDING VCR A yVCR Corresponding VHS Tape_ PAL M _ SECAM ASAPLAYBACK VCR Corresponding VCR sv g000W ASARECOROtNG VCR SAMSUNG Wor...

Страница 16: ...AMCORDEB AS A PLAYBACK VCB Carncolder Corresponding SV 5000W ASA RECORDING VCB SAMSUNG Worldwide VCR Any VHS Tape Adapter 2nd VCR AS A PLAYBACK VCR Corresponding VCB 0 iiii SV 5000W AS A RECORDING VCR AMSUNG ...

Страница 17: ...mended Use AV Rear SCART In Out Television LINE Rear AudioNideo RCA Out Television Other VCR LINE 1 Front Audio Video RCA In Audio system _ Camcorder Other VCR LINE 2 Rear AudioMdeo RCA In Audio system Camcorder Satellite receiver Other VCR OUT TO TV Rear 75 O Out Television coaxial c_ IN FROM ANT Rear 75 O In Antenna coaxial _ Cable television network _e Whenever you connect an audio or video sys...

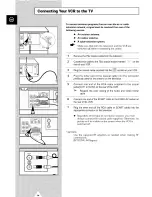
Страница 18: ...r VCR 4 Plug the other end of the coaxial cable into the connector previously used for the antenna on the television 5 Connect one end of the RCA cable supplied to the output jacks OUT1 or OUT2 on the rear of the VCR _ Respect the color coding of the Audio and Video In Out cable 6 Connect one end of the SCART cable to the EURO AV socket on the rear of the VCR 7 Plug the other end of the RCA cable ...

Страница 19: ...ace the cover by aligning it with the base of the remote control and pushing it back into place I Initial Setup The VCR automatically displays the initial setup MENU when the VCR is plugged into the AC outlet for the first time 1 2 3 4 Ptugthe VCRintothe AC outlet Result The LAM_A6a SETis displayed Press the t o and OK button to select your favorite language Result The COON Z RY SeT is displayed P...

Страница 20: ...t the USER SET2 4 Press _ to select the USER SET2 menu item COLOR ON BLUE SCREEN ON SQPB OFF USERSETI kA _ END tMENU 5 Check beiow to change the item r_ USER SET2 iTEM USAGE COMMENT SAP SAP on off Initial mode is SAP OFF COLOR COLOR or B W initial mode is an Color off mode is select B W if color distortion occurs in the play or conversion mode then select color off mode BLUE BLUE SCREEN initial se...

Страница 21: ...t the menu TIMER PROGRAMMING USER SET INSTALLATION LANGUAGE SET k CLOCK SET AV END MENU _ END tMEMU i To turn On Screen Information on off Your VCR displays most information both on the VCR and television You can choose to display or not to display this information on the television screen except for the Index Timer Programming function Picture which cannot be turned off 1 Press MENU on the remote...

Страница 22: ...ITALY SPAIN I I U K HONGKONG D K K CHINA CIS INSTALLATION COUNTRY ANT iCATV ANTENNA AUTO SET UP _MANUAL SET UP AV k END MENU MA_UAL SET UP GUIDE CN SET UP CH ADD DELETE _ RF OUT M G I K H RF OUT CH 14 69 0FF A _ END MENU If you want to know the broadcast system of your specific country see the World Broadcast Systems page 50 SECAM L ERANCE is not available on this VCR 1 Press the MENU button on th...

Страница 23: ..._I SET UP Result The i s J_t SET UP menu is displayed 4 Press the button until the cursor is placed in front of 5 Press the or 4 button to change the RF OUT CHANNEL Result The _ out CH is changed Your VCR RF out channel may need to be changed if there is no picture or the picture suffers from interference For better picture and sound quality connect your VCR to the TV using the RCA cable if the ap...

Страница 24: ...n on the remote control Result The programming menu is displayed and the cursor is automatically placed in front of the AUTOSET UP option 2 Press the button to select AU I O SET UP 3 Press OK to start the Auto scanning Result The AU I Oindication flashes on the VCR display The number of channels automatically stored by the VCR depends on the number of channels that have been found reception condit...

Страница 25: ... _ button to select this option Result The IN ION menu is displayed 4 Press the corresponding D or _ button until the cursor is placed in front of the i_a_t SET UP option 5 Press the corresponding m or _ button until the cursor is placed in front of the CH _D OE_ option 6 Press the _ or _ button to seJect chaenet that you want to memorize or delete If you wish to store the _ press OK button to mem...

Страница 26: ...P_CTURE T_MER You can record a cassette at two different speeds PAL SECAM MESECAM NTSC PAL M SP Standard Play SP Standard Play LP Long Play SLP Super Long Play In Long Play or Super Long Play modes therecordingisofaslightlylowerquality To record a cassette Press the REC SPEED button on the remote control until in standard play mode SPis displayed in long play mode T P is displayed PAL SECAM MESECA...

Страница 27: ...y pressing the REC SPEED button as many times as required see page 22 6 Press the REC button for at least one second to start recording Result The record indicator appears on the television and VCR display An index is recorded on the tape see page 36 7 To stop recording press STOP m once If the cassette is ejected when you start recording check that the safety tab is intact or the opening is cover...

Страница 28: ...on 5 Select the recording speed by pressing the REC SPEED button as many times as required see page 22 6 Press the REC button for at least one second to start recording Result The record indicator appears on the television screen and VCR display An index is recorded on the tape see page 36 7 Press the REC button several times to increase the recording time in _ 30 minute intervals up to four hours...

Страница 29: ...start time 7 Select the required hour value by pressing the or button 8 Press to select the minutes 9 Select the required minute value by pressing the or button 10 Press to select the recording stop time 11 Select the required recording stop time by pressing the _ or button following the same procedure as when selecting the recording start time 12 Press to select the REC SYSTEM 13 Select the requi...

Страница 30: ...ss up to e ght number buttons to set the Plus Code Use to correct any mistakes 3 Press OK to save the code The channe number appears on the left side The start and end recording times recording date and speed aJso appear 4 Press MENU to finish Check whether there is enough time left on the video tape to record the program 5 To stop a Timer Recording press the VCR POWER button When using a cable de...

Страница 31: ...3 VCR Plus Guide channel numbers appear on the top row Receiving channels are on the bottom Press _ or _ to select a VCR Plus Guide channel number 4 Press or g for the correct receiving channel number For example If receiving channel 23 corresponds to the VCR Plus Guide channet 45 press _ and 4 until 45 appears in the top row of numbers with the downward pointing arrow directly below Press the _ a...

Страница 32: ...hange any value as required 5 On completion press MENU twice Cancelling a Preset Recording CLOCK I JAN WED 12 32P CH DAY START4STOP 1 SUI 7 05P_ 7 25P_k A_ SET _ DELETE CLR RST MENU You can cancel any program that is incorrect or no longer required 1 Press the TIMER button and select STANDARD TIMER Result The preset programs are displayed 2 Select the program to be cancelled by pressing the or _ b...

Страница 33: ...OOOW VCR This function only needs to be used when there is no color or picture during playback 1 Press MENU on the remote control Result The programming menu is displayed 2 Press the corresponding or _ button until the cursor is placed in front of the USER SE_ option 3 Pressthe buttonto selectthis option Result TheUSERS_ 1 1 menu is displayed 4 Press the corresponding _ or _ button until the curso...

Страница 34: ...E SCREEN ON USER SET1 1 Press MENU on the remote control and select user set 2 Press the v and buttons to select USER SE 22 3 Press the o and buttons to set SAPto e l 4 Press menu key twice to exit MENU 5 To select SAP press the AUDIO button on the remote control until SAP is displayed on the screen SAP will be displayed on the TV screen when a SAP broadcast is received 6 Press the REC button at l...

Страница 35: ... on during normal playback the video output will be distorted Adjusting Picture Alignment Manually The Fine AdJustment feature enables you to adjust the alignment manually to obtain the best possible picture When noise bars or streaks appear during playback adjust alignment manually by pressing the TRACKING _ or v buttons until the picture is clear and stabie Result The tracking bar appears The im...

Страница 36: ...tions are available Option Description L Used to listen to the sound on the left Hi Fi channel R Used to listen to the sound on the right Hi Fi channel MIX Used to listen to the mixed sound of the Hi Fi and linear audio For example you can play back Hi Fi audio sound while at the same time listening to narration dubbed onto the normal audio track See pages 43 and 44 for further details of the Audi...

Страница 37: ...ard search to playbackagain F F 1_ whilefast forwardingthe tape with the picturedisplayed The cassette is rewound automatically when the end of the tape is reached if you press POWER while a cassette is being rewound the VCR switches off automatically when the beginning of the cassette is reached Playing a Cassette in Slow Motion You can play a cassette in slow motion No sound is heard when playin...

Страница 38: ...e Shuttle function is available on the remote control No sound is beard when playing a sequence at variable speeds 1 i 1 1 i i 1 Press the PLAY D button to start playing the cassette 2 Turn the SHUTTLE RING to the left or right to vary the playback speed 3 Each time you turn the shuttte ring the speed will change as shown in the following ilDstration SP on All Systems IIII INN IIIIIII REVERSE REVE...

Страница 39: ... _ 1 i_ _ _ 1 Press the ART button dubng PLAY or STROBE mode Result The contrast of the image is changed 2 Pressthe buttonto vary the contrastof the ART mode 3 To exit the ART mode pressthe ART button iiiiiiiiii i _ J ii i_ iJiJJJJJJ i i i I Iiiiii i i i i_i_ i ii iiiiiiiiiii_ iiiiiiiiiiiiiiiiiiiiiiiiiiiiiiiiiiiiiiii MONITOR You can see the original input signal during a conversion recording 1 Pre...

Страница 40: ... Prey Seq being Next etc Seq played Seq etc 2 7 7 2 This VCR uses a standard indexing system VISS As a result it will recognize any indexes marked by other VCRs using the same system and vice versa Enter the number of the index to be found using the numeric buttons _ When entering a single digit number do not forget to precede it with a zero E_ 02 Result The index number is displayed Select the di...

Страница 41: ...tape counter indicates how long the cassette has been running 4 To set the tape counter to zero at the beginning of a sequence press DISPLAY twice to display the counter and press CLR RST when you want to set the tape counter to zero 5 To fast forward or rewind to the sequence at which the counter was set to zero simply press REW 1 or F F I _ Result The VCR stops automatically when the counter rea...

Страница 42: ...tton 11 again as often as necessary to advance frame by frame until the exact recording position is located 5 While the VCR is in still mode press the REC button at least one second to activate the Assemble Edit function Result The Record symbol flashes on the display 6 Select the source from which you wish to record by pressing the CH or buttons for television channels or the INPUT button for the...

Страница 43: ...to input signals from equipment such as camcorders VCRs or stereo sound systems FRONT OF THE VCR Camcorder VCR Stereo sound system The RCA output connectors OUT1 or OUT2 on the rear of the VCR are used to output signals to equipment such as a stereo sound system REAR OFTHE VCR Stereo sound system _ The EURO AV connector on the rear of the VCR is used for equipment with a SCART input output such as...

Страница 44: ...es not supply stereo sound connect only the left audio input L You can also use a SCART cable to connect to the EURO AV on the rear of your VCR 2 Insert a blank cassette in your VCR 3 Insert the pre recorded cassette in the other video source VCR or camcorder 4 Press the INPUT button to select the appropriate input on your VCR LINE 1 or LINE 2 or AVfor the EUROAV 5 Start playing back the cassette ...

Страница 45: ...respond to the input button on the VCR an abnormal signal is outputted 4 Press the PAL output system button on the VCR Result The display panel shows the NTSC input signal and the PAL output signal and the NTSC signal is converted into the PAL signal for output Playback Conversion You can perform playback conversion of the signal recorded on the tape into the appropriate format for the country 1 I...

Страница 46: ... convert from a tape recorded on NTSC to a PAL recorded tape insert the NTSC tape into the other VCR 5 Press the INPUT button on the remote control to select the L1 input Result The display panel shows L1 6 Press the PAL output system button on the front panel to select the PAL system Result The display panel shows PAL 7 Press the PLAY button of the other VCR 8 Pressthe RECbutton of the SamsungVCR...

Страница 47: ...io The Hi Fi and normal soundtracks are recorded simultaneously and audio dubbing is applicable only to the normal audio track k Video track Normal audio track Hi Fi audio track mono 2 channe 0 TUNER TV picture CH 10 from built in tuner SIMULCAST TV picture SC from built in tuner LINE 1 LI Video signal from LINE 2 L2 video input connector EURO AV AV Video signal from audio video connector TVsoundl...

Страница 48: ...VCR 3 Insert the pre recorded video cassette on which the audio track is to be replaced 4 Select the LINE 1 input by pressing INPUT until L I is displayed 5 Locate the point on the cassette at which you wish to start dubbing 6 Press P STILL 11 7 Press A DUB Result Your VCR is new in the Audio Dubbing Pause mode 8 On the sound system locate the point on the CD or cassette at which you wish to start...

Страница 49: ... the other end of the RCA audio cable to the audio input connectors L R on the front of your VCR 3 Select the SC Simulcast mode by pressing INPUT one or more times until sc is displayed 4 Select the television program by using the CH Up Down buttons 5 Tune the sound system to the appropriate radio station 6 Press the REC button for at least one second when the broadcast starts Result The sound rec...

Страница 50: ...l be ejected 2 To unlock the VCR hold down the P STILL 11 button again for approximately five seconds Result The lock indicator LOCK is no longer displayed Resetting Your VCR ff you find that your VCR is not operating correctly or no indications appear in the display you can reset it Press the RESET button on the front panel with a pen or pencil to reset the VCR Result All preset data will be eras...

Страница 51: ...LP Tape format VHS type video tape S VHS type video tape Play back only Recording time Maximum 8 hours with a T 160 tape E 240 Rewinding time Within 100 Seconds high speed rewinding T 120 or E 180 tape Video input 1 OVp p unbalanced 75 f_ Video output 1 OVp p unbalanced 75 f_ Video S N Above 43dB standard recording Resolution Above 220 standard recording NTSC 240 standard recording PAL Audio input...

Страница 52: ...ayback picture or the picture Press the TRACKING buttons A or v is distorted Check to see if you are using a pre recorded tape Check the playback system in the USER SET Menu Check the SQPB in the USER SET2 Menu See page 31 You cannot see normal broadcasts Check that the source selected using the INPUT button is the VCR s tuner Check the TV VCR antenna connections Noise barorstreakson playback Pres...

Страница 53: ...uner must be set to the frequency of the appropriate channel Station or Channel Frequency assigned to a given broadcasting company to enable them to transmit a series of broadcasts or programs Program Number assigned to a given channel on the tuner in the VCR to help you select it more easily Broadcast transmitted on a given channel Cable TV Coaxial cable network transmitting broadcasts on a subsc...

Страница 54: ...ya Kuwait Laos Liechtenstein Madeira Majorca Islands Malaysia Malaw Mozambique Netherlands New Zealand Nigena Norway ORlan Pakistan Palestine Papua New Guinea Portugal Qatar Sierra Leone Singapore Spain Sd Lanka Sudan Swaziland Sweden Swdzedand Thailand Turkey Uganda Yemen United Arab Emirates Zambia Zimbabwe D K China Korea North N M I BIG D K Argentina Brazil Angola Egypt Paraguay Botswana Ban U...

Страница 55: ...site http www samsung latin america co Middle East Africa Dubai Tel 971 4 837 700 Saudi Arabia Tel 968 2 65t 2111 Kuwait Tel 965 470 6812 Europe U K United Kingdom Te 44 1952 292 262 Web site http www samsungelectronics co uk France Tel 33 10 4938 6569 Web site http www samsung fr Germany Te 49 6196 66 1900 Web site http www samsung de Italy Tel 39 2 92t4 1815 Portugal Tel 35 1 414 8112 Spain Tet ...

Страница 56: ...ELECTRONICS ...

Отзывы: