background image

GB

33

GB

32

Connecting an RCA Audio/Video Input Cable 

(SV-446I Only)

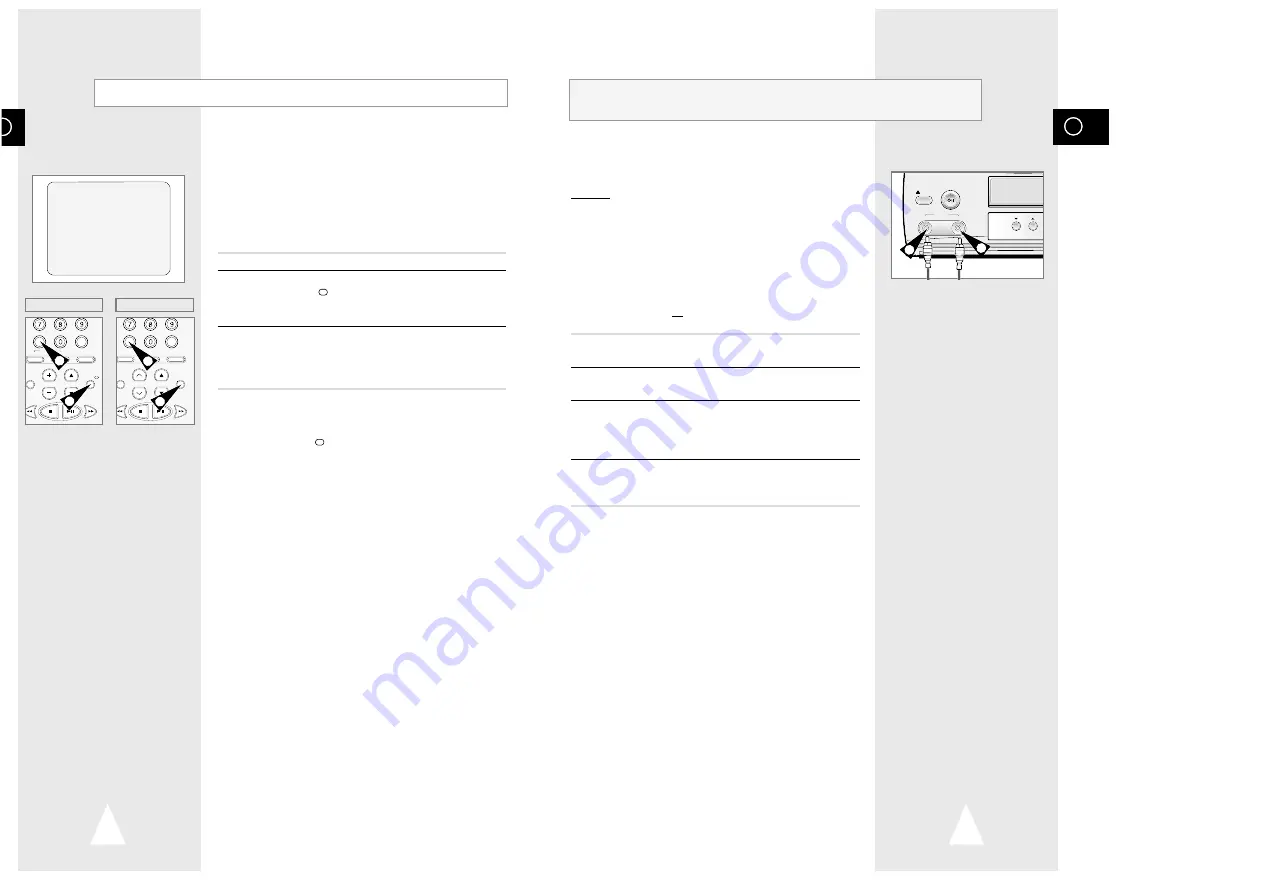
You can connect other audio/video equipment to your VCR using
audio/video cables if the appropriate outputs are available on the
equipment chosen.

Examples:

You wish to copy a video cassette with the help of a
second VCR (see page 34).

You wish to play back and/or copy pictures taken
with a camcorder (see page 34).

Regardless of the type of connection chosen, you
must always connect the coaxial cable supplied.
Otherwise, no picture will be visible on the screen
when the VCR is switched off.

Make sure that both the television and the VCR are
switched off before connecting the cables.

1

Connect one end of the RCA audio/video cable into the VIDEO
INPUT socket on the front of the VCR.

2

Plug the other end of the audio/video cable into the appropriate
output connector on the other system (VCR or camcorder).

3

Connect one end of the RCA audio cable supplied into the AUDIO
INPUT sockets on the front of the VCR.

Take care to respect the colour coding of the left and right
channels.

4

Plug the other end of the audio cable into the appropriate output
connectors on the other system (VCR, camcorder or sound
system).

EJECT

STANDBY/ON

PROG

VIDEO                              AUDIO

LINE IN 2

1

3

Using the Tape Counter

0:00:00

CLR/RST       F.ADV          INDEX

TV                  VCR                INPUT

REPEAT

VOL         PROG/TRK

AUDIO

REC

      MENU

DISP./

SELECT

-/--

CLR/RST       F.ADV          INDEX

A.TRK                  IPC                INPUT

REPEAT

TRK          PROG

UDIO

REC

      MENU

DISPLAY

2

2

2

2

(SV-242I/SV-226I)

(SV-446I)

The tape counter:

Indicates the elapsed time in the play and record modes
(hours, minutes and seconds)

Is reset when a cassette is inserted in the VCR

Allows you to find the beginning of a sequence easily

If the remaining time is to be calculated correctly, you
must indicate the type of cassette being used. 

1

Insert a cassette in your VCR.

2

To set the tape counter to zero at the beginning of a sequence:

Press DISP./

or DISPLAY twice to display the counter

Press CLR/RST when you want to set the tape counter to
zero

3

When you are ready,  

Start playback or Recording. 

Press the 

button.

To fast-froward or rewind to the sequence at which the
counter was set to zero, press 

➛➛

or 

❿❿

.

Some VCR information, such as the counter, can be
displayed on the television screen (unless you have
deactivated the OSD mode; refer to page 15).

Press DISP./

or DISPLAY:

Once to display the current function, programme
number, recording speed, date, time and counter

Twice to display the counter only

Three times to display the time remaining on the

cassette

Four times to clear the display

Содержание SV-446I

Страница 1: ...VIDEO CASSETTE RECORDER SV 446I SV 242I SV 226I Instruction Manual PAL www samsungvcr com ...

Страница 2: ...TS Selecting the Cassette Type 21 Selecting the Recording Speed 21 Protecting a Recorded Cassette 22 Recording a Programme Immediately 22 Recording a Programme with Automatic Stop 23 Using the Timer Programming Feature 24 Checking a Preset Recording 25 Cancelling a Preset Recording 25 GB 2 About this manual Thank you for purchasing a Samsung Video Cassette Recorder VCR Your Owner s Instructions co...

Страница 3: ...tte 26 Adjusting Picture Alignment Automatically SV 242I SV 226I Only 26 Adjusting Picture Alignment Manually 26 Intelligent Picture Control 27 Intelligent Picture Control SV 242I SV 226I Only 27 Selecting the Colour Mode 28 Selecting the Audio Mute Mode 28 SEARCHING FOR A SEQUENCE Playing a Cassette in Slow Motion SV 446I Only 29 Playing a Sequence Frame by Frame 29 Picture Search Fast Forward Re...

Страница 4: ...D FORWARD SEARCH BUTTON MENU BUTTON MENU SELECTION UP BUTTON MENU SELECTION BUTTON OK BUTTON TIMER BUTTON STANDBY ON BUTTON SLOW BUTTON SHUTTLE BUTTON V LOCK BUTTON CLEAR AND RESET BUTTON AUTO TRACKING BUTTON IPC BUTTON TRACKING BUTTONS AUDIO MUTE BUTTON STOP BUTTON REWIND REVERSE PICTURE SEARCH BUTTON RECORD BUTTON MENU SELECTION BUTTON MENU SELECTION DOWN BUTTON RECORDING SPEED SELECTION BUTTON ...

Страница 5: ...your systems Systems connected permanently to the VCR satellite receiver for example or temporarily camcorder for example Your VCR is equipped with the following connectors Connector Location Type Direction Recommended Use LINE IN 1 Rear Audio Video RCA In Satellite receiver Television Other VCR Audio Video Rear Audio Video RCA Out Television output Other VCR Audio system OUT TO TV Rear 75 Ω Out T...

Страница 6: ...on the television You thus Obtain better quality sound and pictures Simplify the setting up procedure of your VCR Regardless of the type of connection chosen you must always connect the coaxial cable supplied Otherwise no picture will be visible on the screen when the VCR is switched off Make sure that both the television and the VCR are switched off before connecting the cables 1 Connect the coax...

Страница 7: ...age 16 and Problems and Solutions on page 38 8 When the picture and sound are perfectly clear store this channel at the desired programme position on the television Result That programme is now reserved for use with your VCR Plug Auto Set Up Your VCR will automatically set itself up when it is plugged into the mains for the first time TV stations will be stored in memory The process takes a few mi...

Страница 8: ...ion You can choose to display or hide this information on the television screen except for the Index Programming MENU which cannot be hidden 1 Press MENU on the remote control Result The programming menu is displayed 2 Press the corresponding or buttons to select the USER SET option 3 Press the OK button to select this option Result The USER SET menu is displayed 4 Press the corresponding or butto...

Страница 9: ... be changed if the pictures suffer from interference or if your TV cannot find the pictures Also you can change the VCR output channel to adjust the frequency in which information is displayed on the screen 1 Press MENU on the remote control Result The programming menu is displayed 2 Press the corresponding or buttons to select the INSTALLATION option 3 Press the OK button to select this option Re...

Страница 10: ... select this option Result The INSTALLATION menu is displayed 4 Press the corresponding or buttons until the MANUAL SET UP option is selected 5 Press the button to select MANUAL SET UP option Result The TV STATION TABLE menu is displayed 6 Press the or buttons to select a programme number as required 7 Press the button to preset the station Result The MANUAL TUNING menu is displayed 8 Press the or...

Страница 11: ...U button on the remote control Result The programming menu is displayed 2 Press the corresponding or buttons to select the INSTALLATION option 3 Press the OK button to select this option Result The INSTALLATION menu is displayed 4 Press the corresponding or buttons until the MANUAL SET UP option is selected And then press the button to select this option Result The TV STATION TABLE menu is display...

Страница 12: ...ears on the television and VCR display An index is recorded on the tape see page 31 7 To stop recording press once If the cassette is ejected when you start recording check that the safety tab is intact or the opening is covered with adhesive tape If you reach the end of the tape while recording the cassette rewinds automatically This function enables you to record up to nine hours of programmes L...

Страница 13: ...n the cassette Auto Tape Speed Select The VCR s Auto Tape Speed Select function compares the duration of the timer recording to the actual recording time remaining on the tape loaded If there is insufficient tape to complete a timer recording in AUTO mode the VCR automatically switches to LP mode to record the whole programme E g If there is a one hour AUTO mode timer recording to be started but o...

Страница 14: ... If you do not press a button within ten seconds the PICTURE menu disappears automatically 5 On completion press the IPC button again Intelligent Picture Control SV 242I SV 226I Only CLR RST F ADV INDEX A TRK IPC INPUT REPEAT TRK PROG AUDIO DISPLAY 1 PICTURE IPC OFF SOFTEN SHARPEN ON OFF This function allows you to play back any pre recorded cassette 1 Switch on both the television and your VCR 2 ...

Страница 15: ...Sequence Frame by Frame SLOW V LOCK F ADV TV VCR INPUT REPEAT VOL PROG TRK AUDIO DISP SELECT SLOW SHUTTLE V LOCK 1 1 OK REC MENU 1 2 2 GB 28 You can select the mode in which the sound is mute To select the audio mute mode on and off simply press the AUDIO button on the remote control Selecting the Audio Mute Mode X VOL P AUDIO REC TRK AUDIO REC SV 242I SV 226I SV 446I Selecting the Colour Mode Bef...

Страница 16: ...OLD down the or button the VCR will search at 9 times the normal speed Releasing the button will return the VCR to search at 5 times the normal speed To return to normal playback mode press the II button 4 Whilst in Picture Search mode if you press the button again the VCR will enter normal Fast Forward mode 5 Likewise whilst in Picture Search mode if you press the button again the VCR will enter ...

Страница 17: ...VCR camcorder or sound system EJECT STANDBY ON PROG VIDEO AUDIO LINE IN 2 1 3 Using the Tape Counter 0 00 00 CLR RST F ADV INDEX TV VCR INPUT REPEAT VOL PROG TRK AUDIO REC MENU DISP SELECT CLR RST F ADV INDEX A TRK IPC INPUT REPEAT TRK PROG UDIO REC MENU DISPLAY 2 2 2 2 SV 242I SV 226I SV 446I The tape counter Indicates the elapsed time in the play and record modes hours minutes and seconds Is res...

Страница 18: ...EPEAT VOL PROG TRK AUDIO DISP 1 2 2 6 6 7 3 5 5 4 GB 34 F ADV This function allows you to start a new recording at a specific position on the cassette while maintaining a very smooth scene change 1 Insert the cassette to be edited in your VCR 2 Press the ll button to start playback 3 When you reach the position from which you wish to start the new recording press the ll button 4 Press the F ADV bu...

Страница 19: ... C 41 F 104 F 5 C 40 C Operation humidity 10 75 10 75 Weight 2 8 Kg net 2 8 Kg net Dimensions WxHxD 360 x 94 x 240 mm 360 x 94 x 240 mm MODEL SV 446I SV 242I SV 226I The Auto Power Off feature automatically turns off your VCR if no signal is received and you do not press any button for the selected time 1 Press MENU on the remote control Result The programming menu is displayed 2 Press the corresp...

Страница 20: ... V H 196 25 CCIR 009 E09 V H 203 25 CCIR 010 E10 V H 210 25 CCIR 011 E11 V H 217 25 CCIR 012 E12 V H 224 25 CCIR 013 A V L 53 75 Italy 014 B V L 62 25 Italy 015 C V L 82 25 Italy 016 D V H 175 25 Italy 017 E V H 183 25 Italy 018 F V H 192 25 Italy 019 G V H 201 25 Italy 020 H V H 210 25 Italy 021 E21 UHF 471 25 CCIR 022 E22 UHF 479 25 CCIR 023 E23 UHF 487 25 CCIR 024 E24 UHF 495 25 CCIR 025 E25 UH...

Страница 21: ...THIS APPLIANCE IS DISTRIBUTED BY www samsungvcr com AC68 01333A ELECTRONICS ...

Отзывы: