


ENG-19
ENG-18
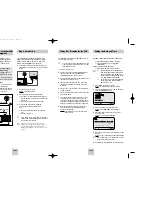
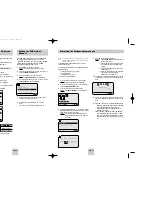
Cancelling a Preset Recording
Checking a Preset Recording
You can check your preset recordings:
◆
When you have finished presetting the VCR
◆
If you have forgotten which programmes will be
recorded
1
- Insert the cassette. Press the TIMER button.
Press the
or
❷
buttons to select the
STANDARD option and then press the
❿
button or,
◆
Press MENU on the remote control.
Result: The programming menu is displayed.
◆
Press the OK button to select TIMER
PROGRAMMING option.
Result: The TIMER PROGRAMMING menu is
displayed.
2
Press the
or
❷
buttons to select the required
programme.
3
Press the
or
❷
buttons to select and change
any values as required. For more details, refer to
the previous page.
4
On completion, press MENU twice.
You can cancel any programmes that are:
◆
Incorrect
◆
No longer required
1
- Insert the cassette. Press the TIMER button.
Press the
or
❷
buttons to select the
STANDARD option and then press the
❿
button or,
◆
Press MENU on the remote control.
Result: The programming menu is displayed.
◆
Press the OK button to select TIMER
PROGRAMMING option.
Result: The TIMER PROGRAMMING menu is
displayed.
2
Select the programme to be cancelled by pressing
the
or
❷
buttons.
3
Press the CLR/RST button to cancel the selected
programme.
Result: All the recording information is deleted and
the broadcast will not be recorded.
4
On completion, press MENU twice.
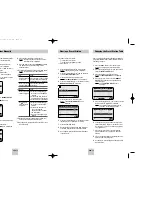
This function allows you to play back any pre-recorded
cassette.
1
Switch on both the television and your VCR.
2
Insert the video cassette to be played. If the safety
tab on the cassette is intact, press
❿
ll
.
Otherwise, the cassette is played automatically.
➢
When a cassette is loaded, the tape position is
optimized automatically to reduce disturbance
(Digital Auto Tracking).
3
To...
Then press...
Stop the playback
■
(STOP).
Eject the cassette
(EJECT)
.
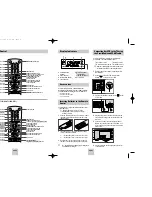
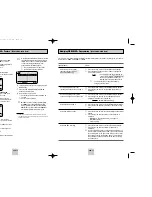
Playing a Cassette
The Picture Alignment feature enables you to optimize
the tape position automatically to obtain the best
possible picture.
When noise bars or streaks appear during playback,
adjust picture alignment by pressing the A.TRK button.
Result:
◆
The tracking bar appears.
◆
The picture is automatically adjusted.
◆
The tracking bar disappears when digital
auto tracking has been completed.
The Picture Adjustment feature allows you to adjust the
alignment manually to obtain the best possible picture.
When noise bars or streaks appear during playback,
adjust alignment manually by pressing the PROG/TRK
(
or
❷
) / TRK (
or
) buttons until the picture
is clear and stable.
Result:
◆
The tracking bar appears.
◆
The image is adjusted.
◆
The tracking bar disappears when you
release the button.
Adjusting Picture Alignment
Automatically
★
(SV-671B/SV 671I/
SV-275B/SV-271B/SV-271I Only)
Adjusting Picture Alignment
Manually
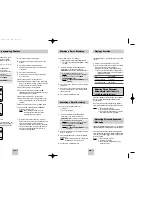
The Timer Programming feature allows you to preset
the VCR to record a programme up to one month
before that programme is to be broadcast. Up to six
programmes can be preset.
☛
Before presetting a recording, check that the
date and time are correct.
1
- Insert the cassette. Press the TIMER button.
Press the
or
❷
buttons to select the
STANDARD option and then press the
❿
button or,
◆
Press MENU on the remote control.
Result: The programming menu is displayed.
◆
Press the OK button to select TIMER
PROGRAMMING option.
Result: The TIMER PROGRAMMING menu is
displayed.
2
Press
❿
to select the input source.
3
Select the required station by pressing the
,
❷
buttons or INPUT to select the AV1, AV2 or AUX
★
(SV-675B/SV-671B/ SV-671I only) input sources.
4
Press
❿
to select the recording day.
5
Select the required day by pressing the
or
❷
buttons.
6
Press
❿
to select the recording start time.
7
Select the required hour value by pressing the
or
❷
buttons.
8
Press
❿
to select the minutes.
9
Select the required minute value by pressing the
or
❷
buttons.
10
Press
❿
to select the recording end time.
11
Select the required recording end time by pressing
the
or
❷
buttons, following the same procedure
as when selecting the recording start time.
12
Press
❿
to select the recording speed.
13
Press the
or
❷
buttons to select the SP
(Standard Play), LP (Long Play), AUTO (Auto Tape
speed Select) recording speeds.
14
Press
❿
to select the PDC recording mode.
15
Press the
or
❷
buttons to toggle between the
PDC mode (marked ON) and the non-PDC mode
(marked -).
16
When you have finished, press the MENU button.
17
Press the VCR STANDBY/ON (STANDBY/ON)
button to activate the timer.
Result: Before starting recording, the VCR
compares the timer duration with the
remaining time on the cassette.
➢
Auto Tape Speed select. The VCR’s “Auto Tape
Speed select” function compares the duration of the
timer recording to the actual recording time
remaining on the tape loaded. If there is insufficient
tape to complete a timer recording in AUTO mode,
the VCR automatically switches to LP mode to
record the whole programme.
Using the Timer Programming Feature
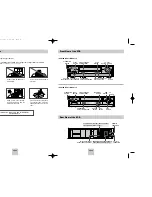
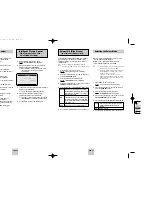
PROG
❷
➛❿
DELETE:
CLR/RST
MENU
1/JAN THU 21:28
PR DAY START
→
STOP V/P
1 MO 1 12:00
→
12:50SP ON
-- ---- --:--
→
--:---- -
-- ---- --:--
→
--:---- -
-- ---- --:--
→
--:---- -
-- ---- --:--
→
--:---- -
-- ---- --:--
→
--:---- -
★
(SV-675B/SV-275B)
** TIMER METHOD **
STANDARD
VIDEOPLUS
❷
❿
END:
MENU
❷
➛❿
OK
END:
MENU
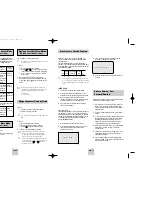
PROG OPTIONS INSTALL
CLOCK BONUS LANG
PROG
TIMER PROGRAMMING
02119G SV-675B/XEU-eng 1/12/04 4:54 PM Page 18