background image

GB

39

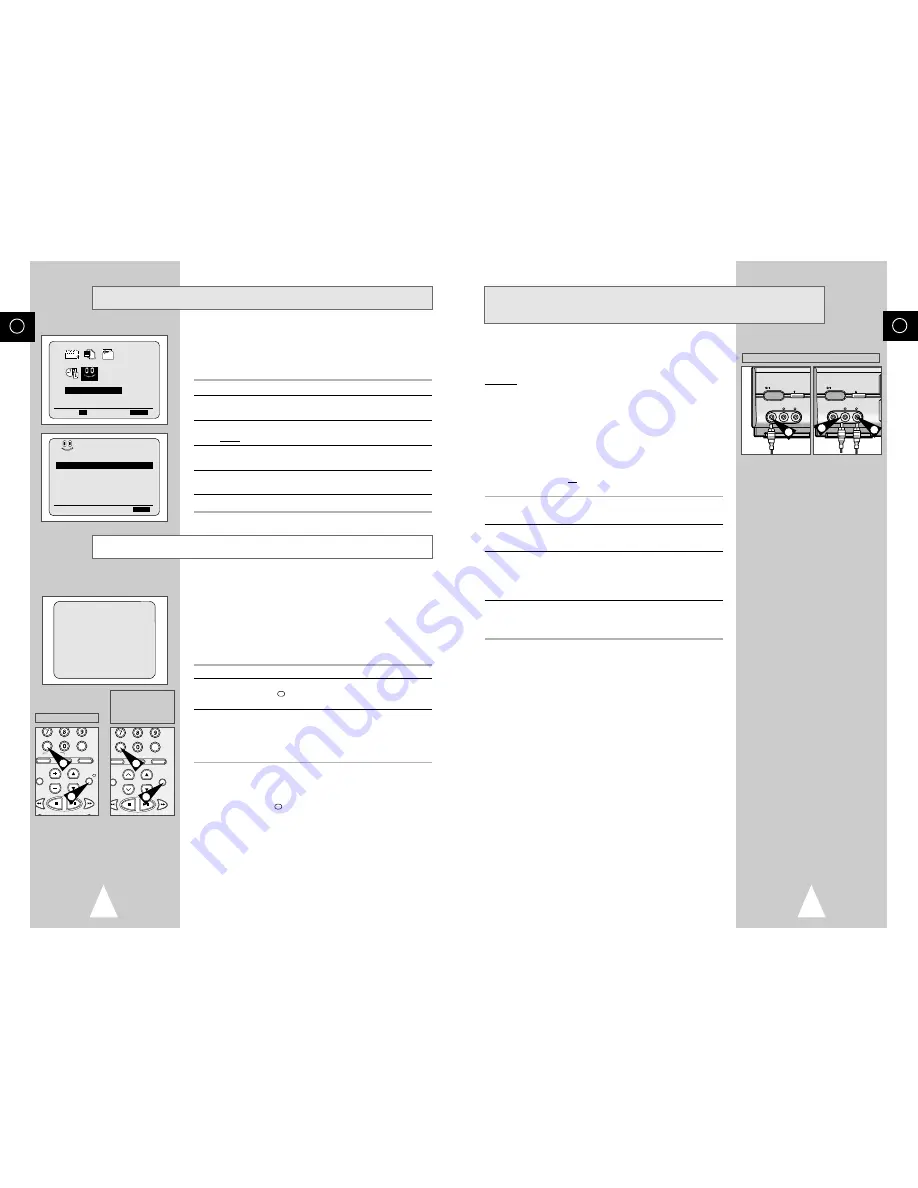
Connecting an RCA Audio/Video Input Cable  

(SV-665B/SV-661B/SV-662B/SV-661I Only)

You can connect other audio/video equipment to your VCR using
audio/video cables if the appropriate outputs are available on the
equipment chosen.

Examples:

You wish to copy a video cassette with the help of a
second VCR (see page 40).

You wish to play back and/or copy pictures taken
with a camcorder (see page 40).

Regardless of the type of connection chosen, you
must always connect the coaxial cable supplied.
Otherwise, no picture will be visible on the screen
when the VCR is switched off.

Make sure that both the television and the VCR are
switched off before connecting the cables.

1

Connect one end of the RCA audio/video cable into the VIDEO
INPUT socket on the front of the VCR.

2

Plug the other end of the audio/video cable into the appropriate
output connector on the other system (VCR or camcorder).

3

Connect one end of the RCA audio cable supplied into the AUDIO
INPUT sockets on the front of the VCR.

Take care to respect the colour coding of the left and right
channels.

4

Plug the other end of the audio cable into the appropriate output
connectors on the other system (VCR, camcorder or Hi-Fi sound
system).

EJECT

STANDBY/ON

I I

AUX

VIDEO              L   AUDIO   R

I I

I I

1

EJECT

STANDBY/ON

I I

AUX

VIDEO              L   AUDIO   R

I I

I I

3

3

(SV-665B/SV-661B/SV-662B/SV-661I)

GB

38

VI EXTEND 

(SV-665B/SV-265B Only)

To prevent delays or over-runs the VCR has a function called
Videoplus EXTEND allowing you to extend the recording time by
up to 60 minutes. 

Only use if PDC is not available or set to OFF.

1

Press the MENU button on the remote control.  

2

Press the corresponding 

œ

,

or 

buttons to select the

EASY OPERATION

option.

3

Press the OK button to select this option.
Result:

The 

EASY OPERATION

menu is displayed.

4

Press the corresponding 

œ

or

buttons, until the

VIDEOPLUS EXTEND

option is selected.

5

Press 

or

buttons to set the Videoplus EXTEND time by 

increments of 10 minutes. 

6

To turn off, press 

or

buttons repeatedly until 

OFF

shows. 

The tape counter:

Indicates the elapsed time in the play and record modes
(hours, minutes and seconds)

Is reset when a cassette is inserted in the VCR

Allows you to find the beginning of a sequence easily

If the remaining time is to be calculated correctly, you
must indicate the type of cassette being used. 

1

Insert a cassette in your VCR.

2

To set the tape counter to zero at the beginning of a sequence:

Press DISP./

or DISPLAY twice to display the counter

Press CLR/RST when you want to set the tape counter to zero

3

When you are ready,  

Start playback or Recording. 

Press the 

button.

To fast-forward or rewind to the sequence at which the
counter was set to zero, press 

➛➛

or 

❿❿

.

Some VCR information, such as the counter, can be
displayed on the television screen (unless you have
deactivated the OSD mode; refer to page 17).

Press DISP./

or DISPLAY:

Once to display the current function, programme
number, recording speed, date, time and counter

Twice to display the counter only

Three times to display the time remaining on the
cassette

Four times to clear the display

Using the Tape Counter

EASY OPERATION

PROG        OPTIONS     INSTALL

CLOCK       BONUS         LANG

œ

➛❿

OK

END:

MENU

PDC/VPS DEFAULT

:OFF

VIDEOPLUS EXTEND  :OFF

AUTO POWER OFF  

:OFF

REPEAT PLAY

:OFF

NO. OF

INTERVAL REPEAT : 5

œ❷

END:

MENU

  BONUS     

BONUS    

0:00:00

CLR/RST       F.ADV          INDEX

TV                  VCR                INPUT

REPEAT

VOL         PROG/TRK

UDIO

REC

      MENU

DISP./

SELECT

-/--

CLR/RST       F.ADV          INDEX

A.TRK                  IPC                INPUT

REPEAT

TRK          PROG

DIO

EC

      MENU

DISPLAY

2

2

2

2

(SV-665B)

(SV-661B/SV-662B/

SV-661I/SV-265B/
SV-261B/SV-262B/
SV-261I)

Содержание SV-261I

Страница 1: ...VIDEO CASSETTE RECORDER SV 665B SV 662B SV 661B SV 262B SV 265B SV 661I SV 261B SV 261I Instruction Manual PAL www samsungvcr com ...

Страница 2: ...s not long enough to reach a power point you should obtain a suitable safety approved extension lead or consult your dealer for assistance However if there is no alternative to cutting off the plug remove the fuse and then safely dispose of the plug Do not connect the plug to a mains socket as there is a risk of shock hazard from the bared flexible cord IMPORTANT The wires in the mains lead are co...

Страница 3: ...e Timer Programming Feature 28 Checking a Preset Recording 29 Cancelling a Preset Recording 29 PLAYING BACK Playing a Cassette 30 Adjusting Picture Alignment Automatically SV 661B SV 662B SV 661I SV 265B SV 261B SV 262B SV 261I Only 30 Adjusting Picture Alignment Manually 30 Intelligent Picture Control 31 Intelligent Picture Control SV 661B SV 662B SV 661I SV 265B SV 261B SV 262B SV 261I Only 31 F...

Страница 4: ... VCR or remote control During a storm and or light ning unplug the VCR from the mains socket and aerial If the remote control is not used for a long period of time remove the batteries and store it in a cool dry place VIDEO CASSETTE COMPARTMENT PLAY BUTTON RECORD BUTTON PAUSE STILL BUTTON EJECT BUTTON F F BUTTON PROGRAMME SELECTION BUTTONS REW BUTTON II REC STOP PROG II P S EJECT STANDBY ON REW F ...

Страница 5: ...TTON RECORD BUTTON MENU SELECTION BUTTON MENU SELECTION DOWN BUTTON RECORDING SPEED SELECTION BUTTON TV STANDBY ON BUTTON INDEX BUTTON FRAME ADVANCE BUTTON TUNER AV1 AV2 AUX SELECTION REPEAT SELECTION BUTTON PROGRAMME SELECTION TRACKING BUTTONS DISPLAY BUTTON PLAY PAUSE STILL BUTTON FAST FORWARD FORWARD SEARCH BUTTON MENU BUTTON MENU SELECTION UP BUTTON MENU SELECTION BUTTON OK BUTTON TIMER PROGRA...

Страница 6: ...SV 662B SV 661I Only Audio output Rear Audio RCA Out Audio Hi Fi system SV 665B SV 661B SV 662B SV 661I Only Whenever you connect an audio or video system to your VCR ensure that all elements are switched off Refer to the documentation supplied with your equipment for detailed connection instructions and associated safety precautions R D L G AUDIO OUT SORTIE AV2 SATELLITE IN TV AV1 EURO AV Display...

Страница 7: ... Plug the other end of the coaxial cable into the connector previously used for the aerial on the television 5 Connect one end of the scart cable to the AV1 EURO AV socket on the rear of the VCR You must connect your VCR to the television via the scart cable 6 Plug the other end into the appropriate connector on the television TV Connecting Your VCR to the TV using the Coaxial Cable and SCART cabl...

Страница 8: ...cting Your VCR to the TV Using the Coaxial Cable 2 Plug the VCR into the mains Result A message appears 3 Press OK button to start the auto scanning The number of stations automatically stored by the VCR depends on the number of stations that it has found The process will finish after a few minutes 4 The current time and date are displayed automatically Check the date and time if it is Correct Pre...

Страница 9: ... OUTPUT CH CH60 END MENU SV 665B SV 661B SV 662B SV 661I SV 265B SV 261B SV 262B SV 261I GB 16 Setting the Date and Time You must insert or replace the batteries in the remote control when you Purchase the video cassette recorder Find that the remote control is no longer working correctly 1 Push the tab in the direction of the arrow to release the battery compartment cover on the rear of the remot...

Страница 10: ...PR 1 CH MFT NAME MEMORY OK END MENU TV STATION TABLE PR CH NAME 1 27 CAEB 2 3 4 5 SWAPPING OK DELETE CLR RST MENU GB 18 Presetting the Stations Automatically AUTO SET UP PLEASE WAIT 2 I I END MENU YOUR DATA WILL BE LOST PRESS OK TO CONTINUE MENU TO EXIT You do not need to preset the stations if you have already set them automatically see Plug Auto Set Up on page 14 Your VCR contains a built in tun...

Страница 11: ...reset Station Table INSTALLATION PROG OPTIONS INSTALL CLOCK BONUS LANG INSTALL OK END MENU INSTALL AUTO SET UP MANUAL SET UP VCR OUTPUT CH CH60 END MENU TV STATION TABLE PR CH NAME 1 27 CAEB 2 3 4 5 SWAPPING OK MENU TV STATION TABLE PR CH NAME 1 2 3 27 CAEB 4 5 SWAPPING OK MENU GB 20 If you have stored a TV station That you do not require At the wrong programme position you can cancel it 1 Press t...

Страница 12: ... at two different speeds SP Standard Play LP Long Play In Long Play modes Each cassette lasts twice as long The recording is of a slightly lower quality To record a cassette Press the SPEED button on the remote control until In standard play mode SP is displayed In long play mode LP is displayed Selecting the Cassette Type If you wish to use the tape counter to display the time remaining on a cass...

Страница 13: ...2B SV 661I SV 265B SV 261B SV 262B SV 261I GB 24 Recording a Programme Immediately Protecting a Recorded Cassette Video cassettes have a safety tab to prevent accidental erasure When this tab has been removed you cannot record on the tape 1 If you wish to protect a cassette break off the tab using a small screwdriver 2 To re record over a protected cassette safety tab broken cover the hole with ad...

Страница 14: ...SV 265B Only Before presetting your VCR Switch on both the television and your VCR Check that the date and time are correct Insert the cassette on which the programme is to be recorded safety tab intact Up to six programmes can be preset 1 Press the TIMER button Result The TIMER METHOD is displayed 2 Press the corresponding or buttons until the VIDEOPLUS option is selected 3 Press the button to se...

Страница 15: ... can be preset Before presetting a recording check that the date and time are correct 1 Insert the cassette Press the TIMER button Press the or buttons to select the STANDARD option and then press the button or Press MENU on the remote control Result The programming menu is displayed Press the OK button to select TIMER PROGRAMMING option Result The TIMER PROGRAMMING menu is displayed 2 Press to se...

Страница 16: ...R RST F ADV INDEX A TRK IPC INPUT REPEAT TRK PROG AUDIO DISPLAY 1 PICTURE IPC OFF SOFTEN SHARPEN ON OFF Intelligent Picture Control SV 661B SV 662B SV 661I SV 265B SV 261B SV 262B SV 261I Only SV 665B SV 661B SV 662B SV 661I SV 265B SV 261B SV 262B SV 261I GB 30 The Picture Adjustment feature allows you to adjust the alignment manually to obtain the best possible picture When noise bars or streaks...

Страница 17: ...T menu is displayed 4 Press the corresponding or buttons until the FORMAT 16 9 option is selected 5 Press the button to select AUTO ON OFF AUTO Set when you use a wide TV The VCR automatically detects if programmes being played back or recorded are in normal or Wide Screen format ON The VCR always plays back and records in 16 9 Wide Screen format Set if the VCR cannot detect Wide Screen TV program...

Страница 18: ...al speed To return to normal playback mode press the II button 4 Whilst in Picture Search mode if you press the button again the VCR will enter normal Fast Forward mode 5 Likewise whilst in Picture Search mode if you press the button again the VCR will enter normal Rewind mode 6 If when Rewinding or Fast Forwarding you press the or button the VCR will enter the Picture Search mode GB Picture Searc...

Страница 19: ... fast forward or rewind to a specific index and start playback from that point Depending on the direction selected the indexes are numbered as follows This VCR uses a standard indexing system VISS As a result it will recognize any indexes marked by other VCRs using the same system and vice versa INTRO SCAN 1 To search for a specific index press INDEX 2 Press the or buttons depending on the directi...

Страница 20: ...lect the EASY OPERATION option 3 Press the OK button to select this option Result The EASY OPERATION menu is displayed 4 Press the corresponding or buttons until the VIDEOPLUS EXTEND option is selected 5 Press or buttons to set the Videoplus EXTEND time by increments of 10 minutes 6 To turn off press or buttons repeatedly until OFF shows The tape counter Indicates the elapsed time in the play and ...

Страница 21: ... 6 7 3 5 5 4 GB 40 This function allows you to start a new recording at a specific position on the cassette while maintaining a very smooth scene change 1 Insert the cassette to be edited in your VCR 2 Press the ll button to start playback 3 When you reach the position from which you wish to start the new recording press the ll button 4 Press the F ADV button again as often as necessary to advance...

Страница 22: ...V 661I Low Power Mode reduces the Standby power consumption of the VCR when in Standby mode Useful for example when you are away from the house on holiday It saves actually turning the VCR off 1 Press MENU on the remote control Result The programming menu is displayed 2 Press the corresponding or buttons to select the USER SET option 3 Press the OK button to select this option Result The USER SET ...

Страница 23: ...WEST MIDLANDS COVENTRY D J HENRY TEL 01203 431393 WEST MIDLANDS DUDLEY J S STOREY ELECTRICAL TEL 01384 455608 WALSALL BEAVER ELECTRONICS TEL 01922 725554 WARLEY MERRIVALE TV SVCS TEL 0121 544 6273 6350 WILTSHIRE SWINDON COLORITE TV LTD TEL 01793 641038 WORCESTERSHIRE WORCESTER THE HI FI CAR RADIO REPAIR TEL 01905 26623 SOUTH YORKSHIRE SHEFFIELD GRAPHIC ELECTRONIC SVCS TEL 0114 256 2791 BARNSLEY AL...

Страница 24: ...this warranty are the consumers sole rights and Samsung its subsidiaries and distributors shall not be liable for indirect or consequential loss or any damage to records compact discs videos or audio taper or any other related equipment or material SAMSUNG ELECTRONICS U K LTD Please ensure the form above is completed at the time of purchase and present it to the dealer to quality for guarantee ser...

Страница 25: ...THIS APPLIANCE IS DISTRIBUTED BY www samsungvcr com AC68 01880C Rev 01 ELECTRONICS ...

Отзывы: