background image

13 - תירבע

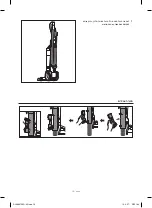
קבאה בא

וש לועפת

יפוקסלטה רוניצה תכראה

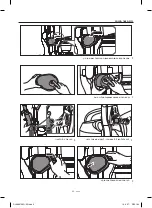
רוניצ בצמ

1

2

•  

.באושה ףוגמ רוניצה תא דרפה ןכמ רחאלו הלעמ יפלכ תידיה הסכמ תא ףוחד

•  

 .רוניצה תא ךיראהל ידכ רוניצה יבג לעש רותפכה לע ץחל

הדימע בצמב שומיש

הדימע בצמ

1

2

•  

.הליענה תא ררחשל ידכ תונידעב הרוחא תידיה תא הטה ןכמ רחאלו תשרבמה לע ךלגר ףכ תא םיש

•  

.יוביכ/הלעפהה גתמ לע ץחל

DJ68-00709G-HE.indd   13

15. 4. 27.   �� 11:00

DJ68-00709G-00.indb   16

15. 4. 27.   �� 11:04

Содержание SU10F40 Series

Страница 1: ...Cleaner user manual Please read the User Manual thoroughly before operating the vacuum For indoor use only Thank you for purchasing a Samsung product SU10F40 SERIES DJ68 00709G 00 DJ68 00709G 00 indb...

Страница 2: ...e 13 Using upright mode 14 Operating the Brush bar On Off Switch 14 Resetting the overload protector 14 Using the vacuum s handle The dust bin handle 15 Using the accessory kit optional MAINTENANCE 17...

Страница 3: ...Indicates that a risk of personal injury or material damage exists OTHER SYMBOLS USED Indicates something you must NOT do Indicates instructions you must follow Indicates that you must disconnect the...

Страница 4: ...cuum is used by or near children 4 Use only as described in this manual Use only the manufacturer s recommended attachments 5 Do not use with a damaged cord or plug If the vacuum is not working as it...

Страница 5: ...ur vacuum cleaner indoors in a cool and dry area 18 Use only on dry indoor surfaces 19 Do not modify the polarized plug to fit a non polarized outlet or extension cord 20 Do not touch the brush drum w...

Страница 6: ...ug when rewinding onto cord reel Do not allow plug to whip when rewinding 28 Do not pick up hard or sharp objects such as glass nails screws coins etc 29 Always turn off the vacuum before connecting o...

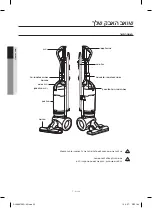
Страница 7: ...in Release Button Carrying Handle Dust Bin Handle CAUTION Do not plug in your vacuum cleaner until you are familiar with all instructions and operating procedures WARNING Plastic film can be dangerous...

Страница 8: ...6 Empty carton Find the parts shown above before disposing of packing materials 1 Vacuum cleaner body 2 Handle 3 Pipe 4 2 In 1 Accessory 5 Accessory Kit Optional depending on the model 6 Users Manual...

Страница 9: ...Click 2 3 1 Stand the vaccum upright and then insert the bottom of the pipe into the body hole until you hear a click 2 Insert the hook on the top portion of the pipe into the hole in the handle as sh...

Страница 10: ...English 10 Wind cord around the cord hangers and secure with clip ATTACHING THE ACCESSORIES DJ68 00709G 00 indb 10 15 4 27 11 03...

Страница 11: ...English 11 Before using the vacuum cleaner USING THE ACCESSORIES Crevice tool Dusting Brush DJ68 00709G 00 indb 11 15 4 27 11 03...

Страница 12: ...English 12 STOWING THE POWER CORD CAUTION When removing the plug from an electrical outlet grasp the plug not the cord Operating the vacuum DJ68 00709G 00 indb 12 15 4 27 11 03...

Страница 13: ...cap and then separate the pipe from the body Push the button on the pipe to make the pipe longer USING UPRIGHT MODE Upright mode 1 2 Place a foot on the brush and then tilt the handle back gently to...

Страница 14: ...s not work RESETTING THE OVERLOAD PROTECTOR The overload protector shuts off the brush motor if the brush bar becomes obstructed To reset the overload protector use a pen tip to press the reset switch...

Страница 15: ...English 15 Operating the vacuum USING THE ACCESSORY KIT OPTIONAL Funiture tool Upholstery Mini turbo brush DJ68 00709G 00 indb 15 15 4 27 11 03...

Страница 16: ...English 16 Pet Tool Rake the hair Seperate the cover from the pet tool and then throw the hair away Re attach the cover DJ68 00709G 00 indb 16 15 4 27 11 03...

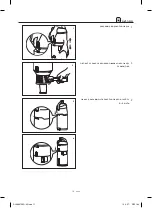
Страница 17: ...then push the button near the bottom of the bin 2 Alternately for asthma or allergy sufferers To empty the dust bin place the bottom of the bin into a plastic bag as shown Holding the bag firmly push...

Страница 18: ...E GRILLE Separate the dust bin from the vacuum s body 1 Clean the grille with the dusting brush to remove lint 2 To re attach the dust bin to the vacuum s body follow steps 3 and 4 3 4 DJ68 00709G 00...

Страница 19: ...PREMOTOR FILTER Pull the dust bin cover to open 1 Remove the filter from the dust bin 2 Shake the filter to remove dust and then wash the filter 3 Leave the filter in the shade until completely dry 4...

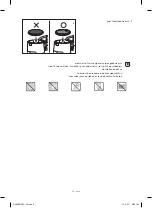
Страница 20: ...sure the filter is completely dry before putting it back into the vacuum cleaner Allow it to dry for 12 hours Do not use a wet filter Replace the dust filter if it becomes damaged or deformed The dust...

Страница 21: ...ver 2 Separate the filter from the vacuum s body 3 Shake the filter to remove dust 4 Clean the filter when suction is noticeably and continuously reduced or the vacuum cleaner overheats abnormally Not...

Страница 22: ...the vacuum s body 5 Re assemble the filter and filter cover 6 Click Re attach the dust bin to the vacuum 7 The dust bin will not re attach to the vacuum if the filter cover is not installed correctly...

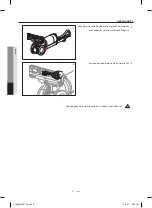
Страница 23: ...lug the vaccum Lie the vaccum down so its bottom is accessible as shown 1 Carefully cut off any hair or string caught in the brush 2 CAUTION Before inspecting the brush bar turn off the brush bar and...

Страница 24: ...ush the release button on the brush housing and then pull the hose out 2 Check for clogs in the opening of the brush housing and in the hose 3 When done re attach the hose to the brush housing 4 Click...

Страница 25: ...PECTING THE BRUSH ROLL If a clog is present or debris is visible inspect the brush roll 1 2 INSPECTING THE BELT If the belt is broken or cracked replace it with a new belt following the instructions o...

Страница 26: ...Diverter cover using a flat head screwdriver Clean the inside of the cover with a dry cloth Push the button 2 3times to check if it works properly Assemble the handle with pipe Re attach the cover aft...

Страница 27: ...low suction Empty the dust bin Clean the filter and confirm that the filter assembly is positioned properly Check the hose connection or flow path Dust escaping from the vacuum Empty the dust bin Clea...

Страница 28: ...DJ68 00709G 00 indb 28 15 4 27 11 03...

Страница 29: ...Samsung Series SU10F40 DJ68 00709G 00 indb 1 15 4 27 11 03...

Страница 30: ...7 7 8 9 9 10 11 12 12 13 13 14 14 14 15 17 17 18 19 21 23 24 25 26 27 DJ68 00709G 00 indb 2 15 4 27 11 03...

Страница 31: ...3 DJ68 00709G 00 indb 3 15 4 27 11 03...

Страница 32: ...4 1 2 3 4 5 DJ68 00709G 00 indb 4 15 4 27 11 03...

Страница 33: ...5 6 7 8 9 10 11 12 13 14 15 16 17 DJ68 00709G 00 indb 5 15 4 27 11 03...

Страница 34: ...6 18 19 20 21 22 23 8 24 25 26 27 28 29 30 DJ68 00709G 00 indb 6 15 4 27 11 03...

Страница 35: ...7 DJ68 00709G 00 indb 7 15 4 27 11 03...

Страница 36: ...8 1 2 3 4 5 6 1 2 3 4 5 6 DJ68 00709G 00 indb 8 15 4 27 11 03...

Страница 37: ...9 0N OFF 1 2 3 1 2 3 DJ68 00709G 00 indb 9 15 4 27 11 03...

Страница 38: ...10 DJ68 00709G 00 indb 10 15 4 27 11 03...

Страница 39: ...11 DJ68 00709G 00 indb 11 15 4 27 11 03...

Страница 40: ...12 DJ68 00709G 00 indb 12 15 4 27 11 03...

Страница 41: ...13 1 2 1 2 DJ68 00709G 00 indb 13 15 4 27 11 03...

Страница 42: ...14 1 ON OFF 2 DJ68 00709G 00 indb 14 15 4 27 11 03...

Страница 43: ...15 DJ68 00709G 00 indb 15 15 4 27 11 03...

Страница 44: ...16 DJ68 00709G 00 indb 16 15 4 27 11 03...

Страница 45: ...17 MAX 1 2 3 4 DJ68 00709G 00 indb 17 15 4 27 11 03...

Страница 46: ...18 1 2 3 4 3 4 DJ68 00709G 00 indb 18 15 4 27 11 03...

Страница 47: ...19 1 2 3 4 DJ68 00709G 00 indb 19 15 4 27 11 03...

Страница 48: ...20 5 1 2 12 DJ68 00709G 00 indb 20 15 4 27 11 03...

Страница 49: ...21 1 2 3 4 DJ68 00709G 00 indb 21 15 4 27 11 03...

Страница 50: ...22 5 6 7 DJ68 00709G 00 indb 22 15 4 27 11 04...

Страница 51: ...23 1 2 DJ68 00709G 00 indb 23 15 4 27 11 04...

Страница 52: ...24 1 2 3 4 DJ68 00709G 00 indb 24 15 4 27 11 04...

Страница 53: ...25 1 2 3 4 DJ68 00709G 00 indb 25 15 4 27 11 04...

Страница 54: ...26 2 3 DJ68 00709G 00 indb 26 15 4 27 11 04...

Страница 55: ...27 2 3 26 DJ68 00709G 00 indb 27 15 4 27 11 04...

Страница 56: ...DJ68 00709G 00 indb 28 15 4 27 11 04...

Страница 57: ...DJ68 00709G HE indd 28 15 4 27 11 00 DJ68 00709G 00 indb 1 15 4 27 11 04...

Страница 58: ...27 2 3 page26 DJ68 00709G HE indd 27 15 4 27 11 00 DJ68 00709G 00 indb 2 15 4 27 11 04...

Страница 59: ...26 2 3 DJ68 00709G HE indd 26 15 4 27 11 00 DJ68 00709G 00 indb 3 15 4 27 11 04...

Страница 60: ...25 1 2 3 4 DJ68 00709G HE indd 25 15 4 27 11 00 DJ68 00709G 00 indb 4 15 4 27 11 04...

Страница 61: ...24 1 2 3 4 DJ68 00709G HE indd 24 15 4 27 11 00 DJ68 00709G 00 indb 5 15 4 27 11 04...

Страница 62: ...23 1 2 DJ68 00709G HE indd 23 15 4 27 11 00 DJ68 00709G 00 indb 6 15 4 27 11 04...

Страница 63: ...22 5 6 7 DJ68 00709G HE indd 22 15 4 27 11 00 DJ68 00709G 00 indb 7 15 4 27 11 04...

Страница 64: ...21 1 2 3 4 DJ68 00709G HE indd 21 15 4 27 11 00 DJ68 00709G 00 indb 8 15 4 27 11 04...

Страница 65: ...20 5 12 DJ68 00709G HE indd 20 15 4 27 11 00 DJ68 00709G 00 indb 9 15 4 27 11 04...

Страница 66: ...19 1 2 3 4 DJ68 00709G HE indd 19 15 4 27 11 00 DJ68 00709G 00 indb 10 15 4 27 11 04...

Страница 67: ...18 1 2 4 3 3 4 DJ68 00709G HE indd 18 15 4 27 11 00 DJ68 00709G 00 indb 11 15 4 27 11 04...

Страница 68: ...17 MAX 1 2 3 4 DJ68 00709G HE indd 17 15 4 27 11 00 DJ68 00709G 00 indb 12 15 4 27 11 04...

Страница 69: ...16 DJ68 00709G HE indd 16 15 4 27 11 00 DJ68 00709G 00 indb 13 15 4 27 11 04...

Страница 70: ...15 DJ68 00709G HE indd 15 15 4 27 11 00 DJ68 00709G 00 indb 14 15 4 27 11 04...

Страница 71: ...14 1 ON OFF 2 DJ68 00709G HE indd 14 15 4 27 11 00 DJ68 00709G 00 indb 15 15 4 27 11 04...

Страница 72: ...13 1 2 1 2 DJ68 00709G HE indd 13 15 4 27 11 00 DJ68 00709G 00 indb 16 15 4 27 11 04...

Страница 73: ...12 DJ68 00709G HE indd 12 15 4 27 11 00 DJ68 00709G 00 indb 17 15 4 27 11 04...

Страница 74: ...11 DJ68 00709G HE indd 11 15 4 27 11 00 DJ68 00709G 00 indb 18 15 4 27 11 04...

Страница 75: ...10 DJ68 00709G HE indd 10 15 4 27 11 00 DJ68 00709G 00 indb 19 15 4 27 11 04...

Страница 76: ...9 0N OFF 1 2 3 1 2 3 DJ68 00709G HE indd 9 15 4 27 10 59 DJ68 00709G 00 indb 20 15 4 27 11 04...

Страница 77: ...8 1 2 3 4 5 6 1 2 3 4 1 2 5 6 DJ68 00709G HE indd 8 15 4 27 10 59 DJ68 00709G 00 indb 21 15 4 27 11 04...

Страница 78: ...7 DJ68 00709G HE indd 7 15 4 27 10 59 DJ68 00709G 00 indb 22 15 4 27 11 04...

Страница 79: ...6 26 27 28 29 30 DJ68 00709G HE indd 6 15 4 27 10 59 DJ68 00709G 00 indb 23 15 4 27 11 04...

Страница 80: ...5 9 10 11 12 13 14 15 16 17 18 19 20 21 22 23 8 24 25 DJ68 00709G HE indd 5 15 4 27 10 59 DJ68 00709G 00 indb 24 15 4 27 11 04...

Страница 81: ...4 1 2 3 4 5 6 7 8 DJ68 00709G HE indd 4 15 4 27 10 59 DJ68 00709G 00 indb 25 15 4 27 11 04...

Страница 82: ...3 DJ68 00709G HE indd 3 15 4 27 10 59 DJ68 00709G 00 indb 26 15 4 27 11 04...

Страница 83: ...07 7 8 09 9 10 11 12 12 13 13 14 14 14 15 17 17 18 19 21 23 24 25 26 27 DJ68 00709G HE indd 2 15 4 27 10 59 DJ68 00709G 00 indb 27 15 4 27 11 04...

Страница 84: ...Samsung SU10F40 SERIES DJ68 00709G HE indd 1 15 4 27 10 59 DJ68 00709G 00 DJ68 00709G 00 indb 28 15 4 27 11 04...

Отзывы: