Samsung SR8855 Скачать руководство пользователя страница 23

Operating the cleaner

 _23

Operating the cleaner

03  
OPERA

TING

 THE
 CLEANER

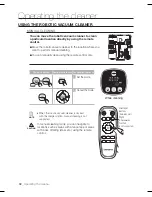
INSTALLING THE ROBOTIC VACUUM CLEANER

ABOUT THE BATTERY

-  This battery is only for Samsung robotic vacuums. It is strictly prohibited to use it for other 

appliances or for other purposes.

- Do not disassemble or modify the battery.

- Charge it in a location with good ventilation.

- Do not expose the battery to fire and do not heat it.

- Do not connect any metallic objects to the (+) or (-) terminals of the battery.

- Keep it indoors (0

~40

).

- Before you discard this product, dispose of batteries in an environmentally safe manner.

- Do not discard this batteries with your regular household trash.

- Follow all local regulations when disposing of old batteries.

  The robotic vacuum cleaner is powered by an environment-friendly Nickel Metal Hydride 

(NiMH) rechargeable battery, and an over-charge prevention function guarantees an 

extended life time.


The battery warranty period is 6 months from the 

date of purchase.

  When purchasing a battery, ask the customer care 

center for the genuine part symbol (

) and 

model number before purchasing it.

✽ 

Battery information : 

    AA Size Ni-MH,  UNION SUPPO, Model HPY,  12 (EA).

✽ 

 If the battery is out of order, do not disassemble it. Contact your nearest customer care 

center.

✽ 

 An increased charging time and a shorter battery life indicates the near end of the battery 

life. Please contact an authorized customer care center to replace your battery.

The rechargeable battery incorporated in this product is not user replaceable.

For information on its replacement, please contact your service provider.

DJ68-00518F.indb23

2010.2.231:22:6PM

Содержание SR8855

Страница 1: ...this unit please read the instructions carefully For indoor use only English imagine the possibilities Thank you for purchasing a Samsung product To receive a more complete service please register you...

Страница 2: ...e exists OTHER SYMBOLS USED NOTE Explains terms to help users understand how use the product properly SAFETY INFORMATION Before operating the appliance please read this manual thoroughly and retain it...

Страница 3: ...on or instruction concerning use of the appliance by a person responsible for their safety Children should be supervised to ensure that they do not play with the appliance BATTERY CHARGER Do not modif...

Страница 4: ...h ammonia drain cleaner etc Do not pick up anything that is burning or causing a smoke such as cigarettes matches or hot ashes Do not use to pick up flammable or combustible liquids such as gasoline n...

Страница 5: ...battery 24 Setting the Time 25 Installing the VIRTUAL GUARD 27 Using robotic vacuum cleaner 27 Starting stopping cleaning 28 Recharging 29 Auto cleaning 30 Spot cleaning 31 Max cleaning 32 Manual clea...

Страница 6: ...s may result in fire or electric shock Do not use multiple plugs in a single socket Do not leave the cord lying exposed on the floor This may result in fire or electric shock Do not pull the power plu...

Страница 7: ...ms and narrow and highly situated locations such as tables or shelves Critical damage abnormal operation and breakage may occur when used in these locations Open all doors to clean all rooms When a do...

Страница 8: ...ot step or sit on the robotic vacuum Children may fall and injure themselves or critical damage may occur to the product When a child or pet is left alone make sure to turn off the Power Switch of the...

Страница 9: ...il or pet litter This may result in critical damage to the product Liquids may spread through the wheels resulting in contamination WARNING Objects in front of the charger will prevent the robotic vac...

Страница 10: ...from the robotic vacuum cleaner immediately turn off the Power Switch and call the customer care center WARNING Do not use the robotic vacuum cleaner on a table or other high locations This may resul...

Страница 11: ...spray water directly onto the exterior or wipe it with a volatile material such as benzene thinner or alcohol This may result in critical damage to the product CAUTION The unit must not be disassembl...

Страница 12: ...rom the customer care center Failing to do so may result in fire or electric shock WARNING Before cleaning the charger make sure to disconnect the power cord for safety WARNING When removing foreign s...

Страница 13: ...orners by reaching to them as close as possible 6 Scheduled Cleaning Mode At the specified time the cleaning robot cleans the floor 7 Daily Cleaning Mode The cleaning robot cleans the floor everyday a...

Страница 14: ...uum cleaner does crash into an obstacle the 2 bumper sensors absorb the impact Edge Cleaning Side ROTATING Brush The edge cleaning side rotating brush cleans dust from the edges Auto Charging When the...

Страница 15: ...02 Assembling the cleaner COMPONENTS Main Body Others Components Charger Station Remote Control User Manual 2 Battery Remote Control Cradle VIRTUALGUARD Spare Edge Cleaning Side Brush 2 Spare Filter S...

Страница 16: ...sor Obstacle Sensor Display Panel Camera Obstacle Sensor Bumper Sensor VIRTUAL GUARD Sensor Remote Control Sensor Remote Control Sensor Dust Bin Dust Bin Eject Button Dust Outlet Driving Wheel Battery...

Страница 17: ...eries type D before use Installing the batteries Lift the cover of the VIRTUAL GUARD while pressing the locking tab Install the batteries into the VIRTUAL GUARD as shown by the figure below If the bat...

Страница 18: ...talled with the wrong polarity the remote control will not work After inserting the tip of the cover into the slot push the other end to close it until it clicks into place 1 2 3 Specification AAA typ...

Страница 19: ...ger station to charge its battery 6 Cleaning Mode Display Each time the Cleaning Mode button is pressed the corresponding cleaning mode is displayed a Auto Mode This icon turns on when Auto cleaning m...

Страница 20: ...he robotic vacuum cleaner to a particular section by using Fence virtual wall mode or clean several sections one by one using Guard virtual door mode Installing the robotic vacuum cleaner Turning the...

Страница 21: ...omatically If the robotic vacuum cleaner is separated from the charger the battery is automatically discharged 2 There should be no obstacles 0 5m to the left and right and within 1 m of the front 1 I...

Страница 22: ...e Power Switch at the bottom of the robotic vacuum cleaner off and on Reset Re plug the power of the charger Reset Check whether there are any foreign substances on the charge connector and wipe the c...

Страница 23: ...isposing of old batteries The robotic vacuum cleaner is powered by an environment friendly Nickel Metal Hydride NiMH rechargeable battery and an over charge prevention function guarantees an extended...

Страница 24: ...and Daily Cleaning functions properly setting the time is necessary You can only set the time using the remote control You can only set the time using the remote control Suppose current time is 07 00...

Страница 25: ...de The green lamp flashes Off The lamp is turned off 2 Setting the mode Whenever you press the Mode Power button Fence virtual wall mode Guard virtual door mode Power off is selected in this sequence...

Страница 26: ...ed simultaneously they may malfunction due to interference of the infrared signals Turn the VIRTUAL GUARD in another direction or set the fence length to an appropriate value if the distance detection...

Страница 27: ...ns Each robotic vacuum function only runs when the Power Switch is turned on When the robotic vacuum is operating press the button to cancel the operation and select a function Using the remote contro...

Страница 28: ...the Recharging button Troubleshooting when the robotic vacuum cleaner does not return to the charger Check the installation of the charger When the charger is in a location where the charger cannot g...

Страница 29: ...nd resume cleaning after charging its battery Number of cleaning operations resumed Once While cleaning When cleaning is complete Cancel the mode 2 1 Set the mode Main unit button Remote control butto...

Страница 30: ...ean While cleaning When cleaning is complete In Spot cleaning mode the robotic vacuum cleaner cleans an area with a length of 1 5m and a width of 1 5m When cleaning is completed the robotic vacuum cle...

Страница 31: ...returns to the charger station and resumes cleaning after charging the battery Number of resumed cleaning operations Once While cleaning Cancel the mode 2 1 Set the mode Main unit button Remote contr...

Страница 32: ...anually clean using the remote control only In manual cleaning mode you can navigate to locations such as areas with a fence tape or areas with a risk of falling stairs etc using the remote control Wh...

Страница 33: ...aner remembers its original position while moving If the battery level becomes too low while cleaning the robotic vacuum cleaner will automatically return to the charger station and resume cleaning af...

Страница 34: ...our 4 Set the minutes 5 Complete the settings 6 Main unit button Remote control button Configuration Sequence Example The current time 07 00 a m The desired cleaning start time 09 30 a m Decrease Incr...

Страница 35: ...n Enter Daily Cleaning mode and confirm that the configured time is correct Check the daily reservation time 1 Start the setting 2 Set the hour 3 Confirm the hour 4 Set the minutes 5 Complete the sett...

Страница 36: ...cuum cleaner Cleaning the Sensor Window and the Camera You must turn off the Power Switch at the bottom of the main unit before cleaning the robotic vacuum Never spray water thinner benzene etc direct...

Страница 37: ...the Dust Bin and the Filter 2 Separate the dust bin cover by pulling it in the direction of the arrow in the figure 1 Press the Dust Bin Eject PUSH button and pull the dust bin to separate the dust bi...

Страница 38: ...e grid pattern of the filter is facing downwards It cannot be installed in the wrong direction 4 Wipe the dust from the filter and the dust bin You can wash them with water 6 Close the dust bin cover...

Страница 39: ...You must turn off the Power Switch at the bottom of the main unit before cleaning the robotic vacuum 3 Lift the power brush up from the main unit 4 Remove any foreign substances such as long hairs or...

Страница 40: ...t clicks into place To prevent the robotic vacuum cleaner from becoming clogged be careful not to vacuum tooth picks or cotton swabs When removing foreign substances become difficult contact a custome...

Страница 41: ...nit before cleaning the robotic vacuum 3 Turning the side rotating brush repeat the procedures in Step 2 4 If hair or string is wrapped between the main unit and the side rotating brush undo the screw...

Страница 42: ...pair of nippers that are not sharp at the ends if necessary 1 When cleaning the driving wheel place a soft cloth on the floor and flip the main unit placing it down carefully You must turn off the Po...

Страница 43: ...el and is LO displayed in the display panel Lift up the robotic vacuum cleaner manually dock the robotic onto the charger to charge it Has the robotic vacuum cleaner become hooked on wires on the floo...

Страница 44: ...VIRTUAL GUARD or set the distance to an appropriate value Robotic vacuum cleaner passes through the VIRTUAL GUARD Are the batteries of the VIRTUAL GUARD worn out Replace the batteries 2 type D LR20 al...

Страница 45: ...urn off the Power Switch at the bottom and remove the foreign substance from the right driving wheel Check bumper sensor Slightly pull the stuck bumper outward A foreign substance dust stain etc is on...

Страница 46: ...46_ Product specification Product specification Charger Station Main Body 93 mm Height 355 mm Length 355 mm Width 275 mm Width 161 mm Length 122 mm Height...

Страница 47: ...ifications 14 4V 2 000 mA Cleaning Specifications Dust bin capacity About 0 6 Charging type Auto Charging Manual Charging Cleaning mode Auto Spot Max Manual Edge Scheduled Cleaning Setting Daily Clean...

Страница 48: ...e any questions or comments relating to Samsung products please contact the SAMSUNG customer care center Country Customer Care Center Web Site Switzerland 0848 SAMSUNG 7267864 CHF 0 08 min www samsung...

Страница 49: ...Produkt entschieden haben Produkt registrieren und gewinnen unter www samsung com register Robo Sauger Benutzerhandbuch Lesen Sie die Anweisungen sorgf ltig durch ehe Sie das Ger t in Betrieb nehmen...

Страница 50: ...E VERWENDETE SYMBOLE HINWEIS Dieses Zeichen weist darauf hin dass Erkl rungen folgen damit die Benutzer besser verstehen wie sie das Ger t richtig verwenden sollen SICHERHEITSINFORMATIONEN Bitte lesen...

Страница 51: ...t verantwortliche Person eine Unterweisung zur Bedienung des Ger ts erhalten haben Kinder m ssen beaufsichtigt werden damit sie nicht mit dem Ger t spielen k nnen BATTERIELADEGER T Manipulieren Sie de...

Страница 52: ...bleiche Ammoniak Abflussreiniger usw auf Saugen Sie nichts auf was brennt oder Rauch erzeugt z B Zigaretten Streichh lzer oder hei e Asche Verwenden Sie das Ger t nicht um leicht entz ndliche oder bre...

Страница 53: ...mationen zur Batterie 24 Einstellen der Uhrzeit 25 Einbau des VIRTUAL GUARD 27 Verwenden des Robo Saugers 27 Starten Stoppen des Staubsaugers 28 Aufladen 29 Autosaugen 30 Punktsaugen 31 Max cleaning 3...

Страница 54: ...von Stromschl gen oder Brand Schlie en Sie nicht mehrere Ger te an eine Steckdose an Lassen Sie das Kabel nicht ungesch tzt auf dem Boden herumliegen Andernfalls besteht die Gefahr von Stromschl gen...

Страница 55: ...B Tischen oder Regale Bei Einsatz in solchen Bereichen k nnen schwerste Sch den Betriebsst rungen und Bruch auftreten ffnen Sie alle T ren damit alle Zimmer gesaugt werden Wenn eine T r geschlossen is...

Страница 56: ...eten oder sich daraufsetzen Kinder k nnten hinfallen und sich verletzen oder k nnen schwerste Sch den am Ger t auftreten Wenn ein Kind oder Haustier alleine zu Hause ist vergessen Sie nicht den Robo S...

Страница 57: ...om glich aufsaugt Dies kann zu schwersten Sch den am Ger t f hren Die Fl ssigkeiten k nnen sich ber die R der ausbreiten und so zu Verunreinigungen f hren WARNUNG Gegenst nde vor dem Ladeger t verhind...

Страница 58: ...usche Geruch oder Rauch Auftreten schalten Sie das Ger t sofort mit dem Netzschalter aus und rufen Sie das Kundendienstzentrum an WARNUNG Verwenden Sie den Robo Sauger nicht auf Tischen oder an ander...

Страница 59: ...er t reinigen d rfen Sie kein Wasser direkt auf die Au enfl chen spr hen oder es mit Chemikalien wie Reinigungsbenzin Verd nner oder Alkohol abwischen Dies kann zu schwersten Sch den am Ger t f hren V...

Страница 60: ...endienstcenter ersetzen Andernfalls besteht die Gefahr von Stromschl gen oder Brand WARNUNG Vergewissern Sie sich vor dem Reinigen des Ladeger ts zu Ihrer Sicherheit das Netzkabel aus der Dose gezogen...

Страница 61: ...swirkung der Kollision zu reduzieren und der Sto sensor hilft dabei 6 Zeitplanermodus Zur angegebenen Zeit reinigt der Robo Sauger den Boden 7 Modus f r t gliche Reinigung Der Robo Sauger reinigt den...

Страница 62: ...trotzdem mit einem Hindernis kollidieren sollte absorbieren die 2 Sto sensor in Stufe 2 den Sto SEITLICH ROTIERENDE KANTENB RSTE Die seitlich Rotierenden Kantenb rsten entfernen Staub von den R ndern...

Страница 63: ...2 Inbetriebnahme des Staubsaugers KOMPONENTEN Sauger Weiteres Zubeh r Ladestation Fernbedienung Benutzerhandbuch 2 Batterien Fernbedienungshalterung VIRTUALGUARD Seitliche Kantenb rsten 2 als Ersatz E...

Страница 64: ...ARD Sensor Fahrsensor Display Kamera Fahrsensor Sto stangensensor VIRTUAL GUARD Sensor Fernbedienungssensor Fernbedienungssensor Staubeh lter Auswerftaste f r den Staubbeh lter Staubauslass Antriebsra...

Страница 65: ...uch ein Einsetzen der Batterien Heben Sie die Abdeckung des VIRTUAL GUARDS an w hrend Sie die Verriegelungslasche herunterdr cken Setzen Sie die Batterien so in den VIRTUAL GUARD ein wie in der nachfo...

Страница 66: ...n mit der falschen Polung eingesetzt werden funktionier die Fernbedienung nicht Nachdem Sie die Spitze der Abdeckung in den Schlitz eingesetzt haben dr cken Sie das andere Ende bis es h rbar einrastet...

Страница 67: ...aufzuladen 6 Anzeige des Reinigungsmodus Bei jedem Dr cken der Taste f r den Reinigungsmodus wird der entsprechende Reinigungsmodus angezeigt a Automatikbetrieb Dieses Symbol leuchtet wenn Automatikb...

Страница 68: ...eschr nken oder mehrere Abschnitte nacheinander reinigen indem Sie den W chter Modus virtuelle T r verwenden ZUSAMMENSETZEN DES ROBO SAUGERS GER T EIN UND AUSSCHALTEN Wenn die Stromversorgung ausgesch...

Страница 69: ...den werden Wenn der Robo Sauger vom Ladeger t getrennt wird wird die Batterie automatisch entladen 2 Es d rfen sich rechts und links im Abstand von 0 5 m und vorn im Abstand von 1 m keine Hindernisse...

Страница 70: ...der ein zur cksetzen Trennen Sie den Netzstecker des Ladeger ts kurzzeitig vom Stromnetz zur cksetzen Kontrollieren Sie ob am Ladeanschluss Fremdstoffe vorhanden sind und wischen Sie den Ladeanschluss...

Страница 71: ...Batterien stets alle in Ihrem Land geltenden gesetzlichen Bestimmungen Der Robo Sauger wird ber eine aufladbare umweltfreundliche Nickelmetallhydrid Batterie NiMH mit Strom versorgt Der berladungsschu...

Страница 72: ...instellen wenn Sie nach Plan oder t glich saugen m chten Sie k nnen die Zeit nur mit Hilfe der Fernbedienung einstellen Sie k nnen die Zeit nur mit Hilfe der Fernbedienung einstellen Annahme Es ist ge...

Страница 73: ...odus virtuelle T r Die gr ne Lampe blinkt Aus Die Lampe ist aus 2 Einstellen des Modus Bei jedem Dr cken der Modus Netztaste wechselt das Ger t nacheinander zum Zaunmodus virtuelle Wand W chtermodus v...

Страница 74: ...er gleichzeitig verwenden kann es aufgrund von Interferenzen der Infrarotsignale zu St rungen kommen Drehen Sie den VIRTUAL GUARD in eine andere Richtung oder stellen Sie die Zaunl nge auf einen geeig...

Страница 75: ...anhalten Die Funktionen des Robo Saugers stehen nur zur Verf gung nachdem das Ger t mit dem Netzschalter eingeschaltet wurde Wenn der Robo Sauger l uft dr cken Sie die Taste um den Betrieb zu unterbre...

Страница 76: ...ken Sie dann die Ladetaste Fehlerbehebung wenn der Robo Sauger nicht zum Ladeger t zur ckkehrt berpr fen Sie die Aufstellung des Ladeger ts Befindet sich das Ladeger t an einer Stelle von der aus es d...

Страница 77: ...achdem seine Batterie wieder aufgeladen ist Anzahl der wieder aufgenommenen Reinigungsvorg nge Einmal Beim Reinigen Nach Abschluss des Reinigens Modus beenden 2 1 Modus einstellen Tasten am Sauger Tas...

Страница 78: ...gef hrt werden soll Beim Reinigen Nach Abschluss des Reinigens Im Punktreinigungsmodus s ubert der Robo Sauger einen Bereich mit einer L nge und Breite von 1 5 m Wenn das Saugen beendet ist zeigt der...

Страница 79: ...einigen erst wieder fort wenn seine Batterie wieder aufgeladen ist Anzahl der fortgesetzten Reinigungsvorg nge Einmal Beim Reinigen Modus beenden 2 1 Modus einstellen Tasten am Sauger Taste der Fernbe...

Страница 80: ...hf hren Im manuellen Reinigungsmodus k nnen Sie den Robo Sauger mit Hilfe der Fernbedienung auch an Stellen bewegen die mit dem virtuellen Zaun gesichert sind oder in Bereiche bei denen die Gefahr bes...

Страница 81: ...isch zur Ladestation zur ck und setzt das Reinigen erst wieder fort nachdem seine Batterie wieder aufgeladen ist Anzahl der wieder aufgenommenen Reinigungsvorg nge Einmal Beim Reinigen Modus beenden 2...

Страница 82: ...Minuten einstellen 5 Einstellungen abschlie en 6 Tasten am Sauger Taste der Fernbedienung Konfigurationsreihenfolge Beispiel Aktuelle Zeit 07 00 Uhr Gew nschte Startzeit f r das Reinigen 09 30 Uhr De...

Страница 83: ...gliches Reinigen und best tigen dass die konfigurierte Zeit stimmt Pr fen Sie die eingestellte Zeit f r die t gliche Reinigung 1 Einstellungen starten 2 Stunde einstellen 3 Stunde best tigen 4 Minuten...

Страница 84: ...S UND DER KAMERA Schalten Sie den Netzschalter unten am Sauger immer aus ehe Sie den Robo Sauger reinigen Spr hen Sie niemals Wasser Verd nner Reinigungsbenzin usw direkt auf den Sauger des Robo Sauge...

Страница 85: ...EH LTERS UND DES FILTERS 2 ffnen Sie den Deckel des Staubbeh lters indem Sie ihn in Richtung des in der Abbildung dargestellten Pfeils ziehen 1 Dr cken Sie die Auswerftaste f r den Staubbeh lter DR CK...

Страница 86: ...ch unten zeigt Es kann nicht in der falschen Richtung eingesetzt werden 4 Wischen Sie den Staub vom Filter und Staubbeh lter ab Sie k nnen beide mit Wasser sp len 6 Schlie en Sie den Deckel des Staubb...

Страница 87: ...lter zu l sen Schalten Sie den Netzschalter unten am Sauger immer aus ehe Sie den Robo Sauger reinigen 3 Heben Sie die Saugb rste aus dem Ger t 4 Entfernen Sie Fremdstoffe z B lange Haare oder Schn re...

Страница 88: ...es h rbar einrastet Um zu verhindern dass der Robo Sauger verstopft achten Sie darauf keine Fremdk rper aufzusaugen Wenn sich die Fremdstoffe nur mit Schwierigkeiten entfernen lassen wenden Sie sich a...

Страница 89: ...nigen 3 Rotieren Sie die seitliche Drehb rste und wiederholen Sie den Vorgang aus Schritt 2 4 Wenn sich Haare oder Schn re zwischen dem Sauger und der seitlichen Drehb rste verfangen haben l sen Sie d...

Страница 90: ...lfe eines St bchens oder einer Pinzette mit stumpfen Zangen 1 Wenn Sie das Antriebsrad reinigen legen Sie ein weiches Tuch auf den Boden und drehen Sie den Saugschlitten vorsichtig auf die Oberseite S...

Страница 91: ...O angezeigt Heben Sie den Robo Sauger hoch und docken Sie ihn manuell an das Ladeger t an um ihn aufzuladen Hat sich der Robo Sauger in einem Kabel auf dem Boden verfangen Schalten Sie das Ger t aus u...

Страница 92: ...Abstand auf einen geeigneten Wert ein Der Robo Sauger kann den VIRTUAL GUARD passieren Sind die Batterien des VIRTUAL GUARD verbraucht Ersetzen Sie die Batterien 2 Alkaline Batterien Typ D LR20 Ist d...

Страница 93: ...halter an der Ger teunterseite und entfernen Sie die Fremdstoffe vom rechten Antriebsrad berpr fen Sie den Sto sensor Ziehen Sie den festgeklemmten Sto sensor leicht heraus Fremdstoffe Schnur Papier S...

Страница 94: ...46_ Technische Daten Technische Daten Ladestation Sauger 93 mm H he 355 mm L nge 355 mm Breite 275 mm Breite 161 mm L nge 122 mm H he...

Страница 95: ...e 14 4 V 2 000 mA Technische Daten Reinigung Kapazit t des Staubeh lters Etwa 0 6 Ladezeit Automatisch Manuell Laden Reinigungsmodus Auto Punkt Maximal Hand Kanten Zeitplanermodus Einstellung f r t gl...

Страница 96: ......

Страница 97: ...nt les instructions Utilisation int rieure uniquement Manuel d utilisation Robot aspirateur imagine the possibilities Merci d avoir effectu l achat d un produit Samsung Enregistrez vos produits Samsun...

Страница 98: ...termes pour aider l utilisateur comprendre comment utiliser l appareil de mani re ad quate CONSIGNES DE S CURIT Avant d utiliser cet appareil veuillez lire attentivement ce manuel et le conserver pour...

Страница 99: ...t l utilisation de cet appareil de la part d une personne responsable et ce pour leur propre s curit Les enfants doivent tre surveill s afin de garantir qu ils ne jouent pas avec l appareil CHARGEUR D...

Страница 100: ...r N aspirez jamais de mati re toxique javel ammoniaque produit de d bouchage etc N aspirez jamais d objets en train de br ler ou de fumer tels que des cigarettes des allumettes ou des cendres chaudes...

Страница 101: ...module VIRTUAL GUARD 27 Utilisation du robot aspirateur 27 D marrage Arr t du nettoyage 28 Recharge 29 Nettoyage automatique 30 Nettoyage localis 31 Nettoyage intensif 32 Nettoyage manuel 33 Nettoyag...

Страница 102: ...tra ner une lectrocution ou un incendie N utilisez pas de prises multiples Ne laissez pas le cordon tra ner sur le sol Cela pourrait entra ner une lectrocution ou un incendie Ne tirez pas la prise d a...

Страница 103: ...s de bain salle d eau ou surfaces troites et en hauteur tables tag res En cas d utilisation dans ces lieux l appareil risque d tre gravement endommag dysfonctionnements pannes Ouvrez toutes les portes...

Страница 104: ...tomber Veillez ce que les enfants ne montent pas et ne s assoient pas dessus Les enfants risqueraient de tomber et de se blesser ou d endommager gravement l appareil Si un enfant ou un animal domesti...

Страница 105: ...ide eau huile ou liti re d animaux Cela risquerait d endommager gravement l appareil Le liquide risquerait de se r pandre sur les roues et de salir l int rieur de l appareil DANGER Les objets situ s d...

Страница 106: ...ion d un son d une odeur anormal e ou de fum e mettez imm diatement l appareil hors tension et contactez le centre d assistance client le DANGER N utilisez pas le robot aspirateur sur une table ou aut...

Страница 107: ...vaporiser de l eau directement sur la surface ext rieure ou d appliquer une substance volatile telle que du benz ne du diluant ou de l alcool Cela risquerait d endommager gravement l appareil ATTENTI...

Страница 108: ...Le non respect de cette consigne risquerait de provoquer un incendie ou une lectrocution DANGER Avant de nettoyer le chargeur veillez d brancher le cordon d alimentation pour des raisons de s curit DA...

Страница 109: ...hoc le capteur antichoc contribue galement r duire l impact L appareil permet un nettoyage des angles le plus efficace possible 6 Mode de nettoyage programm Il est possible de programmer le robot aspi...

Страница 110: ...percuter un obstacle les 2 capteurs antichocs absorbent l impact BROSSE ROTATIVE LAT RALE La brosse rotative lat rale permet de nettoyer la poussi re sur les c t s CHARGEMENT AUTOMATIQUE Lorsque la ba...

Страница 111: ...COMPOSANTS Unit principale Autres composants Chargeur Station de recharge T l commande Manuel d utilisation 2 piles Support pour t l commande VIRTUAL GUARD Brosse rotative lat rale de rechange 2 Filtr...

Страница 112: ...s Capteur antichoc Capteur VIRTUAL GUARD Capteur de la t l commande Capteur de la t l commande Collecteur de poussi re Bouton d jection du collecteur de poussi re Ouverture du r servoir de poussi re R...

Страница 113: ...ser l appareil Mise en place des piles Soulevez le couvercle du module VIRTUAL GUARD tout en appuyant sur la languette de verrouillage Ins rez les piles dans le module VIRTUAL GUARD comme indiqu sur l...

Страница 114: ...ctionnera pas Apr s avoir ins r la languette du couvercle dans l encoche appuyez sur l autre c t pour le fermer jusqu ce qu un petit clic se fasse entendre 1 2 3 Sp cification piles alcalines de type...

Страница 115: ...r la station de recharge pour recharger sa batterie 6 Affichage du mode de nettoyage Chaque fois que le bouton de mode de nettoyage est actionn le mode de nettoyage correspondant s affiche a Mode auto...

Страница 116: ...RD You can confine the robotic vacuum cleaner to a particular section by using Fence virtual wall mode or clean several sections one by one using Guard virtual door mode Installing the robotic vacuum...

Страница 117: ...tomatically If the robotic vacuum cleaner is separated from the charger the battery is automatically discharged 2 There should be no obstacles 0 5m to the left and right and within 1 m of the front 1...

Страница 118: ...sactivez le r initialisation Rebranchez le chargeur r initialisation V rifiez qu aucune substance trang re n est pr sente sur les connecteurs de charge et essuyez les connecteurs de l unit principale...

Страница 119: ...lage des batteries us es Si la batterie ne fonctionne plus ne la d montez pas et contactez le centre d assistance client le le plus proche Un temps de charge plus long et un temps de fonctionnement de...

Страница 120: ...s de nettoyage programm et de nettoyage quotidien le r glage de l heure est n cessaire Vous pouvez uniquement r gler l heure l aide de la t l commande Vous pouvez uniquement r gler l heure l aide de l...

Страница 121: ...moin est vert Off d sactiv le t moin est teint 2 R glage du mode L actionnement du bouton Mode Mise en marche s lectionne tour tour un mode dans l ordre suivant_ mode Fence mur virtuel mode Guard por...

Страница 122: ...au chargeur car le chargement automatique risquerait de s interrompre Une barri re invisible se forme pour emp cher le robot aspirateur de heurter le module VIRTUAL GUARD il est donc conseill d instal...

Страница 123: ...fonctionne que si le bouton de mise sous tension est allum Lorsque le robot aspirateur est en cours de fonctionnement appuyez sur le bouton pour annuler l op ration puis s lectionnez une fonction Util...

Страница 124: ...uler l op ration puis sur le bouton Recharging D pannage au cas o le robot aspirateur ne retourne pas sur le chargeur V rifiez l installation du chargeur Si le chargeur de l o il est install ne parvie...

Страница 125: ...et reprend le nettoyage une fois sa batterie charg e Nombre de fois o il reprendra le nettoyage une fois En cours de nettoyage Lorsque le nettoyage est termin Permet d annuler le mode 2 1 Permet de r...

Страница 126: ...e Lorsque le nettoyage est termin En mode de nettoyage localis Spot le robot aspirateur nettoie une zone de 1 5m x 1 5m Une fois le nettoyage termin le robot aspirateur affiche les messages End Stop e...

Страница 127: ...rateur revient automatiquement sur la station de recharge et reprend le nettoyage une fois sa batterie charg e Nombre de fois o il reprendra le nettoyage une fois En cours de nettoyage Permet d annule...

Страница 128: ...mande uniquement En mode de nettoyage manuel vous pouvez d placer l appareil dans des zones comportant des barri res ou pr sentant un risque de chute escaliers etc l aide de la t l commande ATTENTION...

Страница 129: ...squ il se d place Si le niveau de la batterie devient faible en cours de nettoyage le robot aspirateur revient automatiquement sur la station de recharge et reprend le nettoyage une fois sa batterie c...

Страница 130: ...eure 3 Permet de valider l heure 4 Permet de r gler les minutes 5 Permet de terminer les r glages 6 Bouton de l unit principale Bouton de la t l commande Action correspondante Exemple Il est 7h Le d b...

Страница 131: ...charge Permet d entrer en mode de nettoyage quotidien et de valider l heure configur e 1 Permet de commencer les r glages 2 Permet de r gler l heure 3 Permet de valider l heure 4 Permet de r gler les...

Страница 132: ...ET DE LA CAM RA Vous devez teindre le bouton de mise sous tension situ sous l unit principale avant de la nettoyer Ne vaporisez jamais d eau de diluant de benz ne etc directement sur l unit principal...

Страница 133: ...T DU FILTRE 2 Retirez le capot du r servoir de poussi re en tirant dans la direction de la fl che indiqu e sur l illustration 1 Appuyez sur bouton d jection du r servoir de poussi re PUSH et tirez sur...

Страница 134: ...tre plac dans le mauvais sens 6 Refermez le capot du r servoir de poussi re et replacez ce dernier dans l unit principale Structure du r servoir de poussi re Bouton d jection du collecteur de poussi...

Страница 135: ...e le bouton de mise sous tension situ sous l unit principale avant de la nettoyer 3 S parez la brosse principale de l unit 4 Retirez tout corps tranger tel que des cheveux ou des bouts de ficelle enro...

Страница 136: ...jusqu entendre un petit clic Afin d viter que le robot aspirateur ne se bouche veillez ne pas aspirer de cure dents cotons tiges etc Si vous ne parvenez pas retirer les corps trangers contactez le ce...

Страница 137: ...of the main unit before cleaning the robotic vacuum 3 Turning the side rotating brush repeat the procedures in Step 2 4 Si des cheveux ou des bouts de ficelle sont coinc s entre l unit principale et...

Страница 138: ...d un b ton ou d une paire de pinces aux bouts arrondis si n cessaire 1 Pour nettoyer la roue d entra nement placez un chiffon doux sur le sol et retournez doucement l unit principale Vous devez teindr...

Страница 139: ...est il affich sur le panneau d affichage Soulevez le robot aspirateur et placez le sur le chargeur pour le recharger Le robot aspirateur est il coinc dans des c bles tra nant sur le sol teignez du bo...

Страница 140: ...placez le une distance appropri e Le robot aspirateur franchit le module VIRTUAL GUARD Les piles du module VIRTUAL GUARD sont elles vides Changez les piles piles alcalines type D LR20 Le module VIRTUA...

Страница 141: ...ez le corps tranger coinc dans la roue d entra nement droite V rifiez le capteur antichoc Tirez l g rement sur le pare choc vers l ext rieur Un corps tranger poussi re salet etc se trouve sur la fen t...

Страница 142: ...t ristiques techniques du produit Caract ristiques techniques du produit Chargeur Station de recharge Unit principale 93 mm hauteur 355 mm longueur 355 mm largeur 275 mm largeur 161 mm longueur 122 mm...

Страница 143: ...principale 40 W Caract ristiques de la batterie 14 4 V 2000 mA Caract ristiques de nettoyage Capacit du r servoir de poussi re Environ 0 6 Type de recharge Recharge automatique manuelle Mode de netto...

Страница 144: ......

Страница 145: ...dotto Samsung Per ricevere un servizio pi completo Registra il tuo prodotto su www samsung com register Robot aspirapolvere Manuale dell utente Prima di utilizzare questo prodotto leggere attentamente...

Страница 146: ...IZZATI NOTA Spiega i termini utilizzati al fine di facilitare la comprensione da parte dell utente dell uso corretto del prodotto INFORMAZIONI SULLA SICUREZZA Prima di utilizzare il prodotto leggere a...

Страница 147: ...loro sicurezza fornisca loro una corretta supervisione e istruzione all uso I bambini devono essere controllati per evitare che giochino con l apparecchio BASE DI RICARICA Non modificare la spina pol...

Страница 148: ...ssiche candeggina ammoniaca disgorgante idraulico Non aspirare oggetti in fiamme o che possano causare fumo quali sigarette fiammiferi o braci Non utilizzare per aspirare liquidi infiammabili o combus...

Страница 149: ...tteria 24 Impostazione dell orario 25 Installazione della VIRTUAL GUARD 27 Uso del robot aspirapolvere 27 Avviare interrompere la pulizia 28 Ricarica 29 Pulizia automatica 30 Pulizia spot 31 Pulizia m...

Страница 150: ...carica elettrica Non usare una spina multipla su una presa singola Non lasciare il cavo di alimentazione appoggiato a terra La mancata osservanza di questa precauzione pu causare un incendio o una sca...

Страница 151: ...a tavoli o ripiani Se usato in tali luoghi possono verificarsi seri danni malfunzionamenti o rotture Aprire tutte le porte delle stanze per effettuarne la pulizia Quando una porta chiusa il robot aspi...

Страница 152: ...ttano i piedi o si siedano sull aspirapolvere I bambini potrebbero cadere provocandosi lesioni o danneggiare seriamente il prodotto Se un bambino o un animale domestico viene lasciato da solo all inte...

Страница 153: ...esta precauzione pu causare gravi danni al prodotto I liquidi potrebbero spandersi tramite le ruote dell apparecchio sporcando la zona intorno ATTENZIONE Eventuali oggetti posizionati di fronte alla b...

Страница 154: ...fumo od odore di bruciato proveniente dall aspirapolvere spegnere immediatamente l apparecchio e chiamare il centro assistenza ATTENZIONE Non usare l aspirapolvere su un tavolo o in luoghi elevati da...

Страница 155: ...non spruzzarvi sopra acqua n pulirlo con sostanze volatili quali benzina diluenti o alcool La mancata osservanza di questa precauzione pu causare gravi danni al prodotto AVVERTENZA The unit must not...

Страница 156: ...enza La mancata osservanza di questa precauzione pu causare un incendio o una scarica elettrica ATTENZIONE Prima di pulire la base di ricarica scollegare il cavo di alimentazione ATTENZIONE Durante la...

Страница 157: ...ente l urto Inoltre il robot riesce ad effettuare una pulizia accurata avvicinandosi il pi possibile a bordi e angoli 6 Modalit di pulizia programmata All ora impostata il robot aspirapolvere inizia l...

Страница 158: ...el sensore paracolpi SPAZZOLE ROTATIVE LATERALI PER LA PULIZIA DEI BORDI Le spazzole rotative laterali per la pulizia dei bordi eseguono la pulizia dei punti pi inaccessibili AUTO RICARICA Quando il l...

Страница 159: ...ere COMPONENTI Corpo principale Altri componenti Base di ricarica Stazione Telecomando Manuale dell utente 2 batterie Porta telecomando VIRTUALGUARD Ricambi per spazzole rotative laterali per la puliz...

Страница 160: ...li Sensore paracolpi Sensore VIRTUAL GUARD Sensore telecomando Sensore telecomando Vaschetta di raccolta polvere Tasto espulsione vaschetta di raccolta polvere Uscita polvere Ruote di guida Copribatte...

Страница 161: ...le batterie alcaline tipo D Installazione delle batterie Sollevare il coperchio del VIRTUAL GUARD premendo al contempo la leva di sblocco Inserire le batterie nella VIRTUAL GUARD come mostrato nella...

Страница 162: ...ttare la giusta polarit il telecomando non funziona Una volta inserita la punta del coperchio nell alloggiamento spingere l altro capo fino ad avvertire uno scatto 1 2 3 Specifiche Batterie alcaline t...

Страница 163: ...6 Visualizzazione della modalit di pulizia Ogni qualvolta il tasto della modalit di pulizia viene premuto viene visualizzata la modalit di pulizia corrispondente a Modalit Auto Questa icona si attiva...

Страница 164: ...e operazioni di pulizia programmata e quotidiana 5 Installazione della VIRTUAL GUARD E possibile restringere il raggio d azione del robot aspirapolvere a una zona delimitata usando la modalit Fence re...

Страница 165: ...ticamente le batterie Se il robot aspirapolvere viene tenuto separato dalla base di ricarica la batteria inizia a scaricarsi 2 Non devono essere presenti ostacoli entro 0 5 m sulla sinistra e sulla de...

Страница 166: ...mente in modo regolare verificare le seguenti condizioni Spegnere e riaccendere l unit agendo sul tasto posto sul fondo del prodotto Reset Ricollegare l aspirapolvere alla base di ricarica Reset Verif...

Страница 167: ...Il robot aspirapolvere alimentato da una batteria ricaricabile nichel metallo idruro NiMH ed dotato di una protezione per la sovraccarica al fine di garantirne una lunga durata Il periodo di garanzia...

Страница 168: ...uotidiana impostare l orario come desiderato E possibile impostare l orario solo mediante telecomando E possibile impostare l orario solo mediante telecomando Supponendo che l orario attuale sia le 07...

Страница 169: ...e La spia verde lampeggia Off La spia spenta 2 Impostazione della modalit Premendo il tasto Modalit Alimentazione verranno attivate in sequenza le seguenti modalit Fence barriera virtuale Guard porta...

Страница 170: ...olare a causa delle interferenze dei segnali a infrarossi Rivolgere la VIRTUAL GUARD verso un altra direzione o impostare la lunghezza della barriera su un valore appropriato se il sensore di rilevame...

Страница 171: ...Ogni funzione viene eseguita solo se l interruttore di accensione in posizione On Quando il robot aspirapolvere in funzione premere il tasto per annullare l operazione e selezionare una funzione Uso d...

Страница 172: ...ica Risoluzione dei problemi nel caso il robot aspirapolvere non ritorni alla base di ricarica Verificare l installazione della base di ricarica Quando la base di ricarica si trova in una posizione da...

Страница 173: ...r automaticamente alla base di ricarica per poi riprendere la pulizia una volta ricaricate le batterie Numero di operazioni di pulizia riprese una Durante la pulizia Una volta terminata la pulizia Ann...

Страница 174: ...a pulizia Una volta terminata la pulizia Nella modalit di pulizia Spot il robot aspirapolvere esegue la pulizia di un area di 1 5 m x 1 5 m Una volta terminata la pulizia il robot aspirapolvere visual...

Страница 175: ...razioni di pulizia il robot aspirapolvere torner automaticamente alla base di ricarica per poi riprendere la pulizia una volta ricaricate le batterie Numero di operazioni di pulizia riprese una Durant...

Страница 176: ...a manualmente usando solo il telecomando Usando il telecomando durante la pulizia manuale possibile che il robot aspirapolvere entri in zone delimitate o zone a rischio di caduta scalini ecc Durante l...

Страница 177: ...poich il robot aspirapolvere memorizza la posizione originale durante il suo movimento Se il livello di carica delle batterie molto basso durante le operazioni di pulizia il robot aspirapolvere torne...

Страница 178: ...Impostare minuti 5 Completare impostazioni 6 Tasto unit principale Tasto telecomando Sequenza configurazione Esempio Orario corrente 07 00 Orario avvio pulizia desiderato 09 30 Decrease Increase Decr...

Страница 179: ...re la modalit Pulizia programmata e confermare l orario specificato Verificare l orario specificato per la pulizia quotidiana 1 Avviare le impostazioni 2 Impostare ora 3 Confermare ora 4 Impostare min...

Страница 180: ...nere sempre l unit premendo il tasto di accensione posto sul fondo prima di effettuare la manutenzione del robot aspirapolvere Non spruzzare acqua diluenti benzina o sostanze simili direttamente sul c...

Страница 181: ...arare la vaschetta estraendola nella direzione illustrata dalla freccia in figura 1 Premere il tasto di espulsione della vaschetta di raccolta polvere PUSH quindi estrarre la vaschetta Per prima cosa...

Страница 182: ...ntarlo in modo diverso 4 Pulire il filtro e la vaschetta di raccolta polvere Entrambi possono essere puliti in acqua corrente 6 Chiudere il coperchio della vaschetta di raccolta polvere e reinserirla...

Страница 183: ...tasto di espulsione della vaschetta PUSH Spegnere sempre l unit premendo il tasto di alimentazione posto sul fondo prima di effettuare la manutenzione del robot aspirapolvere 3 Sollevare la spazzola d...

Страница 184: ...ertire uno scatto Al fine di prevenire l otturazione del robot aspirapolvere prestare attenzione a non aspirare stuzzicadenti o bastoncini di cotone Se la rimozione degli oggetti complicata contattare...

Страница 185: ...i effettuare la manutenzione del robot aspirapolvere 3 Ruotando la spazzola ripetere la procedura descritta al punto 2 4 Se si sono incastrati capelli o filamenti tra la spazzola e il corpo dell unit...

Страница 186: ...di forbici non appuntite 1 Nel pulire le ruote di guida posizionare un panno morbido sul pavimento e capovolgere il corpo principale appoggiandolo con cura Spegnere sempre l unit premendo il tasto di...

Страница 187: ...nterrotto il funzionamento durante la pulizia Lampeggia un solo settore del livello di carica della batteria e sul display compare LO Sollevare il robot aspirapolvere e inserirlo manualmente nella bas...

Страница 188: ...re la direzione della VIRTUAL GUARD o impostare la distanza a un valore appropriato Il robot aspirapolvere oltrepassa la VIRTUAL GUARD Le batterie della VIRTUAL GUARD sono esaurite Sostituire le batte...

Страница 189: ...ruota di guida destra Spegnere l unit premendo il tasto sul fondo del robot e rimuovere il corpo estraneo impigliato nella ruota di guida destra Verificare il sensore paracolpi Tirare leggermente vers...

Страница 190: ...46_ specifiche del prodotto Specifiche del prodotto Base di ricarica Stazione Corpo principale 93 mm altezza 355 mm lunghezza 355 mm larghezza 275 mm larghezza 161 mm lunghezza 122 mm altezza...

Страница 191: ...ia Capacit vaschetta di raccolta polvere Circa 0 6 Tipo di ricarica Ricarica automatica Ricarica manuale Modalit di pulizia Auto Spot Max Manuale Bordi Pulizia programmata Impostazione della pulizia q...

Страница 192: ...memo...

Страница 193: ...memo...

Страница 194: ...memo...

Страница 195: ...memo...

Страница 196: ...Code No DJ68 00518F REV 0 0...

Отзывы: