background image

6.5

Troubleshooting

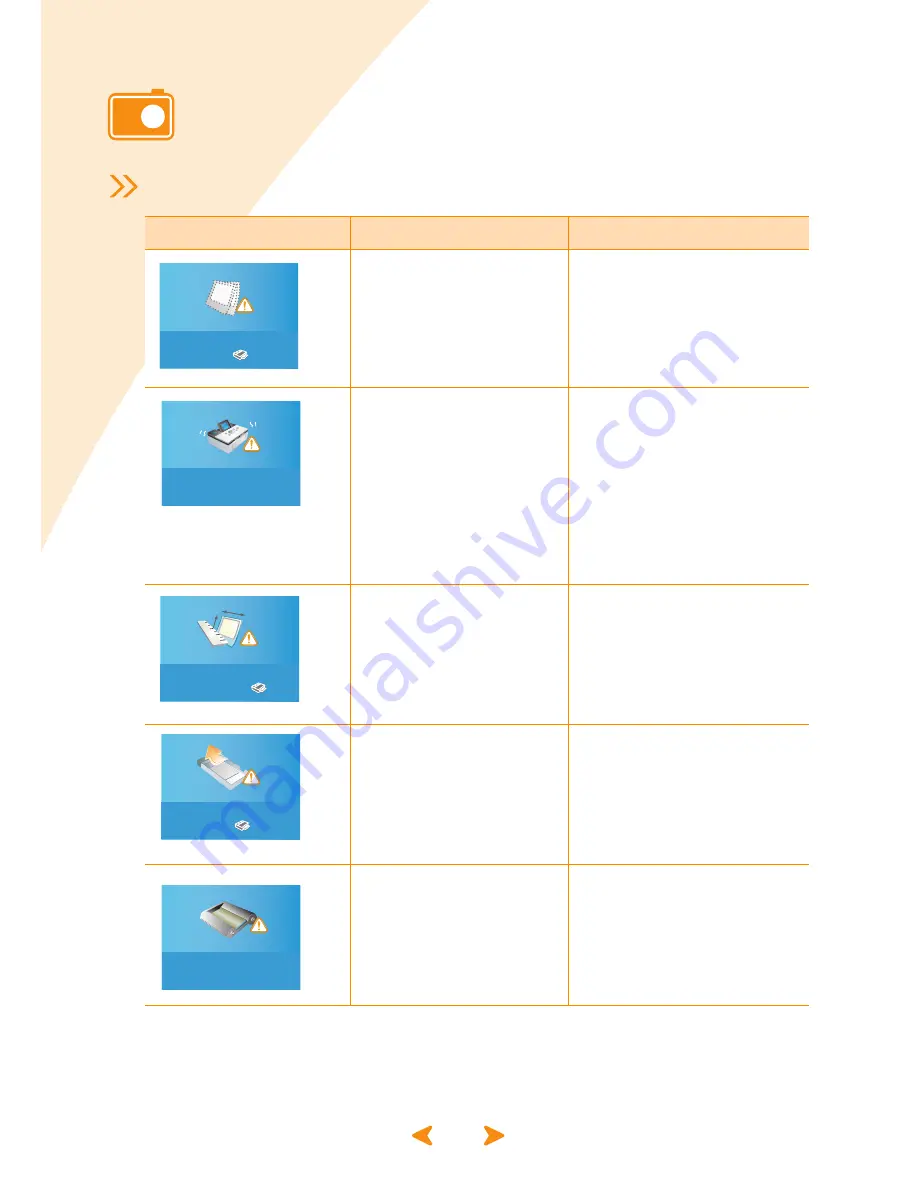
Error messages on the display

Display

Problem

Troubleshooting

•Error when there is no 

paper.

•Load the paper. (see page 

2.3-Loading paper)

•Press the Print button. 

•Paper jam

•Turn the printer off. 

•If the jammed paper does 

not come out automatically, 

remove it manually.

•Turn the printer on.

•Note that one page of the 

ribbon cartridge’s life is 

used when the paper 

jams occurs even though 

an image is not printed.

•Wrong paper size 

•Reset the paper size. 

•Press the Print button. 

•Paper casette is not 

inserted or inserted 

incorrectly.

•Insert paper casette.

•Reinsert paper casette 

correctly.

•Ribbon Cartridge is not 

installed or installed 

incorrectly.

•Reinstall Ribbon cartridge 

correctly.

Insert Papers and then 

press

Power Off and then

Remove Paper Jam

Check Paper Size

and then press

Insert Tray and then

press

Power Off and then 

Check Ribbon Cartridge

Содержание SPP 2020 - Photo Printer - 20 Sheets

Страница 1: ...SPP 2040Series SPP 2020 Series SamsungP User sGuide hotoPrinter ...

Страница 2: ...Association CIPA Memory Stick and Memory Stick PRO are trademarks of Sony Corporation MultiMediaCard is trademark of Toshiba Corporation xD Picture Card is trademark of Fuji Photo Film Co Ltd Toshiba Corporation and Olympus Optical Co Ltd Mac Mac logos and Macintosh are trademarks of Apple Computer Inc Bluetooth is trademark of Bluetooth SIG Inc IBM and IBM PC are trademarks of International Busin...

Страница 3: ... 10 7267 www samsung com latin EL SALVADOR 800 6225 www samsung com latin GUATEMALA 1 800 299 0013 www samsung com latin JAMAICA 1 800 234 7267 www samsung com latin PANAMA 800 7267 www samsung com latin PUERTO RICO 1 800 682 3180 www samsung com latin REP DOMINICA 1 800 751 2676 www samsung com latin TRINIDAD TOBAGO 1 800 7267 864 www samsung com latin VENEZUELA 1 800 100 5303 www samsung com lat...

Страница 4: ...m ur AUSTRALIA 1300 362 603 www samsung com au CHINA 800 810 5858 010 6475 1880 www samsung com cn HONG KONG 2862 6001 www samsung com hk INDIA 3030 8282 1600 1100 11 www samsung com in INDONESIA 0800 112 8888 www samsung com id JAPAN 0120 327 527 www samsung com jp MALAYSIA 1800 88 9999 www samsung com my PHILIPPINES 1800 10 SAMSUNG 7267864 www samsung com ph SINGAPORE 1800 SAMSUNG 7267864 www sa...

Страница 5: ...on when you set up your work area Never insert objects of any kind into the printer ventilation openings Ensure that the fan vents on the bottom of the casing are clear at all times Do not place the printer on a soft surface doing so will block the bottom vents If you use an extension cord with this system make sure that the total ampere rating on the products plugged into the extension cord does ...

Страница 6: ...licable to all countries The length of the power cord set must be at least 6 00 feet 1 8m and a maximum of 9 75 feet 3 0m All power cord sets must be approved by an acceptable accredited agency responsible for evaluation in the country where the power cord set will be used The power cord set must have a minimum current capacity of 7 A and a nominal voltage rating of 125 or 250 volts AC as required...

Страница 7: ...ge 3 7 Setting various effects 3 9 Setting color mode 3 9 Setting sharpness 3 9 Setting brightness 3 9 Setting additional functions 3 10 Setting borders 3 10 Selecting layout 3 11 Setting print all function 3 12 Setting language 3 12 Printing DPOF files 3 13 Removing memory cards 3 14 When not connected to a computer 3 14 When connected to a computer 3 14 4 Printing directly from your digital came...

Страница 8: ... Macintosh 5 24 Using in MAC OS 10 3 X USB environment 5 24 Printing from a Macintosh 5 26 Deleting the program 5 28 Printing using PhotoThru program in Macintosh 5 29 Installing the program 5 29 Printing the image 5 29 Using MSC Mass Storage Class function For SPP 2040 Series only 5 31 Printing with Bluetooth Optional SPP 00BA 5 32 6 Maintenance Maintaining the printer 6 2 Cleaning the outside 6 ...

Страница 9: ...necting to a computer This package contains the SPP 2040 or SPP 2020 Series photo printer accessories a user s guide and an installation CD Please check that you have product and accessories after unpacking This user s guide will explain how to print images and use the photo printer Please read the user s guide before operating the photo printer Name of each part ...

Страница 10: ...operating functions Power adapter port Use this to connect the power adapter included with the printer Display panel Shows printer power on off status images print status and error messages USB port Use this port to connect the printer to the computer Output tray Printed photos are discharged into this tray Front cover Put down to install the paper cassette USB port for digital camera Use this por...

Страница 11: ...elease level Push upward to remove the existing Ribbon cartridge Ribbon cartridge install holder Install the Ribbon cartridge Side cover Open to install the Ribbon cartridge Copies Shows the number of copies being made of the current image Image Number Shows the order of images Total copies Shows the total number of copies to be printed x3 4 9 9 ...

Страница 12: ...menu setting changes Menu Access menus to use effects and other functions Print Print images Power adapter port Use this to connect the power adapter included with the printer USB port Use this port to connect the printer to the computer Paper cassette Insert paper for printing Output tray Printed photos are discharged into this tray Front cover Put down install the paper cassette USB port for dig...

Страница 13: ... is not of a supported format or there is a JPEG file error You can do other print jobs without any operation Flickers at 0 5 second of interval No paper paper size error paper type error cartridge error You can do other print jobs after solving the problems Rear aperture When printing the paper moves back and forth through the printer Ribbon cartridge release lever Put upward to remove the existi...

Страница 14: ...fications Depending on your country the USB cable may not be supplied with your printer Accessories Power adapter Paper Cassette Ribbon cartridge for 10 pieces printing Power cord User s guide Memory Card Only for SPP 2040 Series Quick installation guide USB cable Paper 10 pieces Software program CD ...

Страница 15: ...he printer This chapter details the distances that need to be maintained between the printer and surrounding objects how to turn the printer on and off and how to load paper To ensure quick and easy printing please read this chapter Installing the Ribbon cartridge Loading paper Connecting the power cord ...

Страница 16: ... the film If the film is not even it could be damaged during installation 3 Insert the cartridge in the direction in the shown illustration 4 Make sure that the cartridge is under the lever and then close the side cover Do not use sharp objects such as a knife or scissors to open the ribbon cartridge package You could damage the surface of the ribbon cartridge Do not touch the ribbon cartridge fil...

Страница 17: ... side down may cause a problem Do not load more than 20 sheets of paper Do not touch the surface of the paper Only use the supplied ribbon cartridge photo paper and approved IPP 4640G for 40 pages printing IPP 46120G for 120 pages printing paper If not there will be a problem You can not print if the spare portions of the paper has been defaced or cut off Do not insert the paper cassette when the ...

Страница 18: ...ter to the power adapter port of the printer 2 Connect the power cord to the power adapter and connect the cord to the wall outlet or power source Make sure the power adapter does not block the printer s rear aperture 3 Press the On Off button The printer will turn on after about 5 seconds Do not disassemble the printer when the printer is turned on There is danger of electric shock Do not insert ...

Страница 19: ... can choose specific copy size and language options without connecting to a computer Inserting memory cards Printing images Printing multiple images Printing images using multi display Printing enlargements of portions of an image Setting various effects Setting additional functions Printing DPOF files Removing memory cards ...

Страница 20: ...until it stops Secure Digital The label should be facing up and the angled corner should be on the right with the metal contacts facing down Insert the memory card until it stops SmartMedia The angled corner should be on the right and the arrow pointing into the printer with the metal contacts facing up Insert the memory card until it stops Insert one memory card only Do not force a card into the ...

Страница 21: ... the upper left corner To apply various effects see page 3 9 Setting various effects To select additional printing or printer functions see page 3 10 Setting additional functions 4 Press the Print button and press it again to start printing After printing the number of copies to print reverts to 0 Insert one memory card only When a paper jam occurs during printing do not pull out the jammed paper ...

Страница 22: ... the printer are not displayed and cannot be printed 3 Press the Up and Down buttons to select the number of copies The number of copies you have selected displays in the upper left corner To apply various effects see page 3 9 Setting various effects To select additional printing or printer functions see page 3 10 Setting additional functions Insert one memory card only When a paper jam occurs dur...

Страница 23: ...revious or next image Follow the step 3 The total copies of the selected image displays in the upper right corner 5 Press the Print button and press it again to start printing After printing the number of copies to print reverts to 0 Total copies x3 4 9 9 Copies x3 4 Print Cancel ...

Страница 24: ...age display 3 Press the Left and Right buttons to move to an image on the display panel and then press the OK button to select the image The check mark on the bottom left means the number of copies has already been selected Press the Right button at the bottom right corner image to move to the next nine image 4 The selected image displays You can now start printing For details about printing see p...

Страница 25: ...mory cards 2 Press the Left and Right buttons to select an image from those on the display panel The image number displays in the bottom right corner Use the Up and Down buttons to select the number of copies to print Images in file formats not supported by the printer are not displayed and cannot be printed 3 Press the Zoom In button Insert one memory card only Image Number x3 4 9 9 ...

Страница 26: ...m In button you can see 1 25x 1 5x 1 75x 2x 2 25x 2 5x 2 75x 3x enlargement To zoom out of the image press the Zoom Out button 5 Press the Left and Right button to select the portion you want 6 Press the Print button and press it again to start printing After printing the number of copies to print reverts to 0 x3 4 Print Cancel ...

Страница 27: ...navigate to Color Mode Press the Left and Right buttons to select Normal Black White Sepia Antique Vivid Red Green Blue Warmer Cooler Less Blue Less Yellow Press the OK button to complete the selection Setting sharpness Press the Up and Down buttons to navigate to Sharpness Press the Left and Right buttons to select Normal Hard or Soft Press the OK button to complete the selection Setting brightne...

Страница 28: ...n again Setting screen appears When Setting appears on the display panel press the Up and Down buttons to navigate to the desired setting After printing or turning the printer off and on again all functions return to their default settings except for the layout Setting borders Press the Up and Down buttons to navigate to Borderless Press the Left and Right buttons to select On or Off Press the OK ...

Страница 29: ...1 18x1 57in 20x30mm 0 79x1 18in 35x45mm 1 38x1 77in 50x70mm or 1 97x2 76in Press the OK button to complete the selection Images printed with the various layout For example Paper size Postcard Borderless Off According to the layout some portions of the image may not be printed Off 2 Up 4 Up 30x40mm 1 18x1 57in 20x30mm 0 79x1 18in 35x45mm 1 38x1 77in 50x70mm 1 97x2 76in ...

Страница 30: ...avigate to Print All Press the Left and Right buttons to select No or Yes Press the OK button complete the selection Setting language Press the Up and Down buttons to navigate to Language Press the Left and Right buttons to select the desired language Press the OK button to complete the selection ...

Страница 31: ...of the photos stored on the camera just those photos he or she wants to print Then those files are loaded onto a memory card and the card is inserted into the printer There is no need to use a computer to separate the photos When printing DPOF files make sure that the AUTPRINT MRK file is in the memory card s MISC folder The printer supports only DPOF version 1 0 This printer supports only the num...

Страница 32: ...n When not connected to a computer Gently remove the memory card from the printer When connected to a computer 1 Close the program you ve used 2 Gently remove the memory card from the printer Insert one memory card only If you remove the memory card while printing a job the printing job will be canceled ...

Страница 33: ...nd SPP 2040 Series Samsung Photo Printer supports PictBridge You can print images directly from your digital camera through a USB cable without connecting to a computer You cannot use a memory card while a digital camera is connected to the printer via a USB cable ...

Страница 34: ...pending on the PictBridge compatible device Please refer to your device s user s guide If you print multiple images on one sheet of your digital camera the date will not print regardless of your settings You can set border layout date and DPOF functions from your digital camera if supported When a paper jam occurs during printing do not pull out the jammed paper After turning the power off and the...

Страница 35: ...nter as the default printer in Windows Printing from a Windows based computer Setting up the printer in Windows Printing with the PhotoThru program in Windows Installing the program for Macintosh Setting up the printer in Macintosh Printing from a Macintosh Printing using PhotoThru program in Macintosh Using MSC Mass Storage Class function For SPP 2040 Series only Printing with Bluetooth Optional ...

Страница 36: ...ress the On Off button to turn the printer on For details about the power connection see page 2 4 Connecting the power cord If the power cable is already connected make sure that the printer is turned on 2 Connect the USB cable to printer s USB cable port Make sure you insert the USB cable in the proper port 3 Connect the USB cable to computer s USB cable port Make sure you insert the USB cable in...

Страница 37: ...Me 2000 XP 32bit Windows 98 Me Processor Pentium III 400MHz or more Pentium III 933 MHz recommended Memory 128MB or more 256MB recommended Free hard disk space 500MB or more 1GB recommended Internet Explorer 5 0 or higher 6 0 recommended Windows 2000 XP 32bit Processor Pentium III 1GHz or more Pentium IV 1 5GHz recommended Memory 256MB or more 512MB recommended Free hard disk space 1GB or more 5GB...

Страница 38: ...dow does not appear eject the CD ROM and insert it again Or click Start and then Run Type X setup exe replacing X with the letter of your drive and click OK 4 Select Typical If you select Typical Printer Photothru and Status Monitor are all installed If you want to install only selected functions select Custom If your printer is not already connected to the computer the following window opens Conn...

Страница 39: ...heckbox and click Finish You are now sent to the Samsung web site Otherwise just click Finish You can print images from now Open the file to print and start printing If you select Custom a screen with the list of all program elements appears Select the desired features and click Next If you select View User s Guide the PDF version of the user s guide will come up If the Adobe Acrobat program is no...

Страница 40: ...rograms or All Programs Samsung SPP 2040 Series or Samsung SPP 2020 Series Maintenance 2 Select Repair when the screen appears If your printer is not connected to a computer the following window opens After connecting the printer click Next If you want to reinstall the program without connecting the printer to the computer click Next and select No Windows XP screen Windows XP screen ...

Страница 41: ...ars If you choose to print a test page select the check box and click Next When the test page prints out correctly click Yes 4 Click Finish when the reinstallation is done Deleting the program 1 Select Start Programs or All Programs Samsung SPP 2040 Series or Samsung SPP 2020 Series Maintenance 2 Select Remove when the screen appears Windows XP screen Windows XP screen ...

Страница 42: ...ram for Windows 3 Select the components you want to remove and click Next 4 Click Yes when the window asking you to remove the component s you selected appears 5 Click Finish when the uninstallation is done Windows XP screen ...

Страница 43: ...alling the program delete the program and reinstall it 1 Select Start Programs or All Programs PhotoThru Uninstall 2 Select OK when the screen for confirming to delete program after the InstallShield Wizard screen appears 3 Select Finish when the uninstallation is done Windows XP screen Windows XP screen ...

Страница 44: ...cation it is printed on the selected printer If you install the printer driver the printer is automatically selected as the default printer 1 Select Start Settings Printer If you are using Windows XP select Start Printers and Faxes 2 Select Samsung SPP 2040 Series or Samsung SPP 2020 Series and right click on the Printer or Printers and Faxes screen 3 Click Set as default printer If the printer is...

Страница 45: ... see page 5 13 Opening the Properties screen Print order may vary depending on the program in use For details about print order see the program user s guide To print from a Macintosh see page 5 26 Printing from a Macintosh You can print the selected images by selecting the printer icon in the bottom right corner of the Windows desktop or by selecting Print from the application s File menu Make sur...

Страница 46: ...ble clicking the printer icon in the bottom right corner of the Windows desktop Or click the Start Settings Printer For Windows XP click Start Printers and Faxes and double click Samsung SPP 2040 Series or Samsung SPP 2020 Series 2 From the Document menu For Windows 98 Me select Cancel Printing For Windows NT4 0 2000 XP select Cancel When you press the Cancel button to cancel a printnig job or if ...

Страница 47: ...further details see page 5 14 Getting to know the properties screen 3 Click OK when you have finished the settings Opening from the printer folder 1 Click Start Settings Printers menu For Windows XP select Printers and Faxes 2 Double click the Samsung SPP 2040 Series or Samsung SPP 2020 Series printer icon 3 Right click on the printer icon and In Windows 98 Me select Properties In Windows 2000 sel...

Страница 48: ...ich information is printed on a page Landscape Portrait 3 Quality If you select Best the print quality of some colors will be better However in most situations there will be no appreciable difference between Best and Normal 4 Paper Options Paper Options allows you to set paper size Make sure that the image direction and the paper direction you set are in the same direction Use the Preview mode in ...

Страница 49: ... printed on a page The layout appears differently depending on the orientation and the quality that you selected on the Basics tab see page 5 14 Basics tab You can select the number of copies type pictures per side and whether to print a border on the page You can choose to have 1 2 4 6 9 or 16 pictures printed per side The print order of the images changes automatically depending on your choices ...

Страница 50: ...ious color and contrast options Property Description 1 Color Mode Select Color or Black White 2 Color Adjust You can adjust Brightness Contrast Saturation and Cyan Red Magenta Green Yellow Blue To adjust color automatically check Auto Adjustment and click OK Windows XP screen Windows XP screen ...

Страница 51: ...ersion number of the driver If you have an Internet browser you can connect to the Internet by clicking on the web site icon Property Description 1 Frame Select a frame 2 Message You can add a date or a note or apply a white background to an image If you want to use white background select the check box 3 Font Attributes You can select a name style color and shade for your font Windows XP screen ...

Страница 52: ...utomatically 2 Click Save after entering desired name to save new setting 3 Select desired name in Favorites to use saved setting To delete a saved name click Delete after selecting the name If you click Yes on the screen to confirm the deletion Untitled appears again Using help Your machine has a help screen that can be activated using the Help button in the printer properties window The help scr...

Страница 53: ...hotoThru refer to the PhotoThru user s guide 1 Select Start Program or All programs PhotoThru PhotoThru menu 2 Locate the image that you want to print when the PhotoThru program appears 3 Double click the image you selected The image is displayed in larger format in the work space and various editing tools appear Edit the image using the available functions ...

Страница 54: ... bar on the top 5 Click Print after selecting the number of copies to be printed and any additional function Make sure that the image direction and the paper direction you set are in the same direction Use the Preview mode in your application to check the image direction to be printed ...

Страница 55: ... Installing the program 1 Quit all programs Connect the printer to a computer using an appropriate USB cable See page see page 5 2 Connecting your printer to a Windows based PC 2 Turn on your Macintosh and insert the supplied Software program CD label side up into your CD ROM drive The installation window appears automatically 3 Double click the CD icon when it appears on Desktop and click Install...

Страница 56: ...5 22 Installing the program for Macintosh 6 Click Continue when the Samsung Photo Installer screen appears 7 Select the hard disk the program will be installed and click Continue ...

Страница 57: ...Installing the program for Macintosh 5 23 8 Select Easy Install as the installation type and click Install 9 Click Quit when the installation is done ...

Страница 58: ...24 Setting up the printer in Macintosh Using in MAC OS 10 3 X USB environment 1 Open the hard disk and select Applications Utilities Printer Setup Utility 2 Click Add on the printer list 3 Select USB tab ...

Страница 59: ...es or SPP 2020 Series and click Add If you fail to search the printer automatically select Samsung in Printer Model Select SPP 2040 Series or SPP 2020 Series and click Add When SPP 2040 Series or SPP 2020 Series is added in the printer list the setting is finished ...

Страница 60: ...inting from a Macintosh 1 Open the file that you want to print 2 Click Page Setup after opening the file 3 Click OK after setting the format size orientation and scale 4 Click Print to print the selected image ...

Страница 61: ...can set copies pages layout output options scheduler paper handling colorSync printer features and summary 6 The screen confirming that the file was sent to the print queue appears and printing begins Make sure that the image direction and the paper direction you set are in the same direction Use the Preview mode in your application to check the image direction to be printed ...

Страница 62: ...ing from a Macintosh Deleting the program 1 Click Uninstall after selecting installation type as Uninstall on step 6 See page 5 21 Installing the program for Macintosh 2 Click Quit when the uninstallation is done ...

Страница 63: ...stalling the program 1 Turn on your Macintosh and insert the supplied Software program CD label side up into your CD ROM drive The installation window appears automatically 2 Double click the CD icon when it appears on Desktop and click Installer Application 3 Double click PhotoThru Installer and follow the on screen instructions Printing the image 1 Select Application PhotoThru 2 Locate the image...

Страница 64: ...ls appear Edit the image using the available functions 4 Click File Print from the menu bar on the top 5 Click Print after selecting the number of copies to be printed and any additional function Make sure that the image direction and the paper direction you set are in the same direction Use the Preview mode in your application to check the image direction to be printed ...

Страница 65: ...rt a memory card into the printer The Removable disk screen appears automatically If the Removable disk screen does not appear automatically select My Computer Removable disk Double click the Removable disk icon 2 Double click Open folder to view files using Windows Explorer The removable disk folder screen appears You can save or move any desired file or folder If you insert two memory cards the ...

Страница 66: ...h wireless technology 1 Insert the Bluetooth device into the USB port for use with digital cameras 2 Send an order to print images from the Bluetooth supported device Please refer to the Bluetooth supported device s user guide and optional Bluetooth device s user guide for more details Bluetooth compliance Version 1 2 Output power Bluetooth Class 2 Up to 10 meters Network topology Point to Multipo...

Страница 67: ...paper cassette Maintaining the printer Replacing the Ribbon cartridge Troubleshooting Specifications Index Close the paper cassette when the printer is not in use Do not store the printer in direct sunlight or in areas that experience temperature extremes Store the paper in its original package on a flat surface and leave it in a cool and dry place ...

Страница 68: ...n the printer off and disconnect the power adapter 2 Clean the outside of the printer using a damp cloth If you want to use a cleanser please contact a Samsung service center for a recommended detergent Do not use other cleansers and soaps as they may cause damage to the print head ...

Страница 69: ...6 3 Replacing the Ribbon cartridge Buy the Ribbon cartridge model named IPP 4640G for 40 pieces printing 1 Open the side cover 2 Push the lever upward 3 Pull the existing cartridge out Lever ...

Страница 70: ... the roller to smooth out wrinkles or uneven areas in the film If the film is not even it could be damaged during installation 5 Insert the cartridge in the direction in the shown illustration 6 Make sure that the cartridge is under the lever and then close the side cover Film Roller Lever ...

Страница 71: ...ribbon cartridge s life is used when the paper jams occurs even though an image is not printed Wrong paper size Reset the paper size Press the Print button Paper casette is not inserted or inserted incorrectly Insert paper casette Reinsert paper casette correctly Ribbon Cartridge is not installed or installed incorrectly Reinstall Ribbon cartridge correctly Insert Papers and then press Power Off a...

Страница 72: ...nt button Images were set wrong Reset image properly Printer failed to read the memory card Remove and insert the memory card again If the error occurs again try another memory card No images on the memory card Re load images onto the memory card and try again This appears when you try to print from a camera that does not support PictBridge Connect a camera that supports PictBridge Unsupported Ima...

Страница 73: ...s x 7680 pixels Cannot read images Turn the printer off and on Images in the memory card were deleted Try printing images from another source xxx images are not printed among the several images After checking the printed images reprint the missed images Cannot print image Turn the printer off and on JPEG Paser Error Unsupported Image Image size is too small Unsupported Image Image size is too big ...

Страница 74: ...ck the status of the printer 1 Right click on the printer icon at the bottom of the screen and click Options in the menu 2 Click the checkbox if you want to set the Status Monitor Alert Option 3 Schedule and automatic status checking from 1 to 10 seconds 4 Click OK to complete the setting ...

Страница 75: ...0 Series 1 07 Kg Memory Card Interfacec c There are many kinds of memory cards and each memory card has many different sub types In some cases a newly launched memory card may not be supported by your printer even if it is a kind of memory card that is available with your printer xD Picture Card M Type is not supported CompactFlash Type I and II MultiMedia Card Memory Stick Memory Stick PRO Serial...

Страница 76: ... for environmentally safe recycling Business users should contact their supplier and check the terms and conditions of the purchase contract This product should not be mixed with other commercial wastes for disposal Declaration of Conformity European Countries Approvals and Certifications The CE marking applied to this product symbolises Samsung Electronics Co Ltd Declaration of Conformity with th...

Страница 77: ...ion reception which can be determined by turning the equipment off and on the user is encouraged to try to correct the interference by one or more of the following measures Reorient or relocate the receiving antenna Increase the separation between the equipment and receiver Connect the equipment into an outlet on a circuit different from that to which the receiver is connected Consult the dealer o...

Страница 78: ...6 12 Specifications EU Declaration of Conformity R TTE ...

Страница 79: ...inter set 5 10 delete driver macintosh 5 28 windows 5 7 PhotoThru Windows 5 9 display 1 3 DPOF print 3 13 E error message 6 5 F favorite set 5 18 front view 1 2 1 4 G Graphics tab 5 16 H help 5 18 I install driver macintosh 5 21 windows 5 4 PhotoThru macintosh 5 29 windows 5 4 L language set 3 12 layout set 3 11 load paper 2 3 M memory card insert 3 2 remove 3 14 MISC folder 3 13 MSC use 5 31 O On...

Страница 80: ...int macintosh 5 29 windows 5 19 power cord connect 2 4 print all images 3 12 macintosh 5 26 PictBridge 4 2 windows 5 11 R rear view 1 3 1 5 reinstall driver windows 5 6 removable disk 5 31 S sharpness set 3 9 side view 1 3 1 5 spool 5 11 system requirements macintosh 5 21 windows 5 3 ...

Страница 81: ...Rev 2 00 ...

Отзывы: