


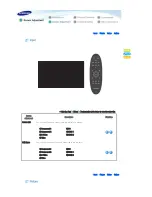


Adjustment
Description
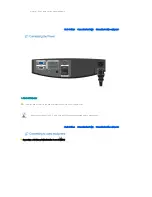
Play/Stop
Install
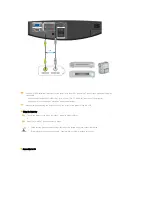
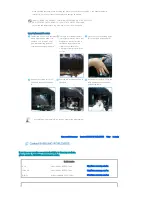
To tailor the picture to the installation location, you can invert the projected images
vertically/horizontally.
1) Front-Floor : Normal Image
2) Front-Ceiling : Horizontal/Vertical Reversed Image
3) Rear-Floor : Horizontally Reversed Image
4) Rear-Ceiling : Vertically Reversed Image
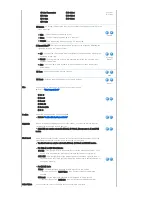
Light Setting
Used to set the image brightness by adjusting the amount of light generated by the
lamp.
1) Bright : Used to enhance the brightness in relatively bright ambient light. Since
this mode increases the light level of the lamp, you may experience more noise
which is produced when the projector is cooled down.
2) Theater : Using this function, you can adjust the light level of the lamp so that you
can comfortably watch pictures on the screen even when watching under dark
conditions. It also lowers power consumption and extends the life of the lamp.
Bright
Theater
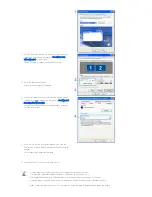
Test Pattern
Generated by the projector itself. Utilized as standard to optimize the installation of the
projector.
1) Crosshatch : You can check whether the picture is distorted or not.
2) Screen Size : You can refer to picture format sizes such as 1.33 : 1 or 1.78 : 1.
3) Color Standard : You can view the difference by changing the Color Standard to
SMPTE_D/HD/EBU.
4) Red : Red Screen, only for color adjustment.
5) Green : Green Screen, only for color adjustment.
6) Blue : Blue Screen, only for color adjustment.
7) White : White Screen, only for color adjustment.
8) 6500K_White : White Screen, brings out the white tones for a more real white.
▶ The Crosshatch and Screen Size patterns of this projector are provided by JKP (JK
Production).
▶ The Red/Green/Blue colors of the test patterns are only for the color adjustment
procedures, and may not comply with the actual colors displayed during video
playback.
Crosshatch
Screen Size
Color
Standard
Red
Green
Blue
White
6500K_White
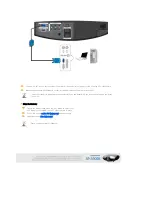
PC
Eliminates or reduces noise that causes unstable screen quality, such as screen
shaking. If the noise is not removed using Fine Adjustment, adjust the frequency to the
maximum and then perform Fine Adjustment again.
Only activated in the PC environment.
1) Auto Adjustment : Used to adjust frequency and phase of PC screen
automatically.
2) Coarse : Used to adjust frequency when vertical lines appear on PC screen.
3) Fine : Used to fine tune the PC screen.
4) Zoom : Used to extend PC screen from the center.
5) Reset : Using this function, you can reset the PC menu settings to the factory
default settings.
Auto
Adjustment
Coarse
Fine
Zoom
Reset
Color Standard
You may adjust the color standard to suit the color standard of the input signal.
1) SMPTE_C : Standardized for Video Equipment by the Society of Motion Picture
and Television Engineers
2) HD : High Definition, 1125 scan lines, standard definition TV submitted to the
ITU-R by U.S., Japan and Canada, in 1986.
3) EBU : Regulations and standards for European Broadcasting Production and
Technology, standardized by the European Broadcasting Union.


