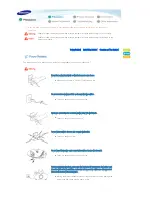
The product color and shape may vary depending
on the model.
Страница 1: ...The product color and shape may vary depending on the model...
Страница 2: ...n the connection is not firm it may cause a fire Do not use loose power outlets or damaged power cables z There is a danger of electric shock or fire Under no circumstances touch the power plug with w...
Страница 3: ...SPREAD OF FIRE KEEP CANDLES OR OTHER OPEN FLAMES AWAY FROM THIS PRODUCT AT ALL TIMES z There is a danger of fire When installing the product in a cabinet or on a shelf make sure the front end of the b...
Страница 4: ...he internal temperature may cause a fire Place the product on the ground carefully z Doing so may cause damage or injury Do not drop the product while carrying it z Doing so may cause damage or injury...
Страница 5: ...ects fall it may cause injury Do not let children place objects such as toys or cookies on the product z If a child tries to reach for any of these objects the product may fall and cause harm Do not l...
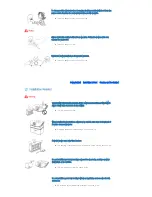
Страница 6: ...turn the product off and unplug the power cord z This may cause electric shock or fire Contact a Service Center Take care not to lose the lens cover of the product z The lens could get damaged When re...
Страница 7: ...ier and check the terms and conditions of the purchase contract This product should not be mixed with other commercial wastes for disposal Correct disposal of batteries in this product alleen voor Eur...
Страница 8: ...stallation structure are optimized to minimize fan noise and beam leakage Various Input Ports Abundant input terminals are available such as two HDMI supporting HDCP terminals and two component termin...
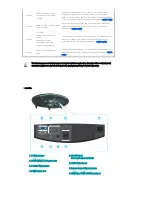
Страница 9: ...adjustable feet up and down 7 Zoom Knob Used to enlarge or reduce image size 8 POWER Button Used to turn the projector on or off 9 SOURCE Button Used to select input signals from the external sources...
Страница 10: ...goes beyond the control limit Refer to Action 3 A problem has occurred when operating the DDP IC in the product Refer to Action 4 A problem has occurred with the operation of the lamp Refer to Action...
Страница 11: ...er turning off the projector Turn the power off wait for a sufficient amount of cooling time and then turn the power on to operate If the same problem occurs continually contact your product distribut...
Страница 12: ...HDMI2 Button 16 COMP2 Button 17 RETURN Button 18 EXIT Button 19 D BLACK Button 20 USER Button 21 INSTALL Button 1 ON Used to turn on the projector 2 COMP1 Used to switch to COMPONENT 1 Mode 3 VIDEO U...
Страница 13: ...in the optical system 20 USER Used to select Picture User Adjust Mode 21 INSTALL Used to flip or reverse the projected image Product Features Product Views Remote Control Product Specifications Design...
Страница 14: ...cts will not exceed the maximum number of bad pixels set by our standards Rarely non displayable pixels may exist however it does not affect the picture quality nor the lifespan of the product Support...
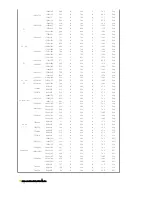
Страница 15: ...0 Sep PC HDMI DVI 720x480 858x525 31 5 N 59 9 N 27 0 Sep 858x525 31 5 N 60 0 N 27 0 Sep 720x576 864x625 31 3 N 50 0 N 27 0 Sep 1280x720 1980x750 37 5 P 50 0 P 74 3 Sep 1650x750 45 0 P 59 9 P 74 2 Sep...
Страница 16: ...i x x x x 480i x x x x PC 16 9 Mode x x x x 4 3 Mode x x x x Picture Position Modes Overscan Off Source Picture Position H V Input Type Mode 16 9 4 3 Zoom 1 Zoom 2 Wide fit Anamorphic HDMI HD 1080p x...
Страница 17: ...60 x x x x x x 720 x 400 70 x x x x x x 640 x 350 70 x x x x x x Component HD 1080p O O O O O O 1080i O O O O O O 720p O O O O O O SD 576p O O O O x O 480p O O O O x O 576i O O O O x O 480i O O O O x...
Страница 18: ...the picture on the screen will not be displayed clearly When installing the screen in bright surroundings use curtains You can install the projector in the following locations Front Floor Front Ceilin...
Страница 19: ...ojector You may adjust the level of the projector up to 3 degrees Depending on the position of the projector Keystone distortion of image may appear Adjusting the Lens Position Moving Dial Move the pi...
Страница 20: ...3 2117 8430 2 6473 2 212 180 3985 2241 8926 6853 9 224 190 4206 2366 9421 9 7234 7 237 200 4428 2491 9917 8 7615 5 249 210 4649 2615 10413 7 7996 3 262 220 4870 2740 10909 6 8377 274 230 5092 2864 114...
Страница 21: ...en refresh rate 5 Click the OK button to close the window and click the OK button of the Display Properties window to close the window The computer may restart automatically 6 Shut down the PC and con...
Страница 22: ...nt 1 Rear of Projector Plug the power cord into the power terminal on the rear side of the projector When used outside of the U S HAR cord with fittings of an approved agency may be used Basic Setting...
Страница 23: ...ojector and the HDMI output terminal of the DVD player Cable Satellite box using a HDMI cable When the connection is finished connect the power of your projector and DVD player Cable Satellite box Usi...
Страница 24: ...nect the power of your projector and DVD player Cable Satellite box Using the Projector Turn on the projector and press the COMP1 button to select Component 1 Press the COMP2 button to select Componen...
Страница 25: ...ection provides a higher visual quality When finishing connecting the devices connect the power of the projector and the VCR Using the Projector Turn on the projector and press the Video button to sel...
Страница 26: ...nd the PC This product supports plug and play and therefore if you use Window XP you do not need to setup the driver on your PC Using the Projector Turn on the projector and press the PC button to sel...
Страница 27: ...ion Play Stop Source List You can select a device connected to the projector to display 1 Component 1 5 PC 2 Component 2 6 HDMI 1 3 S Video 7 HDMI 2 4 Video Edit Name You can edit the names of devices...
Страница 28: ...Used to adjust brightness of the entire picture 4 Sharpness Used to adjust the sharpness of the picture PC mode is not supported 5 Color Used to adjust color lighter or darker 6 Tint Used to obtain m...
Страница 29: ...it is not aligned Refer to Position Moving Support Mode Digital NR When a dotted line is displayed or the screen shakes you can view picture in better visual quality by enabling Noise Reduction Digita...
Страница 30: ...ich have 24 frames per second with minimal scene distortion as in a movie Though the difference is small this function implements the highest screen quality You can adjust 1080P 24 Frame mode in HDMI...
Страница 31: ...for color adjustment 7 White White Screen only for color adjustment 8 6500K_White White Screen brings out the white tones for a more real white The Crosshatch and Screen Size patterns of this projecto...
Страница 32: ...video file Screen Adjustment Description Play Stop Language You can select the language used for the menu screen Menu Position You can move Menu Position up down left right Menu Translucency You can...
Страница 33: ...e LED indicators on your projector on or off according to your requirements 1 Off LED will not come on 2 In Standby Turns the LED on in standby mode 3 In Watching TV Turns the LED on while watching TV...
Страница 34: ...affect the sensitivity and cause the remote control to malfunction z Check if the remote control battery is empty z Check whether the LED indicator on the top of the projector is turned on I cannot s...
Страница 35: ...e sure to properly connect the external devices Check the connection cables again Screen appears in black and white or odd color screen is too dark or bright z As mentioned above check the adjustment...
Страница 36: ...p according to the usage time You can view the lamp usage time in the Information Display INFO button Use the recommended lamp when replacing Lamp specifications are defined in the user s manual Repla...
Страница 37: ...e your projector so that its left side is visible and then remove the screws on the lamp cover Be careful your projector does not fall Open the cover by holding down A in the figure and pulling B Remo...
Страница 38: ...www samsung com latin VENEZUELA 0 800 100 5303 http www samsung com latin Europe AUSTRIA 0810 SAMSUNG 7267864 0 07 min http www samsung com at BELGIUM 02 201 2418 http www samsung com be Dutch http ww...
Страница 39: ...0 http www samsung com kz_ru Asia Pacific AUSTRALIA 1300 362 603 http www samsung com au CHINA 800 810 5858 400 810 5858 010 6475 1880 http www samsung com cn HONG KONG 3698 4698 http www samsung com...
Страница 40: ...le instead of radio waves To view cable broadcasts you have to subscribe to your local cable broadcast service provider and install an additional receiver Color Standard A pre determined default color...
Страница 41: ...ervice Input Port This port is provided for service purposes This port provides data communication in accordance with the RS 232C communication standard S Video IN Port This is called super video S Vi...