Samsung SP-72K8UH Скачать руководство пользователя страница 137

Español - 42

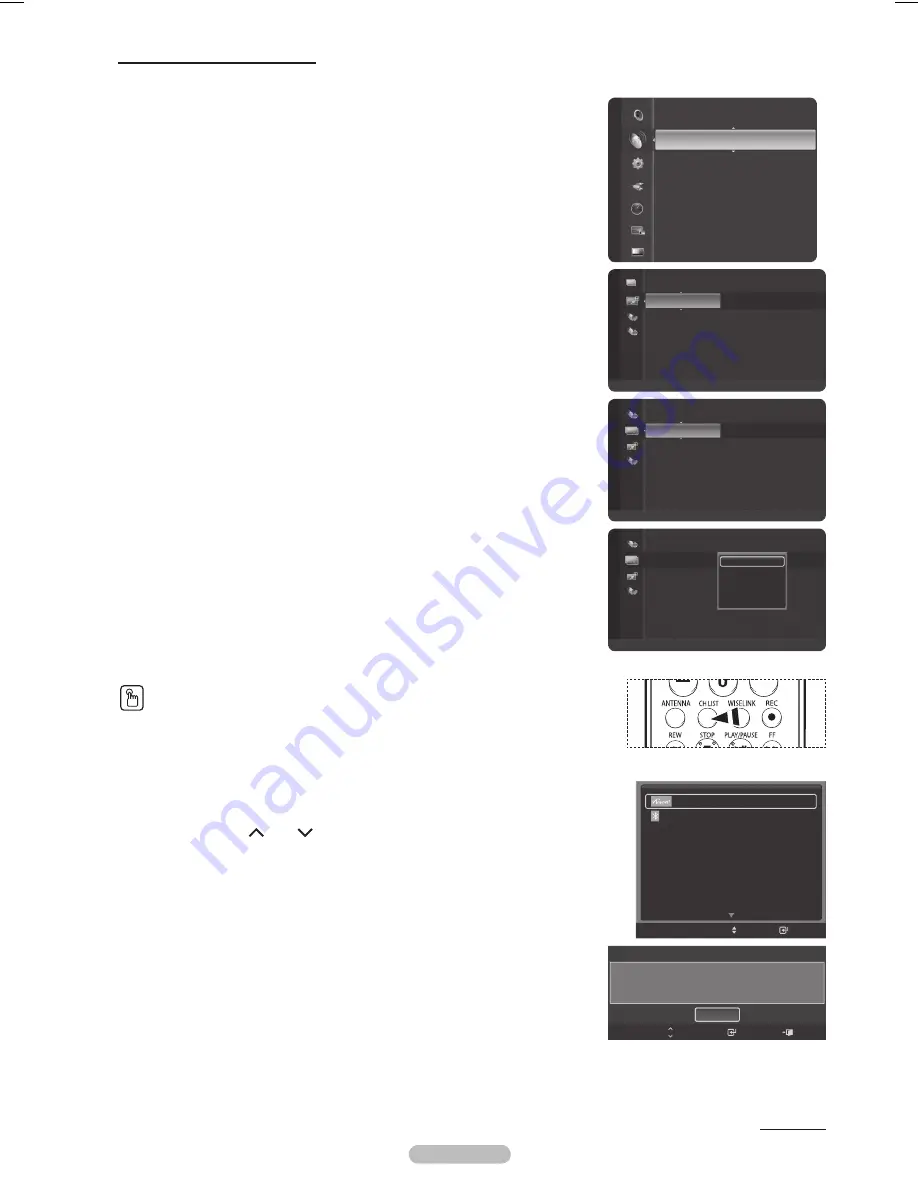
Adición y supresión de canales

Puede añadir o suprimir un canal para que se muestren los canales que desee.
1

   Pulse el botón 

MENU

Pulse los botones ▲ o ▼ para seleccionar 

Canal

 y, a continuación, pulse el botón 

ENTER

Pulse los botones ▲ o ▼ para seleccionar 

Lista de canales

 y, a continuación, pulse el 

botón 

ENTER

.

2

  Pulse el botón ◄ para seleccionar 

Canales agregados

.

3

  Pulse los botones ▲ o ▼ para seleccionar 

Todos los canales

 y, a continuación, pulse 

el botón 

ENTER

Puede ver todos los canales que tiene disponibles.

4

  Pulse los botones ▲ o ▼ para seleccionar el canal que desea agregar y, a 

continuación, pulse el botón azul.

5

  Pulse el botón 

ENTER

 para seleccionar 

Agregar

.

➢ 

Todos los canales añadidos se mostrarán en el menú 

Canales agregados

.

6

  Pulse los botones ▲ o ▼ para seleccionar el canal que desea borrar y, a continuación, 

pulse el botón azul.


Pulse el botón 

ENTER

 para seleccionar 

Borrar

.

Pulse el botón 

EXIT

 para salir.

➢ 

Puede ver todos los canales borrados en el menú 

Canales agregados

 de la misma 

manera.

También puede pulsar el botón 

CH LIST

 del mando a distancia para mostrar las listas 

de canales.

Configuración sencilla

1. Pulse el botón 

TOOLS

 en el mando a distancia.

2. Pulse los botones ▲/▼ para seleccionar 

Agregar/borrar canal

; a continuación pulse el botón 

ENTER

.

3. Pulse los botones 

CH 

 y 

CH 

 para seleccionar el canal que desea añadir o borrar; a 

continuación pulse el botón 

ENTER

.

Continúa…


Lista Disp.


Conexión del auricular

Configuración de la imagen
Configuración del sonido
Temporizador                                       Apagado
Subtítulo                                                 Apagado
Agregar/borrar canal
Agregar a Favoritos

Mover

Ingresar

Agregar/borrar canal

DTV Aire        6-1                   No está en la Memoria

Salir

Ingresar

Añadir

CH

Cambiar

Canal

 
Antena 

: Aire

Lista de canales 


Prog. Auto 

Borrar canal encriptado
Sintonia Fina

Intensidad señal
LNA 

: Encendido 

6  

    Aire

6-1


Aire


7  

    Aire

7-1  

♥ Aire

9  

    Aire

9-1 

♥ Aire

10 

    Aire

10-1 

♥ Aire

11 

    Aire

Canales agregados

     Aire


Antena


Zoom


Selección


Opción

6  

    Aire

6-1


Aire


7  

    Aire

7-1  

♥ Aire

9  

    Aire

9-1 

♥ Aire

10 

    Aire

10-1 

♥ Aire

11 

    Aire

Todos los canales

     Aire


Antena


Zoom


Selección


Opción

6  

    Aire

6-1


    Aire


7  

    Aire

7-1  

♥ Aire

9  

    Aire

9-1 

♥ Aire

10 

    Aire

10-1 

♥ Aire

11 

    Aire

Agregar
Agregar a Favoritos
Visualización con temporizador

Edición de nombre de canal

Deseleccionar todos

Todos los canales

     Aire


Antena


Zoom


Selección


Opción

BP68-00640B-00Spa.indb   42

2007-04-23   ¿ÀÈÄ 4:48:24

Содержание SP-72K8UH

Страница 1: ...egister your product at www samsung com global register Record your Model and Serial number here for future reference Model _______________ Serial No _______________ Owner s Instructions SP 72K8UH DLP TV ...

Страница 2: ...s license is limited to private non commercial use by end user consumers for licensed contents No rights are granted for commercial use The license does not cover any product unit other than this product unit and the license does not extend to any unlicensed product unit or process conforming to ISO IEC 11172 3 or ISO IEC 13818 3 used or sold in combination with this product unit The license only ...

Страница 3: ...y it was originally encoded for broadcast This is a big advantage for DTV over analog TV there is no noise ghosting static or scratchy audio 3 How can I connect an antenna in my townhouse co operative apartment condominium or apartment The Federal Communications Commission s OTARD Rule part of the Telecommunications Act of 1996 allows residents of condominiums townhouse or members of neighborhood ...

Страница 4: ...hannel Sound MTS Track Analog 38 Automatic Volume Control 39 Selecting the Internal Mute 39 Resetting the Sound Settings 40 Channel Control Clearing Scrambled Channels Digital 40 Managing Channels 41 Fine Tuning Analog Channels 46 Checking the Digital Signal Strength 47 LNA Low Noise Amplifier 47 Function Description Selecting a Menu Language 48 Setting the Time 48 Viewing Closed Captions On Screen...

Страница 5: ...e sharpest picture possible A built in multi channel sound decoder for stereo and bilingual listening Built in dual channel speakers A special sleep timer Widescreen TV with adjustable image size Life like clear images provided by DNle technology My Color Control mode to correspond with your color preference Digital Input jack HDMI DVI connection of your PC to this TV Digital Audio Output OPTICAL ...

Страница 6: ...ard Registration Card Safety Guide Manual Quick Guide Manual Power Cord Cloth Clean The product color and shape may vary depending on the model Continued Sold Separately Replacement Lamp For purchasing a replacement lamp ask at a nearby service center Use authorized lamps only The company cannot guarantee the quality of the product if an unauthorized lamp is used S Video Cable Video Cable Antenna ...

Страница 7: ...dby state The picture will automatically appear in about 15 seconds Auto Timer ON OFF has been set and the set will automatically be turned on in about 15 seconds A cooling fan inside the set is not operating normally Lamp cover on the side of the set is not properly shut Check if the ventilation hole on the side of the set is blocked because if the inner temperature is too high the power will shu...

Страница 8: ...Connect to a Digital Audio component 6 DVI IN AUDIO L R Connect to the DVI audio output jack of an external device 7 S VIDEO AV IN 1 2 Video input for external devices with an S Video output such as a Camcorder or VCR 8 3D SYNC OUT Connect to a 3D IR Emitter to enable the 3D Gaming function 9 VIDEO AUDIO OUT L R AV OUT Video Audio outputs for external devices Video output is not avaiable RF Digita...

Страница 9: ...source button TV DVD CABLE STB VCR on the remote control PRE CH Tunes to the previous channel a WISELINK This function enables you to view and play photo JPEG and audio files MP3 from an external device See page 72 JPEG 79 MP3 b REC Use to make a recording c VCR DVD Functions Rewind Stop Play Pause Fast Forward d CH CH Press to change channels e EXIT Press to exit from the menu f UP DOWN LEFT RIGH...

Страница 10: ...leads that look like this see Antennas with 300 Ω Flat Twin Leads below If your antenna has one lead that looks like this see Antennas with 75 Ω Round Leads If you have two antennas see Separate VHF and UHF Antennas Antennas with 300 Ω Flat Twin Leads If you are using an off air antenna such as a roof antenna or rabbit ears that has 300 Ω twin flat leads follow the directions below 1 Place the wir...

Страница 11: ...to the ANT IN terminal on your cable box This terminal might be labeled ANT IN VHF IN or simply IN 2 Connect this cable to a two way splitter 3 Connect an Antenna cable between an OUTPUT terminal on the splitter and the IN terminal on the cable box 4 Connect an Antenna cable between the ANT OUT terminal on the cable box and the B IN terminal on the RF A B switch 5 Connect another cable between the...

Страница 12: ...must connect two cables Each VCR has a different back panel configuration When connecting a VCR match the color of the connection terminal to the cable S Video Connection Your Samsung TV can be connected to the S Video jack of a VCR This connection delivers a better picture when compared to the regular video connection above 1 To begin follow steps 1 3 in the previous section to connect the antenn...

Страница 13: ...ONENT IN 2 Y PB PR jacks on the TV and the COMPONENT OUT Y PB PR jacks on the DVD Player Cable Satellite Box Set Top Box 2 Connect Audio Cables between the COMPONENT IN 1 L AUDIO R or COMPONENT IN 2 L AUDIO R jacks on the TV and the AUDIO OUT jacks on the DVD Player Cable Satellite Box Set Top Box Component video separates the video into Y Luminance brightness PB Blue and PR Red for enhanced video...

Страница 14: ... the digital audio and video signals using a single cable Multimedia interface is a more accurate name for it especially because it allows multiple channels of digital audio 5 1 channels The difference between HDMI and DVI is that the HDMI device is smaller in size has the HDCP High Bandwidth Digital Copy Protection coding feature installed and supports multi channel digital audio Each DVD Player ...

Страница 15: ...conductor DIGITAL AUDIO OUT OPTICAL RF Digital Analog AV S Video Sound is output When a DVD player or Cable Satellite box is connected to the COMPONENT or HDMI IN jacks on the TV the Optical jack outputs 2 1 channel audio only If you want to hear 5 1 channel audio connect the DIGITAL AUDIO OUT OPTICAL jack on the player or box directly to the Digital Audio System not the TV Connecting an Amplifier...

Страница 16: ...3 DVI IN jack on the TV and the PC output jack on your computer 2 Connect a 3 5 mm Stereo mini plug 2RCA Cable between the DVI IN L AUDIO R jack on the TV and the Audio Out jack of the sound card on your computer Each PC has a different back panel configuration When connecting a PC match the color of the connection terminal to the cable When connecting the HDMI DVI to your PC select HDMI3 DVI and ...

Страница 17: ...e and if it is connected to ANT 2 IN AIR select Air If both ANT 1 IN CABLE and ANT 2 IN AIR are connected select the Air Cable In Cable mode you can select the correct analog signal source among STD HRC and IRC by pressing the or button then press the ENTER button If you have Digital cable select the signal source for both Analog and Digital Contact your local cable company to identify the type of...

Страница 18: ...en the ENTER button The message Select the time zone in which you live is displayed 10 Press the or button to highlight the time zone for your local area and to move the highlight to the appropriate time zone on the map of the United States Press the ENTER button If clock is not automatically set see pages 48 49 to set the clock 11 The message Enjoy your watching is displayed When you have finishe...

Страница 19: ... For example for Channel 7 1 press 7 then and then 1 HD indicates the TV is receiving a Digital High Definition signal SD indicates the TV is receiving a Standard Definition signal For quick channel change press the number buttons then press the ENTER button Using the PRE CH Button to select the Previous Channel Press the PRE CH button The TV will switch to the last channel viewed To quickly switc...

Страница 20: ...ion items with a Single button press 1 Press the TOOLS button The TOOLS menu will appear 2 Press the button to select a menu then press the ENTER button 3 Press the ENTER buttons to display change or use the selected items For a more detailed description of each function refer to the corresponding page Device List see page 82 Headset Connection see page 69 Picture Setting see page 28 Sound Setting...

Страница 21: ...ave Digital cable select the signal source for both Analog and Digital STD HRC and IRC identify various types of cable TV systems Contact your local cable company to identify the type of cable system that exists in your particular area At this point the signal source has been selected 6 The TV begins memorizing all available stations When pressing the ENTER button during a storing process the mess...

Страница 22: ...ter set up repeat steps 2 3 and 4 but try one of the other codes listed for your brand of VCR If no other codes are listed try each VCR code 000 through 080 Note on Using Remote Control Modes VCR When your remote control is in VCR mode the volume buttons still control your TV s volume Setting Up the Remote to Operate Your Cable Box 1 Turn off your cable box 2 Press the CABLE button on your TV s re...

Страница 23: ...des DVD When your remote control is in DVD mode the volume buttons still control your TV s volume Setting Up the Remote to Operate Your Set Top Box 1 Turn off your STB 2 Press the STB button on your TV s remote control 3 Press the SET button on your TV s remote control 4 Using the number buttons on your remote control enter three digits of the STB code listed on page 25 of this manual for your bra...

Страница 24: ...37 070 025 038 025 081 082 083 021 056 059 007 008 018 021 026 037 062 006 036 073 074 075 076 021 006 021 024 025 034 005 019 041 075 Brand MITSUBISHI MONTGOMERY WARD MTC MULTITECH NEC OPTIMUS PANASONIC PENTAX PENTEX RESEARCH PHILCO PHILIPS PIONEER PORTLAND PROSCAN QUARTZ QUASAR RADIO SHACK REALISTIC RCA SANSUI SANYO SCOTT SEARS SHARP SHIMTOM SIGNATURE SONY SYLVANIA SYMPHONIC TANDY TASHIKA TATUNG...

Страница 25: ...AMSUNG SET TOP BOX Brand ALPHASTAR ANAM CHANNEL MASTER CROSSDIGITAL CHAPARRAL DIRECT TV DAEWOO DISH NETWORK SYSTEM DISHPRO DRAKE DX ANTENNA ECHOSTAR EXPRESSVU GOI GE GENERAL INSTRUMENT HTS HOME CABLE HITACHI HUGHES NETWORK IQ IQ PRISM JANEIL JERROID JVC Code 023 043 018 034 019 035 015 016 017 019 022 045 060 061 062 065 066 067 068 074 069 070 069 018 024 032 027 025 069 070 071 069 069 065 046 0...

Страница 26: ...74 122 123 027 065 077 078 079 082 080 125 081 095 066 146 067 068 090 060 061 089 133 135 069 074 074 064 113 071 073 091 110 089 092 091 022 033 115 116 073 051 108 109 073 059 100 106 107 074 075 025 031 057 058 054 055 056 076 093 074 094 073 Brand NORCENT NEXT BASE NEC NANTAUS NESA OPTOMEDIA ELECTRONICS OPTIVIEW ONKYO PHILCO PRINCETON PROSCAN PANASONIC PHILIPS ROTEL RIO RCA RAITE ROWA SAMPO S...

Страница 27: ...urce To Edit the Input Source Name Name the external device connected to the input jacks to make your input source selection easier 1 Press the MENU button Press the or button to select Input then press the ENTER button Press the or button to select Edit Name then press the ENTER button 2 Press the or button to select AV1 AV2 AV3 S Video1 S Video2 Component1 Component2 PC HDMI1 HDMI2 or HDMI3 DVI ...

Страница 28: ... control to select one of the standard picture settings 3 Press the or button to select Contrast Brightness Sharpness Color or Tint G R then press the ENTER button Tint G R is not available in DTV or PC mode 4 Press the or button to decrease or increase the value of a particular item Press the ENTER button Each adjusted setting will be stored separately according to its input mode When you make ch...

Страница 29: ...just the Primary Color Red Green Blue Intensity Press the or button until you reach the optimal setting White Balance 10 10 You can adjust the color temperature for more natural picture colors Press the or button until you reach the optimal setting My Color Control Pink Green Blue Reset This setting can be adjusted to suit your personal preferences Select the Pink Green or Blue by pressing the or ...

Страница 30: ...cally enlarged Wide Fit Enlarges the aspect ratio of the picture to fit the entire screen 4 3 Sets the picture to 4 3 normal mode Just Scan Use this function to see the full image without cutting off the picture when DTV Component or HDMI 1080i 1080p signals are input Some cable boxes and satellite receivers have their own set of screen sizes which may differ from the ones above Only 16 9 and 4 3 ...

Страница 31: ...the MENU button Press the ENTER button to select Picture Press the or button to select Active Color then press the ENTER button 2 Press the or button to select Off or On then press the ENTER button Press the EXIT button to exit This function is not available in PC mode When you select Standard or Movie in Picture Mode the Active Color automatically changes to Off and it is deactivated When the Pic...

Страница 32: ... the Movie mode It is inactivated DNIeTM Digital Natural Image engine This feature brings you more a detailed image with 3D Dual View noise reduction and detail contrast and white enhancement Setting the Color Gamut Color gamut is a color matrix made up of the basic colors of Red Green and Blue 1 Press the MENU button Press the ENTER button to select Picture Press the or button to select Color Gam...

Страница 33: ...ory defaults 1 Press the MENU button Press the ENTER button to select Picture Press the or button to select Picture Reset then press the ENTER button 2 Press the or button to select Reset All Reset Picture Mode or Cancel then press the ENTER button Reset All All the picture values return to default settings Reset Picture Mode Current picture values return to default settings Picture DNIe On Color ...

Страница 34: ...and turn it on again the PIP window will disappear You can view Analog TV broadcasts on the PIP screen sub picture when the main picture is from an external device connected to HDMI1 2 3 Component1 2 or PC Main picture Sub picture Component 1 2 HDMI 1 2 3 PC Analog TV broadcasts only Press the PIP button on the remote control to activate or deactivate the PIP Changing the Size of the PIP Window 3 ...

Страница 35: ...r button to select Air Cable then press the ENTER button Press the or button to select Air or Cable then press the ENTER button Air Air antenna signal Cable Cable antenna signal Changing the PIP Channel 6 Press the or button to select Channel then press the ENTER button Press the or button at the bottom of the remote to select the desired channel in the PIP window then press the ENTER button The c...

Страница 36: ...rd sound settings Customizing the Sound The sound settings can be adjusted to suit your personal preference Alternatively you can use one of the automatic settings 1 Press the MENU button Press the or button to select Sound then press the ENTER button Press the or button to select Equalizer then press the ENTER button 2 Press the ENTER button to select Mode Press the or button to select a particul...

Страница 37: ...o speaker playback system including internal television speakers It is fully compatible with all multichannel formats 1 Press the MENU button Press the or button to select Sound then press the ENTER button Press the or button to select SRS TruSurround XT then press the ENTER button 2 Press the or button to select Off or On then press the ENTER button Press the EXIT button to exit TruSurround XT SR...

Страница 38: ...MENU button Press the or button to select Sound then press the ENTER button Press the or button to select Multi Track Sound then press the ENTER button 2 Press the or button to select a setting you want then press the ENTER button Press the EXIT button to exit Choose Mono for channels that are broadcasting in mono or if you are having difficulty receiving a stereo signal Choose Stereo for channels...

Страница 39: ...exit The left right audio outputs and digital audio outputs Optical remain enabled The VOL VOL MUTE and S MODE buttons do not operate when the Internal Mute is set to On When Internal Mute is set to On Sound menu except Multi Track Sound cannot be adjusted TV s Internal Speakers Audio Out Optical R L Out to Sound System TV AV S Video Component PC HDMI TV AV S Video Component PC HDMI Internal Mute ...

Страница 40: ... cable channels This process may take up to 20 30 minutes 1 Press the MENU button Press the or button to select Channel then press the ENTER button Press the or button to select Clear Scrambled Channel then press the ENTER button It searches scrambled channels which are to be removed from the list To stop searching scrambled channels Press the button to select Stop then press the ENTER button Pres...

Страница 41: ... control to bring up the channel lists Using the Color buttons on the Remote with the Channel List Red Antenna Switches to air or cable Green Zoom Enlarges or shrinks the channel number Yellow Select Selects multiple channel lists Blue Option Displays the Add or Delete Add to Favorite or Delete from Favorite Timer Viewing Channel Name Edit and Deselect All menus A gray colored channel refers to a ...

Страница 42: ...ss the CH LIST button on the remote control to bring up the channel lists Easy Setting 1 Press the TOOLS button on the remote control 2 Press the button to select Channel Add Delete then press the ENTER button 3 Press the CH and CH button to select the channel to be added or deleted then press the ENTER button Continued Device List Headset Connection Picture Setting Sound Setting Sleep Timer Off C...

Страница 43: ...n the same manner Only memorized channels can be set as favorite channels All favorite channels will be shown on Favorite menu Press the CH LIST button on the remote control to bring up the channel lists Easy Setting 1 Press the TOOLS button on the remote control 2 Press the button to select Favorite Channel or Delete Favorite Channel then press the ENTER button The current channel is added to or ...

Страница 44: ...serve a program in the All Channels or Favorite menus using the same procedures For information on how to confirm a viewing reservation refer to page 45 Press the CH LIST button on the remote control to bring up the channel lists Digital Program Guide and Viewing Reservation When a digital channel is selected and you press the button the Program Guide for the channel appears You can reserve a prog...

Страница 45: ...ENTER button 6 Press the or button to select OK then press the ENTER button The viewing reservation has been canceled Press the EXIT button to exit Programed Menu Change Info Select to change a viewing reservation Cancel schedules Select to cancel a viewing reservation Information Select to view a viewing reservation Press the CH LIST button on the remote control to bring up the channel lists Cont...

Страница 46: ...it The names of digital broadcasting channels are automatically assigned and cannot be labelled Fine Tuning Analog Channels Use fine tuning to manually adjust a particular channel for optimal reception 1 Press the MENU button Press the or button to select Channel then press the ENTER button Press the or button to select Fine Tune then press the ENTER button 2 Press the or button to adjust the fine...

Страница 47: ...nal is weak physically adjust your antenna to increase the signal strength Continue to adjust the antenna until you find the best position with the strongest signal Press the EXIT button to exit LNA Low Noise Amplifier If the TV is operating in a weak signal area sometimes the LNA function can improve the reception a low noise preamplifier boosts the incoming signal 1 Press the MENU button Press t...

Страница 48: ...are receiving a digital signal 1 Press the MENU button Press the or button to select Setup then press the ENTER button Press the or button to select Clock then press the ENTER button 2 Press the ENTER button to select Clock Mode Press the or button to select Auto then press the ENTER button Setup Plug Play Language English Clock Sleep Timer Off Timer 1 Inactivated Timer 2 Inactivated Timer 3 Inact...

Страница 49: ...n press the ENTER button Press the or button to select Clock then press the ENTER button 2 Press the ENTER button to select Clock Mode Press the or button to select Manual then press the ENTER button 3 Press the or button to select Clock Set then press the ENTER button 4 Press the or button to move to Month Day Year Hour Minute or am pm Set the date and time you want by pressing the or button then...

Страница 50: ...n by timer This function is only available in timer On mode and prevents overheating which may occur if a TV is on for too long time Setting the Sleep Timer The sleep timer automatically shuts off the TV after a preset time 30 60 90 120 150 and 180 minutes 1 Press the MENU button Press the or button to select Setup then press the ENTER button Press the or button to select Sleep Timer then press th...

Страница 51: ...arent Size This option consists of Default Small Standard and Large Font Style This option consists of Default Style0 Style 7 You can change the font you want Foreground Color This option consists of Default White Black Red Green Blue Yellow Magenta and Cyan You can change the color of the letter Background Color This option consists of Default White Black Red Green Blue Yellow Magenta and Cyan Yo...

Страница 52: ... This channel carries data that is intended to augment information carried in the program CC3 Secondary Synchronous Caption Service Alternate program related caption data typically second language captions CC4 Special Non Synchronous Use Captions Similar to CC2 Text1 First Text Service This may be various non program related data Text2 Second Text Service Additional data usually not program relate...

Страница 53: ...reen which means that Game Mode is On with the selected source If Game Mode is On Picture Mode is automatically changed to Game and users cannot change the mode Sound Mode in the Sound menu is deactivated Adjust the sound using the equalizer The Reset in the Sound menu is activated Reset function initializes the Equalizer settings to the factory default setting The Channel menu is deactivated Game...

Страница 54: ...ween On and Off Press the ENTER button Press the EXIT button to exit Setting Up Your Personal ID Number PIN 1 Press the MENU button Press the or button to select Setup then press the ENTER button Press the or button to select V Chip then press the ENTER button 2 Press the number buttons to enter your current 4 digit PIN The default PIN for a new TV set is 0 0 0 0 Continued Setup Game Mode Off DLP ...

Страница 55: ...ection Parental restrictions can be set up using either of two methods The TV guidelines or the MPAA rating 1 Press the MENU button Press the or button to select Setup then press the ENTER button Press the or button to select V Chip then press the ENTER button 2 Press the number buttons to enter your current 4 digit PIN The default PIN for a new TV set is 0 0 0 0 for USA models only for Canada mod...

Страница 56: ...low All Press to unlock all TV ratings Block All Press to lock all TV ratings The TV Y TV Y7 TV G TV PG TV 14 and TV MA have additional options See the next step to change any of the following sub ratings The V Chip will automatically block certain categories that are more restrictive For example if you block TV Y category then TV Y7 will automatically be blocked Similarly if you block the TV G ca...

Страница 57: ... be blocked also How to Set up Restrictions Using Canadian English for Canada Models 9 Press the or button to select Canadian English then press the ENTER button 10 The Canadian English screen will appear Press the or button to select an appropriate restriction Press the ENTER button to activate the restriction selected The symbol is indicated Press the RETURN button to return to V Chip C C8 G PG ...

Страница 58: ...ating menu is available for use after information is downloaded from the broadcasting station However depending on the information from the broadcasting station it may not be available for use 14 The Downloadable U S Rating screen will appear Press the or button to select an appropriate restriction Press the ENTER button to activate the restriction selected The symbol is indicated Press the EXIT b...

Страница 59: ... or Low then press the ENTER button Press the EXIT button to exit This function is only available when you have an external device connected via HDMI to the TV Setup PC Home theater PC Off HDMI Black Level Normal Film Mode Off Light Effect Always Blue Screen Off Melody Medium Bluetooth Anynet HDMI CEC SW Upgrade PC Home theater PC Off HDMI Black Level Normal Film Mode Off Light Effect Always Blue ...

Страница 60: ...nd Always you want then press the ENTER button Press the EXIT button to exit Off LED Blue will not come on In Standby The blue LED lights while in Standby mode and it turns off when your TV is turned on In Watching The blue LED lights when watching TV and it turns off when your TV is turned off Always LED Blue will always be on Setup HDMI Black Level Normal Film Mode Off Light Effect Always Blue S...

Страница 61: ... you must set the Blue Screen mode to Off 1 Press the MENU button Press the or button to select Setup then press the ENTER button Press the or button to select Blue Screen then press the ENTER button 2 Press the or button to select Off or On then press the ENTER button Press the EXIT button to exit Blue Screen is displayed when there is no signal from an external device regardless of the Blue Scre...

Страница 62: ...en press the ENTER button The message Scanning for USB It may take up to 30 seconds is displayed 3 If the firmware on the USB is properly recognized the message Upgrade version xxxx to version xxxx The system would be reset after upgrade is displayed Press the or button to select OK then press the ENTER button The upgrade starts Please be careful not to disconnect the power or remove the USB drive...

Страница 63: ...in almost all cases If not contact your computer manufacturer or Samsung Dealer 1 First click on Control Panel on the Windows start menu 2 When the control panel window appears click on Appearance and Theme and a display dialog box will appear 3 When the control panel window appears click on Display and a display dialog box will appear 4 Navigate to the Settings tab on the display dialog box The c...

Страница 64: ... N P 1280 x 1024 63 98 60 02 P P 74 62 70 00 76 82 72 00 79 97 75 02 P P 1920 x 1080 66 58 60 00 P N HDMI DVI Input Mode Resolution Horizontal Frequency KHz Vertical Frequency Hz Pixel Clock Frequency MHz Sync Polarity H V IBM 640 x 350 31 469 70 086 25 175 720 x 400 31 469 70 086 28 322 640 x 480 31 469 59 940 25 175 VESA 800 x 600 37 879 60 317 40 000 1024 x 768 48 364 60 000 65 000 1280 x 1024 ...

Страница 65: ...n reduced re adjust the picture so that it is aligned on the center of the screen Change to the PC mode first 3 Press the ENTER button to select PC then press the ENTER button to select Image Lock 4 Press the or button to select Coarse or Fine then press the ENTER button Press the or button to adjust the screen quality then press the ENTER button This feature may change the width of the image If n...

Страница 66: ...the factory defaults Change to the PC mode first 7 Press the ENTER button to select PC then press the or button to select Image Reset then press the ENTER button 8 The message Image Reset is completed appears on the screen V Chip Menu Transparency Medium PC Home theater PC Off HDMI Black Level Normal Film Mode Off Light Effect Always Blue Screen Off Melody Medium Bluetooth Image Lock Position Auto...

Страница 67: ...or button to select Size then press the ENTER button 2 Press the or button to select the screen format you want then press the ENTER button Press the EXIT button to exit Wide TV Sets the picture in Wide TV format Wide PC Set the picture in Wide PC format 4 3 Set the picture in 4 3 format Press the P SIZE button on the remote control to change the picture size Wide PC The picture position and size ...

Страница 68: ...Press the ENTER button to select Bluetooth Press the or button to select On then press the ENTER button Bluetooth communication is on To not use Bluetooth communication select Off Continued Instructions for use Use the product within the range shown in the picture below If you use the product out of the range or there is an obstacle it may cause a communication failure Depending on other devices y...

Страница 69: ... it must be in the ready state For more detailed information refer to the headset s user manual Use the compatible stereo headset model name iSkin CERULEAN F1 CE F1000 If you use a different headset the lip synchronization problem can happen and the available communication range is not guaranteed For purchasing a compatible headset access the following website www iskin com You can also select a B...

Страница 70: ...t be named in English French or Spanish If not the files can not be played Change the file names to English French or Spanish if necessary Folder or file names can not exceed 128 characters If exceeded they won t function The file system only supports the FAT16 32 Certain types of USB Digital camera and audio devices may not be compatible with this TV WISELINK supports USB Mass Storage Class MSC d...

Страница 71: ...K Mode 1 Press the MENU button Press the or button to select Guide then press the ENTER button Press the ENTER button to select WISELINK 2 Press the or button to select Photo or Music then press the ENTER button The photo or music files saved on the storage device are listed To exit WISELINK mode press the EXIT button on the remote control Press the WISELINK button on the remote control to turn on...

Страница 72: ...t folder The folders and JPEG files are sorted in alphabetical order If the photo is displayed in full screen you can zoom in and out or rotate the photo on the screen Refer to pages 75 76 If the size of a photo file is too big the playing of the background music may be interrupted intermittently When Background Music is On See page 77 WISELINK for this product supports JPEG files up to 8K x 8K pi...

Страница 73: ...ture Setting You can set the Picture mode Refer to on page 28 Sound Setting You can set the Sound mode Refer to on page 36 37 Start Slide Show Zoom Rotate Background Music On Background Music Setting Delete Picture Setting Sound Setting Adjust Enter Move Slide Show Setting Slide Show Speed Normal Repeat Music On Screen Saver 5 min Enter Background Music Setting Select Folder 1 Steve Love mp3 Tomas...

Страница 74: ...r button to select a photo then press the blue button to display the option View Start Slide Show Delete Delete All Select All Information Safe Remove Press the or button to select Start Slide Show then press the ENTER button Slide show displays all JPEG files in the selected folder at a pre set speed During the slide show files are displayed in order from the currently shown file MP3 files can be...

Страница 75: ...ture is smaller than the original screen size the location change function doesn t work To exit WISELINK mode press the EXIT button on the remote control The enlarged file is not saved Press the WISELINK button on the remote control to turn on the WISELINK mode Zoom function information icon Displayed at the top left of the screen Icon Current OSD Function Zoom x 1 Restore a photo to its original ...

Страница 76: ...tes by 90 180 270 and 0 Rotating directly from 90 degrees to 270 degrees is not allowed To exit WISELINK mode press the EXIT button on the remote control The rotated file is not saved Press the WISELINK button on the remote control to turn on the WISELINK mode The Rotating function information icon Displayed at the top left of the screen Icon Current OSD Function Rotating 270 To rotate a photo by ...

Страница 77: ...tton over a photo icon shows the currently selected photo in full screen 4 Press the TOOLS button Press the or button to select Background Music Setting then press the ENTER button The music MP3 files are listed 5 Press the or button to select a particular music file and press the yellow button The mark appears to the left of the selected music MP3 Repeat the above operation to select multiple mus...

Страница 78: ... on the WISELINK mode Deleting Multiple Photos 1 In the Photo list press the or button to select a photo to be deleted and press the yellow button The mark appears to the left of the selected photo Repeat the above operation to select multiple photos 2 Press the blue button press the or button to select Delete selected File and press the ENTER button 3 Press the or button to select OK and press th...

Страница 79: ...e to the music list while playing a music file press the WISELINK button Press the WISELINK button on the remote control to turn on the WISELINK mode Playing a Selected Music File 1 In the Music list press the or button to select a music file and then press the yellow button The mark appears to the left of the selected music Repeat the above operation to select multiple music files 2 Press the blu...

Страница 80: ...press the ENTER button The music files are removed If you select Cancel the removing operation is cancelled To exit WISELINK mode press the EXIT button on the remote control Press the WISELINK button on the remote control to turn on the WISELINK mode Deleting Multiple Music Files 1 In the Music list press the or button to select a music file to be deleted and press the yellow button The mark appea...

Страница 81: ...e between Digital Audio Out Optical on your TV and Digital Audio Input on the Home Theater Connect only one Home Theater When following the connection above the Optical jack only outputs 2 channel audio You will only hear sound from the Home Theater s Front Left and Right speakers and the subwoofer If you want to hear 5 1 channel audio connect the DIGITAL AUDIO OUT OPTICAL jack on the DVD player o...

Страница 82: ... and Switching between Anynet Devices 1 Press the Anynet button Press the ENTER button to select Device List Anynet devices connected to the TV are listed If you cannot find a device you want press the red button to scan for devices 2 Press the or button to select to a particular device and press the ENTER button It is switched to the selected device Only when you set Anynet HDMI CEC to On in the ...

Страница 83: ...e Anynet function only works when the remote control is set to TV The REC button works only in View TV status You cannot control Anynet devices using the buttons on the side of the TV You can control Anynet devices only using the TV remote control The TV remote control may not work under certain conditions In this case re select the Anynet device The Anynet functions don t operate for the products...

Страница 84: ...xclusive remote control Anynet doesn t work at a certain condition Searching channels operating WISELINK When connecting or removing the HDMI cable please make sure to search devices again or restart your TV Check if the Anynet Function of Anynet device is set on I want to start Anynet Check if the Anynet device is properly connected to the TV and check if the Anynet HDMI CEC is set to On in the A...

Страница 85: ...ls Press the TV button to put your remote control in the TV mode Make sure the remote has batteries Check that the and ends of the batteries are inserted correctly Digital broadcasting screen problem Please check the digital signal strength and input antenna The image is too light or too dark Adjust the Brightness and Contrast Adjust the Fine tuning The visual qualities of digital channels vary Th...

Страница 86: ...ed the TV or to a Samsung Service center Caution Replace with the correct code numbered lamp to avoid damage to the TV Turn the power off and wait for 30 minutes before replacing the lamp as it will be hot Do not touch the glass part of the lamp with your bare hands and do not insert any foreign object inside the cover as it may cause poor screen quality electric shock or fire Do not place the old...

Страница 87: ...n by applying an optical system If you place the TV set face down it might cause a problem because dirt or some other contaminant may become attached to the inside of the TV set Temperature If your TV is suddenly moved from a cold to a warm place unplug the power cord and allow at least two hours for moisture that may have formed inside the unit to dry completely Using Your TV in Another Country I...

Страница 88: ...Output 10W X 2 Dimension W x H x D 65 8 x 20 4 x 46 8 inches 1671 x 519 x 1189 mm Weight 104 5 lbs 47 4 Kg Environmental Considerations Operating Temperature Operating Humidity Storage Temperature Storage Humidity 50 F to 104 F 10 C to 40 C 10 to 80 non condensing 4 F to 113 F 20 C to 45 C 5 to 95 non condensing This device is a Class B digital apparatus Design and specifications are subject to ch...

Страница 89: ...stributed under the terms of this General Public License The Program below refers to any such program or work and a work based on the Program means either the Program or any derivative work under copyright law that is to say a work containing the Program or a portion of it either verbatim or with modifications and or translated into another language Hereinafter translation is included without limi...

Страница 90: ...se since you have not signed it However nothing else grants you permission to modify or distribute the Program or its derivative works These actions are prohibited by law if you do not accept this License Therefore by modifying or distributing the Program or any work based on the Program you indicate your acceptance of this License to do so and all its terms and conditions for copying distributing...

Страница 91: ...ost effectively convey the exclusion of warranty and each file should have at least the copyright line and a pointer to where the full notice is found One line to give the program s name and a brief idea of what it does Copyright C year name of author This program is free software you can redistribute it and or modify it under the terms of the GNU General Public License as published by the Free So...

Страница 92: ...GNU General Public License This license the GNU Lesser General Public License applies to certain designated libraries and is quite different from the ordinary General Public License We use this license for certain libraries in order to permit linking those libraries into non free programs When a program is linked with a library whether statically or using a shared library the combination of the tw...

Страница 93: ...very part regardless of who wrote it Thus it is not the intent of this section to claim rights or contest your rights to work written entirely by you rather the intent is to exercise the right to control the distribution of derivative or collective works based on the Library In addition mere aggregation of another work not based on the Library with the Library or with a work based on the Library o...

Страница 94: ... in a single library together with other library facilities not covered by this License and distribute such a combined library provided that the separate distribution of the work based on the Library and of the other library facilities is otherwise permitted and provided that you do these two things a Accompany the combined library with a copy of the same work based on the Library uncombined with ...

Страница 95: ...ERVICING REPAIR OR CORRECTION 16 IN NO EVENT UNLESS REQUIRED BY APPLICABLE LAW OR AGREED TO IN WRITING WILL ANY COPYRIGHT HOLDER OR ANY OTHER PARTY WHO MAY MODIFY AND OR REDISTRIBUTE THE LIBRARY AS PERMITTED ABOVE BE LIABLE TO YOU FOR DAMAGES INCLUDING ANY GENERAL SPECIAL INCIDENTAL OR CONSEQUENTIAL DAMAGES ARISING OUT OF THE USE OR INABILITY TO USE THE LIBRARY INCLUDING BUT NOT LIMITED TO LOSS OF...

Страница 96: ...s cuando registre su producto en www samsung com global register Apunte aquí los números de serie y modelo para consultas futuras Modelo _______________ Nº serie _______________ Manual del usuario SP 72K8UH TV DLP ...

Страница 97: ...a con licencia bajo las siguientes patentes de EE UU 5 991 715 5 740 317 4 972 484 5 214 678 5 323 396 5 539 829 5 606 618 5 530 655 5 777 992 6 289 308 5 610 985 5 481 643 5 544 247 5 960 037 6 023 490 5 878 080 y bajo el número de aplicación de patentes publicadas de EE UU 2001 44713 A1 Esta licencia está limitada al uso no comercial privado de consumidores que sean usuarios finales para conteni...

Страница 98: ...n Esto es una gran ventaja de DTV sobre la TV analógica no hay interferencias imágenes duplicadas estáticas o audio rayado 3 Cómo puedo conectar una antena en casa adosada comunidad de vecinos bloque de apartamentos o piso La norma OTARD de la Comisión Federal de Comunicaciones parte de la Ley de Telecomunicaciones de 1996 permite a los residentes en bloques de apartamentos casas adosadas o comuni...

Страница 99: ...al 38 Selección de una pista de sonido multicanal MTS Analógica 38 Control automático de volumen 39 Selección del silencio interno 39 Reajuste de los valores del sonido 40 Control de los canales Supresión de los canales codificados digitales 40 Gestión de los canales 41 Sintonización fina de los canales analógicos 46 Comprobación de la potencia de la señal digital 47 LNA Low Noise Amplifier Amplificad...

Страница 100: ...eguir la mejor imagen posible Decodificador de sonido multicanal integrado para escuchar en estéreo o bilingüe Altavoces integrados de doble canal Temporizador de desconexión especial Televisor panorámico con tamaño de imagen ajustable Imágenes tan claras como en vivo proporcionadas por la tecnología DNle Modo Mi Ctrl de Color para adaptar éste a sus preferencias Toma de entrada digital Conexión H...

Страница 101: ... Manual de seguridad Manual de referencia rápida Cable de alimentación Paño de limpieza El color y la forma del producto pueden variar según el modelo Continúa Se venden por separado Lamp de recambio Para comprar una lámpara de recambio acuda al servicio técnico más cercano Utilice solamente lámparas autorizadas La empresa no puede garantizar la calidad del producto si se utiliza una lámpara no au...

Страница 102: ...ente en unos 15 segundos El temporizador automático de conexión desconexión está programado y el televisor se encenderá automáticamente en unos 15 segundos Uno de los ventiladores de refrigeración del interior del aparato no funciona bien La cubierta de las lámparas de la parte trasera del aparato no está bien cerrada Compruebe que no esté obstruida la entrada de ventilación del lateral del aparat...

Страница 103: ...da de audio DVI de un dispositivo externo 7 S VIDEO AV IN 1 2 Entrada de vídeo para dispositivos externos con salida de S Vídeo como una videocámara o un aparato de vídeo 8 3D SYNC OUT Conecte un emisor de infrarrojos 3D para activar la función de juegos 3D 9 VIDEO AUDIO OUT L R AV OUT Salidas de vídeo audio para dispositivos externos La salida de vídeo no está disponible en RF digital Component P...

Страница 104: ... el botón de fuente activa TV DVD CABLE STB VCR del mando a distancia PRE CH Sintoniza el canal anterior a WISELINK Esta función permite ver y reproducir archivos de fotos JPEG y de audio MP3 desde un dispositivo externo Consulte las páginas 72 JPEG 79 MP3 b REC Se usa para hacer una grabación c Funciones VCR DVD Rebobinar Parar Reproducir Pausa Avance rápido d CH CH Púlselos para cambiar los cana...

Страница 105: ... aspecto consulte Antenas con cables planos dobles de 300 ohmios a continuación Si la antena tiene un cable con este aspecto consulte Antenas con cables coaxiales de 75 ohmios Si tiene dos antenas consulte Antenas VHF y UHF independientes Antenas con cables planos dobles de 300 ohmios Si utiliza una antena externa de azotea o de cuernos de cables planos dobles de 300 ohmios siga las indicaciones s...

Страница 106: ... de su decodificador de cable Este terminal puede estar etiquetado como ANT IN VHF IN o sencillamente IN 2 Conecte este cable al separador de señales de dos vías 3 Conecte un cable de antena entre un terminal OUTPUT del separador y el terminal IN del decodificador de cable 4 Conecte un cable de antena entre el terminal ANT OUT del decodificador de cable y el terminal B IN del conmutador RF A B 5 C...

Страница 107: ...te del panel posterior Cuando conecte un aparato de vídeo debe hacer coincidir los colores del terminal de conexión y del cable Conexión de S Vídeo Este televisor Samsung se puede conectar a una toma S Video de un aparato de vídeo Esta conexión proporciona una calidad de imagen mejor que la conexión normal de vídeo que se explica más arriba 1 Para empezar siga los pasos 1 a 3 del apartado anterior...

Страница 108: ... IN 2 Y PB PR del televisor y COMPONENT OUT Y PB PR del reproductor de DVD receptor de cable satélite decodificador 2 Conecte cables de audio entre los terminales COMPONENT IN 1 L AUDIO R o COMPONENT IN 2 L AUDIO R del televisor y los terminales AUDIO OUT del reproductor de DVD receptor de cable satélite decodificador El video de componentes divide las señales de vídeo en Y luminancia brillo PB az...

Страница 109: ...es de audio y de vídeo mediante un solo cable La denominación interfaz multimedia es la más adecuada especialmente porque permite varios canales de sonido digital canales 5 1 La diferencia entre los dispositivos HDMI y DVI es que el HDMI es más pequeño tiene instalada la función de codificación HDCP protección alta de la copia digital del ancho de banda y es compatible con el sonido digital de var...

Страница 110: ... Con salida de sonido Cuando un reproductor de DVD o un decodificador de cable satélite está conectado a los terminales COMPONENT o HDMI IN del televisor en el terminal Optical del televisor sólo hay salida de audio de 2 1 canales Para escuchar el audio de 5 1 canales conecte la toma DIGITAL AUDIO OUT OPTICAL del reproductor o del decodificador directamente al sistema de audio digital pero no al t...

Страница 111: ...C del ordenador 2 Conecte un cable estéreo de 3 5 mm minienchufe 2 RCA entre la toma de entrada DVI IN L AUDIO R del televisor y la toma de salida de audio de la tarjeta de sonido del ordenador Cada ordenador tiene una configuración diferente del panel posterior Cuando conecte un ordenador debe hacer coincidir los colores del terminal de conexión y del cable Cuando se conecta HDMI DVI al ordenador...

Страница 112: ... seleccione Cable y si está conectada a ANT 2 IN AIR seleccione Aire Si ANT 1 IN CABLE y ANT 2 IN AIR están conectadas seleccione Aire Cable En el modo Cable puede seleccionar la fuente de señal analógica correcta entre STD HRC e IRC pulsando los botones o a continuación pulse el botón ENTER Si tiene un cable digital seleccione la fuente de señal analógica y digital Póngase en contacto con su prov...

Страница 113: ... mensaje Seleccionar si no observa el horario de verano 10 Pulse los botones o para resaltar la zona horaria del área local y para mover la selección a la zona horaria apropiada en el mapa de Estados Unidos Pulse el botón ENTER Si el reloj no se configura automáticamente consulte las páginas 48 49 para ajustarlo 11 Aparecerá el mensaje Disfrutar su visión Cuando termine pulse el botón ENTER Aunque...

Страница 114: ...ra seleccionar el canal 7 1 pulse 7 y 1 HD indica que el televisor está recibiendo una señal digital de alta definición SD indica que el televisor está recibiendo una señal digital de definición estándar Pulse los botones numéricos y después el botón ENTER para cambiar rápidamente de canal Utilización del botón PRE CH para seleccionar el canal anterior Pulse el botón PRE CH El televisor cambiará a...

Страница 115: ...ón 1 Pulse el botón TOOLS Aparece el menú TOOLS HERRAMIENTAS 2 Pulse los botones para seleccionar un menú y a continuación pulse el botón ENTER 3 Pulse los botones ENTER para ver cambiar o usar las opciones seleccionadas Para ver una descripción más detallada de cada función consulte al página correspondiente Lista de dispositivos página 82 Conexión de auriculares página 69 Configuración de la ima...

Страница 116: ...nalógica y digital STD HRC e IRC identifican los distintos tipos de sistemas de TV por cable Póngase en contacto con su proveedor de cable para saber el tipo de sistema de cable existente en su zona En este momento ya se ha seleccionado el origen de la señal 6 El televisor empieza a memorizar todas las emisoras disponibles Si se pulsa el botón ENTER durante un proceso de almacenamiento se muestra ...

Страница 117: ... la marca de su vídeo Si no aparece ningún otro código pruebe con todos los códigos de vídeo desde el 000 hasta el 080 Nota sobre el uso de los modos del mando a distancia VCR Cuando el mando a distancia esté en el modo VCR los botones de volumen seguirán controlando el volumen del televisor Configuración del mando a distancia para controlar el decodificador de cable 1 Apague el decodificador de c...

Страница 118: ...s de volumen seguirán controlando el volumen del televisor Configuración del mando a distancia para utilizarlo con el decodificador 1 Encienda el decodificador 2 Pulse el botón STB del mando a distancia del televisor 3 Pulse el botón SET del mando a distancia del televisor 4 Si utiliza los botones numéricos del mando a distancia introduzca tres dígitos del código del decodificador que puede encont...

Страница 119: ... 037 007 008 018 026 037 070 025 038 025 081 082 083 021 056 059 007 008 018 021 026 037 062 006 036 073 074 075 076 021 006 021 024 025 034 005 019 041 075 Marca MITSUBISHI MONTGOMERY WARD MTC MULTITECH NEC OPTIMUS PANASONIC PENTAX PENTEX RESEARCH PHILCO PHILIPS PIONEER PORTLAND PROSCAN QUARTZ QUASAR RADIO SHACK REALISTIC RCA SANSUI SANYO SCOTT SEARS SHARP SHIMTOM SIGNATURE SONY SYLVANIA SYMPHONI...

Страница 120: ...013 014 RECEPTOR DE TV DIGITAL DE SAMSUNG Marca ALPHASTAR ANAM CHANNEL MASTER CROSSDIGITAL CHAPARRAL DIRECT TV DAEWOO DISH NETWORK SYSTEM DISHPRO DRAKE DX ANTENNA ECHOSTAR EXPRESSVU GOI GE GENERAL INSTRUMENT HTS HOME CABLE HITACHI HUGHES NETWORK IQ IQ PRISM JANEIL JERROID JVC Código 023 043 018 034 019 035 015 016 017 019 022 045 060 061 062 065 066 067 068 074 069 070 069 018 024 032 027 025 069 ...

Страница 121: ...062 074 122 123 027 065 077 078 079 082 080 125 081 095 066 146 067 068 090 060 061 089 133 135 069 074 074 064 113 071 073 091 110 089 092 091 022 033 115 116 073 051 108 109 073 059 100 106 107 074 075 025 031 057 058 054 055 056 076 093 074 094 073 Marca NORCENT NEXT BASE NEC NANTAUS NESA OPTOMEDIA ELECTRONICS OPTIVIEW ONKYO PHILCO PRINCETON PROSCAN PANASONIC PHILIPS ROTEL RIO RCA RAITE ROWA SA...

Страница 122: ...tar el nombre del origen de entrada Dé un nombre al dispositivo externo conectado en las tomas de entrada de esta manera será más fácil seleccionar el dispositivo de entrada 1 Pulse el botón MENU Pulse los botones o para seleccionar Entrada y a continuación pulse el botón ENTER Pulse los botones o para seleccionar Editar Nombre y pulse el botón ENTER 2 Pulse los botones o para seleccionar una toma...

Страница 123: ...ionar uno de los ajustes de imagen estándar 3 Pulse los botones o para seleccionar Contraste Luminosidad Definición Color o Tinte a continuación pulse el botón ENTER La opción Tinte V R no está disponible en el modo DTV o PC 4 Pulse los botones o para aumentar o reducir el valor de una opción concreta Pulse el botón ENTER Cada valor ajustado se almacenará por separado según su modo de entrada Cuan...

Страница 124: ...los colores primarios rojo verde y azul Pulse los botones o hasta obtener la configuración óptima Balance de blanco 10 10 Se puede ajustar la temperatura del color para conseguir colores más naturales Pulse los botones o hasta obtener la configuración óptima Mi Ctrl de Color Rosa Verde Azul Reiniciar Este valor puede ajustarse para que se adapte a sus preferencias personales Seleccione Rosa Verde ...

Страница 125: ...mato amplio Zoom2 Tamaño de pantalla cuando se amplía verticalmente el formato Zoom1 Ajuste ancho Amplía la relación de aspecto de la imagen para que se ajuste al ancho total de la pantalla 4 3 Ajusta la imagen en modo normal 4 3 Sólo buscar Use esta función para ver la imagen completa sin recortes cuando la entrada de la señal sea DTV Componente o HDMI 1080i 1080p Sólo 16 9 y 4 3 están disponible...

Страница 126: ... seleccionar Imagen Pulse los botones o para seleccionar Active Color y pulse el botón ENTER 2 Pulse los botones o para seleccionar Apagado o Encendido y a continuación pulse el botón ENTER Pulse el botón EXIT para salir Esta función no está disponible en el modo PC Cuando en Modo de Imagen se selecciona Normal o Cine la opción Active Color cambia automáticamente a Apagado y se desactiva Cuando en...

Страница 127: ...iona una imagen más detallada con reducción de interferencias 3D Dual View ampliación de los detalles mejora del contraste y de los blancos Configuración de la gama cromática La gama cromática es una matriz de color compuesta por los colores básicos rojo verde y azul 1 Pulse el botón MENU Pulse el botón ENTER para seleccionar Imagen Pulse los botones o para seleccionar Gama cromática y pulse el bo...

Страница 128: ...onar Imagen Pulse los botones o para seleccionar Reinicio de la imagen y a continuación pulse el botón ENTER 2 Pulse los botones o para seleccionar Reiniciar todo Reinic modo imagen o Cancelar y a continuación pulse el botón ENTER Reiniciar todo Todos los valores de la imagen se restablecen con los valores predeterminados Reinic modo imagen Se restablecen los valores de la imagen actuales con los ...

Страница 129: ...derlo la ventana PIP desaparecerá Puede ver emisiones de televisión analógicas en la pantalla PIP imagen secundaria cuando la imagen principal proviene de un dispositivo externo conectado a los modos HDMI 1 2 3 Componente 1 2 o PC Imagen principal Imagen secundaria Componente 1 2 HDMI 1 2 3 PC Sólo emisiones de televisión analógicas Pulse el botón PIP del mando a distancia para activar o desactiva...

Страница 130: ...e para PIP 5 Pulse los botones o para seleccionar Aire Cable y a continuación pulse el botón ENTER Pulse los botones o para seleccionar Aire o Cable y a continuación pulse el botón ENTER Aire Señal de antena aérea Cable Señal de antena por cable Cambio del canal PIP 6 Pulse los botones o para seleccionar Canal y a continuación pulse el botón ENTER Pulse los botones o en la parte inferior del mando...

Страница 131: ...do estándar Personalización del sonido Los parámetros de sonido pueden ajustarse para que se adapten a sus preferencias personales De manera alternativa puede usar uno de los ajustes automáticos 1 Pulse el botón MENU Pulse los botones o para seleccionar Sonido y a continuación pulse el botón ENTER Pulse los botones o para seleccionar Ecualizador y a continuación pulse el botón ENTER 2 Pulse el bot...

Страница 132: ... dos altavoces incluso con los altavoces internos del televisor Es totalmente compatible con todos los formatos multicanal 1 Pulse el botón MENU Pulse los botones o para seleccionar Sonido y a continuación pulse el botón ENTER Pulse los botones o para seleccionar SRS TruSurround XT y a continuación pulse el botón ENTER 2 Pulse los botones o para seleccionar Apagado o Encendido y a continuación pul...

Страница 133: ...ccionar Sonido y a continuación pulse el botón ENTER Pulse los botones o para seleccionar Sonido Multi track y a continuación pulse el botón ENTER 2 Pulse los botones o para seleccionar el ajuste que desee y a continuación pulse el botón ENTER Pulse el botón EXIT para salir Elija Mono para los canales que emitan en sonido monoaural o si tiene dificultades para recibir una señal estéreo Elija Estér...

Страница 134: ...a y derecha y de audio digital Optical permanecen activadas Los botones VOL VOL MUTE y S MODE no funcionan cuando Silenc Int está establecido en Encendido Cuando Silenc Int está establecido en Encendido el único menú de sonido que se puede ajustar es Sonido Multi track Altavoces internos del televisor Audio Out Optical R L Out para el sistema de sonido TV AV S Vídeo Componente PC HDMI TV AV S Víde...

Страница 135: ...tonizando los canales digitales por cable Puede tardar de 20 a 30 minutos 1 Pulse el botón MENU Pulse los botones o para seleccionar Canal y a continuación pulse el botón ENTER Pulse los botones o para seleccionar Borrar canal encriptado y a continuación pulse el botón ENTER Busca los canales encriptados para borrarlos de la lista Para detener la búsqueda de canales codificados Pulse el botón para...

Страница 136: ...uede pulsar el botón CH LIST del mando a distancia para mostrar las listas de canales Uso de los botones de colores del mando a distancia con la lista de canales Rojo Antena Cambia a aérea o por cable Verde Zoom Amplía o disminuye el número del canal Amarillo Selección Selecciona varias listas de canales Azul Opción Muestra los menús Agregar o Borrar Agregar a Favoritos o Borrar favoritos Visualiz...

Страница 137: ...ón CH LIST del mando a distancia para mostrar las listas de canales Configuración sencilla 1 Pulse el botón TOOLS en el mando a distancia 2 Pulse los botones para seleccionar Agregar borrar canal a continuación pulse el botón ENTER 3 Pulse los botones CH y CH para seleccionar el canal que desea añadir o borrar a continuación pulse el botón ENTER Continúa Lista Disp Conexión del auricular Configura...

Страница 138: ...omo favoritos los canales memorizados Todos los canales favoritos se mostrarán en el menú Favoritos También puede pulsar el botón CH LIST del mando a distancia para mostrar las listas de canales Configuración sencilla 1 Pulse el botón TOOLS en el mando a distancia 2 Pulse los botones para seleccionar Agregar a Favoritos o Borrar favoritos a continuación pulse el botón ENTER Los canales actuales se...

Страница 139: ...uede reservar una programa en los menús Todos los canales o Favoritos con el mismo procedimiento Para obtener información sobre cómo confirmar una reserva de visualización consulte la página 45 También puede pulsar el botón CH LIST del mando a distancia para mostrar las listas de canales Guía de programas digitales y reserva de visualización Si se ha seleccionado un canal digital y se pulsa el bot...

Страница 140: ...programaciones y a continuación pulse el botón ENTER 6 Pulse los botones o para seleccionar Aceptar y a continuación pulse el botón ENTER Se cancela la reserva de visualización Pulse el botón EXIT para salir Menú programado Cambiar información Selecciónelo para cambiar la reserva de visualización Cancelar programaciones Selecciónelo para cancelar la reserva de visualización Información Selecciónel...

Страница 141: ...digitalmente están asignados automáticamente y no pueden asignarlos los usuarios Sintonización fina de los canales analógicos Utilice la sintonización fina para ajustar manualmente un determinado canal a fin de que la recepción sea óptima 1 Pulse el botón MENU Pulse los botones o para seleccionar Canal y a continuación pulse el botón ENTER Pulse los botones o para seleccionar Sintonia Fina y a con...

Страница 142: ...sicamente su antena para incrementar la potencia de la señal Continúe ajustando la antena hasta que encuentre la mejor posición con la señal más potente Pulse el botón EXIT para salir LNA Low Noise Amplifier Amplificador de ruido bajo Si el televisor está funcionando en una zona con señal débil la función LNA puede mejorar la recepción un amplificador previo de bajo ruido refuerza la señal entrant...

Страница 143: ...tones o para seleccionar Configuración y a continuación pulse el botón ENTER Pulse los botones o para seleccionar Reloj y pulse el botón ENTER 2 Pulse el botón ENTER para seleccionar Modo Reloj Pulse los botones o para seleccionar Auto y a continuación pulse el botón ENTER Configuración Plug Play Idioma Español Reloj Temporizador Apagado Temporizador 1 Desactivado Temporizador 2 Desactivado Tempori...

Страница 144: ...y a continuación pulse el botón ENTER Pulse los botones o para seleccionar Reloj y pulse el botón ENTER 2 Pulse el botón ENTER para seleccionar Modo Reloj Pulse los botones o para seleccionar Manual y a continuación pulse el botón ENTER 3 Pulse los botones o para seleccionar Config Reloj y pulse el botón ENTER 4 Pulse los botones o para ir a Mes Fecha Año Hora Minuto o am pm Seleccione la fecha y ...

Страница 145: ...l modo Encendido del temporizador y evita el recalentamiento que se puede producir si el televisor está encendido durante demasiado tiempo Ajuste del temporizador de desconexión El temporizador de desconexión apaga automáticamente el televisor después de un período prefijado 30 60 90 120 150 y 180 minutos 1 Pulse el botón MENU Pulse los botones o para seleccionar Configuración y a continuación pul...

Страница 146: ...ustarse a la vez en Transparente Tamaño Esta opción consta de Programado Pequeño Normal y Grande Tipo de Letra Esta opción consta de Programado Estilo0 Estilo7 Puede cambiar el tipo de letra que desee Color de primer plano Esta opción consta de Programado Blanco Negro Rojo Verde Azul Amarillo Magenta y Cián Puede cambiar el color del texto Color de fondo Esta opción consta de Programado Blanco Neg...

Страница 147: ... destinados a ampliar la información del programa CC3 Servicio de subtítulos secundarios sincronizados Datos alternativos de subtítulos relacionados con el programa generalmente subtítulos del segundo idioma CC4 Subtítulos especiales de uso no sincronizado Similar a CC2 Texto1 primer servicio de texto Se puede tratar de varios datos no relacionados con programa alguno Texto2 segundo servicio de te...

Страница 148: ...juego está activa con la fuente seleccionada Si Modo del juego está activado El modo Imagen cambia automáticamente a Juego Game y los usuarios no pueden cambiar el modo El modo del sonido del menú Sonido se desactiva Debe ajustar el sonido mediante el ecualizador El modo Reiniciar del menú Sonido se activa La función Reiniciar inicializa la configuración del ecualizador con los valores predetermin...

Страница 149: ...Pulse el botón EXIT para salir Configuración del código de identificación personal PIN 1 Pulse el botón MENU Pulse los botones o para seleccionar Configuración y a continuación pulse el botón ENTER Pulse los botones o para seleccionar V Chip y pulse el botón ENTER 2 Pulse los botones numéricos para introducir el número PIN actual de 4 dígitos El código PIN predeterminado para un televisor nuevo es...

Страница 150: ...onfigurarse de dos formas Guía de programas o Clasificación MPAA 1 Pulse el botón MENU Pulse los botones o para seleccionar Configuración y a continuación pulse el botón ENTER Pulse los botones o para seleccionar V Chip y pulse el botón ENTER 2 Pulse los botones numéricos para introducir el número PIN actual de 4 dígitos El código PIN predeterminado para un televisor nuevo es 0 0 0 0 sólo para mod...

Страница 151: ...s los programas de televisión Bloq Todo Se pulsa para bloquear todos los programas de televisión Las categorías TV Y TV Y7 TV G TV PG TV 14 y TV MA disponen de opciones adicionales Consulte el siguiente paso para cambiar cualquiera de las siguientes clasificaciones secundarias El V Chip bloqueará automáticamente ciertas categorías que son más restrictivas Por ejemplo si bloquea la categoría TV Y T...

Страница 152: ...loquearán automáticamente R NC 17 y X Cómo configurar las limitaciones utilizando la opción Inglés Canadiense para modelos de Canadá 9 Pulse los botones o para seleccionar Inglés Canadiense y a continuación pulse el botón ENTER 10 Aparecerá la pantalla Inglés Canadiense Pulse los botones o para seleccionar la restricción apropiada Pulse el botón ENTER para activar la restricción seleccionada Se in...

Страница 153: ...n U S Descargable está disponible después de que la información se haya descargado desde la emisora Sin embargo según el tipo de información de la emisora el menú podría no estar disponible para su uso 14 Aparecerá la pantalla Clasificación U S Descargable Pulse los botones o para seleccionar la restricción apropiada Pulse el botón ENTER para activar la restricción seleccionada Se indica el símbol...

Страница 154: ...l o Bajo y a continuación pulse el botón ENTER Pulse el botón EXIT para salir Está función sólo está disponible cuando se tiene conectado un dispositivo externo en el televisor mediante HDMI Configuración PC PC para Home Cinema Apagado N neg HDMI Normal Modo película Apagado Efecto de luz Siempre PantallaAzul Apagado Melodía Medio Bluetooth Anynet HDMI CEC Actualiz software PC PC para Home Cinema A...

Страница 155: ... y Siempre y a continuación pulse el botón ENTER Pulse el botón EXIT para salir Apagado El LED azul no se activará En m espera El LED azul se enciende cuando el TV está en modo de espera y se apaga cuando se enciende el televisor Viendo la TV El LED azul se enciende cuando se ve la televisión y se apaga cuando se apaga el televisor Siempre El LED azul se encenderá siempre Configuración N neg HDMI N...

Страница 156: ...ENU Pulse los botones o para seleccionar Configuración y a continuación pulse el botón ENTER Pulse los botones o para seleccionar Pantalla Azul y a continuación pulse el botón ENTER 2 Pulse los botones o para seleccionar Apagado o Encendido y a continuación pulse el botón ENTER Pulse el botón EXIT para salir La pantalla azul aparece cuando no existe señal desde un dispositivo externo independiente...

Страница 157: ...software y a continuación pulse el botón ENTER Se muestra el mensaje Explorando USB Puede tardar hasta 30 segundos 3 Si el firmware se reconoce adecuadamente en el USB aparece el mensaje Actualizar la versión xxxx a la versión xxxx Después de la actualización el sistema se debe reiniciar Pulse los botones o para seleccionar Aceptar y a continuación pulse el botón ENTER Se inicia la actualización N...

Страница 158: ...o póngase en contacto con el fabricante del ordenador o con el distribuidor de Samsung 1 Primero haga clic en Panel de control en el menú de inicio de Windows 2 Cuando aparezca la ventana del panel de control haga clic en Apariencia y temas y aparecerá un cuadro de diálogo 3 Cuando aparezca la ventana del panel de control haga clic en Pantalla y aparecerá un cuadro de diálogo 4 Vaya a la pestaña C...

Страница 159: ...0 00 76 82 72 00 79 97 75 02 P P 1920 x 1080 66 58 60 00 P N Entrada HDMI DVI Modo Resolución Frecuencia KHz horizontal Frecuencia Hz vertical Frecuencia de reloj de píxeles MHz Polaridad sincr H V IBM 640 x 350 31 469 70 086 25 175 720 x 400 31 469 70 086 28 322 640 x 480 31 469 59 940 25 175 VESA 800 x 600 37 879 60 317 40 000 1024 x 768 48 364 60 000 65 000 1280 x 1024 63 981 60 020 108 000 192...

Страница 160: ... vuelva a ajustar la imagen de forma que esté centrada en la pantalla Debe cambiar al modo PC en primer lugar 3 Pulse el botón ENTER para seleccionar PC a continuación pulse el botón ENTER para seleccionar Fijar la Imagen 4 Pulse los botones o para seleccionar Grueso o Fino y a continuación pulse el botón ENTER Pulse los botones o para seleccionar la calidad de imagen que desee ajustar y a continu...

Страница 161: ...ica Debe cambiar al modo PC en primer lugar 7 Pulse el botón ENTER para seleccionar PC a continuación pulse los botones o para seleccionar Reiniciar Imagen y pulse el botón ENTER 8 Aparecerá en pantalla el mensaje Reinicio imagen completado V Chip Transpar del menú Medio PC PC para Home Cinema Apagado N neg HDMI Normal Modo película Apagado Efecto de luz Siempre PantallaAzul Apagado Melodía Medio ...

Страница 162: ... continuación pulse el botón ENTER 2 Pulse los botones o para seleccionar el formato de pantalla que desee y a continuación pulse el botón ENTER Pulse el botón EXIT para salir TV Ancho Ajusta la imagen en formato de TV panorámica PC Ancho Ajusta la imagen en formato PC panorámico 4 3 Ajusta la imagen en formato 4 3 Pulse el botón P SIZE del mando a distancia para cambiar el tamaño de la imagen TV ...

Страница 163: ...R para seleccionar Bluetooth Pulse los botones o para seleccionar Encendido y a continuación pulse el botón ENTER Se activa la comunicación Bluetooth Si no desea usar la comunicación Bluetooth seleccione Apagado Continúa Instrucciones de uso Use este producto dentro del ángulo que se muestra en la imagen inferior Si usa el producto fuera del ángulo o si hay algún obstáculo puede haber fallos de co...

Страница 164: ...oth éste debe estar disponible Si desea más información consulte el manual del usuario del auricular Utilice los auriculares estéreo compatibles modelo iSkin CERULEAN F1 CE F1000 De lo contrario puede presentarse un problema de sincronización de labios por lo que no se garantiza el ángulo de comunicación disponible Si desea adquirir unos auriculares compatibles acceda a la página web siguiente www...

Страница 165: ...póngales un nombre inglés francés o español Los nombres de los archivos y de las carpetas no pueden tener más de 128 caracteres Si sobrepasan esta cifra no funcionan El sistema de archivos sólo admite el FAT16 32 Ciertos tipos de cámara digital USB y dispositivos de audio quizás no sean compatibles con este televisor WISELINK sólo admite dispositivos de clase de almacenamiento masivo MSC USB MSC e...

Страница 166: ...SELINK 1 Pulse el botón MENU Pulse los botones o para seleccionar Guía y a continuación pulse el botón ENTER Pulse el botón ENTER para seleccionar WISELINK 2 Pulse los botones o para seleccionar Foto o Música y a continuación pulse el botón ENTER Se muestra la lista de los archivos de fotos o música guardados en el dispositivo de almacenamiento Para salir del modo WISELINK pulse el botón EXIT del ...

Страница 167: ...ta Las carpetas y los archivos JPEG se clasifican en orden alfabético Si la foto se visualiza en pantalla completa se puede ampliar reducir o girar la foto en la pantalla Consulte las páginas 75 y 76 Si el tamaño del archivo de la fotografía es demasiado grande la reproducción de la música de fondo se puede interrumpir intermitentemente Cuando la música de fondo está activada Consulte la página 77...

Страница 168: ...gurar el modo de imagen Consulte la página 28 Configuración del sonido Se puede configurar el modo de sonido Consulte las páginas 36 37 Continúa Inic vis aut Zoom Girar Música de fondo Encendido Configuración de la música de fondo Borrar Configuración de la imagen Configuración del sonido Ajustar Ingresar Mover Ingresar Configuración de la música de fondo Selección Folder 1 Steve Love mp3 Tomas Fe...

Страница 169: ...tinuación pulse el botón azul para mostrar una opción Ver Inic vis aut Borrar Borrar todo Sel Todo Información Retirar con seg Pulse los botones o para seleccionar Inic vis aut y pulse el botón ENTER La presentación muestra todos los archivos JPEG de la carpeta seleccionada según una velocidad establecida previamente En la presentación los archivos se muestran en orden a partir del archivo que se ...

Страница 170: ...á operativa Para salir del modo WISELINK pulse el botón EXIT del mando a distancia El archivo ampliado no se guarda Pulse el botón WISELINK del mando a distancia para activar el modo WISELINK Icono de información de la función de ampliación Aparece en la parte superior izquierda de la pantalla Icono Presentación en pantalla Función Ampliación x 1 Restablece una foto a su tamaño original Ampliación...

Страница 171: ... botón la imagen gira 90 180 270 y 0 El giro directo de 90 a 270 grados no está permitido Para salir del modo WISELINK pulse el botón EXIT del mando a distancia El archivo girado no se guarda Pulse el botón WISELINK del mando a distancia para activar el modo WISELINK Icono de información de la función de giro Aparece en la parte superior izquierda de la pantalla Icono Presentación en pantalla Func...

Страница 172: ...Si se pulsa el botón sobre el icono de una foto la foto seleccionada se muestra en pantalla completa 4 Pulse el botón TOOLS Pulse los botones o para seleccionar Configuración de la música de fondo y a continuación pulse el botón ENTER Se muestran los archivos de música MP3 5 Pulse los botones o para seleccionar el archivo de música que desee y pulse el botón amarillo La marca aparece a la izquierd...

Страница 173: ...eración de borrar Pulse el botón WISELINK del mando a distancia para activar el modo WISELINK Supresión de varias fotos 1 En la lista de Foto pulse los botones o para ir a la foto que desee borrar y pulse el botón amarillo La marca aparece a la izquierda de la foto seleccionada Repita el proceso anterior para seleccionar varios archivos de fotos 2 Pulse el botón azul pulse los botones o para ir a ...

Страница 174: ... música mientras se reproduce un archivo de música pulse el botón WISELINK Pulse el botón WISELINK del mando a distancia para activar el modo WISELINK Reproducción de un archivo de música 1 En la lista de Música pulse los botones o para seleccionar un archivo de música y a continuación pulse el botón amarillo La marca aparece a la izquierda de la música seleccionada Repita el proceso anterior para...

Страница 175: ...la pantalla de la derecha Pulse los botones o para seleccionar Aceptar y a continuación pulse el botón ENTER Los archivos de música se borran Si selecciona Cancelar se cancela la operación de borrar Para salir del modo WISELINK pulse el botón EXIT del mando a distancia Pulse el botón WISELINK del mando a distancia para activar el modo WISELINK Eliminación de varios archivos de música 1 En la lista...

Страница 176: ... la toma Digital Audio Input del sistema cine en casa Conecte sólo un sistema cine en casa Tras la conexión anterior el terminal Optical sólo proporciona salida de audio de dos canales Sólo se oirá el sonido procedente de los altavoces izquierdo y derecho y de los subwoofer del sistema de cine en casa Para escuchar el audio de 5 1 canales conecte la toma DIGITAL AUDIO OUT OPTICAL del reproductor d...

Страница 177: ...l botón Anynet Pulse el botón ENTER para seleccionar Lista Disp Se muestran todos los dispositivos Anynet conectados al televisor Si no encuentra el dispositivo que desea pulse el botón rojo para volver a buscar los dispositivos 2 Pulse los botones o para seleccionar un dispositivo concreto y pulse el botón ENTER Se cambia al dispositivo seleccionado El menú Lista Disp sólo aparece si la opción An...

Страница 178: ...do se ve la TV Reproducir Pausa La función Anynet sólo funciona cuando el mando a distancia está ajustado en TV El botón REC sólo funciona en el estado Ver TV Los dispositivos Anynet no se pueden controlar con los botones del lateral del TV Los dispositivos Anynet sólo se pueden controlar mediante el mando a distancia del televisor El mando a distancia del televisor puede no funcionar en determina...

Страница 179: ...funciona en algunas situaciones Búsqueda de canales funcionamiento de WISELINK Cuando se conecta o se desconecta el cable HDMI 1 3 se han de buscar de nuevo los dispositivos o reiniciar el televisor Compruebe si la función Anynet del dispositivo Anynet está activada Deseo iniciar Anynet Compruebe si el dispositivo Anynet está debidamente conectado al TV y si la opción Anynet HDMI CEC del menú Conf...

Страница 180: ...de transmisión Compruebe los terminales de las pilas Pulse el botón TV del mando a distancia para ponerlo en el modo TV Asegúrese de que el mando a distancia tenga pilas Compruebe que los polos y de las pilas estén correctamente colocados Problema en pantalla con la emisión digital Compruebe la potencia de la señal digital y la antena de entrada La imagen es demasiado clara o demasiado oscura Ajus...

Страница 181: ... en la que adquirió el TV o al Centro de Servicio técnico de Samsung Precaución Coloque una lámpara con el código correcto para evitar daños en el TV Apague y espere 30 minutos antes de sustituir la lámpara ya que estará caliente No toque el cristal con las manos desnudas ni inserte objetos extraños dentro de la cubierta ya que puede reducir la calidad de la pantalla o producir descargas eléctrica...

Страница 182: ...visor Si se derraman líquidos en el interior se pueden producir averías graves Exterior Nunca abra la unidad ni toque las piezas del interior Limpie el televisor con un paño limpio y seco Nunca utilice agua líquidos limpiadores cera ni productos químicos No ponga objetos pesados encima de la carcasa Este televisor DLP proyecta la imagen en una pantalla de gran tamaño aplicando un sistema óptico Si...

Страница 183: ...W X 2 Dimensiones An x Al x Pr 65 8 x 20 4 x 46 8 pulg 1671 x 519 x 1189 mm Peso 104 5 lbs 47 4 Kg Consideraciones medioambientales Temperatura de funcionamiento Humedad de funcionamiento Temperatura de almacenamiento Humedad en almacenamiento Entre 10 C y 40 C 10 al 80 sin condensación Entre 20 C y 45 C 5 al 95 sin condensación Este dispositivo es un aparato digital de la Clase B El diseño y las ...

Страница 184: ...www samsung com br CHILE 800 726 7864 SAMSUNG www samsung com cl COLOMBIA 01 8000 112 112 www samsung com co COSTA RICA 0 800 507 7267 www samsung com latin ECUADOR 1 800 10 7267 www samsung com latin EL SALVADOR 800 6225 www samsung com latin GUATEMALA 1 800 299 0013 www samsung com latin JAMAICA 1 800 234 7267 www samsung com latin MEXICO 01 800 SAMSUNG 7267864 www samsung com mx PANAMA 800 7267...

Отзывы: