background image


26

_ © SAMSUNG Electronics Co., Ltd. 

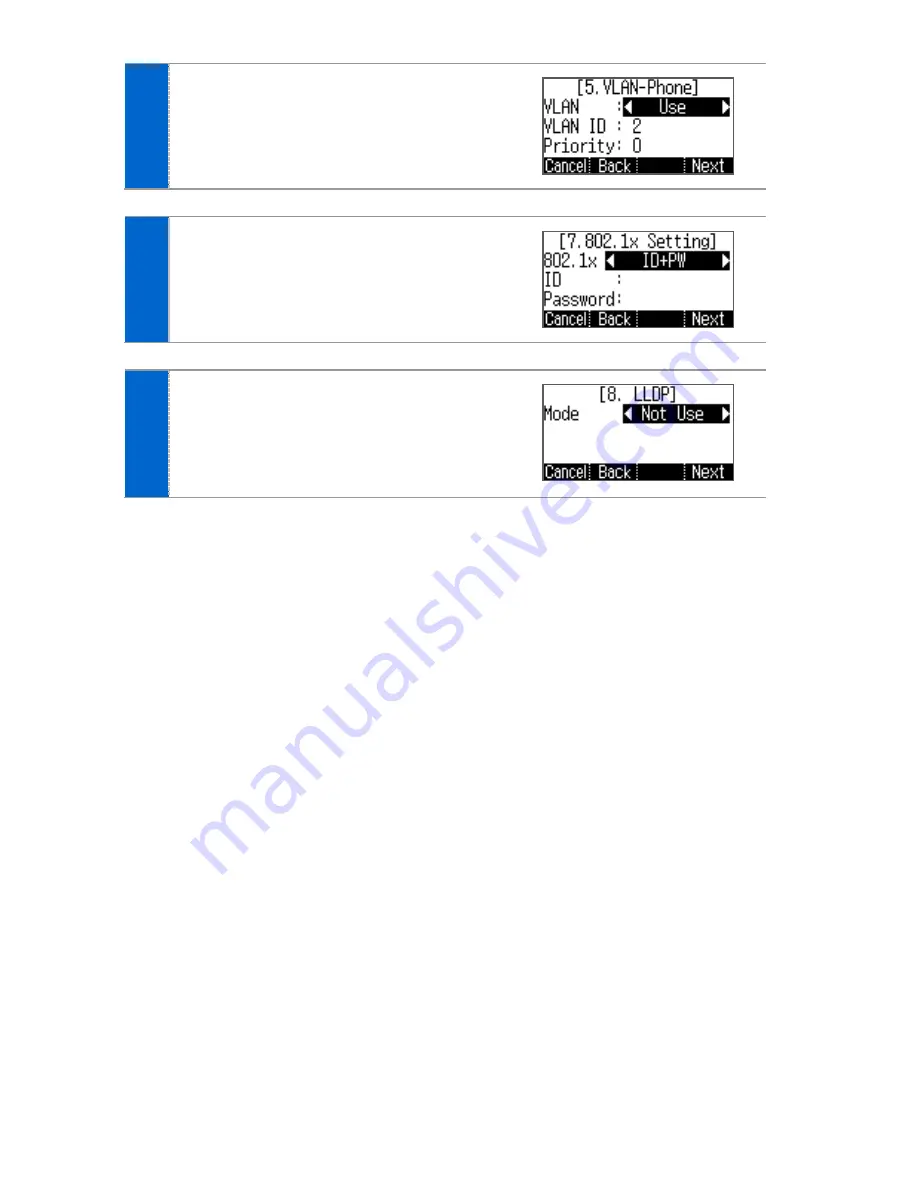
Enter the VLAN information. 

- Make sure to contact the system administrator 

because network connection may be failed if 
incorrect information is entered. 


Enter the 802.1x information and press 
the 

[Next] 

soft button. 

- Make sure to contact the system administrator 

because network connection may be failed if 
incorrect information is entered. 


After configuring LLDP, Complete easy 
installation by pressing the 

[Done]

 soft 

button, then the phone is restarted.   

- To modify already entered information, select 

[No]

 and press the 

[<] 

soft button. 


Содержание SMT-i6010

Страница 1: ...SMT i6010 6011 User Guide ...

Страница 2: ...written consent of SAMSUNG Electronics Co Ltd TRADEMARKS Product names mentioned in this manual may be trademarks and or registered trademarks of their respective companies This guide may be changed for product improvement standardization or other technical reasons without prior notice For further information on the updated guide or the contents contained in the guide please contact your Authorize...

Страница 3: ... in order to avoid personal injury or fatality Caution Provides information or instructions that you should follow in order to avoid a service failure or damage to your phone Note Indicates additional information for referrence Checks Provides the operator with checkpoints for stable system operation Symbols Caution Indication of a general caution Restriction Indication for prohibiting an action f...

Страница 4: ...isture remains on the product even after wiping contact the service center When the phone is out of use for a long time leave the plug pulled out of the outlet If an abnormal sound smell or smoke is emitted from the phone pull out the power plug immediately and then contact the service center Installation Maintenance Do not place the phone in a location with a lot of dust in a location that is sub...

Страница 5: ...bject on top of the phone Do not attempt to disassemble fix or rebuild the phone yourself Do not drop the product or apply impact on the product It may damage product screen or exterior and its internal parts Use a soft and dry cloth when cleaning the phone Do not spray water directly onto the product and do not use chemicals such as wax benzene alcohol thinner mosquito killer perfume spray lubric...

Страница 6: ...ection to Back Ports 9 Assembling the Cradle for Desk 11 Assembling the Wall Mount Bracket option 12 THINGS YOU SHOULD KNOW 15 Key Functions 15 Part Names and Functions 17 Front Configuration 17 Name and Function 18 Phone Information Display 20 Phone Status Indicator 20 LED Indicator 20 Phone Status Icons 21 Supplementary Functions Menu 22 Usage of Supplementary Functions Menu 22 ...

Страница 7: ... Answering Incoming Calls 30 Receiving a Call via the Handset 30 Receiving a Call via Speaker Phone 30 Functions Available during Call 31 Call Park 31 Mute 31 Call Transfer 32 Conference Function 33 Details Premium CID 33 Call Move 34 Volume Control 35 Volume Control of a Handset 35 Volume Control of a Speaker 35 Volume Control of Ringing Sound 36 HOW TO USE MENUS 37 Menu Structure 37 Contacts 39 ...

Страница 8: ...n 51 Security 52 Bluetooth Headset 52 User Data Initialization 57 Setting Wi Fi 5G Only 57 Phone Information 58 Version Information 58 Network information 58 Deskphone Manager Connection Information 58 INTEROPERATION SERVICE 59 Smart Phone Interoperation SDM 59 System Configuration Diagram 59 Key Functions 60 Registration Methods 60 Deregistration 65 Dashboard 66 Contacts 67 Call Log 77 ...

Страница 9: ...SMT i6010 6011 User Guide _7 Program Key 79 Settings 82 TROUBLESHOOTING 85 ANNEX 87 Product Specifications 87 ...

Страница 10: ...n the Package Phone Body Handset Phone Cradle Quick Guide LAN Cable Power Adaptor option Wall Mount Bracket option If any components are damaged or missing contact the dealer The Power Adaptor and Wall Mount Bracket are options If necessary contact the dealer ...

Страница 11: ... 1 If a headset is used connect it to the headset port 2 Connect a handset to the handset port of the phone 3 Connect one end of the PC connection LAN cable which was provided with the phone to the PC connection port of the phone Connect the other end to the PC network port ...

Страница 12: ...ed upon LAN connection 5 If PoE is not supported connect the power adapter to the power connection port When the plug of the connected power adapter is plugged into the outlet the phone is booted up The power adapter is purchased separately When connecting the power cable make it go through the center hole of phone cradle 6 If a USB is used connect a USB to the USB connection port ...

Страница 13: ...phone can be changed depending on the assembly direction of the cradle 1 Fix one latch of the cradle to the top or bottom groove of the phone 2 Push the remaining latch into the remaining groove on the opposite side 3 Place the phone on the installation location and check whether it shakes ...

Страница 14: ... an optional item If necessary please contact your dealer 1 Place the wall mount bracket installed on the wall and mark two screw holes and drill it Use one of two bottom holes 2 Insert the 2 plastic anchors in a hole in the wall with mallet and fix with enclosed screws 3 Handset bracket and wall mount bracket are fixed to the body as shown below for the order ...

Страница 15: ...uide _13 4 Insert the wall mount bracket as shown in the figure 5 Extract hanger part which placing the handset in the body with a flat blade screw driver and re insert it a 180 degree turn This prevents the handset falling ...

Страница 16: ...14_ SAMSUNG Electronics Co Ltd 6 Attach to match wall mount bracket hole and screws and pull down to make sure firmly fixed ...

Страница 17: ...hat use international phone calls frequently Bluetooth Headset A user can talk to a counterpart by connecting a wireless Bluetooth headset to the phone Bluetooth Smart Phone Mode Connect the phone and a smartphone via Bluetooth then you can use the phone to take the call received to the smartphone and you can also use the call move function Call Park If you must interrupt a call you can put the ca...

Страница 18: ...all cannot be received DND If this function is selected the phone does not ring even when a call is placed to the phone USB Charging With a phone to which a power adaptor is connected you can use the USB charging function When PoE is connected the USB charging function is not available during call ...

Страница 19: ...material to hold handset so do not leave things whichshould not receive the influence of the magnetic material Phone Status indicator Program key button Soft button Direction Key OK button Back button Dial button Speaker button Volume button LCD screen Handset Menu button Move button Contacts button Transfer button Message button Hold button Conference button Redial button Headset button Mute butt...

Страница 20: ...button silences the voice of the user to the called party Speaker button This button is used to converse via a speaker phone instead of a handset Dial button This button is used to enter numbers and characters Program key button You can assign a frequently used function to each button When you press a specified button the assigned function is executed For details about how to set this function con...

Страница 21: ... soft menus are displayed Handset Handset transfers the caller s voice Navigation button The i6010 6011 phone has navigation buttons that allow users to use its functions easily Button Function Navigation Direction key This button is used to edit the contents on the screen or move between menu items OK This button is used to select or save the item where a cursor is placed in a menu mode This butt...

Страница 22: ...ED Indicator The below button LED is turned on or off depending on status Button LED LED Status Description Speaker Red indicator light turns on When a speaker phone is used Mute Red indicator light turns on When all voice sending is blocked Headset Red indicator light turns on When a call is made via a headset Program Key Blinks fast in red 0 3 sec When the user is receiving an incoming call Blin...

Страница 23: ...etting status being displayed on the right top side Icon Description Signal intensity of wireless network Types of headset in use general EHS Bluetooth Bluetooth headset Bluetooth mobile phone Smart phone connection status AOM connection status Galaxy Tab 10 1 Lock status ...

Страница 24: ...he system and displayed as a menu on the right side of a screen Supplementary functions menu varies depending on system version Usage of Supplementary Functions Menu While pressing the Function soft button at the bottom of screen press the right selection button of the menu you want to use Supplementary Functions Menu of Waiting Screen Supplementary Functions Menu of Communication Status ...

Страница 25: ...anged in sequence The input mode status is displayed as an icon in the status area of the top right corner of the LCD 2 Alphabet and numbers can be input using the dial buttons Inputting special characters Press the button to select the special character input mode and select characters using the navigation button to input or modify them A a 1 English input mode uppercase English input mode lowerc...

Страница 26: ...er PnP Plug Play A phone is automatically registered if the system supports PnP To use the PnP function a system administrator must configure an environment for PnP in advance Contact the administrator to check whether the PnP environment is configured 1 When the power is connected during initialization status the Easy Install soft menu is displayed at the bottom of screen Start easy installation ...

Страница 27: ...er the network information When the setup method is Wired Select one out of DHCP Static PPPoE Make sure to contact the system administrator because network connection may be failed if incorrect information is entered When the setup method is Wireless When Wi Fi is selected nearby APs are automatically searched Wi Fi is working properly when the AC adaptor is connected After selecting an AP to conn...

Страница 28: ...ntered 6 Enter the 802 1x information and press the Next soft button Make sure to contact the system administrator because network connection may be failed if incorrect information is entered 7 After configuring LLDP Complete easy installation by pressing the Done soft button then the phone is restarted To modify already entered information select No and press the soft button ...

Страница 29: ... the office An outbound line is the telephone line where the user can make or receive a call to from outside e g home which is directly connected to the switching system of a central office Dialing an Extension Number 1 Pick up the handset check whether the dial tone is audible and then press the extension number 2 When you press the extension number you can hear a call connection tone 3 If the ot...

Страница 30: ... dial tone is audible 2 Press a key specified by the manufacturer to make an outbound call e g 9 3 When you dial a number you can hear a call connection tone 4 If the other party receives the call begin the conversation As the outbound call number may vary per system contact the system administrator ...

Страница 31: ...picked during a call the speaker is turned off and the conversation can be continued through the handset 4 When a call ends press the Speaker button again If a handset is being used hang up Dialing the Last Call Number 1 When you press the Log soft button at the bottom of waiting screen the recent call log is displayed 2 Move to a phone number you want by using the navigation button And press the ...

Страница 32: ...e rings 2 Converse with the counterpart 3 Hang up the handset when the call ends Receiving a Call via Speaker Phone 1 When the phone rings press the Speaker button 2 Converse with the counterpart If the handset is picked during a call the speaker is turned off and the conversation can be continued through the handset 3 When a call ends press the Speaker button again ...

Страница 33: ...manger 1 To hold the current call press the Hold button during call 2 The Hold message is displayed If Speaker mode waiting screen is displayed The call can be resumed by pressing the Program key Resume soft button again Mute This function is used to silence the user s voice during a call via an extension line but the user can still hear the voice of the other party 1 To block your voice during ca...

Страница 34: ...ine enter the outbound call number first and then enter the phone number 3 When a ring back tone is heard from the other subscriber put down the handset Alternately wait until the called party receives the call and then hang up the phone after telling him her about it If the subscriber who received a transferred call is busy or does not receive the call To return to the original call press the can...

Страница 35: ... 3 When a call is connected start to talk by pressing the Conference button You can add a subscriber in the same manner during conference call To know the maximum number of conference participants contact the system administrator If this function does not work properly contact the system administrator Details Premium CID Displays the counterpart s information on the screen during communication Whe...

Страница 36: ...de to the smartphone connect your smartphone to the IP phone For more information about how to setup refer to the Bluetooth Headset part of this manual 2 During communication using the IP phone if you press the Move button you can still talk through the smartphone Operation may vary depending on call type 3 During communication using the smartphone if you press the Headset button you can still tal...

Страница 37: ...while making a call via a handset 2 To increase the volume of a handset press the of the Volume button 3 To decrease the volume press the of the Volume button Volume Control of a Speaker 1 The user can adjust the volume of a speaker in the following way while calling 2 To increase the speaker volume press the of the Volume button 3 To decrease the speaker volume press the of the Volume button ...

Страница 38: ...ease the volume of the ringtone press of the Volume button while the bell is ringing 2 To decrease the volume of the ringtone press the of the Volume button while the bell is ringing By pressing the Volume button in standby mode the user can also adjust the key tone volume ...

Страница 39: ... address book You can search for a user registered in the directory server History You can check the recent outgoing incoming history Message You can write and save a message Language You can search and use the information provided from the browser server System Option Call Forward You can set call forward type Absent Message If you can not receive calls then sends a message to caller Call You can...

Страница 40: ...ou can set up a headset User Data Init You can initialize the user data Wi Fi 5G Only Set You can enable or disable Wi Fi 5G Only mode Phone Information Version Information You can check the phone version Network Information You can check the network setting information of the phone SDM information You can check registered external device and register or cancel registration ...

Страница 41: ...bers is displayed When you select a target and press the OK button the detail information is displayed Call You can make a call to the selected phone number Search Phone Number You can search a phone number saved in the contacts by using a name or number 1 Press the Menu Contacts Search soft button 2 Enter a name or phone number and press OK button to display a list of the searched phone numbers Y...

Страница 42: ...mbers company mobile phone home fax others e mail memo bell sound buddy ID and register photos 3 Pushing button to save phone number Email Memo Select menu you want and press OK You can save max 10 phone number Office Mobile Home Fax max 3 Email max 1 Memo Editing Contacts You can edit a phone number registered in the contacts 1 Press the Menu Contacts Search select a phone number to edit OK Edit ...

Страница 43: ...delete the phone number Add Group This is the function used to add a new group 1 Press the Menu Contacts Option New soft button 2 Enter a new group name and press the Save soft button Delete Group This is the function used to delete an existing group 1 Go to Menu Contacts Option select a group to delete and press the Del soft button 2 Click the Yes soft button to delete the phone number The member...

Страница 44: ...ords can be saved Select Menu History You can move to Total Outgoing Incoming Absence number list Save You can save selected number to phone book Call You can call the selected number Option You can delete history of selected number of all If selected number is saved to phone book you can view detail information by pushing OK button ...

Страница 45: ... functions are not supported depending on system Creating a Message This is the function used to create and save a message to send 1 Press the Menu Message Short Message New Nsg soft button 2 After creating a message specify a recipient by pressing the OK button at the right Save By pressing the below soft button you can save a created message into the temporary box 3 After entering a called numbe...

Страница 46: ...e Delete All You can delete all the messages 3 To view all message information select the message and then press OK button Reply You can reply to a counterpart who sent a message Fwd You can forward a message to others by pressing the below soft button Option You can use following function Call You can call the person who send the message Save You can save the number who send the message Del You c...

Страница 47: ...e All You can delete all the messages 3 To view all message information select the message and then press OK button Reply You can reply to a counterpart who sent a message Fwd You can forward a message to others by pressing the below soft button Option You can use following function Call You can call the person who send the message Save You can save the number who send the message Del You can dele...

Страница 48: ...temporarily saved message is displayed Delete You can delete a selected message Delete All You can delete all the messages 3 To view all message information select the message and then press OK button Forward You can forward a message to others by pressing the below soft button Delete You can delete a message Settings You can set received message display method ...

Страница 49: ...ing on phone version or system System Options You can select call services Supported function is vary depending on phone version or system Call Transfer 1 Select Menu System Options Call Transfer 2 Select Call Transfer type and input subscriber number to transfer and press save soft button Absent Message Select Menu System Options Absent Message Select Message to send ...

Страница 50: ... System Options Station On off You can set auto hodling conversation time display subscriber service etc Extension Login 1 Select Menu System Options Extension Login 2 In case of not using Extension Login if you press Set phone registration will be cancelled and displays ID Passord input window After input ID password for Extension Login press Login or OK key then you can login If you press releas...

Страница 51: ...tton and push OK button then detail information will be displayed To change function push Edit soft button The AOM button setup function may not be available depending on system If this function does not work properly contact the system administrator For detail information about how to use the AOM button function refer to the SCM operation manual ...

Страница 52: ...eceiver speaker ringtone key tone headset message alert and alarm respectively Ring Tone Select Menu Settings Sound Ring Tone You can set up a ringtone Key Tone Select Menu Settings Sound Key Tone You can set up a key tone Message Tone Select Menu Settings Sound Message Tone You can set up a message alert sound Bluetooth Ring Select Menu Settings Sound Bluetooth Ring You can set Bluetooth Ring Typ...

Страница 53: ...ng Select Menu Settings Screen LCD Power Saving Select the time when the LCD screen will be turned off Always off Off After 10 sec Off After 20 sec User configuration Changing the default settings for the screen menu may affect the lifetime of the LCD and therefore do not change them if possible Below are shown the default LCD power Saving settings Screen off User Configuration 08 00 to 18 00 ...

Страница 54: ...Settings Security Change Password You can change a password Menu Lock Select Menu Settings Security Phone Call Lock Select Menu Settings Security Call Disable you can disable Call Lock Outbound you can enable Outbound Call Lock All you can enable all Outgoing Call Lock Bluetooth Headset You can set up a function related to the headset and Bluetooth Bluetooth function is suppored 6011 model only Us...

Страница 55: ... the headset type to be used in the phone Standard You can use general voice call headset Bluetooth You can use Bluetooth headset EHS You can use EHS type headset If you set Bluetooth mode as Smartphone you can use Headset mode as Standard only And if you change setting related setting value may be initialized Bluetooth Mode SMT i6011 Phone provides two kind of Bluetooth function Headset You can r...

Страница 56: ...rby Bluetooth devices the connection information is displayed 3 After selecting a Bluetooth headset to connect to the phone press the Pair button After checking it is the correct device press the Yes button The Bluetooth headset to connect must be in the pairing waiting mode 4 If Bluetooth headset is connected Bluetooth Icon will be activated at the Title Bar If you use Bluetooth headset you have ...

Страница 57: ...t button to move the call to the phone You can also move a call from the phone to the smartphone by pressing the Move button 4 When you press the Disconnect button the device is disconnected 5 When you press the Remove button the device is deleted from the search list as well as it is disconnected Bluetooth is the name for a short range radio networking technology that operates at 2 4 GHz to suppo...

Страница 58: ...adio transmission receipt part of Bluetooth or a mobile phone abnormal operation or noise may occur Noise may occur depending on the position of the user if the reception power is reduced due to radio obstacles e g walls and partitions It may be difficult to talk due to the noise from the surroundings when the user is in a noisy area or outdoors ...

Страница 59: ... Data Initialization Initialize all user setting and user data Setting Wi Fi 5G Only If you select Wi Fi 5G Only mode only 5G frequency is searched Select Menu Settings Wi Fi 5G Only Set Wi Fi 5G function is supported in 6011 model only ...

Страница 60: ...nformation Network information When you select Menu Phone Information Network Information the IP address DSN information or LAN connection status information etc is displayed Deskphone Manager Connection Information When you select Menu Phone Information SDM Information you can check the connection information of a mobile device Display SDM Samsung Deskphone Manager App Connection information Conf...

Страница 61: ...keys and also do various settings by interoperating with SMT i5343 The SDM supports Samsung Galaxy S2 S3 Note1 Note2 and Galaxy Note2 10 1 System Configuration Diagram The SDM supports only the AOM function when it is installed on a pad The authentication procedure is the same both in a smartphone and pad Only layout is different Dashboard Contacts Call Log Program Key Settings Smartphone AC Setti...

Страница 62: ...o the IP phone in the following procedures To use SDM you have to register your IP phone You need only one registration and authentication for first use and after then it is registered automatically But if network configuration or phone configuration is changed then it may be needed re registration To download and install SDM contactk system manager Registration Using WIFI Authentication User ID A...

Страница 63: ...SMT i6010 6011 User Guide _61 1 Start the app and press the Start button 2 Enter an ID PW and select Deskphone IP input 3 Enter deskphone IP information and enter OK button ...

Страница 64: ...ation Using USB Smart phone uses USB tethering function with IP phone by USB data cable In this case IP phone and smart phone communicates 1 1 directly so IP phone can t use smart phone s data communication and wireless network This function is useful when used in environments without a wireless AP For registration using USB tethering Smart phone can use USB tethering Smart phone don t need WiFi c...

Страница 65: ...ager Information Setting remaines in effect until it is changed by the user 2 Start the app and press the USB connection button 3 Turn on USB tethering by selecting USB tethering setting at the bottom and select the Back button If USB tethering is activated then authentication is processed automatically ...

Страница 66: ...G Electronics Co Ltd 4 If the authentication procedure is successful the dashboard screen is displayed 5 If phone number of smart phone address is not registered you have to authenticate using account information ...

Страница 67: ...mart phone connected to the deskphone Deregistration in Settings 1 In the dashboard screen go to Application settings and select the Deregistration in the Connection info setting 2 When the deregistration popup is displayed press the Yes button for deregistration ...

Страница 68: ... where you can change presence status or access key functions Function Description Dashboard Contacts icon Moves to the contacts screen Call Log icon Move to the call log screen Prog Key icon Moves to the program key screen Settings icon Moves to the Settings screen ...

Страница 69: ...ts of all WeWork or deskphone View group You can see the group per device View details You can see the detail information of a selected contact Search You can search a contact Add contact You can add a contact Delete You can delete a contact Copy to deskphone You can save a contact to the deskphone Dialing You can make a call through the deskphone or smartphone Long touch action You can edit or de...

Страница 70: ...ils Favorites You can enable disable favorites Dialing You can make a call through the deskphone or smartphone Edit You can edit a contact Delete You can delete a contact Group You can manage the group of a contact Copy to deskphone Copy to smartphone Copy a contact to the deskphone or smartphone Contacts in smart phone can t be added edited deleted ...

Страница 71: ...want to add a contact is displayed when you add a contact The fields may vary per device Function Description Add Edit Contacts Enter name You can enter it briefly or in detail Add Group Select a group by going to the group list screen Select type Select a type if it exists ...

Страница 72: ... group in the Add Edit Contacts screen the below screen is displayed You can select multiple groups for the contact or create a new group Function Description Select Group Create group You can create a new group Select Group Select a group where a contact will belong ...

Страница 73: ...ion it is changed to the selection mode Function Description Group List View contacts You can see the list of contacts Create group You can add a new group Delete You can delete a group Long touch action You can edit or delete a group name Contacts in smart phone can t be added edited deleted ...

Страница 74: ...72_ SAMSUNG Electronics Co Ltd Group name edit When you press group name edit after long touch in the group list the below popup where you can enter a group name is displayed Enter a name and press OK ...

Страница 75: ...s contacts you can enter its name and select members Function Description Add Group Enter name Enter a group name If it is duplicate there will be a warning popup Add Member Moves to the member selection screen Find Contact You can search a contact using an entered keyword ...

Страница 76: ...ed to the selection mode If you add a contact in a group the device selection window is not displayed The contact automatically belongs to the group Function Description Contacts in Group Search Search a contact in a group Add contact Create a contact in a group Add Member Manage a group member add or remove Delete Delete a group member ...

Страница 77: ...dd remove a group member The bar above means the selected contacts Function Description Add Member Select Remove a group member You can add a group member or remove an existing group member Find Contact You can search a contact using an entered keyword ...

Страница 78: ...ch and phone number search The WeWork contacts do not support phone number You can perform directory name search or number search by entering search keyword Function Description Search Directory Search Search Real time search for a text entered in the search box Directory name search Name based search in the directory service Directory number search Number based search in the directory service ...

Страница 79: ... of deskphone is synchronized in real time Function Description Call Log Call log per device View call log per device All Deskphone View View by classifying per call log type All Incoming Outgoing Missed View call log details View the detail information of a call log Delete Delete a call log Delete all Delete all the calls Contacts in smart phone can t be added edited deleted ...

Страница 80: ...a call log Shows all the call log of a specific number in order and provides dialing and the contact interoperation function Function Description View call log details Dialing You can make a call using the deskphone or smartphone Delete Delete a call log Add Edit Add Edit a new contact ...

Страница 81: ...function Function Description Program Key Change device You can change a device by pressing its name Change page Using the left right swipe at the top title bar you can change a page Add function You can add a function Long touch action You can see the details and delete the information Edit Delete You can edit or delete a function Settings Moves to the Settings screen ...

Страница 82: ... or delete a program key It supports multi tasking You must press Save to make it applied after checking what you want to edit or delete Function Description Edit Delete Function Edit Moves to the Edit screen Delete Select a function to delete Done Apply the changes ...

Страница 83: ...Select a function and enter a value corresponding to the function Function Description Add Edit Function screen Select function Move to the function selection screen and select a function you want Input Enter a value for the function or search the value Done Apply the addition or change ...

Страница 84: ...ection info setting Option setting for IP phone connection Deskphone call setting Option setting for deskphone incoming call Application info Check and upgrade application information Contacts Synchronization Setting You can set up contacts view If it is set to ON you can see the contacts of smartphone in the deskphone Contacts of smartphone does not saved in the deskphone ...

Страница 85: ...und or vibration etc Based on this setting This function may not supported depending your system SDM shortcut If you select this when the SDM is registered to the deskphone the SDM shortcut notification is registered to the notification bar Application info Check the application information You can do upgrade and NFC simple setting Smart CID If you enabled Incoming call notification in Settings th...

Страница 86: ...84_ SAMSUNG Electronics Co Ltd ...

Страница 87: ...and reconnect it The phone s functions do not work after the phone has been reset If the message IP conflict appears on the screen it means that your IP address is already being used by a phone or PC Please contact the system administrator If the message ID conflict appears on the screen it means that your ID is already being used by another phone Please contact the system administrator When you p...

Страница 88: ...om the speaker may cause echoing Maintain a distance of 1 m from the phone Caller ID does not appear on the LCD screen Ask the service provider whether the Caller ID service is activated If the user has requested to be removed from the Caller ID service it will not appear on the screen If the user is calling from an area where the Caller ID service is not valid e g making an international call Cal...

Страница 89: ...ght LCD Mono Graphic LCD 128 64 Pixel Adaptor input power AC 100 250 V 50 60 Hz 1 0 A Adaptor output power DC 12 V 2 A PoE Input Power DC 48 V 0 3 A PoE Device 802 3 af standard support For CLASS 0 Operating conditions Temperature 0 45 C humidity 10 90 Class B Device Broadcasting communication device for home use This device obtained EMC registration mainly for home use Class B and may be used in ...

Страница 90: ...ountry Certificate Cert No EUROPE CE CB Certificate No NL 36551 CB USA CANADA FCC IC IC 649E SMTI6021 US A3LIPNANSMTI6021 UL SMT i6011 Country Certificate Cert No EUROPE CE CB Certificate No NL 36551 NB No 1177 CB USA CANADA FCC IC IC 649E SMTI6021 US A3LIPNANSMTI6021 FCC ID A3LSMTI6021 UL ...

Страница 91: ......

Страница 92: ......

Страница 93: ......

Страница 94: ......

Страница 95: ...le reuse of material resources Household users should contact either the retailer where they purchased this product or their local government office for details of where and how they can take these items for environmentally safe recycling Business users should contact their supplier and check the terms and conditions of the purchase contract This product and its electronic accessories should not b...

Страница 96: ...s Co Ltd No information contained here may be copied translated transcribed or duplicated by any form without the prior written consent of SAMSUNG Information in this document is subject to change without notice ...

Страница 97: ...QUESTIONS OR COMMENTS Homepage www samsungnetwork com ...

Отзывы: