background image

25

Connecting and Using a Source Device

2

2 Connecting and Using a Source Device

2.3

Connections

2.3.1

Connecting to a PC

z

Select a connection method suitable for your PC.


Connecting parts may differ in different products.


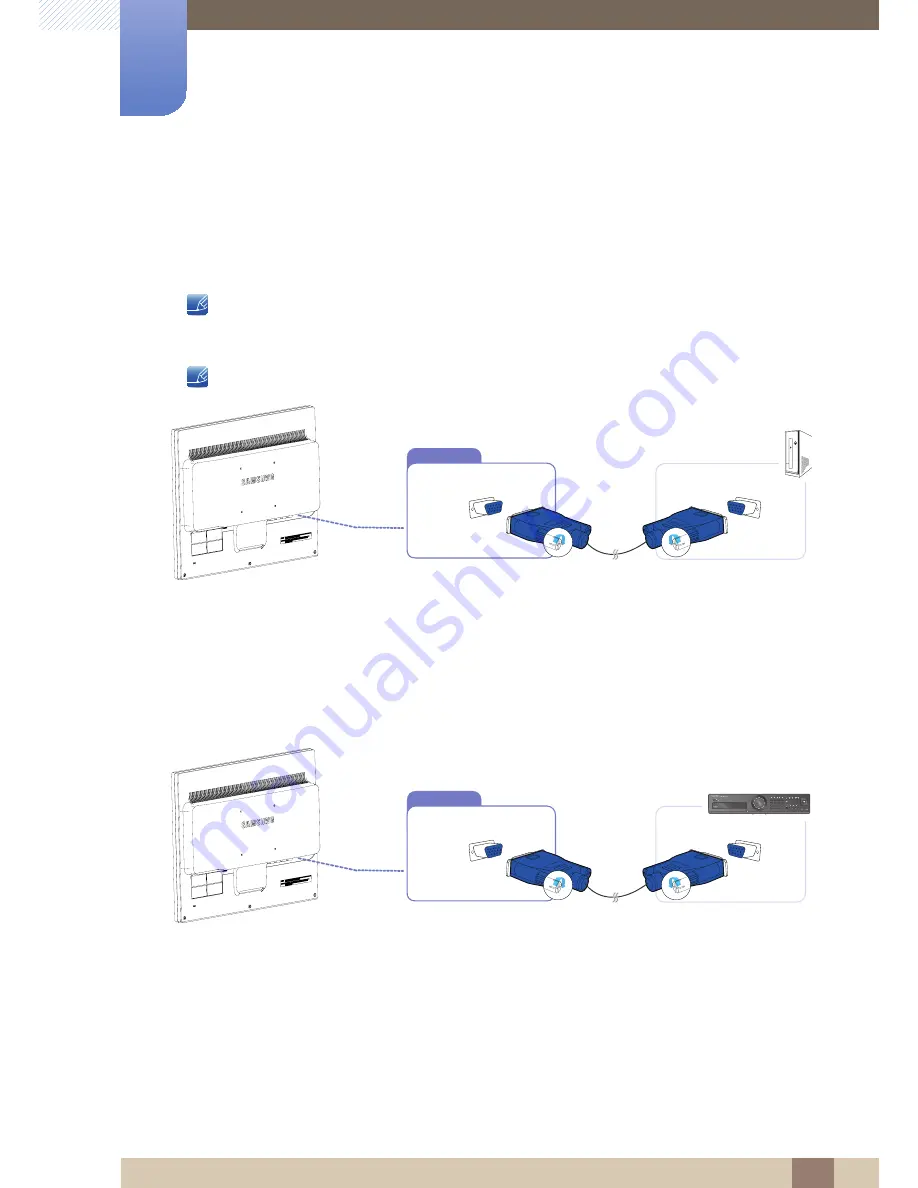
Connection Using the VGA Cable 


Do not connect the power cable before connecting all other cables. Ensure you connect a source 

device first before connecting the power cable.


Connect the VGA cable to the VGA port on the back of the product and the VGA port on the PC.

VGA

VGA

2.3.2

Connecting to a DVR


VGA

VGA

1

2

3

4

5

6

7

8

9

10

11

12

13

14

15

16

ALARM

HDD

NETWORK

 BACKUP

REC

DVD RECORDER

   REC

ZOOM

MODE

FREEZE

AUDIO

BACKUP

ALRAM

SEARCH

TELE

WIDE

VIEW

PRESET

MENU

RETURN

USB

OPEN/CLOSE

DVR

Содержание SMT-1914

Страница 1: ...User manual Security LED Monitor AB68 01117B SMT 1914 ...

Страница 2: ...0 Installation and Safety 12 Operation and Safety 15 Correct posture to use the product PREPARATIONS 16 Checking the Contents 16 Removing the Packaging 17 Checking the Components 18 Parts 18 Frontal Buttons 20 Reverse Side 21 Installation 21 Attaching the Stand 22 Installing a Wall mount Kit or Desktop Stand 23 Anti theft Lock CONNECTING AND USING A SOURCE DEVICE 24 Before Connecting 24 Pre connec...

Страница 3: ... Sharpness 32 Configuring Sharpness 33 SAMSUNG MAGIC Bright 33 Configuring SAMSUNG MAGIC Bright 34 SAMSUNG MAGIC Angle 34 Configuring SAMSUNG MAGIC Angle 35 Coarse 35 Adjusting Coarse 36 Fine 36 Adjusting Fine CONFIGURING TINT 37 SAMSUNG MAGIC Color 37 Configuring SAMSUNG MAGIC Color 38 Red 38 Configuring Red 39 Green 39 Configuring Green 40 Blue 40 Configuring Blue 25 Connections 26 Setting Optim...

Страница 4: ...44 Menu H Position Menu V Position 44 Configuring Menu H Position Menu V Position SETUP AND RESET 45 Reset 45 Initializing Settings Reset 46 Language 46 Changing the Language 47 Eco Saving 47 Configuring Eco Saving 48 Off Timer On Off 48 Configuring Off Timer On Off 49 Off Timer Setting 49 Configuring Off Timer Setting 50 Key Repeat Time 50 Configuring Key Repeat Time 51 Customized Key 51 Configur...

Страница 5: ...ION TROUBLESHOOTI NG GUIDE 55 Requirements Before Contacting Samsung Customer Service Center 55 Testing the Product 55 Checking the Resolution and Frequency 55 Check the following 57 Q A SPECIFICATIONS 59 General 60 PowerSaver 62 Standard Signal Mode Table APPENDIX 64 Correct Disposal 64 Correct Disposal of This Product Waste Electrical Electronic Equipment 65 Terminology 61 Dimensions ...

Страница 6: ...istered trademarks of Microsoft Corporation VESA DPM and DDC are registered trademarks of the Video Electronics Standards Association Icons used in this manual Symbols for safety precautions The following images are for reference only Real life situations may differ from what is shown in the images Warning A serious or fatal injury may result if instructions are not followed Caution Personal injur...

Страница 7: ...ble by the plug and do not touch the cable with wet hands Otherwise an electric shock may result 3 Wipe the monitor screen using a clean soft and dry cloth z Do not apply a cleaning agent that contains alcohol solvent or surfactant to the monitor z Do not spray water or detergent directly on the product 4 Wet a soft and dry cloth in water and wring thoroughly to clean the exterior of the monitor 5...

Страница 8: ...oduct for ventilation An internal temperature rise may cause fire and damage the product Be sure to allow the amount of space as shown below or greater when installing the product The exterior may differ depending on the product 10 cm 3 93 inches 10 cm 3 93 inches 10 cm 3 93 inches 10 cm 3 93 inches 10 cm 3 93 inches ...

Страница 9: ...t hands z Otherwise an electric shock may result Insert the power plug all the way in so it is not loose z An unstable connection may cause a fire Ensure you connect the power plug to a grounded power socket type 1 insulated devices only z An electric shock or injury may result Do not bend or pull the power cord with force Do not weigh the power cord down with a heavy object z A damaged power cord...

Страница 10: ...to completely cut the power to the product Power to the product cannot be completely cut off with the power button Hold the plug when disconnecting the power cord from the power socket z An electric shock or fire may result DO NOT PLACE CANDLES INSECT REPELLANTS OR CIGARETTES ON TOP OF THE PRODUCT DO NOT INSTALL THE PRODUCT NEAR HEAT SOURCES z Otherwise a fire may result Avoid installing the produ...

Страница 11: ...z Otherwise the product lifespan may be reduced or a fire may result Do not install the product within the reach of young children z The product may fall and injure children Edible oil such as soybean oil can damage or deform the product Do not install the product in a kitchen or near a kitchen counter Take care not to drop the product when moving it z Otherwise product failure or personal injury ...

Страница 12: ...lt z Contact Samsung Customer Service Center for repair Before you move the product be sure to turn off the power switch and remove all z Otherwise the power cord may be damaged and a fire or electric shock may result If the product generates a strange noise a burning smell or smoke remove the power cord immediately and contact Samsung Customer Service Center z An electric shock or fire may result...

Страница 13: ...amaged and product failure an electric shock or fire may result If a gas leakage is found do not touch the product or power plug Also ventilate the area immediately z Sparks can cause an explosion or fire z During a lightning or thunderstorm do Do not lift or move the product by pulling the power cord or any cable z Otherwise the cable may be damaged and product failure an electric shock or fire m...

Страница 14: ...ult Leaving the screen fixed on a stationary image for an extended period of time may cause afterimage burn in or defective pixels z If you are not going to use the product for an extended period of time activate power saving mode or a moving picture screen saver Disconnect the power cord from the power socket if you do not plan on using the product for an extended period of time vacation etc z um...

Страница 15: ...uct excessively may cause it to fall and result in personal injury Do not place heavy objects on the product z Product failure or personal injure may result Use the product in the correct posture as follows z Straighten your back z Allow a distance of 45 to 50cm between your eye and the screen and look slightly downward at the screen Keep your eyes directly in front of the screen z Adjust the angl...

Страница 16: ...e careful not to damage the product when you open the packaging with a sharp instrument 2 Remove the styrofoam from the product 3 Check the components and remove the styrofoam and plastic bag This image is for reference only 4 Store the box in a dry area so that it can be used when moving the product in the future ...

Страница 17: ...ct if any item is missing z The appearance of the components and items sold separately may differ from the image shown Components Components may vary depending on the country security LED MONITOR Power cable VGA signal cable Instruction Manual Warranty card Not available in some locations Cable holding ring Manual CD ...

Страница 18: ...ds Disable To unlock the locked OSD control press the button for more than 10 seconds If the OSD control is locked z Brightness and Contrast can be adjusted and INFORMATION can be viewed z The Customized Key function can be used by pressing the button The Customized Key function specified before the OSD control was locked is available even when the OSD control is locked Configure Customized Key an...

Страница 19: ... Properties will activate the Auto Adjustment function Turn the screen on or off Key Guide When a control button on the product is pressed the Key Guide will be displayed before the onscreen menu opens The guide shows the function of the button pressed To access the onscreen menu when the guide is displayed press the corresponding button again The Key Guide may vary depending on the function or pr...

Страница 20: ... shape of parts may differ from what is shown Specifications are subject to change without notice to improve quality Port Ports Connect the power cord for your monitor to the POWER port on the back of the product Connect to a PC DVR using the VGA cable VGA POWER VGA ...

Страница 21: ...tion shown by the figure Check if the Stand Connector is firmly connected Turn the connecting screw at the bottom of the stand fully so that it is completely fixed Place a soft cloth over the table to protect the product and place the product onto the cloth so that the front of the product is facing downwards Hold the main body of the product with your hand as shown by the figure Push the assemble...

Страница 22: ...parts on the wall mount kit or desktop stand you want to attach Place a protective cloth or cushion on a flat surface Next place the product with the face down on top of the cloth or cushion Hold the main body of the product with your hand as shown by the figure Pull the stand in the direction of the arrow as shown in the figure to separate it Installing a Wall mount Kit or Desktop Stand Attach th...

Страница 23: ...se a wall mount kit that can be installed 10cm or farther away from the wall z Be sure to use a wall mount kit that complies with the standards 1 3 3 Anti theft Lock An anti theft lock allows you to use the product securely even in public places The locking device shape and locking method depend on the manufacturer Refer to the user guide provided with your anti theft locking device for details Th...

Страница 24: ...rts on source devices may differ from device to device z Do not connect the power cable until all connections are completed Connecting the power cable during connection may damage the product z Check the types of ports at the back of the product you want to connect 2 2 Connecting the Power z To use the product connect the power cable to a power outlet and the POWER port on the product The input vo...

Страница 25: ...Do not connect the power cable before connecting all other cables Ensure you connect a source device first before connecting the power cable Connect the VGA cable to the VGA port on the back of the product and the VGA port on the PC VGA VGA 2 3 2 Connecting to a DVR VGA VGA 1 2 3 4 5 6 7 8 9 10 11 12 13 14 15 16 ALARM HDD NETWORK BACKUP REC DVDRECORDER REC ZOOM MODE FREEZE AUDIO BACKUP ALRAM SEARC...

Страница 26: ...solution to the optimum value 1 Press to move to the la 2 To hide the information message press z If the optimum resolution is not selected the message will appear up to three times for a specified time even when the product is turned off and on again z The optimum resolution can also be selected in Control Panel on your PC The optimal resolution for this monitor is as follows x Hz Follow the abov...

Страница 27: ...ion Using a PC z Adjust the resolution and refresh rate in Control Panel on your PC to obtain optimum picture quality z The picture quality of LEDs may degrade if the optimum resolution is not selected Changing the Resolution on Windows XP Go to Control Panel Display Settings and change the resolution 1 2 3 ...

Страница 28: ...Connecting and Using a Source Device 2 2 Connecting and Using a Source Device Changing the Resolution on Windows Vista Go to Control Panel Personalization Display Settings and change the resolution 1 2 3 4 ...

Страница 29: ...29 Connecting and Using a Source Device 2 2 Connecting and Using a Source Device Changing the Resolution on Windows 7 Go to Control Panel Display Screen Resolution and change the resolution 1 2 3 4 ...

Страница 30: ...ilable if Eco Saving is set to On 3 1 1 Configuring Brightness 1 Press any button on the front of the product to display the Key Guide Next press to display the corresponding menu screen 2 Press to move to Picture 3 Press to move to Brightness appear 4 Adjust the Brightness using the buttons SAMSUNG MAGIC MENU Custom Off PICTURE Brightness Contrast Sharpness Coarse Fine SAMSUNG MAGIC Bright SAMSUN...

Страница 31: ...or is in Full or Intelligent mode 3 2 1 Configuring Contrast 1 Press any button on the front of the product to display the Key Guide Next press to display the corresponding menu screen 2 Press to move to Picture 3 Press to move to Contrast appear 4 Adjust the Contrast using the buttons SAMSUNG MAGIC SAMSUNG MAGIC MENU XVWRP 2II PICTURE SAMSUNG MAGIC Bright SAMSUNG MAGIC Angle Brightness Contrast S...

Страница 32: ...or Intelligent mode 3 3 1 Configuring Sharpness 1 Press any button on the front of the product to display the Key Guide Next press to display the corresponding menu screen 2 Press to move to Picture 3 Press to move to Sharpness The following screen will appear 4 Adjust the Sharpness using the buttons SAMSUNG MAGIC SAMSUNG MAGIC MENU Custom Off PICTURE SAMSUNG MAGIC Bright SAMSUNG MAGIC Angle Brigh...

Страница 33: ...e contrast and brightness as required z Standard Obtain a picture quality suitable for editing documents or using Internet z Game Obtain a picture quality suitable for playing games that involve many graphic effects and dynamic movements z Cinema Obtain the brightness and sharpness of TVs suitable for enjoying video and DVD content z Dynamic Contrast Obtain balanced brightness through automatic co...

Страница 34: ... Back Mode 1 Select this option to view from a place slightly lower than the product z Lean Back Mode 2 Select this option to view from a place lower than Lean Back Mode 1 z Standing Mode Select this option to view from a place higher than the product z Side Mode Select this option to view from either side of the product z Group View Select this option for more than one viewer to view from places ...

Страница 35: ...he Key Guide Next press to display the corresponding menu screen 2 Press to move to Picture 3 Press to move to Coarse t The following screen will appear 4 Adjust the Coarse using the buttons MENU Custom Off PICTURE SAMSUNG MAGIC Bright SAMSUNG MAGIC Angle Brightness Contrast Sharpness Coarse Fine AUTO and press on the product and press on the produc 1688 ...

Страница 36: ...o display the Key Guide Next press to display the corresponding menu screen 2 Press to move to Picture 3 Press to move to Fine 4 Adjust the Fine using the buttons MENU Custom Off PICTURE SAMSUNG MAGIC Bright SAMSUNG MAGIC Angle Brightness Contrast Sharpness Coarse Fine AUTO and press on the product and press on the product The following screen will appear 1688 ...

Страница 37: ... Guide Next press to display the corresponding menu screen 2 Press to move to COLOR 3 Press to move to Color appear z Off Disable Color z Demo Compare normal screen mode with Color mode z Full Obtain a vivid picture quality for all areas including the flesh colors in the picture z Intelligent Improve the chroma for all areas except the flesh colors in the picture 4 5 The selected option will be ap...

Страница 38: ...lligent mode 4 2 1 Configuring Red 1 Press any button on the front of the product to display the Key Guide Next press to display the corresponding menu screen 2 Press to move to COLOR 3 Press to move to Red The following screen will appear 4 Adjust the Red using the buttons SAMSUNG MAGIC MENU COLOR SAMSUNG MAGIC Color Off Red Green Blue Color Tone Gamma Mode1 Normal AUTO and press on the product a...

Страница 39: ...ligent mode 4 3 1 Configuring Green 1 Press any button on the front of the product to display the Key Guide Next press to display the corresponding menu screen 2 Press to move to COLOR 3 Press to move to Green 4 Adjust the Green using the buttons SAMSUNG MAGIC MENU COLOR SAMSUNG MAGIC Color Red Green Blue Color Tone Gamma Mode1 Normal Off AUTO and press on the product and press on the product The ...

Страница 40: ...lligent mode 4 4 1 Configuring Blue 1 Press any button on the front of the product to display the Key Guide Next press to display the corresponding menu screen 2 Press to move to COLOR 3 Press to move to Blue 4 Adjust the Blue using the buttons SAMSUNG MAGIC MENU COLOR SAMSUNG MAGIC Color Mode1 Normal Off Red Green Blue Color Tone Gamma AUTO and press on the product and press on the product The fo...

Страница 41: ...or Tone t The following screen will appear z Cool 2 Set the color temperature to be cooler than Cool 1 z Cool 1 Set the color temperature to be cooler than Normal mode z Normal Display the standard color tone z Warm 1 Set the color temperature to be warmer than Normal mode z Warm 2 Set the color temperature to be warmer than Warm 1 z Custom Customize the color tone 4 5 The selected option will be ...

Страница 42: ...product to display the Key Guide Next press to display the corresponding menu screen 2 Press to move to COLOR 3 Press to move to Gamma appear 4 5 The selected option will be applied SAMSUNG MAGIC MENU COLOR SAMSUNG MAGIC Color ֻҖ Normal Off Mode1 Mode2 Mode3 Red Green Blue Color Tone Gamma AUTO and press on the product and press on the product The following screen will Press to move to the option ...

Страница 43: ... on the front of the product to display the Key Guide Next press to display the corresponding menu screen 2 Press to move to SIZE POSITION 3 Press to move to H Position or V Position appear 4 Press to configure H Position or V Position MENU SIZE POSITION H Position V Position Menu H Position Menu V Position AUTO SIZE POSITION AUTO Menu H Position Menu V Position H Position V Position and press on ...

Страница 44: ...s any button on the front of the product to display the Key Guide Next press to display the corresponding menu screen 2 Press to move to SIZE POSITION 3 Press to move to Menu H Position or Menu V Position screen will appear 4 Press to configure Menu H Position or Menu V Position MENU SIZE POSITION H Position V Position Menu H Position Menu V Position AUTO SIZE POSITION AUTO Menu H Position Menu V ...

Страница 45: ...e corresponding menu screen 2 Press to move to SETUP RESET 3 Press to move to Reset The following screen will appear 4 5 The selected option will be applied MENU SETUP RESET Off QJOLVK Off SAMAUNG Reset Language Eco Saving Off Timer On Off Off Timer Setting Key Repeat Time Customized Key AUTO Reset all settings Yes No EXIT AUTO Acceleration Bright MAGIC and press on the product and press on the pr...

Страница 46: ...ey Guide Next press to display the corresponding menu screen 2 Press to move to SETUP RESET 3 Press to move to Language appear 4 Press to move to the la 5 The selected option will be applied MENU ଥࢿ ଥࢿ 3 ɼ ܖ ـ HXWVFK QJOLVK VSDxRO UDQoDLV WDOLDQR 0DJ DU 3ROVNL 3RUWXJXrV ƧNJLjLjǁƿǀ 6YHQVND 7 UNoH ଞ 䇁 ᣣᧄ 5HVHW DQJXDJH FR 6DYLQJ 2II 7LPHU 2Q 2II 2II 7LPHU 6HWWLQJ H 5HSHDW 7LPH SETUP RESET AUTO Customize...

Страница 47: ...2 Press to move to SETUP RESET 3 Press to move to Eco Saving appear z 75 Change the monitor power consumption to 75 of the default level z 50 Change the monitor power consumption to 50 of the default level z Off Deactivate the Eco Saving function 4 5 The selected option will be applied SAMSUNG MAGIC MENU English SETUP RESET ଥࢿ ଥࢿ Off 5HVHW DQJXDJH FR 6DYLQJ 2II 7LPHU 2Q 2II 2II 7LPHU 6HWWLQJ AUTO ...

Страница 48: ...ve to Off Timer On Off oduct The following screen will appear z Off Deactivate the off timer so that the product does not power off automatically z On Activate the off timer so that the product powers off automatically 4 5 The selected option will be applied MENU QJOLVK Off SETUP RESET 5HVHW DQJXDJH FR 6DYLQJ 2II 7LPHU 2Q 2II 2II 7LPHU 6HWWLQJ Off On AUTO SAMAUNG Key Repeat Time Customized Key Acc...

Страница 49: ...Setting 1 Press any button on the front of the product to display the Key Guide Next press to display the corresponding menu screen 2 Press to move to SETUP RESET 3 Press to move to Off Timer Setting ct The following screen will appear 4 Press to configure Off Timer Setting MENU English Off On SETUP RESET 5HVHW DQJXDJH FR 6DYLQJ 2II 7LPHU 2Q 2II 2II 7LPHU 6HWWLQJ 10h AUTO SAMAUNG Key Repeat Time C...

Страница 50: ...TUP RESET 3 Press to move to Key Repeat Time will appear z Acceleration 1 sec or 2 sec can be selected If No Repeat is selected a command responds only once when a button is pressed 4 5 The selected option will be applied MENU English Off On SETUP RESET 5HVHW DQJXDJH FR 6DYLQJ 2II 7LPHU 2Q 2II 2II 7LPHU 6HWWLQJ ݤ ɾ Acceleration 1 sec 2 sec No Repeat AUTO Key Repeat Time Customized Key and press on...

Страница 51: ...ove to SETUP RESET 3 Press to move to Customized Key oduct The following screen will appear 4 Press to move to the op 5 The selected option will be applied MENU SETUP RESET AUTO English Off On 5HVHW DQJXDJH FR 6DYLQJ 2II 7LPHU 2Q 2II 2II 7LPHU 6HWWLQJ Key Repeat Time Customized Key and press on the product and press on the pr tion you want and press z Angle Bright Eco Saving SAMSUNG MAGIC SAMSUNG ...

Страница 52: ...appear 6 8 1 Configuring Display Time 1 Press any button on the front of the product to display the Key Guide Next press to display the corresponding menu screen 2 Press to move to SETUP RESET 3 Press to move to Display Time appear 4 5 The selected option will be applied MENU SETUP RESET LVSOD 7LPH 0HQX 7UDQVSDUHQF VHF VHF VHF VHF AUTO and press on the product and press on the product The followin...

Страница 53: ...ct to display the Key Guide Next press to display the corresponding menu screen 2 Press to move to SETUP RESET 3 Press to move to Menu Transparency product The following screen will appear 4 5 The selected option will be applied MENU SETUP RESET AUTO 20 sec LVSOD 7LPH 0HQX 7UDQVSDUHQF Off On and press on the product and press on the Press to move to the option you want and press ...

Страница 54: ...tton on the front of the product to display the Key Guide Next press to display the corresponding menu screen 2 Press to move to INFORMATION The current input source frequency and resolution will appear The displayed menu items may vary depending on the model MENU SETUP RESET kHz Hz NP x Optimal Mode x Hz PICTURE COLOR SIZE POSITION INFORMATION AUTO EXIT ...

Страница 55: ...nal Cable appears the product is working normally If the screen remains blank check the PC system video controller and cable 8 1 2 Checking the Resolution and Frequency For a mode that exceeds the supported resolution refer to 9 3 Standard Signal Mode Table the message Not Optimum Mode will appear for a short time 8 1 3 Check the following Installation issue PC mode The screen keeps switching on a...

Страница 56: ...cy compatible with the product Next if required change the settings referring to Standard Signal Mode Table page 62 in this manual and the INFORMATION menu on the product There are shadows or ghost images left on the screen The screen is too bright The screen is too dark Adjust Brightness page 30 and Contrast page 31 Screen color is inconsistent Change the COLOR settings Refer to Configuring Tint ...

Страница 57: ...nitor settings z Windows ME 2000 Go to Control Panel Display Settings Advanced Monitor and adjust Refresh rate under Monitor settings z Windows Vista Go to Control Panel Appearance and Personalization Personalization Display Settings Advanced Settings Monitor and adjust Refresh rate under Monitor settings z Windows 7 Go to Control Panel Appearance and Personalization Display Screen Resolution Adva...

Страница 58: ...indows 7 Go to Control Panel Appearance and Personalization Display Adjust Resolution and adjust the resolution How do I set power saving mode z Windows XP Set power saving mode in Control Panel Appearance and Themes Display Screen Saver Settings or BIOS SETUP on the PC z Windows ME 2000 Set power saving mode in Control Panel Display Screen Saver Settings or BIOS SETUP on the PC z Windows Vista Se...

Страница 59: ...imum Pixel Clock 137MHz Analog Power Supply This product uses 100 to 240V Refer to the label at the back of the product as the standard voltage can vary in different countries Signal connectors Only VGA Dimensions W x H x D Weight Without Stand With Stand 4 92 kg VESA Mounting Interface 100 mm x 100 mm 3 9 Inches x 3 9 Inches Size 19 0 Inches 48 cm 1280x1024 60Hz 1280x1024 75Hz Display Color 16 7M...

Страница 60: ...er The power saving function of this product reduces power consumption by switching off the screen and changing the color of the power LED if the product is not used for a specified period of time The power is not turned off in power saving mode To switch the screen back on press any key on the keyboard or move the mouse Power saving mode functions only when the product is connected to a PC that h...

Страница 61: ...61 Specifications 9 Specifications 9 3 Dimensions 9 412 377 3 347 406 5 17 4 302 1 87 59 4 63 1 217 4 ...

Страница 62: ...mitted from your PC the screen will automatically be adjusted If the signal transmitted from the PC does not belong to the standard signal modes the screen may be blank even though the power LED turns on In such a case change the settings according to the following table by referring to the graphics card user manual SMT 1914 Resolution Horizontal Frequency kHz Vertical Frequency Hz Pixel Clock MHz...

Страница 63: ...Hz z Vertical Frequency Repeating the same picture dozens of times per second allows you to view natural pictures The repeat frequency is called vertical frequency or refresh rate and is indicated in Hz VESA 1152 x 864 67 500 75 000 108 000 108 000 VESA 1280 x 1024 63 981 60 020 108 000 VESA 1280 x 1024 79 976 75 025 135 000 Resolution Horizontal Frequency kHz Vertical Frequency Hz Pixel Clock MHz...

Страница 64: ...nt possible harm to the environment or human health from uncontrolled waste disposal please separate these items from other types of waste and recycle them responsibly to promote the sustainable reuse of material resources Household users should contact either the retailer where they purchased this product or their local government office for details of where and how they can take these items for ...

Страница 65: ...ay an image although the refreshing is invisible to the naked eye The number of screen refreshes is called scanning rate and is measured in Hz A scanning rate of 60Hz means that the screen refreshes 60 times per second The screen scanning rate depends on the performance of the graphics cards in your PC and monitor Horizontal Frequency Characters or images displayed on the monitor screen consist of...

Страница 66: ...n the screen and is suitable for performing multiple tasks at the same time E g A resolution of 1280 x 1024 consists of 1 280 horizontal pixels horizontal frequency and 1 024 vertical lines vertical resolution Plug Play The Plug Play feature allows the automatic exchange of information between a monitor and PC to produce an optimum display environment The monitor uses VESA DDC international standa...

Страница 67: ...SUNG TECHWIN AMERICA Inc Samsung House 1000 Hillswood Drive Hillswood Business Park Chertsey Surrey UNITED KINGDOM KT16 OPS TEL 44 1932 45 5300 FAX 44 1932 45 5325 www samsungtechwin com www samsungsecurity com 100 Challenger Rd Suite 700 Ridgefield Park NJ 07660 Toll Free 1 877 213 1222 Direct 1 201 325 6920 Fax 1 201 373 0124 www samsungcctvusa com SAMSUNG TECHWIN EUROPE LTD ...

Отзывы: