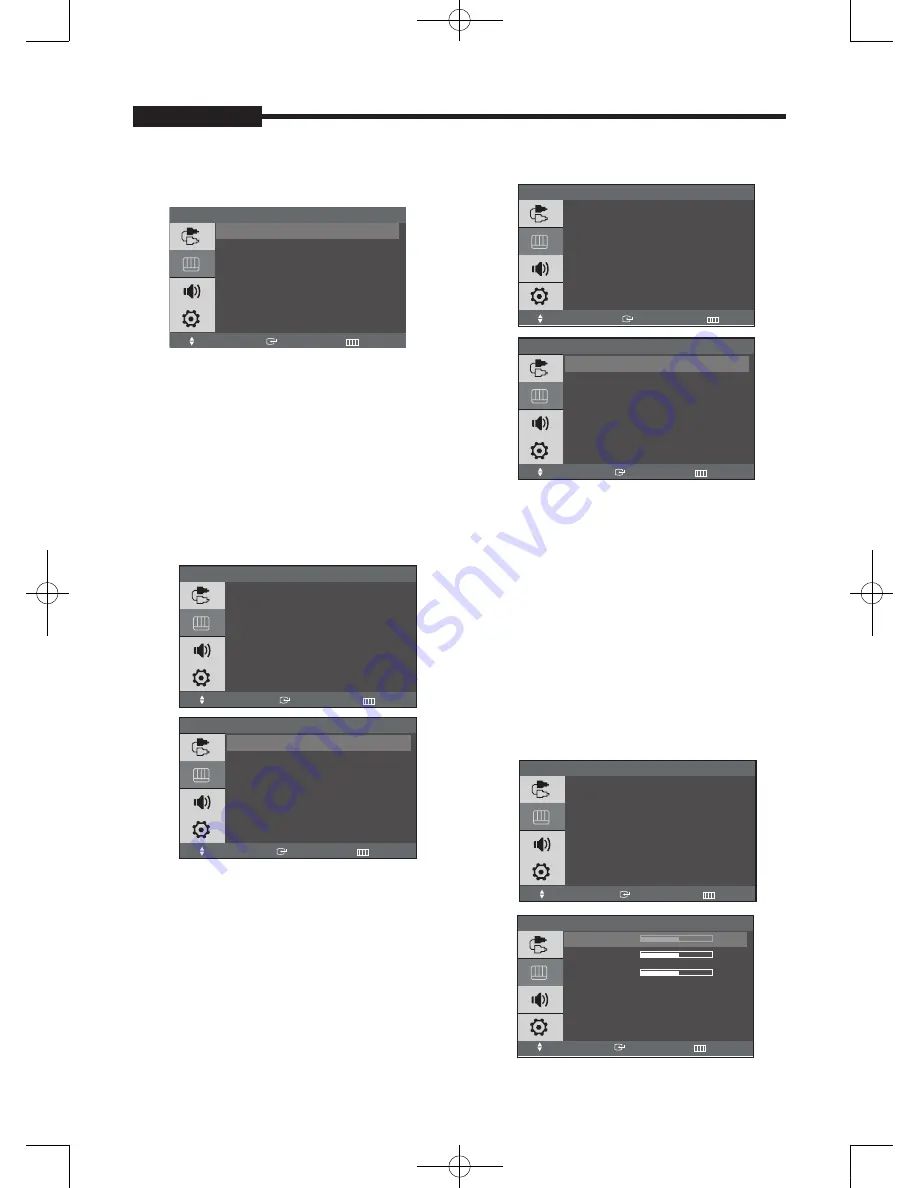
Samsung SMT-1721 Скачать руководство пользователя страница 13

- 1 -

USER'S MANUAL

 

Color Tone 

      VGA mode : Cool, Normal, Warm, Custom 

1.  Press the MENU and 

/

 button to select the 


Picture menu.   


.  Press  the ENTER button.
3.  Press  the 

/

 and ENTER button button to select  


the Color Tone menu.   


4.  Press the 

/

 button to select the setting you  


want. 

5.  Press the MENU or 

 button repeatedly to exit.

 

Size : Zoom, 4:3

The menu is available only if you select the over, 
Under Scan.

1.  Press the MENU and 

/

 button to select the 


Picture menu. 

.  Press  the ENTER or 

 button. 


3.  Press  the 

/

 and ENTER button to select the  


Size menu. 


4.  Press  the ENTER or 

 button. 


5.  Press the 

/

 button to select the Size you want.

6.  Press the MENU or 

 button repeatedly to exit.

 

Under Scan : Over, Under


The menu is not available if you select the Zoom, 
Picture Size.

 1.  Press the MENU and 

/

 button to select the 


Picture menu. 

.  Press  the ENTER or 

 button. 


3.  Press  the 

/

 button to select the Under Scan  


menu.     

4.  Press  the ENTER or 

 button. 


5.  Press the 

/

 button to select the scan mode you  


want.

6.  Press the MENU or 

 button repeatedly to exit.

VGA mode

 

Color Control : Red, Green, Blue 

Clor Tone

Cool

Normal
Warm
Custom


 Move 

 Enter 

 Return

<VGA mode>

USER'S MANUAL

Picture


 Move 

 Enter 

 Exit

Mode  

: Movie 

Custom  


Color Tone 

: Warm 

Size 

: 4:3 

Under Scan 

: Under 

Size


 Move 

 Enter 

 Return

Zoom

4:3

Size


 Move 

 Enter 

 Return

Over

Under

Picture


 Move 

 Enter 

 Exit

Mode  

: Movie 

Custom  


Color Tone 

: Warm 

Size 

: 4:3 

Under Scan 

: Under 

Picture

Custom  


Color Tone 

: Normal 

Color Control 


Image Lock 


Auto Adjustment   

PIP Picture


 


 Move 

 Enter 

 Exit

Color Control

Red 


  50

Green   


  50

Blue 


  50


 Move 

 Enter 

 Return

1-AB68-00651A-03eng_0607.indd   12

2007-06-07   오후 7:13:29

Содержание SMT-1721

Страница 1: ...TFT LCD MONITOR SMT 1721 SMT 1921 User Guide 1 AB68 00651A 03eng_0607 indd 101 2007 06 07 오후 7 13 04 ...

Страница 2: ...TFT LCD MONITOR SMT 1721 SMT 1921 English 1 AB68 00651A 03eng_0607 indd 102 2007 06 07 오후 7 13 10 ...

Страница 3: ...tor and to protect it from overheating and these openings should never be blocked by placing the monitor on a bed sofa rug or other similar surface This monitor should never be placed near or over a radiator or heat register This monitor should not be placed in a built in installation such as a bookcase or rack unless proper ventilation is provided or Samsung s in structions have been adhered to 1...

Страница 4: ...approved by the party responsible for compliance could void the user s authority to operate the equipment NOTE This equipment has been tested and found tocomply with the limits for a Class A digital device pursuant to Part 15 of the FCC Rules These limits are designed to provide reasonable protection against harmful interference when the equipment is operated in a commercial environment This equip...

Страница 5: ...View 5 Rear Left Side View 6 Remote Controller 7 Connecting to External Devices 8 OSD Menu Configurations 9 No Signal Display 9 OSD Menu Selection 9 A Input Menu 9 B Picture Menu 11 C Sound Menu 14 D Setup Menu 15 Specifications 17 Contents 1 AB68 00651A 03eng_0607 indd 4 2007 06 07 오후 7 13 11 ...

Страница 6: ...ease the level of active function and move to the previous menu Still picture function in Video mode when there is no OSD menu on the screen Also activates Auto adjustment function in the VGA mode when you press the Auto button with the OSD Menu off PIP Increases the level of active function and selects OSD menu Also Activates PIP function in the VGA Mode ENTER SOURCE Selects input source activate...

Страница 7: ...O B IN Composite signal input for VIDEO B VIDEO B OUT Video looping output for VIDEO B S VIDEO IN Y C separated signal input S VIDEO OUT Y C separated signal looping output VGA VGA signal input Left Side View AUDIO B Audio B input Right RED Left White AUDIO A S VIDEO Audio A S Video input Right RED Left White Rear View Left Side View 1 AB68 00651A 03eng_0607 indd 6 2007 06 07 오후 7 13 19 ...

Страница 8: ...STEM ID of remote controller Refer to Number button PIP Available in VGA Mode Push the PIP button to turn PIP screen On Off P MODE Available in Video A B S Video Mode Press to select a pre defined Picture Mode of the monitor or to change the picture atmosphere as required When you press this button current mode is displayed on the lower center of the screen The monitor has four auto matic picture ...

Страница 9: ...nal Devices The product can be connected to an external device such as Camera DVR VCR External Monitor etc USER S MANUAL CAMERA VCR External MONITOR DVR USER S MANUAL 1 AB68 00651A 03eng_0607 indd 8 2007 06 07 오후 7 13 26 ...

Страница 10: ...setting 5 Press the MENU or button repeatedly to exit Inputs can be set to Video A Video B S Video VGA mode 1 Press the MENU and ENTER button 2 Press the ENTER or button and then button to select input menu 3 Press the ENTER or button to save the setting and exit PIP ON VGA mode only If you didn t select VGA input this menu is not available 1 Press the MENU and ENTER button 2 Press the and ENTER b...

Страница 11: ... 1 Press the MENU and ENTER button 2 Press the and ENTER button to select the PIP menu 3 Press the ENTER or button to see sub menu 4 Press the and ENTER button to select the Off 5 Press the MENU or button repeatedly to exit Edit Name 1 Press the MENU and ENTER button 2 Press the and ENTER button to select the Edit menu 3 Press the and ENTER button to select input 4 Press the and ENTER button to se...

Страница 12: ...on to select the setting you want 5 Press the and the ENTER button to adjust the setting value and save 6 Press the button to select the Contrast or Brightness 7 Press the and ENTER button to adjust the setting value and save 8 Press the MENU or button repeatedly to exit If you select the Brightness then the picture below appears on the screen Color Tone Video mode Cool2 Cool1 Normal Warm1 Warm2 T...

Страница 13: ... not available if you select the Zoom Picture Size 1 Press the MENU and button to select the Picture menu 2 Press the ENTER or button 3 Press the button to select the Under Scan menu 4 Press the ENTER or button 5 Press the button to select the scan mode you want 6 Press the MENU or button repeatedly to exit VGA mode Color Control Red Green Blue Clor Tone Cool Normal Warm Custom Move Enter Return V...

Страница 14: ...o exit Position Image Lock 1 Press the MENU and button to select the Picture menu 2 Press the ENTER or button 3 Press the and ENTER button to select the Image Lock menu 4 Press the and ENTER button to select the Position 5 Press the or button to adjust the Position 6 Press the MENU or button repeatedly to exit Auto Adjustment If you didn t select VGA input this menu is not avail able 1 Press the M...

Страница 15: ...ect the Mode 4 Press the and ENTER button to select the setting you want 5 Press the MENU or button repeatedly to exit Custom Bass Treble Balance 1 Press the MENU and button to select the Sound menu 2 Press the ENTER or button 3 Press the and ENTER button to select the Custom 4 Press the button to select the sub menu you want Bass Treble Balance 5 Press the button to adjust the setting value and s...

Страница 16: ...R or button 3 Press the and ENTER button to select the System ID 4 Press the and ENTER button to select the setting you want 0 9 5 Press the MENU or button repeatedly to exit Blue Screen On Off USER S MANUAL USER S MANUAL Language Move Enter Return English Deutsch Francais Espanol Italiano Svenska Portugues Setup Language English Transparancy Medium System ID 0 Blue Screen On Reset Move Enter Exit...

Страница 17: ...ilable 1 Press the MENU and button to select the Setup menu 2 Press the ENTER or button 3 Press the and ENTER button to select the Reset 4 Press the and ENTER button to select the setting you want 5 Press the and ENTER button to selelct the OK or Cancel 6 Press the MENU or button repeatedly to exit USER S MANUAL Setup Language English Transparancy Medium System ID 0 Blue Screen On Reset Move Enter...

Страница 18: ...2D Comb Filter Yes Noise Reduction Yes PIP Yes Freeze Yes Under Scan Yes Video Composite 2ch input 1 0Vp p 75Ω terminated Loop Through out BNC Type S Video 1ch input Y C Loop Through out VGA 1ch input Audio 2Channel input 2W Stereo RCA Type OSD Language 11 Language Eng Fre Ger Spa Ita Rus Swe Por Kor Chn Jpn HAS Stand Lift 0 100mm Tilt 5 25 Swivel 165 165 Dimensions WxDxH Net 371mm x 220mm x 367 6...

Страница 19: ...AB68 00651A 03 1 AB68 00651A 03eng_0607 indd 18 2007 06 07 오후 7 13 31 ...

Отзывы: