background image

2-8

D

2-7

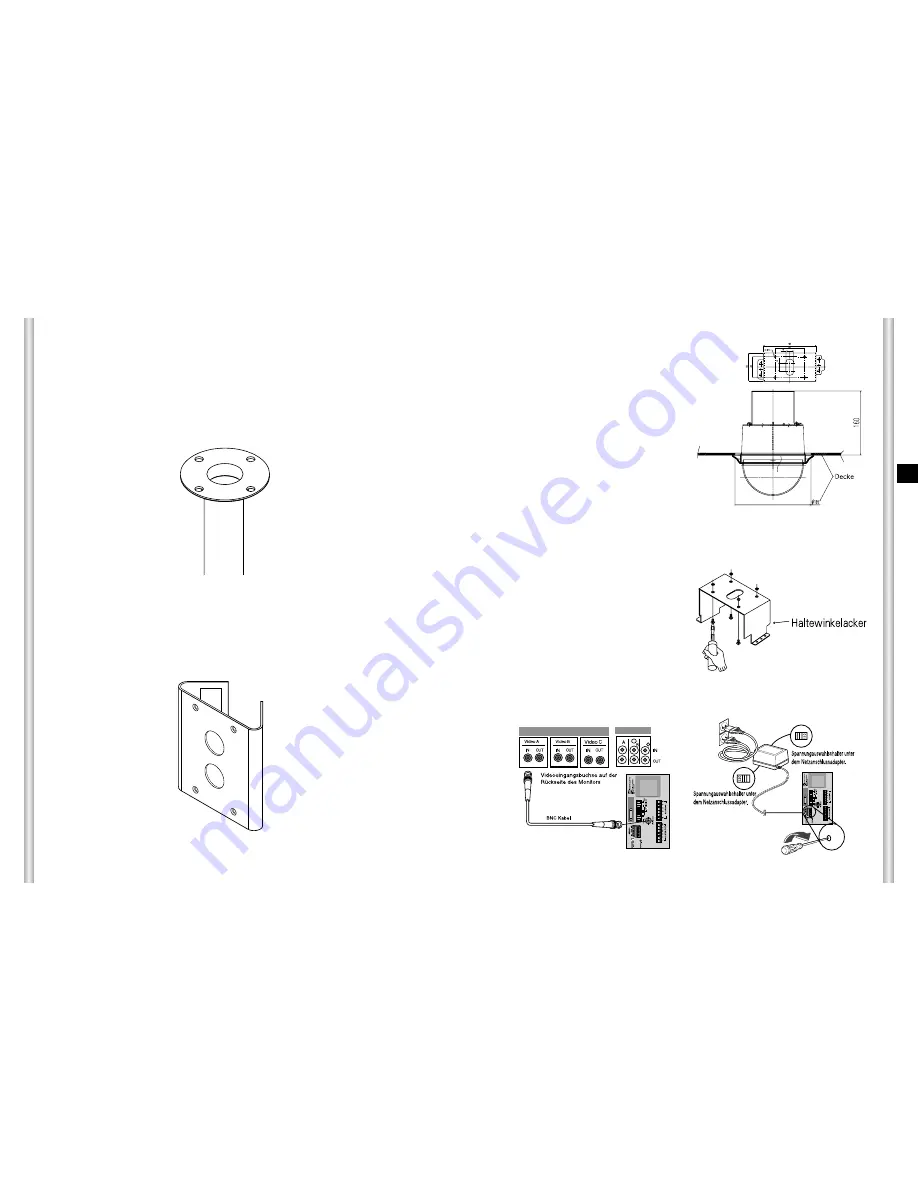
1. [Bild 1] Befestigen Sie den Aufbau

an der Decke.
(Beachten Sie bei der Installation
die Höhe des Aufbaus.)

* Eingebaut vom Hersteller.

3. [Bild 2] Befestigen Sie den

Haltewinkel (BRKT-ANCHOR)
an der Decke und schrauben
Sie sie mit 4 Schrauben fest.

[Bild 2]

2. Machen Sie an der Stelle, wo die Kamera installiert werden soll, ein
Loch in die Decke.

(Das Loch sollte etwa einen Durchmesser von 185 mm haben.)

4. [Bild 3, 4] Verbinden Sie die verschiedenen Kabel mit dem

Kameraadapter (siehe Seite 2-4)

[Bild 4]

[Bild 3]

[Bild 1]

Länge des
Deckenlochs

5) DECKENHALTERUNG (SADT-100CM)

Diese Halterung wird bei der Installation des SmartDome-
Kameragehäuses für innen oder außen an einer Betondecke
verwendet. 

6) MASTHALTERUNG (SADT-100PM)

Diese Halterung eignet sich zur Installation der WANDHALTERUNG 
(SADT-100WM) an einem Masten mit einem Durchmesser von über 8 cm.

Installation der Kamera

Содержание SmartDome SCC-C6403P

Страница 1: ...SmartDome Camera SCC C6403P Part AB68 00571A 00 E D F Es I Owner s Instructions Benutzerhandbuch Manuel d instruction Manual del usuario Istruzioni per l uso ...

Страница 2: ...ket or table specified by the manufacturer or sold with the apparatus 13 Unplug this apparatus When a cart is used use caution when moving the cart apparatus combination to avoid injury from tip over 14 Refer all servicing to qualified service personnel Servicing is required when the apparatus has been damaged in any way such as power supply cord or plug is damaged liquid has been spilled or objec...

Страница 3: ...ence received including interference that may cause undesired operation Note This equipment has been tested and found to comply with the limits for a Class A digital device pursuant to part 15 of the FCC Rules These limits are designed to provide reasonable protection against harmful interference when the equipment is operated in a commercial environment This equipment generates uses and can radia...

Страница 4: ...and installation environment requirements Chapter 3 Setup Menu Overview presents the structure of the Setup menu for the SCC C6403P including a detailed explanation of the functions performed in each submenu Appendix SCC C6403P Product Specifications contains product specifications of the SCC C6403P in itemized categories Table of contents Before Usage 1 1 Chapter 1 SCC C6403P Overview 1 4 SCC C64...

Страница 5: ...5 AUTO SET 3 22 AUTO PAN 3 22 POSITION SET 3 22 SPEED 3 23 DWELL TIME 3 23 PATTERN 3 23 SCAN 3 24 AUTO PLAY 3 25 AUTO RETURN 3 25 AUTO PLAY 3 25 PLAY NUMBER 3 25 6 ALARM SET 3 26 ALARM PRIORITY SET 3 26 ALARM IN SET 3 26 ALARM OUT SET 3 26 AUTO SET 3 27 AUX OUT CONTROL 3 27 7 OTHER SET 3 27 PROPORTINAL P T 3 27 TURBO P T 3 28 AUTO CAL 3 28 AUTO FLIP 3 28 CAM RESET 3 28 LANGUAGE 3 28 PASSWORD 3 28 ...

Страница 6: ... a variety of functions such as DAY NIGHT to improve the sensitivity by automatic conversion into the black and white mode at night or in the environment with low illumination White Balance to control the brightness to the illumination Backlight Compensation under spotlight or utmost bright illumination Auto Focus to automatically adjust the focus to the subject movement PAN TILT for an easy opera...

Страница 7: ...1 8 E 1 7 ADAPTER CONNECTION SCC C6403P Adapter BOARD AC 24V OUT POWER AC 24V OUT POWER BACK ...

Страница 8: ...2nd digit and SW703 the 1st digit EX In case of Camera Address 1 see the following figure for setup Setting communication Protocol Use number 1 4 PIN of SW704 to set communication Protocol Baud Rate Setting Use PIN 5 and 6 of SW704 SW701 SW702 SW703 1 2 3 4 5 6 7 8 ON OFF BAUD RATE 4800 BPS 9600 BPS 19200 BPS 38400 BPS PIN 5 ON OFF ON OFF PIN 6 ON ON OFF OFF A SAMSUNG HALF B SAMSUNG FULL PIN1 PIN2...

Страница 9: ...T POWER Camera Holder Adapter Board Cover Body Owner s Instructions Screws Chapter 2 SCC C6403P Installation In this chapter we will check the contents of the package before installing the SCC C6403P and prepare a power adapter suitable for the power supply system Power Consumption 18W Voltage AC24V 1 5A Then we will install the SCC C6403P and connect the cables ...

Страница 10: ...and the external Controller 3 Now connect the Power Adapter Cable Use a driver to screw one part of the two lines of Power Adapter to Power Input Terminal of the SCC C6403P Controller Adapter BOARD To install and use the SCC C6403P the following cables should be prepared Power Adapter Cable The cable that plugs into the SCC C6403P power input receptacle has the rated voltage of AC24V 1 5A Check th...

Страница 11: ...high 3 Use the supplied screws to fasten the camera to the bracket assembly 4 Keep persons away from the installation area as there is a risk of falling objects Also move valuables to a safe location before installation Separately Sold Products for Installation Depending on the installation site it may be convenient to use one of the following products 1 CEILING MOUNT BRACKET SBR 100DCM This brack...

Страница 12: ...camera will be installed The hole should be about ø185 4 Figure 3 4 Connect the various cables to the CAMERA ADAPTER See page 2 4 Figure 4 Figure 3 Installing the Camera Figure 1 5 CEILING MOUNT ADAPTOR SADT 100CM This adaptor is used for installing the indoor housing or the outdoor housing for the SmartDome Camera to a concrete ceiling 6 POLE MOUNT ADAPTOR SADT 100PM This adaptor is used for inst...

Страница 13: ... CAMERA and the CONNECTOR and turn it left about 15 degrees Check the sound of LOCKING and that the LEVER LOCKING is in place Use the screws BH M3 x L8 to connect the CAMERA and the ADAPTER so they don t move Figure 7 8 Figure 8 Assemble the COVER BODY onto the DOME Figure 8 5 Figure 5 Match the BRKT ANCHOR and CAMERA ADAPTER and use 4screws PH M4 x 8 to assemble them Figure 5 6 Pull the safety wi...

Страница 14: ...P ON OFF CAM RESET LANGUAGE ENGLISH FRANÇAIS DEUTSCH ESPAÑOL ITALIANO PASSWORD ON OFF EXIT QUIT SAVE SYSTEM INFO CAMERA SET CAMERA ID ON OFF V SYNC INT LINE COLOR BW COLOR BW AUTO MOTION DET OFF ON ZOOM SPEED 1 2 3 4 DIGITAL ZOOM 0FF X2 X10 DISPLAY ZOOM OFF ON DISPLAY P T OFF ON EXIT QUIT SAVE PRESET VIDEO SET IRIS ALC MANU SHUTTER OFF 1 100 1 120 1 10K AUTOX2 X128 AGC MOTION OFF LOW HIGH AGC S SL...

Страница 15: ...n by using the LOCATION submenu Press Enter Means there are Sub Menus CAMERA SET CAMERA ID ON V SYNC INT COLOR BW COLOR MOTION DET OFF ZOOM SPEED 3 DIGITAL ZOOM OFF DISPLAY ZOOM OFF DISPLAY P T OFF EXIT QUIT CAMERA ID A B C D E F G H I J K L M N O PQ R S T U V W X Y Z 0 1 2 3 4 5 6 7 8 9 SP ï î SP LOCATION RET SCC C6403 V SYNC In the V SYNC menu vertical synchronization can be selected The vertica...

Страница 16: ...nd white composite video signal BURST OFF The color burst signal is not output LEVEL You can set the brightness level that changes from COLOR mode to BW mode in 3 steps LOW MEDIUM and HIGH DURATION Set the HOLDING time for switching between COLOR and BW mode depending the changes in the amount of light You can set the HOLDING time to 10sec S 30sec 60sec or 300sec L Press Enter CAMERA SET CAMERA ID...

Страница 17: ...OTION detection strength The higher the more sensitive After PAN TILT ZOOM FOCUS IRIS movement finishes MOTION DET function will not work for about 5 seconds to stablize the chage of the screen MOTION detection function operates based on the brightness change within the setup region Therefore erroneous operation may occur depending on the brightness difference between the background and the object...

Страница 18: ...LEVEL 0 I RET Use Left Right key in the LEVEL menu to control the video output level brightness ALC BLC USER LEVEL 0 I RET SIZE LOKALIZACJA SIZE LOKALIZACJA SIZE LOKALIZACJA MANU When you press ENTER key after selecting MANU in the IRIS item an additional screen appears in which you can set manually opening or closing the IRIS VIDEO SET IRIS MANU SHUTTER OFF AGC OFF WHITE BAL ATW1 DIS OFF FOCUS MO...

Страница 19: ...s 7 shutter speeds from 1 100 1 120 to 1 10K second to be used for the bright and fast video image The AUTO slow electronic shutter supports 12 shutter speeds from x2 to x160 and sets the shutter speed to be slow In order to make the image on the screen more distinct and brighter when you photograph under dark illumination If you want to sense the light brightness to control the shutter speed to t...

Страница 20: ... mode the user can set the white Balance considering the current illumination Select MANU item and press ENTER the sub screen where you can select Manual White Balance will be shown Use the left right keys to select 3200K 5600K or OFF USER mode in the PRESET menu 3200K Set color temperature to 3200K 5600K Set color temperature to 5600K USER Choose out a proper value from the RED and BLUE graph for...

Страница 21: ... MODE ONEAF SPECIAL EXIT QUIT SPECIAL In SPECIAL menu you can directly adjust Y LEVEL C LEVEL and DETAIL functions Y LEVEL It is used to set the levels for the Sync signal and the entire brightness signal of the video signal C LEVEL It is used to set the levels for the Burst signal and the entire colour signal of the video signal DETAIL Controls both horizontal and vertical distinction VIDEO SET I...

Страница 22: ...FAST PRESET SPEED 1 Maximum PAN moving speed of 240 sec PRESET SPEED 8 Maximum PAN moving speed of 400 sec DWELL TIME This is a function setting for the DWELL TIME of the PRESET location in SCAN motion It can set DWELL TIME From 1 60 Sec IMAGE HOLD Pauses the image when PRESET is in movement If you set the IMAGE HOLD menu to ON the screen will be paused until PRESET finishes moving EXIT QUIT Does ...

Страница 23: ...en select a start position and press ENTER Move PAN again to select a end position and press ENTER Now ZONE AREA setup is complete Press Enter After PAN control press ENTER to finish SET START ZONE AREA SET 0 LOCATION ZONE ID SET ZONE ENABLE ON EXIT QUIT After P R Z control press ENTER SET END ZONE ENABLE This function turns on or off the ZONE AREA ID indication ZONE AREA Press ENTER to enter the ...

Страница 24: ...fter selecting the locations of two points PAN TILT of START and END it loops continuously in the set up SPEED The number of AUTO PAN is up to 4 5 AUTO SET The AUTO SET menu includes AUTO PAN PATTERN and SCAN and it is able to set up the AUTO PLAY motion Press Enter MAIN MENU CAMERA SET VIDEO SET PRESET ZONE SET AUTO SET ALARM SET OTHER SET SYSTEM INFO AUTO SET AUTO PAN 1 PATTERN 1 SCAN 1 AUTO PLA...

Страница 25: ...ZONE SET AUTO SET ALARM SET OTHER SET SYSTEM INFO AUTO SET AUTO PAN 1 PATTERN 1 SCAN 1 AUTO PLAY RET Press Enter AUTO SET AUTO PAN 1 PATTERN 1 SCAN 1 AUTO PLAY RET PATTERN SET 1 SET START POSITION AND ENTER PATTERN can be set upto 3 Choose 1 2 or 3 with the left or right key in the PATTERN SET and press ENTER to get into the PATTERN set up screen From the moment PATTERN 1 SET is gone for 2 minutes...

Страница 26: ...otion to continue or act only when the ALARM is working If it is set to OFF the ALARM OUT motion will operate only when the ALARM is working Active Low and if it s set to ON the ALARM OUT will always operate regardless of the ALARM 6 ALARM SET It consists of 4 ALARM INPUTs and 3 ALARM OUTs It can sense an ALARM input from exterior SENSORs and it performs with PRESET or PATTERN function and outputs...

Страница 27: ...he speed may go up to 180 sec PAN AUTO CAL This function turns on or off Auto Calibration SCC C6403P has the Auto Calibration function to improve the precision of LENS and PAN TILT motor You may set to OFF 6H 12H 18H 24H Without user s key input for the time designated by the user A C will appear on the screen while initializing LENS and PAN TILT AUTO FLIP When TILT is set to a 90 limit using the ...

Страница 28: ... OUT3 ON OUT3 OFF PRESET 1 3 6 Enter PRESET 1 3 7 Enter PRESET 1 3 8 Enter PRESET 1 3 9 Enter PRESET 1 4 0 Enter PRESET 1 4 1 Enter OTHER SET PROPORTIONAL P T ON PROPORTIONAL P T OFF TURBO P T ON TURBO P T OFF AUTO FLIP ON AUTO FLIP OFF PRESET 1 4 2 Enter PRESET 1 4 3 Enter PRESET 1 4 4 Enter PRESET 1 4 5 Enter PRESET 1 4 6 Enter PRESET 1 4 7 Enter AUTO RETURN 1 PRESET 1 4 8 Enter AUTO CAL PRESET ...

Страница 29: ...ion Mode Resolution S N Ratio Min Object Illumination Color Temperature Signal Output Lens PAN Function TILT Function REMOTE CONTROL ALARM Operation Temperature Operation Humidity SIZE Weight Lives of Main Parts Product specifications SCC C6403P 4 5 Years Cautions The copyright of the manual belongs to Samsung Electronics Co Ltd Without the permission of Samsung Electronics it cannot be reproduced...

Страница 30: ...SmartDome Kamera SCC C6403P Part AB68 00571A 00 D Benutzerhandbuch ...

Страница 31: ...überzug beschädigt werden kann Achtung 1 Lassen Sie keine Gegenstände auf das Gerät fallen und schützen Sie es vor starken Stößen Setzen Sie die Kamera keinen starken Vibrationen oder magnetischen Störfeldern aus 2 Die Kamera darf nicht an Orten mit hohen bzw tiefen Temperaturen über 50 C und unter 10 C oder hoher Luftfeuchtigkeit installiert werden Andernfalls besteht die Gefahr eines Brandes ode...

Страница 32: ...ng der SCC C6403P und informiert über Vorbereitungen und Randbedingungen der Inbetriebnahme Kapitel 3 Überblick über das Setup Menü erläutert die Struktur des Setup Menüs der SCC C6403P einschließlich einer ausführlichen Erklärung der verfügbaren Funktionen in jedem Untermenü Anhang A Technische Daten der Geschwindigk Dome Kamera SCC C6403P enthält Produktspezifikationen der SCC C6403P in tabellar...

Страница 33: ...KTIVIEREN 3 21 5 AUTO PROG 3 22 AUTO PAN 3 22 POSITIONS PROG 3 22 GESCHWINDIGK 3 23 SCHWELLZEIT 3 23 PATTERN 3 23 SCAN 3 24 AUTO MODUS 3 25 AUTO ZURÜCK 3 25 AUTO MODUS 3 25 FUNKTIONSNUMMER 3 25 6 ALARM PROG 3 26 ALARM PRIORITÄT PROG 3 26 ALARM ENT PROG 3 26 ALARM AUS PROG 3 26 AUTO PROG 3 27 AUX AUS KONTROLLE 3 27 7 WEITERE PROG 3 27 PROPORT P T 3 27 TURBO P T 3 28 AUTOKALIBRIER 3 28 AUTO FLIP 3 2...

Страница 34: ...schaltet bei niedriger Beleuchtungsstärke automatisch in den Schwarz Weiß Modus bzw bei ausreichender Beleuchtung wieder in den Farb Modus Weißabgleich Funktion die je nach Beleuchtung das Bild natürlich aussehen lässt Gegenlicht Korrektur Funktion die bei Spotlight oder sehr hellen Beleuchtung das Gegenlicht perfekt korrigiert und das Objekt dunkel aussehen lässt Auto Fokus Funktion Automatische ...

Страница 35: ...1 8 D 1 7 ADAPTERANSCHLUSS SCC C6403P Anschlussfeld AC 24V OUT POWER AC 24V OUT POWER Rückseite ...

Страница 36: ...703 eingestellt Z B KAMERA ADDR Wenn es Adresse 1 ist wird wie folgt eingestellt Einstellung des Kommunikationsprotokolls Benutzen Sie die Ziffern 1 bis 4 PINs von SW704 um das Kommunikationsprotokoll einzustellen Einstellung der Baudrate Verwenden Sie PIN 5 und 6 von SW704 SW701 SW702 SW703 1 2 3 4 5 6 7 8 EIN AUS BAUD RATE 4800 BPS 9600 BPS 19200 BPS 38400 BPS PIN 5 EIN AUS EIN AUS PIN 6 EIN EIN...

Страница 37: ...WER Kamerahalterung Abdeckungsteile Bedienerhan dbuch Schrauben Kapitel 2 Installation der SCC C6403P In diesem Kapitel wird zunächst der Lieferumfang der SCC C6403P überprüft und ein zur Stromversorgung geeigneter Netzadapter vorbereitet Leistungsaufnahme 18W Spannung 24V Wechselstrom 1 5 A Im Anschluss daran werden die Kabelanschlüsse und die Installation der SCC C6403P beschrieben ...

Страница 38: ... einen Schraubenzieher um ein Ende der beiden Leitungen des Netzteils mit dem Spannungseingang der Geschwindigk Dome Kamera SCC C6403P zu verbinden Controller ANSCHLUSSFELD Um die Geschwindigk Dome Kamera SCC C6403P zu installieren und in Betrieb zu nehmen werden folgende Kabel benötigt Netzanschlusskabel Das Kabel das an den Netzeingang der SCC C6403P angeschlossen wird hat eine Nennspannung von ...

Страница 39: ... 3 Benutzen Sie die mitgelieferten Schrauben zur Befestigung der Kamera an der Halterung 4 Im Installationsbereich dürfen sich keine Personen aufhalten da sie durch herabfallende Gegenstände gefährdet werden können Außerdem sollten Sie Gegenstände die nicht beschädigt werden dürfen vor der Installation an einen sicheren Ort bringen Separat erhältliches Zubehör für die Installation Die folgenden Pr...

Страница 40: ... in die Decke Das Loch sollte etwa einen Durchmesser von 185 mm haben 4 Bild 3 4 Verbinden Sie die verschiedenen Kabel mit dem Kameraadapter siehe Seite 2 4 Bild 4 Bild 3 Bild 1 Länge des Deckenlochs 5 DECKENHALTERUNG SADT 100CM Diese Halterung wird bei der Installation des SmartDome Kameragehäuses für innen oder außen an einer Betondecke verwendet 6 MASTHALTERUNG SADT 100PM Diese Halterung eignet...

Страница 41: ...rbindungsstück und drehen sie es um etwa 15Grad nach links Überprüfen Sie am Geräusch ob das Verbindungsteil eingerastet ist und der Hebelverschluss hält Verwenden Sie Schrauben BH M3XL8 um die Kamera und den Adapter zu befestigen Bild 7 8 Bild 8 Montieren Sie den Gehäusering auf den DOME Bild 8 5 Bild 5 Stecken Sie den Kameradapter in den Haltewinkel und schrauben Sie ihn mit 4 Befestigungsschrau...

Страница 42: ...UNDE 18STUNDE 24STUNDE AUTO FLIP EIN AUS KAM RESET SPRACHE ENGLISH FRANÇAIS DEUTSCH ESPAÑOL ITALIANO PASSWORT EIN AUS AUSGANG VERL SICHERN SYSTEM INFO KAMERA PROG KAMERA ID EIN AUS V SYNC INT LINIE FARBE S W FARBE S W AUTO AKTIVITAET EIN AUS ZOOM GESCH 1 2 3 4 DIGITAL ZOOM AUS X2 X10 DISPLAY ZOOM AUS EIN DISPLAY P T AUS EIN AUSGANG VERL SICHERN PRESET VIDEO PROG BLENDE ALC MANU SHUTTER AUS 1 100 1...

Страница 43: ...ü aufruft Enter drücken bedeutet es gibt Untermenüs KAMERA PROG KAMERA ID EIN V SYNC INT FARBE S W FARBE AKTIVITAET AUS ZOOM GESCH 3 DIGITAL ZOOM AUS DISPLAY ZOOM AUS DISPLAY P T AUS AUSGANG VERL KAMERA ID A B C D E F G H I J K L M N O PQ R S T U V W X Y Z 0 1 2 3 4 5 6 7 8 9 SP ï î SP POSITION RUE SCC C6403 V SYNC Im V SYNC Menü kann die vertikale Synchronisation eingestellt werden Von der Geschw...

Страница 44: ...ager signal is output together with black and white composite video signal FARBTRÄGER AUS The farbe farbtrager signal is not output PEGEL You can set the brightness pegel that changes from FARBE mode to S W mode in 3 steps LOW MEDIUM and HOCH ZEITRAUM Set the HOLDING time for switching between FARBE and S W mode depending the changes in the amount of light You can set the HOLDING time to 10sec S 3...

Страница 45: ... links rechts oben unten Taste einzustellen Wenn Sie erneut die EINGABE Taste betätigen wird das BEREICH Einstellungsmenü beendet Die Empfindlichkeit von AKTIVITAET Erkennung ist mit dem AKTIVITAET EMPF Menü einzustellen Je hoher es eingestellt wird desto empfindlicher funktioniert die AKTIVITAET Erkennung Nach beenden eines PAN TILT ZOOM FOCUS BLENDE Vorgangs wird die AKTIVITAET Motion Detection ...

Страница 46: ...nden Sie und im Pegel Menü um den Video Ausgang Pegel Helligkeit zu steuern ALC BLC BENUTZER PEGEL 0 I RUE GROESSE POSITION GROESSE POSITION GROESSE POSITION MANU Wenn Sie im Untermenü Blende auf MANU gehen und die Taste ENTER drücken wird ein zusätzlicher Bildschirm angezeigt über den Sie das Öffnen und Schließen der Blende manuell einstellen können VIDEO PROG BLENDE MANU SHUTTER AUS AGC AUS WEIS...

Страница 47: ...r Geschwindigkeiten von 2 Fach bis zum 128 Fach und diese Funktion stellt die Shutter Geschwindigkeit langsam um das Bild bei Aufnahmen mit schlechter Beleuchtung deutlicher und heller darzustellen Wählen Sie AUTONiedergeschwindigkeit Shutter aus wenn Sie bei schlechter Beleuchtung automatisch die Shutter Geschwindigkeit anpassenmöchten Im SHUTTER Menü betätigen Sie kontinuierlich die linke rechte...

Страница 48: ...nden Sie die links rechts Taste zur Auswahl 3200K 5600K oder AUS USER Modus im PRESET Menü 3200K Farbtemperatur auf 3200K 5600K Farbtemperatur auf 5600K BENUTZER Wählt den angemessenen Wert auf dem ROT und BLAU Graph aus und stellt die Farbe Temperatur ein DIS DIS Digitale Bildstabilisierung Funktion unterstützt die Verbesserung der Erschütterung vom Kamera Schirm Es wird empfohlen DIS Funktion un...

Страница 49: ...L Hier können Sie den Pegel für das Synchronisationssignal und für die Gesamthelligkeit des Videosignals einstellen C PEGEL Hier können Sie den Pegel für das Farbtrager Signal und für das gesamte Farbsignal des Videosignals einstellen DETAIL Kann die Senkrechte die Waagerechte die Schärfe einstellen VIDEO PROG BLENDE ALC SHUTTER AUS AGC WENIG WEISSABGL ATW1 DIS AUS FOKUS MODE EINAF SPEZIAL AUSGANG...

Страница 50: ...len PRESET TEMPO 1 PAN maximale Bewegungsgeschwindigkeit 240 sec PRESET TEMPO 8 PAN maximale Bewegungsgeschwindigkeit 400 sec SCHWELLZEIT Diese Funktion stellt die Verweildauer bei der PRESET Position während der SCAN Bewegung ein Die Verweildauer kann von 1 bis 60 sec eingestellt werden BILD HALTEN Diese Funktion ist das Bild bei der PRESET Bewegung zu stoppen Wenn das BILD HALTEN Menü auf EIN ei...

Страница 51: ... wieder mit PAN die ENDE ein und betätigen Sie die EINGABE Taste um die Einstellung von ZONE BEREICH zu beenden Enter drücken Nach der PAN Operation betätigen Sie die Eingabe Taste um es zu beenden PROG START ZONE GESETZT 0 POSITION ZONEN ID SETZEN ZONE AKTIVIEREN EIN AUSGANG VERL Wenn die EINGABE Taste nach der Operation von P T Z betätigt wird PROG ENDE ZONE AKTIVIEREN Es stellt ZONE BEREICH ID ...

Страница 52: ... N für Start und Ziel wird ein kontinuierlicher Schwenk in der angegebenen Geschwindigkeit gefahren AUTO PAN ist bis 4 einzustellen 5 AUTO PROG Das AUTO PROG Menü besteht aus AUTO PAN PATTERN SCAN Funktion und kann AUTO MODUS einstellen Enter drücken HAUPTMENÜ KAMERA PROG VIDEO PROG PRESET ZONE PROG AUTO PROG ALARM PROG WEITERE PROG SYSTEM INFO AUTO PROG AUTO PAN 1 PATTERN 1 SCAN 1 AUTO MODUS RUE ...

Страница 53: ...OG ALARM PROG WEITERE PROG SYSTEM INFO AUTO PROG AUTO PAN 1 PATTERN 1 SCAN 1 AUTO MODUS RUE Enter drücken AUTO PROG AUTO PAN 1 PATTERN 1 SCAN 1 AUTO MODUS RUE PATTERN PROG 1 START POSITION SETZEN UND BESTÄTIGEN PATTERN kann auf 1 bis 3 gesetzt werden Wählen Sie 1 2 oder 3 mit der rechten oder linken Taste im PATTERN PROG aus und drücken Sie ENTER um in das Einstellungsmenü zu gelangen Von dem Zeit...

Страница 54: ...er nur dann wenn der ALARM eingestellt ist Bei Einstellung von AUS wird die ALARM AUS Bewegung nur ausgeführt wenn gerade ein ALARM aktiv ist Active WENIG bei Einstellung von EIN wird sie immer ausgeführt unabhängig vom ALARM 6 ALARM PROG Zur Verfügung stehen 4 ALARM ENTs und 3 ALARM AUSs Das Gerät kann einen Alarminput von einem externen Sensor empfangen oder im Rahmen der PRESET oder PATTERN Fun...

Страница 55: ...cht AUTOKALIBRIER Die Auto Kalibrierung EIN AUS Funktion SCC C6403P hat eine Auto Kalibrierung Funktion um die Genauigkeitsgrad von OBJEKTIV und PAN TILT zu verbessern Wenn keine Benutzers Taste während der bestimmten Zeit die von Benutzer eingestellt worden ist eingegeben wird wird das Zeichen A C auf dem Schirm angezeigt und die Initialisierung des OBJEKTIVS und des PAN TILT wird automatisch dur...

Страница 56: ...r PRESET 1 3 9 Enter PRESET 1 4 0 Enter PRESET 1 4 1 Enter WEITERE PROG PROPORT P T EIN PROPORT P T AUS TURBO P T EIN TURBO P T AUS AUTO FLIP EIN AUTO FLIP AUS PRESET 1 4 2 Enter PRESET 1 4 3 Enter PRESET 1 4 4 Enter PRESET 1 4 5 Enter PRESET 1 4 6 Enter PRESET 1 4 7 Enter AUTO ZUROCK 1 PRESET 1 4 8 Enter AUTOKALIBRIER PRESET 1 4 9 Enter KAM RESET PRESET 1 5 0 Enter 9 Kurztasten SSC 1000 oder SSC ...

Страница 57: ...onisationsmodus Auflösung Signal Rauschabstand Min Lichtstarke des Ohjekts Farbtemperatur Ausgangssignal Objektiv PAN Funktion TILT Funktion REMOTE CONTROL ALARM Operation Temperature Operation Humidity GROESSE Weight Lebensdauer der Hauptteile Technische Daten SCC C6403P 4 5 Jahre Achtung Das Urheberrecht dieses Handbuchs gehört Samsung Electronics Co Ltd Ohne vorherige Genehmigung von Samsung El...

Страница 58: ...SmartDome Camera SCC C6403P Part AB68 00571A 00 F Manuel d instruction ...

Страница 59: ...SmartDome Camera SCC C6403P Part AB68 00571A 00 Es Manual del usuario ...

Страница 60: ... cables de las señales de alarma a los terminales para las alarmas el adaptador de CA al receptáculo de entrada de CA y el adaptador de CC a la entrada de CC asegurándose de tener en cuenta las polaridades Una conexión incorrecta de la fuente de alimentación puede ocasionar un incendio un choque eléctrico o un daño al producto 3 No conecte varias cámaras a un adaptador El exceder la capacidad pued...

Страница 61: ...tura del menú de ajustes y una detallada explicación de las funciones de cada submenú El apéndice de las Especificaciones del producto SCC C6403P contiene las especificaciones del producto SCC C6403P en categorías detalladas INDICE Antes de Instalar el equipo 1 1 Capítulo 1 Características del SCC C6403P 1 4 Introducción del SCC C6403P 1 5 Localización de controles 1 6 Conexiones del adaptador 1 8...

Страница 62: ...3 22 AUTO PAN 3 22 PROG POSICIÓN 3 22 VELOCIDAD 3 23 CICLO TIEMPO 3 23 RONDA 3 23 BARIDO 3 24 AUTO REPRODUC 3 25 AUTO VOLVER 3 25 AUTO REPRODUC 3 25 REP NÚMERO 3 25 6 ALARMA PROG 3 26 PROG PRIORIDAD ALARMA 3 26 PROG ENT ALARMA 3 26 PROG SAL ALARMA 3 26 PROG AUTO 3 27 CONTROL SALIDA AUX 3 27 7 ALTRA PROG 3 27 P T PROPORCIONAL 3 27 P T TURBO 3 28 AUTO CAL 3 28 REVOCACIÓN 3 28 CÁM RESET 3 28 IDIOMA 3...

Страница 63: ...N para mejorar la sensibilidad por la conversión automática en el modo negro y blanco en la noche o en el ambiente con la baja iluminación White Balance para controlar el brillo a la iluminación Backlight Compensation bajo proyector o iluminación brillante extrema Foco Auto para ajustar automáticamente el foco al movimiento sujeto PAN TILT para un funcionamiento sencillo El SCC C6403P dispone de f...

Страница 64: ...1 8 Es 1 7 Conexiones del adaptador PLACA de adaptador SCC C6403P AC 24V OUT POWER AC 24V OUT POWER Localización de controles Posterior ...

Страница 65: ...a dirección válida Ajuste del protocolo de comunicaciones Usar para ello los PIN 1 a 4 del selector SW704 Ajuste de la velocidad de transmisión Use PIN 5 y 6 del SW704 SW701 SW702 SW703 1 2 3 4 5 6 7 8 ACTIVAR APAGAR VELOCIDAD 4800 BPS 9600 BPS 19200 BPS 38400 BPS PIN 5 ACTIVAR APAGAR ACTIVAR APAGAR PIN 6 ACTIVAR ACTIVAR APAGAR APAGAR A SAMSUNG MEDIO B SAMSUNG LLENO PIN1 PIN2 PIN3 PIN4 A APAGAR AP...

Страница 66: ...conect or de cámara Cubierta Tornillos Capítulo 2 Instalación del SCC C6403P En este capítulo revisaremos el contenido del paquete antes de instalar la cámara SCC C6403P y prepararemos la conexión de un adaptador de corriente que corresponda a la fuente de alimentación del sistema Consumo 18 W Voltaje 24 VCA 1 5 A Luego instalaremos la cámara SCC C6403P y conectaremos los cables Instrucciones embe...

Страница 67: ...iente Utilice un destornillador para atornillar la parte que tiene las dos líneas del adaptador de corriente en el terminal de entrada de corriente de la cámara SCC C6403P Controlador Placa del adaptador Para instalar el SCC C6403P debe tener preparados los siguientes cables Cable de alimentación El cable que se enchufa dentro del receptáculo de entrada de alimentación de la cámara SCC C6403P tien...

Страница 68: ...ornillos suministrados para fijar la cámara al ensamblaje del soporte 4 Mantenga a las personas fuera del área de instalación ya que existe el riesgo de que caigan objetos Así mismo mueva los objetos de valor a un sitio seguro antes de comenzar la instalación Productos para la instalación que se venden por separado Dependiendo del sitio de la instalación podría ser conveniente utilizar uno de los ...

Страница 69: ...nte de 180 mm de diámetro 4 Figura 3 y 4 Conecte todos los cables indicados en la página 14 Ver página 2 4 Figura 4 Figura 3 Instalación de la cámara Figura 1 5 ADAPTADOR DE MONTAJE EN TECHO SADT 100CM Este adaptador sirve para instalar en una techo de concreto la cubierta para interiores o la cubierta para exteriores de la Cámara SmartDome 6 ADAPTADOR DE MONTAJE EN POSTE SADT 100PM Este adaptador...

Страница 70: ... y girelo unos 15 Chequee el sonido que se produce al encajar una pieza con la otra y que está en posición correcta Use los tornillos BH M3XL8 para fijar el cuerpo del domo al adaptador de la cámara de forma la unidad ensamblada no se mueva Figure 7 8 Figura 8 Monte el CUERPO DE LA CUBIERTA en el DOMO Figure 8 5 Figura 5 Ensamble el Adaptador de la cámara al anclaje en U usando 4 tornillos PH M4X8...

Страница 71: ...REVOCACIÓN ACTIVAR APAGAR CÁM RESET IDIOMA ENGLISH FRANÇAIS DEUTSCH ESPAÑOL ITALIANO CONTRASEÑA ACTIVAR APAGAR SALIDA SALIR ACTIVAR INFOR SISTEMA PROG CÁMARA CÁMARA ID ACTIVAR APAGAR V SINC INT LNEA COLOR BW COLOR BW AUTO DET MOVI ACTIVAR APAGAR VEL ZOOM 1 2 3 4 ZOOM DIGITAL APAGAR X2 X10 DISPLAY ZOOM APAGAR ACTIVAR DISPLAY P T APAGAR ACTIVAR SALIDA SALIR ACTIVAR PRESET PROG VIDEO DIAFRAGMA ALC MA...

Страница 72: ... usando el submenú POSICIÓN Preslone Entrar Significa que hay submenús PROG CÁMARA CÁMARA ID ACTIVAR V SINC INT COLOR BW COLOR DET MOVI APAGAR VEL ZOOM 3 ZOOM DIGITAL APAGAR DISPLAY ZOOM APAGAR DISPLAY P T APAGAR SALIDA SALIR CÁMARA ID A B C D E F G H I J K L M N O PQ R S T U V W X Y Z 0 1 2 3 4 5 6 7 8 9 SP ï î SP POSICIÓN VUE SCC C6403 SINC LINEA FASE 262 I VUE MENÚ PROG CÁMERA PROG VIDEO PRESET...

Страница 73: ...ro SATURACION APAGAR La señal de color no se transmite NIVEL Se puede ajustar el nivel de brillo para que cambie del modo de COLOR al modo de BW en 3 pasos BAJO MEDIO y ALTO DURACION Ajusta el tiempo para cambiar entre el modo del COLOR y de BW dependiendo de los cambios en la cantidad de la luz Se puede fijar el CICLO TIEMPO a 10 seg S 30 seg 60 seg o 300 seg L Preslone Entrar PROG CÁMARA CÁMARA ...

Страница 74: ... en el menú de ZOOM DIGITAL Utilice las teclas Izquierda Derecha Arriba Abajo Seleccione ON SÍ y pulse Intro para ver una ventana de men ú adicional de MOVI DET Puede seleccionar uno entre los subelementos de TOP ABAJO BOTTOM ARRIBA LEFT IZQUIERDA RIGHT DERECHA CENTER CENTRO o USER UTIL co mo AREA donde se aplica la funci ó n MOVI Motion Detection Selec cione una entre TOP ABAJO BOTTOM ARRIBA LEFT...

Страница 75: ...sando la tecla Entrar en el estado ARRIBA ALC CLUZ ARRIBA NIVEL 0 I VUE Utilice y en el menú de NIVEL para controlar el nivel de la salida de video brillo ALC CLUZ UTIL NIVEL 0 I VUE DIMENSION POSICIÓN DIMENSION POSICIÓN DIMENSION POSICIÓN MANU Cuando pulse la tecla ENTER tras seleccionar MANU en la opción DIAFRAGMA aparece una pantalla adicional en la que puede ajustar manualmente la abertura o e...

Страница 76: ...tiene 7 velocidades del obturador de 1 100 1 120 a 1 10K segundo para ser utilizado p or una imagen brillante y rápida de video El obturador electrónico lento AUTO tiene 12 velocidades del obturador de x2 a x128 y fija la velocidad del obturador para hacer la imagen lenta sea en la pantalla más clara y más brillante cuando usted fotografía bajo una iluminación oscura Si usted desea ajustar el bril...

Страница 77: ...stá fuera de esta gama en el modo BA1 el balance de blanco apropiado no se puede obtener En ese caso seleccone el modo BA2 2 En el modo BA2 si un color se domina en el área disparada el color se puede mostrar diferentemente Por lo tanto seleccione el modo que es apropiado para el ambiente BM Control de Seguimiento de Balance de Blanco Automático En este modo el balance de blanco exacto es obtenido...

Страница 78: ... APAGAR CAG ACTIVAR BAL BLANCO BA1 DIS ACTIVAR MODO FOCO UNOAF ESPECIAL SALIDA SALIR ESPECIAL SEÑAL Y 0 I C NIVEL 0 I DETALLE 0 I VUE SALIDA Es igual que la función SALIDA del menú de la CÁMARA SET UNOAF s ó lo se puede seleccionar si SHUTTER OBTURADOR se define en APAGAR NO 1 100 1 120 1 10K o AUTOX2 En otros modos AUTOX4 AUTOX128 el modo FOCUS ENFOQUE mostrar á MF la unidad cambia autom á ticame...

Страница 79: ... TILT en 8 pasos de 1 DULC a 8 RÁPIDO VELOCIDAD DE PRESET 1 Velocidad máxima móvil de PAN de 240 seg VELOCIDAD DE PRESET 8 Velocidad máxima móvil de PAN de 400 seg CICLO TIEMPO Esta es la función que fija el tiempo de permanencia del preset dentro de la secuencia de presets Se puede fijar Tiempo de 1 60 Sec MANTÉN IMAGEN Se detiene la imagen cuando el PRESET está en el movimiento si usted fija el ...

Страница 80: ...SICIÓN FIJAR ID ZONA ACTIVAR ZONA ACTIVAR SALIDA SALIR Después de control de P R Z Presione ENTER TERMINAR ACTIVAR ZONA Esta función se enciende o apaga la indicación de ZONA AREA ID FIJAR AREA ZONA Presione ENTER para entrar en la pantalla de MAPA AREA DE ZONA de FIJAR AREA ZONA ACTIVAR Seleccione un número del ZONA AREA de la pantalla de MAPA AREA DE ZONA y presione ENTER para entrar en la panta...

Страница 81: ...figuración AUTO PAN Después de programar el comienzo y fin de los dos parámetros PAN TILT rota continuamente entre estas dos posiciones a la VELOCIDAD configurada El número de AUTO PAN es de hasta 4 5 PROG AUTO El menú PROG AUTO incluye AUTO PAN RONIDA y BAR R y es capaz de instalar el movimiento de AUTO REPRODUC Preslone Entrar MENÚ PROG CÁMARA PROG VIDEO PRESET PROG ZONA PROG AUTO ALARMA PROG AL...

Страница 82: ...SET PROG ZONA PROG AUTO ALARMA PROG ALTRA PROG INFOR SISTEMA PROG AUTO AUTO PAN 1 RONDA 1 BARIDO 1 AUTO REPRODUC VUE Preslone Entrar PROG AUTO AUTO PAN 1 RONDA 1 BARIDO 1 AUTO REPRODUC VUE PROG RONDA 1 FIJAR POSICION INICIO E INTRODUCIR Se pueden fijar 3 RONDA o recorridos Elegir 1 2 o 3 con las flechas izquierda derecha y presiona ENTRAR para entrar en el menú de configuración del recorrido Desde...

Страница 83: ...e como APAGAR el movimiento de salida de alarma SAL ALARMA funcionará sólo cuando la alarma esté funcionando Activa BAJO pero si se establece como ACTIVAR la salida de alarma SAL ALARMA siempre funcionará independientemente de la alarma 6 ALARMA PROG Consiste en 4 entradas de ALARMAS y 3 salidas de ALARMAS Puede detectar una entrada de información de ALARMA desde un detector exterior y puede activ...

Страница 84: ...O CAL Esta función se enciende o apaga Auto Calibración SCC C6403P tiene la función de Auto Calibración para mejorar la precisión del motor de LENTE y de PAN TILT Usted puede fijar a APAGAR 6H 12H 18H 24H Sin la entrada de tecla del usuario por el tiempo señalado por el usuario A C aparecerá en la pantalla mientras que inicializa LENTE y PAN TILT REVOCACIÓN Cuando TILT INCLINACIÓN se ajuste en un ...

Страница 85: ...IDA3 APAGAR PRESET 1 3 6 Enter PRESET 1 3 7 Enter PRESET 1 3 8 Enter PRESET 1 3 9 Enter PRESET 1 4 0 Enter PRESET 1 4 1 Enter ALTRA PROG P T PROPORCIONAL ACTIVAR P T PROPORCIONAL APAGAR P T TURBO ACTIVAR P T TURBO APAGAR UNOAF ACTIVAR UNOAF APAGAR PRESET 1 4 2 Enter PRESET 1 4 3 Enter PRESET 1 4 4 Enter PRESET 1 4 5 Enter PRESET 1 4 6 Enter PRESET 1 4 7 Enter AUTO REPRODUC 1 PRESET 1 4 8 Enter AUT...

Страница 86: ...ation Color Temperature Signal Output Lente PAN Function TILT Function REMOTE CONTROL ALARMA Operation Temperature Operation Humidity DIMENSION Weight Lives of Main Parts Especificaciones de producto SCC C6403P 4 5 años Atención El copyright del manual es propiedad de Samsung Electronics Co Ltd El manual no se podrá reproducir de forma electrónica mecánica por audio o por cualquier otro método sin...

Страница 87: ...SmartDome Camera SCC C6403P Part AB68 00571A 00 I Istruzioni per l uso ...

Страница 88: ...lla superficie o causare danni alle finiture Attenzione 1 Non far cadere oggetti sul prodotto e non sottoporlo a forti colpi Conservare l apparecchio in un luogo non soggetto a vibrazioni eccessive o a interferenze magnetiche 2 Non installare la videocamera in ambienti soggetti a temperature troppo elevate superiori ai 50 gradi centigradi o troppo basse inferiori a 10 gradi centigradi oppure parti...

Страница 89: ...edure di installazione del modello SCC C6403P e descrive i requisiti ambientali di preparazione ed installazione Il Capitolo 3 Descrizione del menù di Set up presenta la struttura del menù di Set up di SCC C6403P con spiegazioni dettagliate delle funzioni relative a ciascun sotto menù L Appendice A Specifiche di prodotto SCC C6403P illustra le caratteristiche specifiche del prodotto SCC C6403P in ...

Страница 90: ...A 3 21 5 PROG AUTO 3 22 AUTO PAN 3 22 PROG POSIZIONE 3 22 VELOCITÀ 3 23 TEMPO DI SCAN 3 23 PERCORSO 3 23 SCANSIONE 3 24 SCANSIONE AUT 3 25 RIT POS AUTO 3 25 SCANSIONE AUT 3 25 NUM FUNZIONE 3 25 6 PROG ALLARMI 3 26 PROG ALLARMI PRIORITA 3 26 PROG ALLARMI IN 3 26 PROG ALLARMI OUT 3 26 PROG AUTO 3 27 CON USCITA AUX 3 27 7 ALTRA PROG 3 27 P T PROPORZ 3 27 TURBO P T 3 28 AUTO CALIBRAZ 3 28 AUTO 180 3 2...

Страница 91: ... functions such as Funzione COLOR B N alterna automaticamente le due modalità per aumentare la sensibilità in ambienti notturni o con una scarsa illuminazione Funzione Bilanciamento del Bianco corregge l immagine naturale a seconda della luce di sottofondo Funzione Compensazione Controluce consente una nitida visione degli oggetti anche in condizione di controluce Funzione Auto Focus fissa e mette...

Страница 92: ...1 8 I 1 7 relay esterno Schema Connessioni di SCC C6403P AC 24V OUT POWER AC 24V OUT POWER RETRO ...

Страница 93: ...SW702 la cifra del posto 1 al SW703 ES INDIRIZZO CAMERA se è su 1 regolare le impostazioni come segue Impostazioni del Protocollo di comunicazione Utilizzare i selettori PIN 1 4 del modulo SW 704 per impostare il Protocollo di comunicazione Impostazione della velocità di trasmissione Utilizzare i PIN 5 e 6 di SW704 SW701 SW702 SW703 1 2 3 4 5 6 7 8 ON OFF VELOCITÀ 4800 BPS 9600 BPS 19200 BPS 38400...

Страница 94: ... telecamera Coperchio di rivestimento Manuale dell utente Viti Capitolo 2 Installazione di SCC C6403P In questo capitolo controlleremo il contenuto della confezione prima d installare la telecamera SCC C6403P e prepareremo un adattatore idoneo al tipo di sistema di alimentazione Consumo energetico 18 W Tensione 24 VAC 1 5 A Procederemo quindi all installazione della SCC C6403P e al collegamento de...

Страница 95: ... con il Controller esterno 3 Connettere ora il cavo adattatore Utilizzare un cacciavite per avvitare una parte delle due linee dell adattatore al terminale di alimentazione di SCC C6403P Dispositivo di controllo SCHEDA adattatore Per installare SCC C6403P occorre predisporre i seguenti cavi Cavo dell adattatore Il cavo da inserire nella presa d ingresso della SCC C6403P ha una tensione nominale pa...

Страница 96: ...staffa utilizzare le viti in dotazione 4 A causa del rischio della caduta di oggetti non permettere l accesso all area di installazione Prima dell installazione trasportare in un luogo sicuro gli oggetti di valore Accessori per l installazione venduti separatamente A seconda del tipo di sito d installazione potrebbe risultare utile usare uno dei prodotti descritti di seguito 1 STAFFA PER IL MONTAG...

Страница 97: ...tura deve misurare circaØ180 4 Figura 3 4 Connettere i vari cavi all ADATTATORE DELLA TELECAMERA vedi pagg 2 4 Figure 4 Figure 3 Installazione della telecamera Figure 1 5 ADATTATORE PER IL MONTAGGIO A SOFFITTO SADT 100WM Questo adattatore viene utilizzato per installare in un soffitto di cemento l alloggiamento interno o esterno destinato alla telecamera a cupola Smart 6 ADATTATORE PER IL MONTAGGI...

Страница 98: ...ttendere di sentire lo scatto che segnala l avvenuto incastro e controllare che la leva di incastro lever locking sia nella posizione di incastro Utilizzare le viti BH M3XL8 per connettere la TELECAMERA con l ADATTATORE affinché non si muovano Figure 7 8 Figura 8 Assemblare il COPERCHIO CORPO alla CUPOLA Figure 8 5 Figura 5 Incastrare la MENSOLA DI SUPPORTO e l ADATTATORE DELLA TELECAMERA ed utili...

Страница 99: ...A 12ORA 18ORA 2ORA AUTO 180 ON OFF CAM RESET LINGUA ENGLISH FRANÇAIS DEUTSCH ESPAÑOL ITALIANO PASSWORD ON OFF USCITA ESCI SALVA INFO SYSTEM PROG CAMERA ID CAMERA ON OFF V SYNC INT LINE COLORE B N COLORE B N AUTO ACTIVITY DET ON OFF VEL ZOOM 1 2 3 4 ZOOM DIGITALE OFF X2 X10 DISPLAY ZOOM OFF ON DISPLAY P T OFF ON USCITA ESCI SALVA PRESET PROG VIDEO IRIS ALC MANU SHUTTER OFF 1 100 1 120 1 10K AUTOX2 ...

Страница 100: ...zione desiderata utilizzando il sottomenù POSIZIONE premere Enter indica la presenza di sottomenù PROG CAMERA ID CAMERA ON V SYNC INT COLORE B N COLORE ACTIVITY DET OFF VEL ZOOM 3 ZOOM DIGITALE OFF DISPLAY ZOOM OFF DISPLAY P T OFF USCITA ESCI ID CAMERA A B C D E F G H I J K L M N O PQ R S T U V W X Y Z 0 1 2 3 4 5 6 7 8 9 SP ï î SP POSIZION RET SCC C6403 V SYNC Dal menù V SYNC è possibilie selezio...

Страница 101: ...me al segnale video composi to bianco e nero BRUST OFF il segnale colore BURST non viene emesso LIVELLO si può impostare il livello di luminosità che cambia dalla modalità COLORE alla modalità B N in 3 fasi BASSA MEDIA e ALTA DURATA impostare il tempo HOLDING da attivare tra modalità COLORE e B N a seconda del cambiamento della quantità di luce Si può impostare a 10 sec S 30 sec 60 sec o 300 sec L...

Страница 102: ...impostazione ZONA Usare il menu SENSIBILITA per impostare il grado di sensibilità del ACTIVITY detection Più si aumenta l altezza maggiore sarà la sensibilità della funzione di rilevazione del activity Alla fine dell utilizzo del PAN TILT ZOOM FOCUS IRIS la funzione ACTIVITY DET non lavora per 5 Secondi a causa della stabilizzazione del cambio di immagine La funzione MOTION detection Rilevamento a...

Страница 103: ...o ALTO ALC BLC ALTO LIVELLO 0 I RET Utilizzare SINISTRA e DESTRA nel menu LIVELLO per controllare il livello di uscita video ALC BLC UTIL LIVELLO 0 I RET DIMENSIONE POSIZIONE DIMENSIONE POSIZIONE DIMENSIONE POSIZIONE MANU Quando si preme il tasto ENTER dopo aver selezionato MANU nell opzione IRIS viene visualizzata una nuova schermata in cui è possibile impostare manualmente l apertura e la chiusu...

Страница 104: ...ad alta velocità supporta 7 velocità diverse da 1 100 1 120 a 1 10 al secondo e può essere usato per immagini video veloci e luminose Lo shutter elettronico AUTO a bassa velocità supporta 12 velocità diverse da x2 a x128 e diminuisce la velocità dello shutter in modo da vedere chiaramente l oggetto filmato anche in carenza di luce Se si vuole rallentare automaticamente la velocità dello shutter me...

Страница 105: ...e il menù di bilanciamento del bianco è impostato sulla modalità MANU l utente potrà impostare il bilanciamento del bianco considerando l illuminazione presente in quell istante Selezionare la voce MANU e premere ENTER apparirà un sotto menù per il bilanciamento del bianco Utilizza il tasto destra sinistra per selezionare la modalità 3200K 5600K o OFF UTIL nel menù di preset 3200K impostare la tem...

Страница 106: ...F SPECIALE USCITA ESCI SPECIALE Dal menu SPECIALE si p ossono controllare direttamente l e funzion i Y LIVELLO C LIVELLO DETTAGLIO Y LIVELLO E utilizzato per impostare i livelli del segnale Sync e la luminosità complessiva del segnale video C LIVELLO E utilizzato per impostare i livelli del segnale Burst e il colore complessivo del segnale video DETTAGLIO Controlla il grado chiarezza orizzontale e...

Страница 107: ... 1 LENTO a 8 VELOCE PRESET VELOCITÀ 1 Velocità massima di spostamento PAN 240 sec PRESET VELOCITÀ 8 Velocità massima di spostamento PAN 400 sec TEMPO DI SCAN Questa funzione imposta il TEMPO DI SCAN rispetto alla collocazione predefinita dalla funzione SCANSIONE in activity Il TEMPO DI SCAN può essere compreso tra 1 60 secondi IMG HOLD Arresta l immagine quando il PRESET è in activity se si impost...

Страница 108: ...re nuovamente PAN per selezionare una posizione limite destra e premere ENTER Adesso la configurazione zona è completata premere Enter Dopo operazione PAN finisce con premedno la chiave Enter PROG INIZIO IMPOSTA ZONA 0 POSIZIONE ID ZONA ATTIVO ZONA ABILITATA ON USCITA ESCI Ë Dopo operazione P R Z preme la chiave Enter PROG FINE ZONA ABILITATA Questa funzione attiva o disattiva l indicazione ID ZON...

Страница 109: ...collocazioni dei due punti PAN TILT di INIZIO e FINE si continua fino ad impostare la velocità SPEED Il numero di AUTO PAN può valere fino a 4 5 PROG AUTO Il menu PROG AUTO comprende la funzioni AUTO PAN PERCORSO e SCANSIONE può impostare il activity Scansione aut premere Enter MAIN MENU PROG CAMERA PROG VIDEO PRESET ZONA PROG PROG AUTO PROG ALLARIMI ALTRA PROG INFO SISTEMA PROG AUTO AUTO PAN 1 PE...

Страница 110: ...RESET ZONA PROG PROG AUTO PROG ALLARIMI ALTRA PROG INFO SISTEMA PROG AUTO AUTO PAN 1 PERCORSO 1 SCANSIONE 1 SCANSIONE AUT RET premere Enter PROG AUTO AUTO PAN 1 PERCORSO 1 SCANSIONE 1 SCANSIONE AUT RET PERCORSO SET 1 CONFIG POS AVVIO PREMI ENTER Possono esserci 3 percorso Scegliere 1 2 o 3 con il pulsante Sinistra o Destra del PROG PERCORSO quindi premere ENTER per accedere alla finestra per l imp...

Страница 111: ...e è impostato su OFF il activity ALLARMI OUT sarà operativo solo quando l ALLARMI è in funzione BASSO attivo Se è impostato su ON ALLARMI OUT funzionerà sempre indipendentemente dallo stato dell ALLARMI 6 PROG ALLARMI Questa funzione comprende 4 INPUT DI ALLARME e 3 OUTPUT DI ALLARME Il sistema può riconoscere un input di ALLARME attraverso i SENSORI esterni funziona attraverso la funzione PRESET ...

Страница 112: ...va o disattiva la funzione di AUTO CALIBRAZIONE SCC C6403P supporta la funzione CALIBRAZIONE automatica per aumentaer la precisione dell obiettivo e del PAN TILT Può mettere OFF 6Ora 12Ora 18Ora 24Ora Senza l input della chiave del utente per il tempo desiderato dal utente A C sarà apparire sullo schermo mentre inizialando OBIETTIVO e PAN TILT AUTO 180 Se si imposta TILT su un limite di 90 utilizz...

Страница 113: ... PRESET 1 3 7 Enter PRESET 1 3 8 Enter PRESET 1 3 9 Enter PRESET 1 4 0 Enter PRESET 1 4 1 Enter ALTRA PROG P T PROPORZ ON P T PROPORZ OFF TURBO P T ON TURBO P T OFF AUTO 180 ON AUTO 180 OFF PRESET 1 4 2 Enter PRESET 1 4 3 Enter PRESET 1 4 4 Enter PRESET 1 4 5 Enter PRESET 1 4 6 Enter PRESET 1 4 7 Enter SCANSIONE AUT 1 PRESET 1 4 8 Enter AUTO CALIBRAZ PRESET 1 4 9 Enter CAM RESET PRESET 1 5 0 Enter...

Страница 114: ...luzione Rapporto segnale rumore S N Minima illuminazione Temperatura di colore Uscita video Obiettivo PAN Function TILT Function CONTROLLO A DISTANZA ALLARMI Temperatura di funzionamento Umidità di funzionamento DIMENSIONE Peso Vive di Parti Principale Specifiche di prodotto SCC C6403P 4 5 Anni Avvertenze Il copyright del manuale è di proprietà di Samsung Electronics Co Ltd Il manuale non può esse...

Отзывы: