background image

Applications

51

S Planner

Introduction

Manage your schedule by entering upcoming events in your planner.

Creating events

Tap 

S Planner

 on the Apps screen.

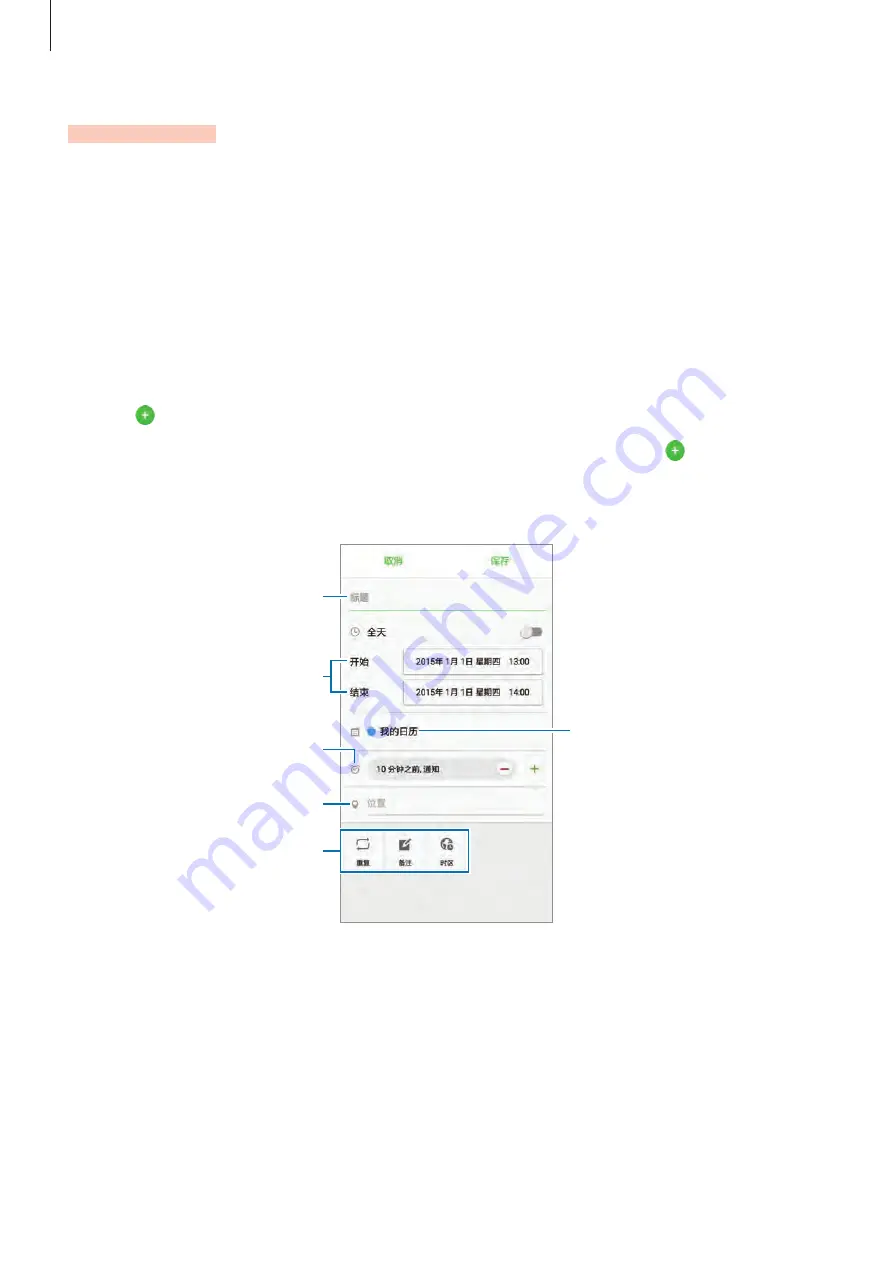
Tap   or double-tap a date.
If the date already has saved events or tasks in it, tap the date and tap  .

Enter event details.

Select a calendar to use or sync 

with.

Enter the location of the event.

Enter a title.

Set a start and end date for the 

event.

Add more details.

Set an alarm.

Tap 

SAVE

 to save the event.

Syncing events with your accounts

On the Apps screen, tap 

Settings


Accounts

, select an account service, and then tap the 

Sync Calendar

 switch to sync events with the account.

To add accounts to sync with, open the Apps screen and tap 

S Planner


MORE


Manage 

calendars


Add account

. Then, select an account to sync with and sign in.

Содержание SM-J320VPP

Страница 1: ...www samsung com cn User Manual English 01 2016 Rev 1 0 SM J320VPP ...

Страница 2: ...ce and data management Applications 33 Installing or uninstalling apps 34 Phone 37 Contacts 38 Messages 40 Internet 41 Email 42 Camera 48 Gallery 49 Smart Manager 51 S Planner 52 Music 53 Video 54 Voice Recorder 55 My Files 55 Memo 56 Clock 57 Calculator 58 Theme Store Settings 59 Introduction 59 WLAN 61 Bluetooth 62 Airplane mode 63 WLAN hotspot and tethering 64 Data usage 64 SIM card manager 65 ...

Страница 3: ...ications 67 Wallpaper 67 Lock screen and security 68 Privacy 68 Accessibility 69 Accounts 70 Reset 70 Language and input 70 Battery 71 Storage 71 Date and time 72 User manual 72 About device Appendix 73 Troubleshooting 78 Notices ...

Страница 4: ...ce or apps to work improperly Software sound sources wallpapers images and other media provided with this device are licensed for limited use Extracting and using these materials for commercial or other purposes is an infringement of copyright laws Users are entirely responsible for illegal use of media You may incur additional charges for data services such as messaging uploading and downloading ...

Страница 5: ...g on the region or service provider The supplied items are designed only for this device and may not be compatible with other devices You can purchase additional accessories from your local Samsung retailer Make sure they are compatible with the device before purchase Use only Samsung approved accessories Using unapproved accessories may cause the performance problems and malfunctions that are not...

Страница 6: ...ics 6 Device layout Headset jack Microphone Back key Front camera Proximity sensor Speaker Power key Multipurpose jack Touchscreen Recents key Home key Loud speaker Volume key Rear camera Back cover Flash ...

Страница 7: ...on Do not allow water to contact the touchscreen The touchscreen may malfunction in humid conditions or when exposed to water Keys Key Function Power Press and hold to turn the device on or off Press to turn on or lock the screen Recents Tap to open the list of recent apps Home Press to turn on the screen while the screen is locked Press to return to the Home screen Back Tap to return to the previ...

Страница 8: ...r Be careful not to damage your fingernails when you remove the back cover Do not bend or twist the back cover excessively Doing so may damage the cover 2 Insert the battery with the battery s gold coloured contacts properly aligned with the device s contacts 1 2 ...

Страница 9: ...Basics 9 3 Replace the back cover Removing the battery 1 Remove the back cover 2 Pull out the battery ...

Страница 10: ...chargers batteries and cables Unapproved chargers or cables can cause the battery to explode or damage the device 1 Connect the USB cable to the USB power adaptor and then plug the end of the USB cable into the multipurpose jack Connecting the charger improperly may cause serious damage to the device Any damage caused by misuse is not covered by the warranty ...

Страница 11: ...ng the remaining charging time While charging open the Home screen and tap Apps Settings Battery The actual charging time may vary depending on the status of your device and the charging conditions The remaining charging time may not be displayed when you charge the device in very cold or very hot conditions Reducing the battery consumption Your device provides various options that help you conser...

Страница 12: ...r electric current The device can be used while it is charging but it may take longer to fully charge the battery If the device receives an unstable power supply while charging the touchscreen may not function If this happens unplug the charger from the device While charging the device and the charger may heat up This is normal and should not affect the device s lifespan or performance If the batt...

Страница 13: ...urn off Ultra power saving mode The usage time left shows the time remaining before the battery power runs out Usage time left may vary depending on your device settings and operating conditions SIM or USIM card Installing the SIM or USIM card Insert the SIM or USIM card provided by the mobile telephone service provider Only microSIM cards work with the device In some areas data transfer speeds ma...

Страница 14: ...SIM card slot If a memory card happens to be lodged in the SIM card slot take the device to a Samsung Service Centre to remove the memory card Use caution not to lose or let others use the SIM or USIM card Samsung is not responsible for any damages or inconveniences caused by lost or stolen cards 3 Replace the battery and back cover Removing the SIM or USIM card 1 Remove the back cover and battery...

Страница 15: ...ever if you are on a call using one card the other card cannot be used to receive new calls These situations apply to voice calls only Data calls or video calls may perform differently Changing the display name and icon of SIM or USIM cards On the Home screen tap Apps Settings SIM card manager Select a SIM or USIM card and tap Name or Icon Set a display name and icon for each card Switching betwee...

Страница 16: ...t the data stored in it Use caution to insert the memory card right side up The device supports the FAT and the exFAT file systems for memory cards When inserting a card formatted in a different file system the device asks to reformat the memory card Frequent writing and erasing of data shortens the lifespan of memory cards When inserting a memory card into the device the memory card s file direct...

Страница 17: ...reen tap Apps Settings Storage Format SD card FORMAT SD CARD DELETE ALL Before formatting the memory card remember to make backup copies of all important data stored in the memory card The manufacturer s warranty does not cover loss of data resulting from user actions Turning the device on and off Press and hold the Power key for a few seconds to turn on the device When you turn on your device for...

Страница 18: ...o it with your fingertips The device may not recognise touch inputs close to the edges of the screen which are outside of the touch input area It is recommended to use fingers when you use the touchscreen Tapping To open an app to select a menu item to press an on screen button or to enter a character using the keyboard on the screen tap it with your finger Tapping and holding Tap and hold an item...

Страница 19: ...Basics 19 Dragging To move an item tap and hold it and drag it to the target position Double tapping Double tap on a webpage or image to zoom in Double tap again to return ...

Страница 20: ...he Home screen or the Apps screen to view other panels Swipe upwards or downwards to scroll through a webpage or a list of items such as contacts Spreading and pinching Spread two fingers apart on a webpage or image to zoom in a part Pinch to zoom out ...

Страница 21: ...creen tap and hold an empty area or pinch your fingers together to access the available options Customise the Home screen by adding deleting or rearranging Home screen panels You can also set the Home screen wallpaper add widgets to the Home screen and more Wallpapers Change the wallpaper settings for the Home screen and the locked screen Widgets Add widgets to the Home screen Widgets are small ap...

Страница 22: ...s tap and hold an empty area on the Home screen tap Widgets tap and hold a widget and then drag it to the Home screen Moving and removing an item Tap and hold an item on the Home screen and then drag it to a new location To move the item to another panel drag it to the side of the screen You can also move frequently used apps to the shortcuts area at the bottom of the Home screen To remove an item...

Страница 23: ...older name To add more apps to the folder tap and hold another app and then drag it to the folder Managing panels On the Home screen tap and hold an empty area to add move or remove a panel To add a panel swipe to the left and then tap To move a panel tap and hold a panel preview and then drag it to a new location To remove a panel tap and hold a panel preview and then drag it to Remove at the top...

Страница 24: ...tem and drag it to a new location To move the item to another panel drag it to the side of the screen Creating folders 1 On the Apps screen tap EDIT 2 Tap and hold an app and then drag it over another app 3 Drop the app when a folder frame appears around the apps A new folder containing the selected apps will be created 4 Tap Enter folder name and enter a folder name To add more apps to the folder...

Страница 25: ...gnal strength Currently accessing SIM or USIM card Roaming outside of normal service area GPRS network connected EDGE network connected UMTS network connected HSDPA network connected HSPA network connected LTE network connected LTE enabled models Wi Fi connected Bluetooth feature activated GPS activated Call in progress Missed call New text or multimedia message Alarm activated Mute mode activated...

Страница 26: ...n lock type and then select a screen lock method The device requires an unlock code whenever unlocking it If the unlock code is forgotten take the device to a Samsung Service Centre to reset it Pattern Draw a pattern by connecting four dots or more and then draw the pattern again to verify it Set a backup PIN to unlock the screen when you forget the pattern PIN A PIN consists of numbers only Enter...

Страница 27: ...the following functions on the notification panel Launch Settings Tap a notification and perform various actions Clear all notifications Maximise brightness for better visibility in bright conditions Rearrange quick setting buttons Quick setting buttons Adjust the brightness Select a SIM or USIM card Using quick setting buttons Tap quick setting buttons to activate some features Swipe to the left ...

Страница 28: ...e languages to use Tap the input language key to switch between the input languages Changing the keyboard layout Tap select a language under Input languages and then select a keyboard layout to use On Pinyin 3 x 4 keyboard a key has three or four characters To enter a character tap the corresponding key repeatedly until the desired character appears Additional keyboard functions PY QWERTY Switch t...

Страница 29: ...o the clipboard 4 Tap and hold where the text is to be inserted and tap Paste Screen capture Capture a screenshot while using the device Press and hold the Home key and the Power key simultaneously You can view captured images in Gallery It is not possible to capture a screenshot while using some apps and features Opening apps On the Home screen or the Apps screen select an app icon to open it To ...

Страница 30: ...switch for details Samsung takes copyright seriously Only transfer content that you own or have the right to transfer Transferring data from a mobile device Transfer data from your previous device to your new device Download and install Smart Switch from Galaxy Apps Launch Smart Switch and follow the on screen instructions to transfer data from your previous device Transferring data from a compute...

Страница 31: ... you are transferring files Doing so may cause data loss or device damage The devices may not connect properly if they are connected via a USB hub Directly connect the device to the computer s USB port 1 Connect the device to the computer using the USB cable 2 Open the notification panel and then tap Connected for charging Media device MTP Tap Camera PTP if your computer does not support MediaTran...

Страница 32: ...nd install Smart Switch 2 On the computer launch Smart Switch 3 Connect the device to the computer using a USB cable 4 If a software update is available follow the on screen instructions to update the device Do not turn off the computer or disconnect the USB cable while the device is updating While updating the device do not connect other media devices to the computer Doing so may interfere with t...

Страница 33: ...e and follow the on screen instructions To change the auto update settings tap Settings Auto update apps and then select an option Managing apps Uninstalling or disabling apps On the Apps screen tap EDIT The icon appears on the apps that you can disable or uninstall Select an app and tap DISABLE or UNINSTALL Alternatively on the Apps screen tap Settings Applications Application manager select an a...

Страница 34: ...ypad 3 Tap or to make a voice call Add the number to the contacts list Preview the phone number Hide the keypad Delete a preceding character Access additional options Making calls from the locked screen On the locked screen drag outside the large circle Making calls from call logs or contacts list Tap LOG or CONTACTS and then swipe to the right on a contact or a phone number to make a call ...

Страница 35: ...cle Rejecting a call When a call comes in drag outside the large circle To send a message when rejecting an incoming call drag the reject message bar upwards To create various rejection messages open the Apps screen and tap Phone MORE Settings Call blocking Call reject messages enter a message and then tap Missed calls If a call is missed the icon appears on the status bar Open the notification pa...

Страница 36: ...witch to a Bluetooth headset if it is connected to the device Turn off the microphone so that the other party cannot hear you Open or close the keypad Activate or deactivate the speakerphone End the current call Increase the volume Record a call conversation When using the speakerphone keep the device away from your ears ...

Страница 37: ...a phone number to the contacts list from the keypad open the Apps screen and tap Phone If the keypad does not appear on the screen tap to open the keypad Enter the number and tap Add to Contacts To add a phone number to the contacts list from received calls or messages open the Apps screen and tap Phone LOG a contact Importing contacts Import contacts from storage services to your device On the Ap...

Страница 38: ... of the contacts list and enter search criteria Once a contact is selected take one of the following actions Add to favourite contacts Make a voice call Compose a message Compose an email Messages Introduction Send and view messages by conversation Sending messages You may incur additional charges for sending messages when you are roaming 1 Tap Messages on the Apps screen 2 Tap ...

Страница 39: ...recipients Attach files Insert a message template Send the message 4 Tap or to send the message Viewing messages Messages are grouped into message threads by contact You may incur additional charges for receiving messages when you are roaming 1 Tap Messages on the Apps screen 2 On the messages list select a contact 3 View your conversation ...

Страница 40: ...the Apps screen 2 Tap the address field 3 Enter the web address or a keyword and then tap Go To view the toolbars drag your finger downwards slightly on the screen Open the homepage Move to the previously visited page Open the browser s tab manager Access additional options Refresh the current webpage View your bookmarks saved webpages and recent history ...

Страница 41: ...o manually register a company email account tap MANUAL SETUP 4 Follow the on screen instructions to complete the setup To set up another email account tap MORE Settings Add account If you have more than one email accounts you can set one as the default account Tap MORE Settings MORE Set default account Sending emails 1 Tap to compose an email 2 Add recipients and enter an email text 3 Tap SEND to ...

Страница 42: ...s where you may violate other people s privacy Taking photos or recording videos 1 Tap the image on the preview screen where the camera should focus 2 Tap to take a photo or tap to record a video Spread two fingers apart on the screen to zoom in and pinch to zoom out To capture an image from the video while recording tap Capture To change the focus while recording a video tap where you want to foc...

Страница 43: ...on the locked screen On the locked screen drag outside the large circle This feature may not be available depending on the region or service provider Some camera features are not available when you launch Camera from the locked screen while the security features are activated Launching Camera quickly Press the Home key twice quickly to launch Camera Camera always launches in auto mode Some camera ...

Страница 44: ...n result in noise in photos Change the exposure value This determines how much light the camera s sensor receives For low light situations use a higher exposure Panorama Take a series of photos horizontally or vertically and then stitch them together to create a wide scene On the preview screen tap MODE Panorama To get the best shots using panorama mode follow these tips Move the camera slowly in ...

Страница 45: ...switch to activate it Show your palm to the front camera After recognising your palm the device will take a photo after a few seconds Wide selfie Take a wide self portrait to include more people in the photo and avoid leaving people out 1 On the preview screen tap to switch to the front camera for self portraits 2 Tap MODE Wide selfie 3 Face the front camera lens 4 When the device detects your fac...

Страница 46: ...n the preview screen may be cut out of the photo depending on the shooting conditions Interval shot Take series of self portraits at an interval and save photos you want 1 On the preview screen tap to switch to the front camera for self portraits 2 Tap MODE Interval shot 3 When the device detects your face tap the screen to take a photo of yourself The device will take four photos at the two secon...

Страница 47: ...g a higher resolution will result in higher quality videos but they will take up more memory Gesture control Set the device to detect your palm so you can use it to take self portraits Save pictures as previewed Invert the image to create a mirror image of the original scene when taking photos with the front camera Grid lines Display viewfinder guides to help composition when selecting subjects Lo...

Страница 48: ...mera settings Gallery Introduction View and manage photos and videos stored in the device Viewing images or videos 1 Tap Gallery on the Apps screen 2 Select an image or a video Video files show the icon on the preview thumbnail To play a video tap More options Move to the previous screen Share the image with others Delete the image Modify the image To hide or show the menus tap the screen ...

Страница 49: ...ple images and videos 1 On the Gallery main screen tap and hold an image or a video to delete 2 Tick the images or videos to delete 3 Tap DELETE Smart Manager Introduction The Smart manager provides an overview of the status of your device s battery storage RAM and system security You can also automatically optimise the device with one tap of your finger ...

Страница 50: ...e device For devices with low battery levels conserve battery power by activating power saving features and closing apps that are consuming an excessive amount of battery power The usage time left shows the time remaining before the battery power runs out Usage time left may vary depending on your device settings and operating conditions Storage Check the status of used and available memory capaci...

Страница 51: ...endar to use or sync with Enter the location of the event Enter a title Set a start and end date for the event Add more details Set an alarm 4 Tap SAVE to save the event Syncing events with your accounts On the Apps screen tap Settings Accounts select an account service and then tap the Sync Calendar switch to sync events with the account To add accounts to sync with open the Apps screen and tap S...

Страница 52: ...a song to play Tap the album image at the bottom of the screen to open the music player screen Change the repeat mode Skip to the next song Tap and hold to fast forward Pause and resume playback Access additional options Adjust the volume Skip to the previous song Tap and hold to rewind Turn on shuffle Set the file as your favourite song Open the playlist ...

Страница 53: ...s Tap Video on the Apps screen Select a video to play Change screen ratio Rewind or fast forward by dragging the bar Skip to the previous video Tap and hold to rewind Skip to the next video Tap and hold to fast forward Access additional options Pause and resume playback Adjust the volume ...

Страница 54: ...oice memos 1 On the Apps screen tap 实用工具 Voice Recorder 2 Tap to start recording Speak into the microphone Tap Pause to pause recording Tap Call rejection to automatically reject incoming calls while recording a voice memo Start recording 3 Tap to finish recording ...

Страница 55: ...m by category On the Apps screen tap 实用工具 Memo Composing memos Tap on the memos list and enter a memo While composing a memo use the following options Category Create or set a category Image Insert images Voice Make a voice recording to insert Tasks Add tick boxes at the beginning of each row to create a list of tasks To save the memo tap SAVE To edit a memo tap a memo and then tap the content of ...

Страница 56: ...ious alarm options and then tap SAVE To activate or deactivate alarms tap the clock icon next to the alarm in the alarms list Stopping alarms Tap DISMISS to stop an alarm If you have previously enabled the snooze option tap SNOOZE to repeat the alarm after a specified length of time Deleting alarms Tap on an alarm in the list of alarms World clock On the Apps screen tap Clock World clock Creating ...

Страница 57: ...ration and then tap START To open the keypad to enter the duration tap KEYPAD 3 Tap DISMISS when the timer goes off Calculator Perform simple or complex calculations Tap Calculator on the Apps screen Rotate the device to landscape orientation to display the scientific calculator If Screen rotation is disabled tap to display the scientific calculator To see the calculation history tap HISTORY To cl...

Страница 58: ... The FM radio scans and saves available stations automatically Select the radio station you want from the stations list and tap to return to the FM radio screen Theme Store Purchase and download themes to change the visual elements of the Home screen locked screen and icons Tap Theme Store on the Apps screen ...

Страница 59: ...heWi Fi feature to connect to aWi Fi network and access the Internet or other network devices Turn offWi Fi to save the battery when not in use 1 On the Settings screen tap WLAN and then tap the switch to activate it 2 Select a network from theWi Fi networks list Networks that require a password appear with a lock icon 3 Tap CONNECT Once the device connects to aWi Fi network the device will reconn...

Страница 60: ...est Sending and receiving data You can share data such as contacts or media files with other devices The following actions are an example of sending an image to another device 1 Tap Gallery on the Apps screen 2 Select an image 3 Tap Share WLAN Direct select a device to transfer the image to and then tap SHARE 4 Accept theWi Fi Direct connection request on the other device If the devices are alread...

Страница 61: ...tapping communications for commercial purposes Samsung is not responsible for the repercussion of illegal use of the Bluetooth feature Pairing with other Bluetooth devices 1 On the Settings screen tap Bluetooth and then tap the switch to activate it The detected devices are listed 2 Select a device to pair with If your device has paired with the device before tap the device name without confirming...

Страница 62: ...lect a device to transfer the image to If the device you want to pair with is not in the list request that the device turns on its visibility option 4 Accept the Bluetooth connection request on the other device Unpairing Bluetooth devices 1 Tap Bluetooth on the Settings screen The device displays the paired devices in the list 2 Tap next to the device name to unpair 3 Tap Unpair Airplane mode This...

Страница 63: ...B tethering to share the device s mobile data connection with a computer via USB When connected to a computer the device is used as a wireless modem for the computer Using the mobile hotspot Use your device as a mobile hotspot to share your device s mobile data connection with other devices 1 On the Settings screen tap WLAN hotspot and tethering Mobile Hotspot 2 Tap the switch to activate it The i...

Страница 64: ... bar upwards or downwards to set the limit 3 Drag the warning adjustment bar upwards or downwards to set a data usage alert level The device will alert you when the warning level is reached SIM card manager Activate your SIM or USIM cards and customise the SIM card settings Refer to Using dual SIM or USIM cards for more information On the Settings screen tap SIM card manager Voice call Select a SI...

Страница 65: ...settings Printing Configure settings for printer plug ins installed on the device You can search for available printers or add one manually to print files Refer to Printing for more information VPN Set up and connect to virtual private networks VPNs Default messaging app Select the default app to use for messaging Printing Configure settings for printer plug ins installed on the device You can con...

Страница 66: ...s and notifications Ringtones and sounds Change the ringtone and system sound settings Vibrations Change the vibration settings Sound quality and effects Configure additional sound settings Do not disturb Set the device to mute incoming call and notification sounds except for allowed exceptions Notifications on lock screen Set whether or not to show the content of notifications on the locked scree...

Страница 67: ...ce Application permissions Specify functions to use for each app Default applications Select a default setting for using apps Wallpaper Change the wallpaper settings for the Home screen and the locked screen On the Settings screen tap Wallpaper Lock screen and security Change the settings for securing the device and the SIM or USIM card On the Settings screen tap Lock screen and security The avail...

Страница 68: ...ng Accessibility Configure various settings to improve accessibility to the device On the Settings screen tap Accessibility Vision Customise the settings to improve accessibility for visually impaired users Hearing Customise the settings to improve accessibility for users with hearing impairment Dexterity and interaction Customise the settings to improve accessibility for users who have reduced de...

Страница 69: ...t an account and select items to sync Registering Samsung accounts You need a Samsung account when using some Samsung apps Register your Samsung account to the device to conveniently use Samsung services 1 On the Settings screen tap Accounts Add account 2 Tap Samsung account 3 Follow the on screen instructions to complete the account setup Once your Samsung account has been registered you can use ...

Страница 70: ... type for text input Samsung Chinese IME Change the Samsung Chinese IME keyboard settings Samsung keyboard Change the Samsung keyboard settings Text to speech options Change the text to speech settings Pointer speed Adjust the pointer speed for the mouse or trackpad connected to your device Battery View battery power information and change power saving options On the Settings screen tap Battery Th...

Страница 71: ...en tap Storage The actual available capacity of the internal memory is less than the specified capacity because the operating system and default apps occupy part of the memory The available capacity may change when you update the device Date and time Access and alter the following settings to control how the device displays the time and date On the Settings screen tap Date and time If the battery ...

Страница 72: ...ation to learn how to use the device and apps or configure important settings On the Settings screen tap User manual About device Access device information edit the device name or update device software On the Settings screen tap About device ...

Страница 73: ...N incorrectly several times You must enter the PUK supplied by your service provider PIN2 When you access a menu requiring the PIN2 you must enter the PIN2 supplied with the SIM or USIM card For more information contact your service provider Your device displays network or service error messages When you are in areas with weak signals or poor reception you may lose reception Move to another area a...

Страница 74: ...e device and turn it on again If your device is frozen and unresponsive press and hold the Power key and the Volume key down simultaneously for more than 7 seconds to restart it If this does not solve the problem perform a factory data reset On the Apps screen tap Settings Reset Factory data reset RESET DEVICE DELETE ALL Before performing the factory data reset remember to make backup copies of al...

Страница 75: ...ry does not charge properly For Samsung approved chargers Ensure that the charger is connected properly If the battery terminals are dirty the battery may not charge properly or the device may turn off Wipe both gold coloured contacts and try charging the battery again The battery depletes faster than when first purchased When you expose the device or the battery to very cold or very hot temperatu...

Страница 76: ... files If you receive error messages or multimedia files do not play when you open them on your device try the following Free some memory by transferring files to a computer or deleting files from your device Ensure that the music file is not Digital Rights Management DRM protected If the file is DRM protected ensure that you have the appropriate licence or key to play the file Ensure that the fil...

Страница 77: ... your computer If you are aWindows XP user ensure that you haveWindows XP Service Pack 3 or higher installed on your computer Your device cannot find your current location GPS signals may be obstructed in some locations such as indoors Set the device to useWi Fi or a mobile network to find your current location in these situations Data stored in the device has been lost Always make backup copies o...

Страница 78: ...s part is above the limit specified in GB T 26572 The information provided in this table is based on figures presented by supply manufacturers and tests conducted by Samsung All toxic and hazardous substances or elements are used at the minimum level allowed by current technology Samsung continues to make every effort to reduce the need for these substances or elements through improved technology ...

Страница 79: ...all tested frequency bands Although the SAR is determined at the highest certified power level the actual SAR level of the phone while operating can be well below the maximum value This is because the phone is designed to operate at multiple power levels so as to use only the power required to reach the network In general the closer you are to a wireless base station antenna the lower the power ou...

Страница 80: ...correct the interference by one or more of the following measures Reorient or relocate the receiving antenna Increase the separation between the equipment and receiver Connect the equipment into an outlet on a circuit from that to which the receiver is connected Consult the dealer or an experienced radio TV technician for help The device may cause TV or radio interference if used in close proximit...

Страница 81: ...hat are not labeled M4 is the better higher of the two ratings T Ratings Phones rated T3 or T4 meet FCC requirements and are likely to be more usable with a hearing device s telecoil T Switch or Telephone Switch than unrated phones T4 is the better higher of the two ratings Note that not all hearing devices have telecoils in them Hearing devices may also be measured for immunity to this type of in...

Страница 82: ... electronic or mechanical including photocopying recording or storing in any information storage and retrieval system without the prior written permission of Samsung Electronics Trademarks SAMSUNG and the SAMSUNG logo are registered trademarks of Samsung Electronics Bluetooth is a registered trademark of Bluetooth SIG Inc worldwide All other trademarks and copyrights are the property of their resp...

Отзывы: