background image

Basics

51

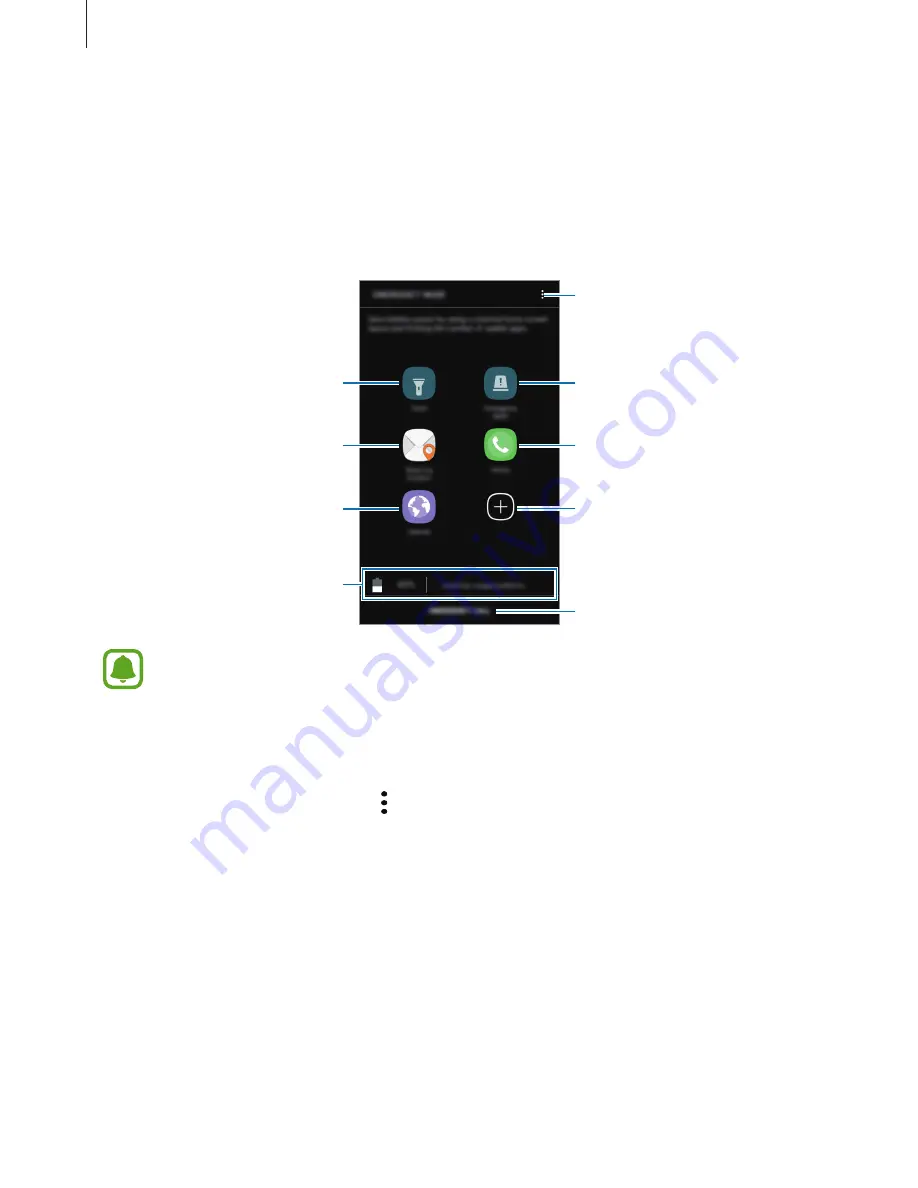
Emergency mode

You can switch the device to emergency mode to reduce battery consumption. Some apps 
and functions will be restricted. In emergency mode, you can make an emergency call, send 
your current location information to others, sound an emergency alarm, and more.
Press and hold the Power key, and then tap 

Emergency mode

.

Add more apps to use.

Make an emergency call.

Remaining battery power and 

usage time left

Turn on the flash.

Make a call.

Send your current location 

information in a message.

Browse the Internet.

Access additional options.

Sound alarms.

The usage time left shows the time remaining before the battery power runs 
out. Usage time left may vary depending on your device settings and operating 
conditions.

Deactivating emergency mode

To deactivate emergency mode, tap   


Disable Emergency mode

. Alternatively, press and 

hold the Power key, and then tap 

Emergency mode

.

Содержание SM-G390F

Страница 1: ...www samsung com User Manual English EU 03 2017 Rev 1 0 SM G390F...

Страница 2: ...chscreen 24 Home screen 30 Lock screen 31 Notification panel 33 Entering text 35 Screen capture 35 Opening apps 36 Secure Folder 39 Multi window 43 Samsung account 44 Transferring data from your previ...

Страница 3: ...otifications 106 Display 108 Wallpapers and themes 108 Advanced features 110 Device maintenance 112 Apps 112 Lock screen and security 113 Cloud and accounts 115 Google 115 Accessibility 116 General ma...

Страница 4: ...r media provided with this device are licensed for limited use Extracting and using these materials for commercial or other purposes is an infringement of copyright laws Users are entirely responsible...

Страница 5: ...formance and is in the device s normal range of operation If the battery becomes too hot the charger may stop charging Do the following when the device heats up Disconnect the charger from the device...

Страница 6: ...recording videos for extended periods When streaming videos while using the maximum brightness setting When connecting to aTV While multitasking or when running many apps in the background When using...

Страница 7: ...only available on supported models If the device becomes hotter than usual a device overheating message will appear To lower the device s temperature the screen brightness and the performance speed wi...

Страница 8: ...athrooms Do not open the back cover using wet hands or when the device is wet The rubber seal fitted to the back cover is an important component of the device Take care when opening and closing the ba...

Страница 9: ...evice Battery Quick start guide The items supplied with the device and any available accessories may vary depending on the region or service provider The supplied items are designed only for this devi...

Страница 10: ...e Touchscreen Speaker Headset jack Multipurpose jack Home key Recents key Power key Front camera Back key Speaker Proximity sensor Volume key XCover key NFC antenna on the battery Rear camera GPS ante...

Страница 11: ...o malfunction Do not cover the proximity sensor area with screen accessories such as a screen protector or stickers Doing so may cause the sensor to malfunction Keys Key Function Power Press and hold...

Страница 12: ...r Be careful not to damage your fingernails when you remove the back cover Do not bend or twist the back cover excessively Doing so may damage the cover 2 Insert the battery with the battery s gold co...

Страница 13: ...d tightly to prevent water and dust from entering the device Open or loose back cover may allow water and dust to enter the device and cause damage Use only Samsung approved back covers and accessorie...

Страница 14: ...er when not in use The charger does not have a power switch so you must unplug the charger from the electric socket when not in use to avoid wasting power The charger should remain close to the electr...

Страница 15: ...e synced such as emails Decrease the backlight time Decrease the screen brightness Battery charging tips and precautions When the battery power is low the battery icon appears empty If the battery is...

Страница 16: ...MISE to change the power saving settings before entering power saving mode 3 Tap APPLY Maximum power saving mode In maximum power saving mode the device decreases battery consumption by applying the d...

Страница 17: ...by lost or stolen cards Some LTE services may not be available depending on the service provider For more information about service availability contact your service provider 1 Remove the back cover a...

Страница 18: ...mpatible with the device Using an incompatible card may damage the device or the memory card or corrupt the data stored in it Use caution to insert the memory card right side up The device supports th...

Страница 19: ...p Apps Settings Device maintenance Storage Storage settings SD card UNMOUNT 1 Remove the back cover 2 Pull out the memory card 3 Replace the back cover Do not remove the memory card while the device i...

Страница 20: ...aintenance Storage Storage settings SD card Format Before formatting the memory card remember to make backup copies of all important data stored in the memory card The manufacturer s warranty does not...

Страница 21: ...old the Power key and theVolume Down key simultaneously for more than 7 seconds to restart it Power key Volume Down key Controlling the touchscreen Do not allow the touchscreen to come into contact wi...

Страница 22: ...en button or to enter a character using the keyboard on the screen tap it with your finger Tapping and holding Tap and hold an item or the screen for more than 2 seconds to access available options Dr...

Страница 23: ...Swiping Swipe to the left or right on the Home screen or the Apps screen to view other panels Swipe upwards or downwards to scroll through a webpage or a list of items such as contacts Spreading and...

Страница 24: ...g all of the device s features It displays widgets shortcuts to apps and more To view other panels swipe to the left or right The Home screen may appear differently depending on the region or service...

Страница 25: ...vice s wallpaper theme or icons Widgets Add widgets to the Home screen Widgets are small apps that launch specific app functions to provide information and convenient access on your Home screen Screen...

Страница 26: ...reen The item will move to the panel at the top of the screen Swipe to the left or right to move to another panel and drag the item to a new location Removing items Tap and hold an item and then drag...

Страница 27: ...to the left and then tap To move a panel tap and hold a panel preview and then drag it to a new location To remove a panel tap and hold a panel preview and then drag it to Remove at the top of the sc...

Страница 28: ...ps A new folder containing the selected apps will be created 4 Tap Enter folder name and enter a folder name To change the folder colour tap To add more apps to the folder tap ADD tick the apps and th...

Страница 29: ...below are most common The status bar may not appear at the top of the screen in some apps To display the status bar drag down from the top of the screen Icon Meaning No signal Signal strength Roaming...

Страница 30: ...r the Home key and swipe in any direction to unlock the screen To change the screen lock method on the Apps screen tap Settings Lock screen and security Screen lock type and then select a method When...

Страница 31: ...the Apps screen tap Settings Lock screen and security Secure lock settings and tap the Auto factory reset switch to activate it Notification panel Using the notification panel When you receive new no...

Страница 32: ...ck notifications from apps Using quick setting buttons Tap quick setting buttons to activate certain features Swipe downwards on the notification panel to view more buttons To change feature settings...

Страница 33: ...select filter details Setting search categories You can set search categories to search for content in specific search fields Tap Settings Select search locations and select categories Entering text...

Страница 34: ...a keyboard layout to use On 3x4 keyboard a key has three or four characters To enter a character tap the corresponding key repeatedly until the desired character appears Additional keyboard functions...

Страница 35: ...the text Screen capture Capture a screenshot while using the device Capturing a screenshot Press and hold the Home key and the Power key simultaneously You can view captured images in Gallery Opening...

Страница 36: ...ice is unlocked Secure Folder is a separate secured storage area The data in Secure Folder cannot be transferred to other devices via unapproved sharing methods such as USB Attempting to customise the...

Страница 37: ...nt password Setting auto lock for Secure Folder Set the device to automatically lock Secure Folder when it is not being used 1 On the Apps screen tap Samsung Secure Folder 2 Tap Settings Auto lock Sec...

Страница 38: ...and Google accounts or other accounts to sync with the apps in Secure Folder 1 On the Apps screen tap Samsung Secure Folder 2 Tap Settings Accounts Add account 3 Select an account service 4 Follow the...

Страница 39: ...UNINSTALL to back up content and uninstall Secure Folder You can access data backed up from Secure Folder open the Apps screen and tap Samsung My Files Internal storage Secure Folder Notes saved in S...

Страница 40: ...ed apps 2 Swipe upwards or downwards and tap on a recent app window The selected app will launch in the upper window 3 In the lower window swipe upwards or downwards to select another app to launch To...

Страница 41: ...the bar between the app windows to access additional options Switch locations between app windows Close the currently selected app Adjusting the window size Drag the bar between the app windows up or...

Страница 42: ...een view Press the Home key to minimise the split screen view The icon will appear on the status bar The app in the lower window will close and the app in the upper window will remain active in the mi...

Страница 43: ...g account Help Registering your Samsung account Registering a new Samsung account If you do not have a Samsung account you should create one 1 On the Apps screen tap Settings Cloud and accounts Accoun...

Страница 44: ...REMOVE ACCOUNT Transferring data from your previous device You can transfer contacts images and other data from a previous device to your device via Smart Switch wirelessly or using a USB connector or...

Страница 45: ...On the previous device launch Smart Switch If you do not have the app download it from Play Store 2 Place the devices near each other 3 On the previous device tap WIRELESS SEND CONNECT 4 On your devi...

Страница 46: ...witch 2 On the computer launch Smart Switch If your previous device is not a Samsung device back up data to a computer using a program provided by the device s manufacturer Then skip to the fifth step...

Страница 47: ...nt to restore and tap RESTORE NOW Device and data management Connecting the device to a computer for data transfer Move audio video image or other types of files from the device to the computer or vic...

Страница 48: ...it updates will be downloaded when the device is connected to aWi Fi network Updating with Smart Switch Connect the device to a computer and update the device to the latest software 1 On the computer...

Страница 49: ...backup data from Samsung Cloud using a Samsung account tap Restore Select a device and the data types you want to restore and tap RESTORE NOW The selected data will be restored to your device Using a...

Страница 50: ...th others even if they are not saved in your contacts list To use this feature your phone number must be verified When you have a communication or sharing history the people you contacted will appear...

Страница 51: ...apps to use Make an emergency call Remaining battery power and usage time left Turn on the flash Make a call Send your current location information in a message Browse the Internet Access additional...

Страница 52: ...apps tap INSTALL To purchase and download apps where charges apply tap the price and follow the on screen instructions To change the auto update settings tap Settings Auto update apps and then select...

Страница 53: ...e apps to operate properly they may need permission to access or use information on your device When you open an app a pop up window may appear and request access to certain features or information Ta...

Страница 54: ...on the Apps screen 2 Enter a phone number If the keypad does not appear on the screen tap to open the keypad 3 Tap to make a voice call or tap to make a video call Add the number to the contacts list...

Страница 55: ...circle Making calls from call logs or contacts list Tap RECENTS or CONTACTS and then swipe to the right on a contact or a phone number to make a call Making an international call 1 Tap to open the key...

Страница 56: ...eive notifications The calls will be logged in the call log You can also block incoming calls from people that do not show their caller ID Tap the Block unknown callers switch to activate the feature...

Страница 57: ...rent call Mute Turn off the microphone so that the other party cannot hear you Speaker Activate or deactivate the speakerphone When using the speakerphone speak into the microphone at the bottom of th...

Страница 58: ...g on the selected storage location the types of information you can save may vary 4 Tap SAVE Adding a phone number to Contacts from the keypad 1 Tap Phone on the Apps screen 2 Enter the number and tap...

Страница 59: ...m other storages to your device 1 Tap Contacts on the Apps screen 2 Tap Settings Import Export contacts IMPORT 3 Select a storage location to save contacts to 4 TickVCF files or contacts to import and...

Страница 60: ...the search field at the top of the contacts list and enter search criteria Tap the contact s image or tap the contact s name Details Then take one of the following actions Add to favourite contacts M...

Страница 61: ...streamline your contacts list 1 Tap Contacts on the Apps screen 2 Tap Settings Merge duplicate contacts 3 Tick contacts and tap MERGE Deleting contacts 1 Tap Contacts on the Apps screen 2 Tap Delete 3...

Страница 62: ...ssage Add recipients from the contacts list Enter emoticons Attach files Edit recipients Send the message 5 Tap SEND to send the message Viewing messages Messages are grouped into message threads by c...

Страница 63: ...then tap the switch to activate it 3 Change the notification settings Notification sound Change the notification sound Vibrate when sound plays Set the device to vibrate when you receive messages Pop...

Страница 64: ...en tap Samsung Internet 2 Tap the address field 3 Enter the web address or a keyword and then tap Go To view the toolbars drag your finger downwards slightly on the screen Bookmark the current webpage...

Страница 65: ...ng security settings You can change your password or the lock method Tap Settings Privacy Secret mode security Change password Deactivating secret mode In the toolbar at the bottom of the screen tap T...

Страница 66: ...o read it If email syncing is disabled new emails cannot be retrieved To enable email syncing tap your account name and then tap the Sync account switch to activate it Camera Introduction Take photos...

Страница 67: ...n the region or service provider Some camera features are not available when you launch Camera from the locked screen or when the screen is turned off while the security features are activated Using s...

Страница 68: ...ailable in some shooting modes Basic shooting Taking photos or recording videos 1 Tap the image on the preview screen where the camera should focus 2 Tap to take a photo or tap to record a video To ta...

Страница 69: ...e high resolutions Your device s camera features a wide angle lens Minor distortion may occur in wide angle photos and does not indicate device performance problems The maximum recording time may redu...

Страница 70: ...elect options and customise the settings and then tap to take a photo Select an appropriate white balance so images have a true to life colour range You can set the colour temperature Tap and drag you...

Страница 71: ...out of the guide frame or you do not move the device the device will automatically stop taking photos Avoid taking photos of indistinct backgrounds such as an empty sky or a plain wall 1 On the shoot...

Страница 72: ...ight Take a photo in low light conditions without using the flash On the shooting modes list tap Night Tag shot Take photos and tag them with the current location and weather information On the shooti...

Страница 73: ...t camera lens 4 When the device detects your face tap the screen to take a photo of yourself Alternatively show your palm to the front camera After recognising your palm a countdown timer will appear...

Страница 74: ...n the preview screen and take a photo of yourself SkinTone Make your skin appear brighter and clearer Slim Face Adjust the face shape and make your face appear slimmer Large Eyes Make your eyes appear...

Страница 75: ...take pictures and then tap the switches to activate them 5 Slowly swivel the device left and then right or vice versa to take a wide self portrait The device will take additional photos when the whit...

Страница 76: ...le options may vary depending on the shooting mode and which camera is being used REAR CAMERA Picture size Select a resolution for photos Using a higher resolution will result in higher quality photos...

Страница 77: ...cation may appear on your photos when you upload them to the Internet To avoid this deactivate the location tag setting Review pictures Set the device to show photos after capturing them Quick launch...

Страница 78: ...Access additional options Share the image with others Delete the image Modify the image Add the image to favourites To hide or show the menus tap the screen You can create a GIF animation or collage...

Страница 79: ...playback screen to adjust the brightness or drag your finger up or down on the right side of the playback screen to adjust the volume To rewind or fast forward swipe to the left or right on the playba...

Страница 80: ...the Apps screen tap Gallery STORIES 2 Tap and hold a story to delete and tap DELETE Syncing images and videos with Samsung Cloud You can sync images and videos saved in Gallery with Samsung Cloud and...

Страница 81: ...sharing method Samsung Notes Introduction Create notes by entering text from the keyboard or by writing or drawing on the screen You can also insert images or voice recordings into your notes Creatin...

Страница 82: ...s Insert a voice recording Insert an image 3 When you are finished composing the note tap SAVE Deleting notes 1 On the Apps screen tap Samsung Notes 2 Tap ALL or tap COLLECTIONS and select a category...

Страница 83: ...vent details Select a calendar to use or sync with Attach a map showing the location of the event Enter the location of the event Add a note Enter a title Set a start and end date for the event Add mo...

Страница 84: ...Then select an account to sync with and sign in When an account is added it will appear on the list S Health Introduction S Health helps you manage your wellness and fitness Set fitness goals check yo...

Страница 85: ...ng on the region View and manage trackers View health tips Compare your step count records with other S Health users or compete with your friends Set your daily goals and track your progress Monitor y...

Страница 86: ...on may be stored until the completion of such purposes You can delete personal data stored by S Health by using the Reset data option in the Settings menu To delete any data you have shared with socia...

Страница 87: ...your voice to text and distinguish between sound sources Making voice recordings 1 On the Apps screen tap Samsung Voice Recorder 2 Tap to start recording Speak into the microphone Tap to pause record...

Страница 88: ...ties around the world time an event or set a specific duration ALARM On the Apps screen tap Clock ALARM Setting alarms Tap in the alarms list set an alarm time select the days on which the alarm will...

Страница 89: ...tap DELETE STOPWATCH 1 On the Apps screen tap Clock STOPWATCH 2 Tap START to time an event To record lap times while timing an event tap LAP 3 Tap STOP to stop timing To restart the timing tap RESUME...

Страница 90: ...the calculation history tap HISTORY To close the calculation history panel tap KEYPAD To clear the history tap HISTORY CLEAR HISTORY Radio Listening to the FM radio Tap Radio on the Apps screen Before...

Страница 91: ...to the favourites list Fine tune the frequency View the list of favourite stations Record a song from the FM radio Turn the FM radio on or off Enter radio station frequency manually Search for an avai...

Страница 92: ...and browse webpages Gmail Send or receive emails via the Google Mail service Maps Find your location on the map search the world map and view location information for various places around you Play Mu...

Страница 93: ...lications 93 Photos Search for manage and edit all your photos and videos from various sources in one place Duo Have video calls with others Google Search quickly for items on the Internet or your dev...

Страница 94: ...d access the Internet or other network devices Your device uses a non harmonised frequency and is intended for use in all European countries TheWLAN can be operated in the EU without restriction indoo...

Страница 95: ...Fi network without requiring an access point 1 On the Settings screen tap Connections Wi Fi and then tap the switch to activate it 2 Tap WI FI DIRECT The detected devices are listed If the device you...

Страница 96: ...e data or media files with other Bluetooth enabled devices Samsung is not responsible for the loss interception or misuse of data sent or received via Bluetooth Always ensure that you share and receiv...

Страница 97: ...ill be connected when the other device accepts the Bluetooth connection request Sending and receiving data Many apps support data transfer via Bluetooth You can share data such as contacts or media fi...

Страница 98: ...ions Data usage Data saver Prevent apps that are running in the background from using a mobile data connection Mobile data Set the device to use data connections on any mobile network Mobile data usag...

Страница 99: ...This disables all wireless functions on your device You can use only non network services On the Settings screen tap Connections and tap the Flight mode switch to activate it Make sure the device is...

Страница 100: ...NFC tags or receive data Making payments with the NFC feature Before you can use the NFC feature to make payments you must register for the mobile payment service To register or get more information a...

Страница 101: ...ections NFC and payment and tap the switch to activate it 2 Tap the Android Beam switch to activate it 3 Select an item and touch the other device s NFC antenna to your device s NFC antenna 4 When Tou...

Страница 102: ...USB tethering to share the device s mobile data connection with a computer via USB When connected to a computer the device is used as a wireless modem for the computer Using the mobile hotspot Use yo...

Страница 103: ...our location information even when the features are deactivated RECENT LOCATION REQUESTS View which apps request your current location information LOCATION SERVICES View the location services your dev...

Страница 104: ...ions More connection settings Printing DOWNLOAD PLUG IN 2 Search for a printer plug in in Play Store 3 Select a printer plug in and install it 4 Select the printer plug in and tap the switch to activa...

Страница 105: ...the device may use only the fastest connection This feature supports HypertextTransmission Protocol HTTP 1 1 and Hypertext Transmission Protocol Secure HTTPS The feature cannot be used with other prot...

Страница 106: ...notification settings tap ADVANCED and select an app Allow notifications Allow notifications from the selected app Show silently Set the device to mute notification sounds and hide notification previe...

Страница 107: ...ce is charging or the screen is turned off Blue light filter Reduce eye strain by limiting the amount of blue light emitted by the screen While you are watching HDR videos from HDR exclusive video ser...

Страница 108: ...to the right and tap To delete a shortcut from the Home screen tap EDIT and select an app or contact with Wallpapers and themes Change the wallpaper settings for the Home screen and the locked screen...

Страница 109: ...or alarms by using palm motions or facing the device s screen downwards Send SOS messages Set the device to send help messages by pressing the Power key three times You can also send sound recordings...

Страница 110: ...rvice provider Adding emergency contacts On the Settings screen tap Advanced features Send SOS messages Send messages to ADD Tap Create contact and enter contact information or tap Select from Contact...

Страница 111: ...operating conditions You cannot receive notifications from apps that use power saving mode Managing the battery You can save battery power by preventing apps that are running in the background from us...

Страница 112: ...Settings screen tap Apps Lock screen and security Change the settings for securing the device and the SIM or USIM card On the Settings screen tap Lock screen and security The available options may var...

Страница 113: ...rypted files Disable this setting before resetting the device Other security settings Configure additional security settings Cloud and accounts Introduction Sync back up or restore your device s data...

Страница 114: ...dar events images and videos Accounts Add your Samsung and Google accounts or other accounts to sync with Adding accounts Some apps used on your device require a registered account Create accounts to...

Страница 115: ...matic restore Set the device to automatically restore settings and app data from the Google server when apps are reinstalled Google Configure settings for some features provided by Google On the Setti...

Страница 116: ...mise your device s system settings or reset the device On the Settings screen tap General management Language and input Select device languages and change settings such as keyboards and voice input ty...

Страница 117: ...tap User manual About device Access your device s information On the Settings screen tap About device My phone number View your phone number Status View various device information such as the SIM car...

Страница 118: ...N incorrectly several times You must enter the PUK supplied by your service provider PIN2 When you access a menu requiring the PIN2 you must enter the PIN2 supplied with the SIM or USIM card For more...

Страница 119: ...eezes or encounters a fatal error Try the following solutions If the problem is still not resolved contact a Samsung Service Centre Restarting the device If your device freezes or hangs you may need t...

Страница 120: ...nected Sound echoes during a call Adjust the volume by pressing theVolume key or move to another area A cellular network or the Internet is often disconnected or audio quality is poor Ensure that you...

Страница 121: ...evice is hot to the touch When you use apps that require more power or use apps on your device for an extended period of time your device may feel hot to the touch This is normal and should not affect...

Страница 122: ...supported by the device If a file format is not supported such as DivX or AC3 install an app that supports it To confirm the file formats that your device supports visit www samsung com Your device su...

Страница 123: ...k to find your current location in these situations Data stored in the device has been lost Always make backup copies of all important data stored in the device Otherwise you cannot restore data if it...

Страница 124: ...storing in any information storage and retrieval system without the prior written permission of Samsung Electronics Trademarks SAMSUNG and the SAMSUNG logo are registered trademarks of Samsung Electro...

Отзывы: