background image

42

Motions & usability features

Motions and gestures

Excessive shaking or impact on the device may result in unintended inputs. Control 
motions properly.

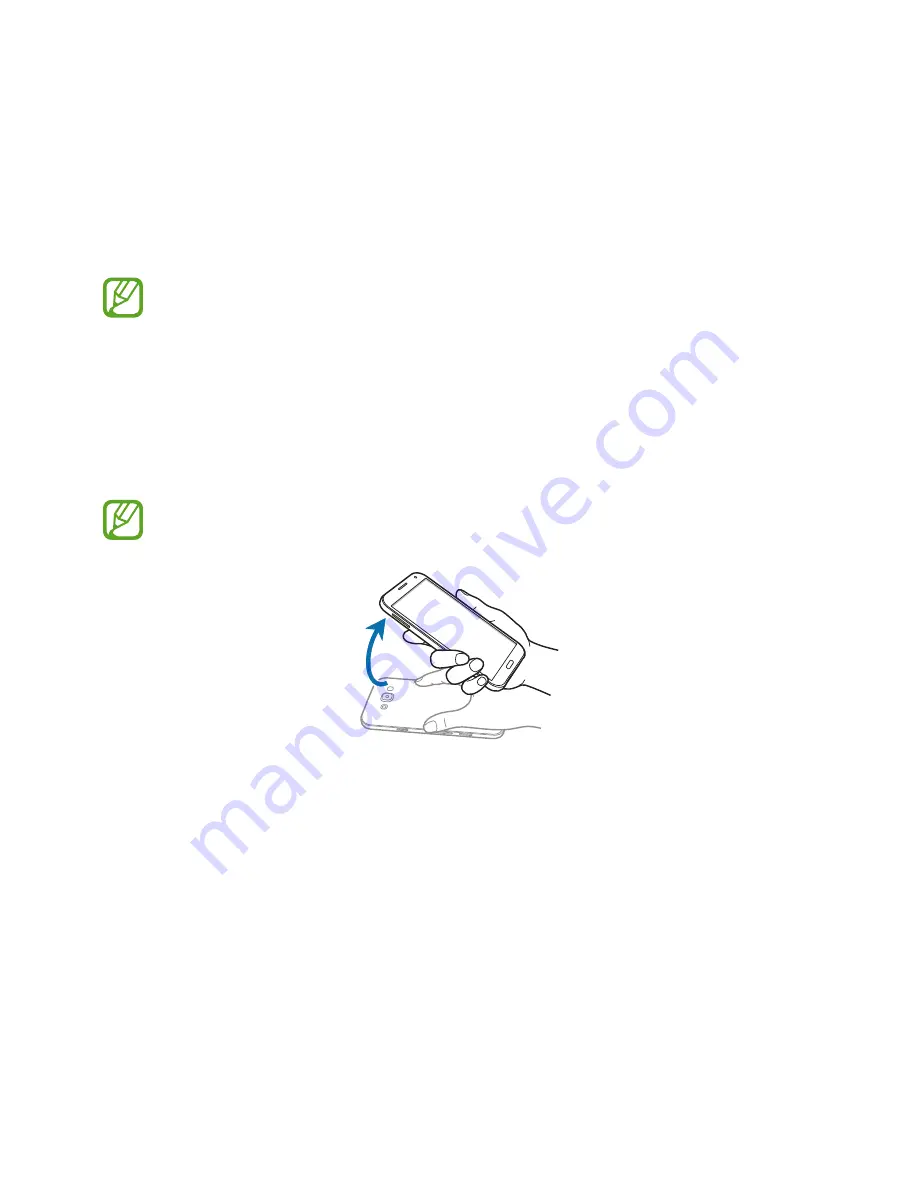
Smart alert

On the Apps screen, tap 

Settings


Motions and gestures


Smart alert

, and then tap the 

Smart alert

 switch to activate it.

If you have missed calls or new messages, the device will vibrate when you pick it up.

This feature may not work if the screen is turned on or the device is not on a flat 
surface.

Содержание SM-E500F/DS

Страница 1: ...www samsung com User Manual English 10 2015 Rev 1 1 SM E500F DS SM E500H DS SM E500HQ SM E500F SM E500H SM E500M...

Страница 2: ...apps 32 Installing or uninstalling apps 34 Entering text 36 Screen capture 36 My Files 37 Power saving feature 38 Viewing help information Network connectivity 39 Mobile data 39 Wi Fi 40 Tethering and...

Страница 3: ...00 Mobile printing Device data manager 102 Upgrading the device 103 Transferring files between the device and a computer 104 Backing up and restoring data 104 Performing a data reset Phone 58 Making c...

Страница 4: ...f Contents 4 Settings 105 About Settings 105 Quick settings 105 Connections 110 Device 114 Personalisation 117 System 123 Applications Appendix 124 Troubleshooting 129 Removing the battery non removab...

Страница 5: ...imited use Extracting and using these materials for commercial or other purposes is an infringement of copyright laws Users are entirely responsible for illegal use of media You may incur additional c...

Страница 6: ...6 Instructional icons Warning situations that could cause injury to yourself or others Caution situations that could cause damage to your device or other equipment Note notes usage tips or additional...

Страница 7: ...s and specifications are subject to change without prior notice You can purchase additional accessories from your local Samsung retailer Make sure they are compatible with the device before purchase U...

Страница 8: ...set jack Multipurpose jack Home button Recent apps button Power button SIM card Memory card tray dual SIM models Memory card tray single SIM models SIM card tray Earpiece Microphone Back button Flash...

Страница 9: ...he touch screen may malfunction in humid conditions or when exposed to water Buttons Button Function Power Press and hold to turn the device on or off Press to turn on or lock the screen Recent apps T...

Страница 10: ...rds work with the device Some LTE services may not be available depending on the service provider For more information about service availability contact your service provider 1 Insert the ejection pi...

Страница 11: ...Getting started 11 2 Pull out the SIM card tray gently from the SIM card tray slot Dual SIM models Single SIM models...

Страница 12: ...SIM card tray 2 2 2 1 The SIM card tray 2 also serves as the memory card tray However you cannot place both the SIM or USIM card and the memory card at the same time Single SIM models Place the SIM or...

Страница 13: ...Getting started 13 4 Insert the SIM card tray back into the SIM card tray slot Dual SIM models Single SIM models...

Страница 14: ...the ejection pin into the hole on the SIM card tray to loosen the tray 2 Pull out the SIM card tray gently from the SIM card tray slot 3 Remove the SIM or USIM card Dual SIM models Single SIM models 4...

Страница 15: ...ger Select a SIM or USIM card and tap the switch to activate it Changing the display name and icon of SIM or USIM cards On the Home screen tap Apps Settings SIM card manager Select a SIM or USIM card...

Страница 16: ...e cannot be turned on immediately when the charger is connected Allow a depleted battery to charge for a few minutes before turning on the device If you use multiple apps at once network apps or apps...

Страница 17: ...he device and then unplug it from the electric socket To save energy unplug the charger when not in use The charger does not have a power switch so you must unplug the charger from the electric socket...

Страница 18: ...card right side up The device supports the FAT and the exFAT file systems for memory cards When inserting a card formatted in a different file system the device asks to reformat the memory card Frequ...

Страница 19: ...Getting started 19 4 Insert the memory card tray back into the memory card tray slot Dual SIM models Single SIM models...

Страница 20: ...ransferring or accessing information Doing so can cause data to be lost or corrupted or can damage the memory card or device Samsung is not responsible for losses that result from the misuse of damage...

Страница 21: ...directions from authorised personnel in areas where the use of wireless devices is restricted such as aeroplanes and hospitals Locking and unlocking the screen Pressing the Power button turns off the...

Страница 22: ...rtips The device may not recognise touch inputs close to the edges of the screen which are outside of the touch input area Leaving the touch screen idle for extended periods may result in afterimages...

Страница 23: ...old an item or the screen for more than 2 seconds to access available options Dragging To move an item tap and hold it and drag it to the target position Double tapping Double tap on a webpage or imag...

Страница 24: ...e Home screen or the Apps screen to see another panel Flick up or down to scroll through a webpage or a list of items such as contacts Spreading and pinching Spread two fingers apart on a webpage map...

Страница 25: ...and more Widgets are small apps that launch specific app functions to provide information and convenient access on your Home screen To view other panels scroll left or right or tap one of the screen...

Страница 26: ...tegories You can get up to date on news that interests you using this feature 1 On the Home screen tap or swipe to the right to open Flipboard Briefing 2 Tap START READING when launching this feature...

Страница 27: ...installed apps On the Home screen tap Apps to open the Apps screen To view other panels scroll left or right or select a screen indicator at the bottom of the screen To customise the Apps screen refe...

Страница 28: ...reen Icon Meaning No signal Signal strength Currently accessing SIM or USIM card dual SIM models Roaming outside of normal service area GPRS network connected EDGE network connected UMTS network conne...

Страница 29: ...ns and quick setting panels Using the notifications panel When you receive new notifications such as messages or missed calls indicator icons appear on the status bar To see more information about the...

Страница 30: ...htness View all quick setting buttons Activate or deactivate options Tap and hold a button to view more detailed settings Clear all notifications Select a SIM or USIM card dual SIM models Rearranging...

Страница 31: ...nformation Sound Vibrate Mute Select a sound mode Screen rotation Allow or prevent the interface from rotating when you rotate the device Some apps do not allow screen rotation Bluetooth Refer to Blue...

Страница 32: ...app icon to open Closing an app Tap and then tap END next to an app to close it To close all running apps tap END ALL Alternatively tap Installing or uninstalling apps Galaxy Apps Use this app to purc...

Страница 33: ...reen and tap Uninstall disable apps appears on the apps that you can disable Select an app and tap DISABLE To uninstall downloaded apps open the Apps screen and tap Downloaded apps Uninstall Alternati...

Страница 34: ...it twice Enter punctuation marks Enter a space Change the keyboard settings Changing the input language Tap Select input languages and then select the languages to use If you select two or more langu...

Страница 35: ...ard settings Enter emoticons Switch to the floating keyboard You can move the keyboard to another location by dragging the tab Switch to the standard keyboard Copying and pasting 1 Tap and hold over t...

Страница 36: ...e image and share it with others You can also capture screenshots using other methods Refer to Palm swipe to capture for more information It is not possible to capture a screenshot while using some ap...

Страница 37: ...he following Displays colours on the screen as grey tones Restricts the available apps to essential and selected apps only Deactivates the mobile data connection when the screen turns off Deactivates...

Страница 38: ...ation To view help information to learn how to use the device and apps open the Apps screen and tap Settings Help To view help information for an app while you are using the app tap Help Some apps may...

Страница 39: ...Wi Fi Connect the device to aWi Fi network to use the Internet or share media files with other devices Refer toWi Fi for additional options Turn offWi Fi to save the battery when not in use 1 On the...

Страница 40: ...t to share your device s mobile data connection with other devices 1 On the Apps screen tap Settings Tethering and Mobile hotspot Mobile hotspot 2 Tap the Mobile hotspot switch to activate it appears...

Страница 41: ...nection with other devices via Bluetooth Ensure that the computer that you connect to supports the Bluetooth feature 1 Pair your device with the other device via Bluetooth Refer to Pairing with other...

Страница 42: ...ntrol motions properly Smart alert On the Apps screen tap Settings Motions and gestures Smart alert and then tap the Smart alert switch to activate it If you have missed calls or new messages the devi...

Страница 43: ...n tap Settings Motions and gestures Mute pause and then tap the Mute pause switch to activate it Placing palm on screen Cover the screen with your palm to mute incoming calls or alarms Turning device...

Страница 44: ...re switch to activate it Place the side of your hand on the screen and sweep it across the screen from the right to the left or vice versa to capture a screenshot The image is saved in the Gallery Alb...

Страница 45: ...dow 1 On the Apps screen tap Settings Multi window and then tap the Multi window switch to activate it Alternatively open the quick setting panel and tap Multi window to activate it 2 Tap and hold to...

Страница 46: ...ndow combination Use this feature to save the combination of the currently running Multi window apps 1 Launch two apps in a split screen Multi window 2 Open the Multi window tray and tap Create The Mu...

Страница 47: ...circle between the app windows up or down to adjust the size of the windows Using Multi window options When you use Multi window apps select the app window and a blue frame will appear around it Tap t...

Страница 48: ...ocations between Multi window apps Drag and drop text or copied images from one window to another Tap and hold an item in the selected window and drag it to a location in another window Some apps may...

Страница 49: ...d operation and then tap the One handed operation switch to activate it To switch to one handed operation mode hold the device in one hand Then quickly drag your thumb from the edge of the screen to t...

Страница 50: ...d hold an item on the Home screen and then drag it to a new location To move the item to another panel drag it to the side of the screen You can also move frequently used apps to the shortcuts area at...

Страница 51: ...apps Hide apps that you do not want to see on the Apps screen On the Apps screen tap Hide apps select apps and then tap DONE To display hidden apps tap Show hidden apps select apps and then tap DONE...

Страница 52: ...next step 5 Set the image as the wallpaper for one or both of the SIM or USIM cards Changing ringtones Change ringtones for incoming calls and notifications On the Apps screen tap Settings Sounds and...

Страница 53: ...ock code is forgotten take the device to a Samsung Service Centre to reset it Pattern Draw a pattern by connecting four dots or more and then draw the pattern again to verify it Set a backup PIN to un...

Страница 54: ...first time set an unlock code and a backup PIN 2 Enter the private mode unlock code When this mode is activated appears at the top of the screen 3 To select items to hide tap and hold an item in the l...

Страница 55: ...r user experience by using a simpler layout and bigger icons on the Home screen You can access the most popular apps and frequently used settings and add shortcuts to your favourite contacts On the Ap...

Страница 56: ...previous device to your new device You can download the app from Galaxy Apps or Play Store 1 On your device tap Smart Switch 2 On your device select an option depending on the previous device type and...

Страница 57: ...uter via Samsung Kies Refer to Connecting with Samsung Kies for more information Setting up accounts Adding accounts Some apps used on your device require a registered account Create accounts to have...

Страница 58: ...mber and then tap or to make a voice call or tap to make a video call Access additional options Preview the phone number View favourite contacts Delete a preceding character View the contacts list Vie...

Страница 59: ...st View call and message logs Enter the number using the keypad Add the number to the contacts list You can also make calls to phone numbers listed in Logs Favourites and Contacts Making calls from ca...

Страница 60: ...ernational calls tap Settings Call More settings Call barring Then select a call type and tick International calls Receiving calls Answering a call When a call comes in drag outside the large circle R...

Страница 61: ...th Switch to a Bluetooth headset if it is connected to the device Tap to view more options When you launch apps during a call a pop up window for the call screen appears You can continue your phone co...

Страница 62: ...nd enter contact information Add an image Add or delete a contact field 3 Tap SAVE To add a phone number to the contacts list from the keypad tap Keypad enter the number and then tap Add to Contacts I...

Страница 63: ...p the search field at the top of the contacts list and enter search criteria Once a contact is selected take one of the following actions Add to favourite contacts Make a voice or video call Compose a...

Страница 64: ...dditional charges for sending or receiving messages when you are roaming 1 Tap Messages on the Apps screen 2 Tap 3 Add recipients and enter a message Dual SIM models Access additional options Enter a...

Страница 65: ...he message 4 Dual SIM models Tap or to send the message Single SIM models Tap to send the message Viewing incoming messages Incoming messages are grouped into message threads by contact Select a conta...

Страница 66: ...nother email account tap MANAGE ACCOUNTS If you have more than one email account you can set one as the default account Tap MANAGE ACCOUNTS Set default account Sending emails Tap Email on the Apps scr...

Страница 67: ...eved To manually retrieve new messages tap Tap a message to read Open attachments Reply to the message Add this email address to the contacts list or view other options Mark the message as a reminder...

Страница 68: ...fingers apart on the screen to zoom in and pinch to zoom out To capture an image from the video while recording tap To change the focus while recording a video tap where you want to focus To focus on...

Страница 69: ...e locked screen To quickly take photos of special moments launch Camera on the locked screen On the locked screen drag outside the large circle If is not shown open the Apps screen tap Settings Lock s...

Страница 70: ...Selfie Use this mode to take a self portrait using the front camera 1 On the Apps screen tap Camera 2 Tap to use the front camera 3 Tap MODE Selfie 4 Show your palm to the screen or tap to take a phot...

Страница 71: ...cam selfie Use this mode to allow the camera to detect and focus your face automatically when you take a self portrait using the rear camera 1 On the Apps screen tap Camera MODE Rear cam selfie 2 Move...

Страница 72: ...on screen 1 On the Apps screen tap Camera MODE Manage modes 2 Tick the modes to add to the modes list Beauty face Take a photo with lightened faces for gentler images Continuous shot Take a series of...

Страница 73: ...amera s sensor receives For low light situations use a higher exposure ISO Select an ISO value This controls camera light sensitivity It is measured in film camera equivalents Low values are for stati...

Страница 74: ...to delete your location information Storage location Select the memory location for storage Save as flipped Invert the image to create a mirror image of the original scene when taking photos with the...

Страница 75: ...files show the icon on the preview thumbnail To hide or show the menu bar and the preview thumbnails tap the screen Access additional options Delete the image Modify the image Move to the previous sc...

Страница 76: ...a nearby device To use this feature open the Apps screen tap Settings NFC and sharing Connect and share Nearby devices and then tap the Nearby devices switch to activate it Refer to Nearby devices for...

Страница 77: ...e date and tap 3 Select either event or task and enter details Add event Set a start and end date for an event You can set an optional repeat setting Add task Add a task to do on a specific date You c...

Страница 78: ...e To change an account s syncing option open the Apps screen tap Settings Accounts and then select an account service Internet 1 Tap Internet on the Apps screen 2 Tap the address field 3 Enter the web...

Страница 79: ...to the previous song Tap and hold to move backwards quickly Turn on shuffle Open the playlist Search for other devices to play the file Set the file as your favourite song Adjust the volume To listen...

Страница 80: ...r device Tap Music on the Apps screen Accessing music on a registered device To use this feature sign in to your Samsung account On the Music main screen tap DEVICES and select a device in Registered...

Страница 81: ...Move forwards or backwards by dragging the bar Search for other devices to play the file Skip to the previous video Tap and hold to move backwards quickly Skip to the next video Tap and hold to move...

Страница 82: ...k samsung com for more information Ensure that the registered devices are turned on and connected to aWi Fi or mobile network You may incur additional charges when you access content stored on other d...

Страница 83: ...he Apps screen 2 Select an option and edit images or videos Edit images by applying various effects Apply various effects to the images you have taken in Shot more mode Trim video segments Combine sev...

Страница 84: ...s for the alarm to repeat after the preset time Smart alarm Set a time and tone for the smart alarm A smart alarm starts at a low volume a few minutes before a preset alarm is scheduled to sound The v...

Страница 85: ...me tap and hold a clock and then tap Deleting clocks Tap Select select clocks and then tap Stopwatch On the Apps screen tap Clock Stopwatch Tap START to time an event Tap LAP to record lap times Tap S...

Страница 86: ...ypad To clear the history tap CLEAR HISTORY Memo Use this app to create memos and organise them by category Tap Memo on the Apps screen Composing memos Tap on the memos list and enter a memo While com...

Страница 87: ...into the microphone Tap to pause recording To cancel recording tap Tap to finish recording While recording a voice memo tap to insert a bookmark Display the list of voice memos Access additional opti...

Страница 88: ...use or resume playback Skip to the previous or next voice memo Flipboard Use this app to view live social network updates and news in a personalised magazine format Tap Flipboard on the Apps screen Th...

Страница 89: ...en View information about the current station Fine tune the frequency Enter radio station frequency manually Record a song from the FM radio View the list of favourite stations Access additional optio...

Страница 90: ...region or service provider Chrome Search for information and browse webpages Gmail Send or receive emails via the Google Mail service Google Share your news and follow updates that your family friend...

Страница 91: ...and share it with others YouTube Watch or create videos and share them with others Photos Manage photos albums and videos that you have saved on the device and uploaded to Google Hangouts Chat with y...

Страница 92: ...e devices the operating distance may be reduced Some devices especially those that are not tested or approved by the Bluetooth SIG may be incompatible with your device Do not use the Bluetooth feature...

Страница 93: ...such as contacts or media files with other Bluetooth devices The following actions are an example of sending an image to another device Sending an image 1 On the Apps screen tap Gallery 2 Select an i...

Страница 94: ...outWi Fi Direct Wi Fi Direct connects devices directly via aWi Fi network without requiring an access point Connecting to other devices 1 On the Apps screen tap Settings Wi Fi and then tap the Wi Fi s...

Страница 95: ...Fi Direct and then select a device to transfer the image to 4 Accept theWi Fi Direct authorisation request on the other device Receiving an image When another device sends you an image accept theWi F...

Страница 96: ...he NFC feature Use the NFC feature to send images or contacts to other devices and read product information from NFC tags If you insert a SIM or USIM card that has a payment feature you can use the de...

Страница 97: ...The payment services list may not include all available payment apps To make a payment with the SIM or USIM card insert the NFC enabled SIM or USIM card into the SIM card tray slot 1 1 The SIM card t...

Страница 98: ...g panel and tap NFC to activate it 3 Tap S Beam and tap the S Beam switch to activate it 4 Select a file and touch the other device s NFC antenna to your device s NFC antenna 5 When Touch to beam appe...

Страница 99: ...AllShare Cast dongle HomeSync This feature may not be available depending on the region or service provider Some files may be buffered during playback depending on the network connection To save ener...

Страница 100: ...The detected devices are listed 4 Select a device to connect to Your device s screen appears on theTV screen If you connect the device for the first time tap and hold the dongle s name in the list and...

Страница 101: ...he device searches for printers that are connected to the sameWi Fi network as your device Select a printer to use as the default printer To add printers manually select a printer plug in tap Add prin...

Страница 102: ...f Samsung Kies from the Samsung website Launch Samsung Kies and connect the device to the computer Samsung Kies automatically recognises the device and shows available updates in a dialogue box if any...

Страница 103: ...a media device 1 Connect the device to the computer using the USB cable 2 Open the notifications panel and then tap Connected as a media device Media device MTP Tap Camera PTP if your computer does no...

Страница 104: ...r Google account via the setup wizard you cannot restore the backup data Using a Samsung account On the Apps screen tap Settings Accounts Add account Samsung account and then sign in to your Samsung a...

Страница 105: ...tions To edit the list of favourite setting options tap Edit quick settings select a setting option and then tap DONE Connections Wi Fi Activate theWi Fi feature to connect to aWi Fi network and acces...

Страница 106: ...n is turned off the device automatically turns offWi Fi connections When this happens the device automatically accesses mobile networks if it is set to use them This may incur data transfer fees To av...

Страница 107: ...computer Bluetooth tethering Use Bluetooth tethering to share the device s mobile data connection with computers or other devices via Bluetooth Flight mode This disables all wireless functions on your...

Страница 108: ...ific locations when you use GPS Wi Fi or Bluetooth features to find your current location SIM card manager dual SIM models Activate your SIM or USIM cards and customise the SIM card settings On the Se...

Страница 109: ...Nearby devices Change settings for sharing content when you connect the device to nearby devices All devices must supportWi Fi direct or be connected to the same access point Device name View the medi...

Страница 110: ...u are roaming Access Point Names Set up access point names APNs Network mode SIM 1 Network mode SIM 2 dual SIM models Select a network type Network mode single SIM models Select a network type Network...

Страница 111: ...bration pattern Notifications single SIM models Select a ringtone for events such as incoming messages and missed calls Display and wallpaper Change the display settings On the Settings screen tap Dis...

Страница 112: ...oto Use this mode to make the display tone look like real colours Basic Use this mode for normal surroundings Auto adjust screen tone Set the device to save power by adjusting the brightness of the di...

Страница 113: ...anel Customise the items that appear on the notifications panel On the Settings screen tap Notification panel Motions and gestures Activate the motion recognition feature and change the settings that...

Страница 114: ...e Google server Backup account Set up or edit your Google backup account Automatic restore Set the device to restore settings and app data when the apps are reinstalled on the device Factory data rese...

Страница 115: ...uble tapping on the screen Speak passwords Set the device to read the password aloud when you enter the password whileTalkBack is activated Font size Change the font size Magnification gestures Set th...

Страница 116: ...ty and interaction Customise the settings to improve accessibility for users who have reduced dexterity Assistant menu Set the device to show the assistive shortcut icon that helps you access function...

Страница 117: ...switch to activate it Private mode access type Set or change the unlock method to activate private mode System Language and input Change the settings for text input Some options may not be available...

Страница 118: ...rt the preset text Auto capitalise Set the device to automatically capitalise the first character after a final punctuation mark such as a full stop question mark or exclamation mark Auto spacing Set...

Страница 119: ...ne Select a speech synthesis engine To change the settings for speech synthesis engines tap Speech rate Select a speed for the text to speech feature Listen to an example Listen to the spoken text for...

Страница 120: ...across time zones Set date Set the current date manually Set time Set the current time manually Automatic time zone Set the device to receive time zone information from the network when you move acros...

Страница 121: ...me shows the time remaining before the battery power runs out if the device is not used Standby time may vary depending on your device settings and operating conditions Display battery percentage Set...

Страница 122: ...ce will not be able to read your encrypted files Disable this setting before resetting the device Remote controls Set the device to allow control of your lost or stolen device remotely via the Interne...

Страница 123: ...edential contents from the device and reset the password Help View help information to learn how to use the device and apps or configure important settings On the Settings screen tap Help About device...

Страница 124: ...or USIM card is blocked usually as a result of entering your PIN incorrectly several times You must enter the PUK supplied by your service provider PIN2 When you access a menu requiring the PIN2 you...

Страница 125: ...and turn it on again If your device is frozen and unresponsive press and hold the Power button and the Volume button down simultaneously for more than 7 seconds to restart it If this does not solve t...

Страница 126: ...le moving wireless network services may be disabled due to issues with the service provider s network The battery icon is empty Your battery is low Charge the battery The battery does not charge prope...

Страница 127: ...Centre Photo quality is poorer than the preview The quality of your photos may vary depending on the surroundings and the photography techniques you use If you take photos in dark areas at night or in...

Страница 128: ...vice and the other Bluetooth device are within the maximum Bluetooth range 10 m If the tips above do not solve the problem contact a Samsung Service Centre A connection is not established when you con...

Страница 129: ...xpand slightly Removing the battery non removable type These instructions are only for your service provider or an authorised repair agent Damage or faults caused by the unauthorised removal of the ba...

Страница 130: ...en and remove the screws 4 Remove the circuit board by lifting it out of the case using an opening tool then put the case aside and place the circuit board face down on a flat work surface 5 Disconnec...

Страница 131: ...31 6 Push the back of the battery with your fingers and remove the battery Make sure not to press or puncture the battery with your fingernails or other objects when removing it This may cause explosi...

Страница 132: ...y information storage and retrieval system without the prior written permission of Samsung Electronics Trademarks SAMSUNG and the SAMSUNG logo are registered trademarks of Samsung Electronics Bluetoot...

Отзывы: