background image

Basics

30

Lock screen

Pressing the Side key turns off the screen and locks it. Also, the screen turns off and 
automatically locks if the device is not used for a specified period.
To unlock the screen, swipe in any direction when the screen turns on.
If the screen is off, press the Side key to turn on the screen. Alternatively, double-tap the 
screen.

Changing the screen lock method

To change the screen lock method, launch the 

Settings

 app, tap 

Lock screen


Screen lock 

type

, and then select a method.

When you set a pattern, PIN, password, or your biometric data for the screen lock method, 
you can protect your personal information by preventing others from accessing your device. 
After setting the screen lock method, the device will require an unlock code whenever 
unlocking it.

You can set your device to perform a factory data reset if you enter the unlock code 
incorrectly several times in a row and reach the attempt limit. Launch the 

Settings

 app, 

tap 

Lock screen


Secure lock settings

, unlock the screen using the preset screen lock 

method, and then tap the 

Auto factory reset

 switch to activate it.

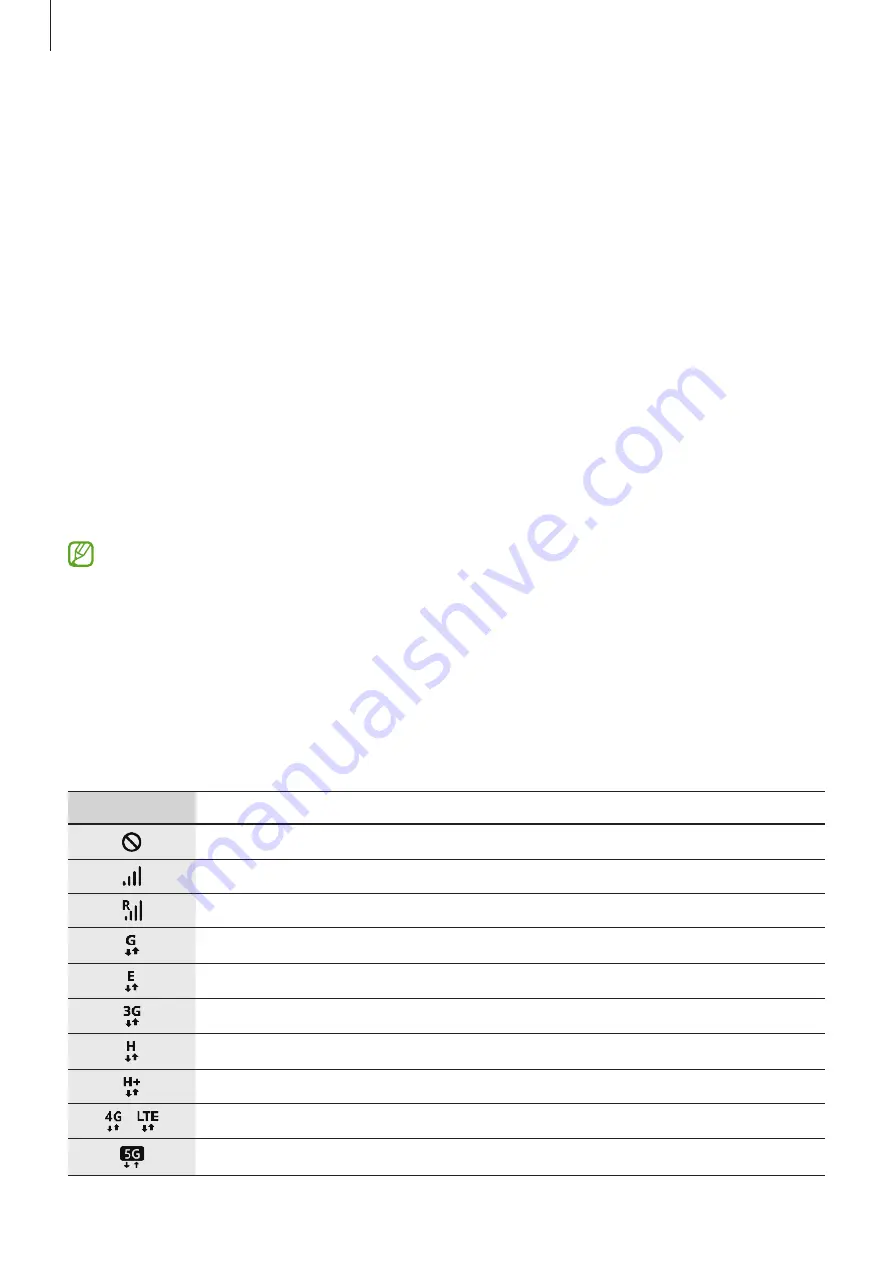
Indicator icons

Indicator icons appear on the status bar at the top of the screen. The icons listed in the table 
below are most common.

Icon

Meaning

No signal
Signal strength
Roaming (outside of normal service area)
GPRS network connected
EDGE network connected
UMTS network connected
HSDPA network connected
HSPA+ network connected

 / 

LTE network connected
5G network connected

Содержание SM-A146U1/DS

Страница 1: ...www samsung com USER MANUAL SM A146U SM A146U1 DS SM S146VL SM A146W English 11 2022 Rev 1 0 ...

Страница 2: ...count 22 Transferring data from your previous device Smart Switch 24 Understanding the screen 33 Notification panel 35 Entering text Apps and features 37 Installing or uninstalling apps 38 Phone 41 Contacts 43 Messages 44 Internet 45 Camera 56 Gallery 60 Multi window 62 Samsung Notes 63 Samsung Members 63 Galaxy Shop 63 Calendar 64 Reminder 65 Voice Recorder 65 My Files 65 Clock 66 Calculator 66 G...

Страница 3: ...ubleshooting 106 Removing the battery Settings 69 Introduction 69 Samsung account 69 Connections 70 Wi Fi 72 Bluetooth 73 NFC and contactless payments NFC enabled models 74 Data saver 75 Mobile data only apps 75 Mobile Hotspot 76 More connection settings 77 Sounds and vibration 78 Sound quality and effects 78 Notifications 79 Display 80 Motion smoothness 80 Wallpaper 80 Themes 80 Home screen 81 Lo...

Страница 4: ...customise the operating system may cause the device or apps to work improperly Software sound sources wallpapers images and other media provided with this device are licensed for limited use Extracting and using these materials for commercial or other purposes is an infringement of copyright laws Users are entirely responsible for illegal use of media You may incur additional charges for data serv...

Страница 5: ...p tap Display and then tap the Adaptive brightness switch to activate it Depending on the region or model some devices are required to receive approval from the Federal Communications Commission FCC If your device is approved by the FCC you can view the FCC ID of the device To view the FCC ID launch the Settings app and tap About phone Status information If your device does not have an FCC ID it m...

Страница 6: ...e device and close any running apps Wait for the device to cool down and then begin charging the device again If the lower part of the device overheats it could be because the connected USB cable is damaged Replace the damaged USB cable with a new Samsung approved one When using a wireless charger do not place foreign materials such as metal objects magnets and magnetic stripe cards between the de...

Страница 7: ...ar while the device is placed in direct sunlight When using the mobile hotspot and tethering feature When using the device in areas with weak signals or no reception When charging the battery with a damaged USB cable When the device s multipurpose jack is damaged or exposed to foreign materials such as liquid dust metal powder and pencil lead When you are roaming Do the following when the device h...

Страница 8: ... the device will turn off Do not use the device until the device s temperature drops below the specified level If the second warning message appears during an emergency call the call will not be disconnected by a forced shut down Precautions for operating environment Your device may heat up due to the environment in the following conditions Use caution to avoid shortening the battery s lifespan da...

Страница 9: ...es and specifications are subject to change without prior notice You can purchase additional accessories from your local Samsung retailer Make sure they are compatible with the device before purchase Use only Samsung approved accessories Using unapproved accessories may cause the performance problems and malfunctions that are not covered by the warranty Availability of all accessories is subject t...

Страница 10: ...int recognition sensor Volume key Front camera Multipurpose jack USBType C Earphone jack SIM card Memory card tray Touchscreen NFC antenna NFC enabled models Rear camera Microphone Main antenna Main antenna Speaker Microphone GPS antenna Galaxy A14 5G ...

Страница 11: ...ork If you attempt to remove the dust or foreign materials with a sharp object the device may be damaged and its appearance may be affected Connectivity problems and battery drain may occur in the following situations If you attach metallic stickers on the antenna area of the device If you attach a device cover made with metallic material to the device If you cover the device s antenna area with y...

Страница 12: ...reenshot Press and hold simultaneously to turn off the device Setting the Side key Select an app or feature to launch by pressing the Side key twice Launch the Settings app tap Advanced features Side key and then select an option you want Soft buttons Back button Home button Recents button When you turn on the screen the soft buttons will appear at the bottom of the screen Refer to Navigation bar ...

Страница 13: ...charger when not in use The charger does not have a power switch so you must unplug the charger from the electric socket when not in use to avoid wasting power The charger should remain close to the electric socket and easily accessible while charging Wired charging Connect the USB cable to the USB power adaptor and plug the cable into the device s multipurpose jack to charge the battery After ful...

Страница 14: ... to another device the battery will drain quickly To avoid losing power during a data transfer always use these apps after fully charging the battery Using a power source other than the charger such as a computer may result in a slower charging speed due to a lower electric current The device can be used while it is charging but it may take longer to fully charge the battery If the device receives...

Страница 15: ...tray 2 Pull out the tray gently from the tray slot 3 Place the SIM or USIM card on the tray with the gold coloured contacts facing downwards and gently press the SIM or USIM card into the tray to secure it Galaxy A14 5G 4 Insert the tray back into the tray slot Use only a nano SIM card Use caution not to lose or let others use the SIM or USIM card Samsung is not responsible for any damages or inco...

Страница 16: ...p Connections SIM card manager SIM cards Activate the SIM card to use and customise the SIM card settings Preferred SIM card Select to use specific SIM cards for some features such as voice calls when two cards are activated More SIM card settings Customise the call settings ...

Страница 17: ...to the tray to secure it 4 Insert the tray back into the tray slot Some memory cards may not be fully compatible with the device Using an incompatible card may damage the device or the memory card or corrupt the data stored in it Use caution to insert the memory card right side up Ensure that the ejection pin is perpendicular to the hole Otherwise the device may be damaged When you remove the tray...

Страница 18: ... Settings app and tap Battery and device care Storage Advanced SD card Unmount Do not remove external storage such as a memory card or USB storage while the device is transferring or accessing information or right after transferring data Doing so can cause data to be corrupted or lost or cause damage to the external storage or device Samsung is not responsible for losses including loss of data res...

Страница 19: ...device on Press and hold the Side key for a few seconds to turn on the device Turning the device off 1 To turn off the device press and hold the Side key Alternatively open the notification panel swipe downwards and then tap 2 Tap Power off To restart the device tap Restart Forcing restart If your device is frozen and unresponsive press and hold the Side key and theVolume Down key simultaneously f...

Страница 20: ...ou turn on your device for the first time or after performing a data reset follow the on screen instructions to set up your device If you do not connect to aWi Fi network you may not be able to set up some device features during the initial setup Samsung account Your Samsung account is an integrated account service that allows you to use a variety of Samsung services provided by mobile devices TVs...

Страница 21: ...nt password and then tap OK Transferring data from your previous device Smart Switch You can use Smart Switch to transfer data from your previous device to your new device Launch the Settings app and tap Accounts and backup Bring data from old device This feature may not be supported on some devices or computers Limitations apply Visit www samsung com smartswitch for details Samsung takes copyrigh...

Страница 22: ...kup data from a computer Transfer data between your device and a computer You must download the Smart Switch computer version app from www samsung com smartswitch Back up data from your previous device to a computer and import the data to your device 1 On the computer visit www samsung com smartswitch to download Smart Switch 2 On the computer launch Smart Switch If your previous device is not a S...

Страница 23: ...or pinch on the screen Do not allow the touchscreen to come into contact with other electrical devices Electrostatic discharges can cause the touchscreen to malfunction To avoid damaging the touchscreen do not tap it with anything sharp or apply excessive pressure to it with your fingertips It is recommended not to use fixed graphics on part or all of the touchscreen for extended periods Doing so ...

Страница 24: ...ome Tap to return to the Home screen Tap and hold to launch the Google Assistant app Back Tap to return to the previous screen Hiding the navigation bar View files or use apps on a wider screen by hiding the navigation bar Launch the Settings app tap Display Navigation bar and then tap Swipe gestures under Navigation type The navigation bar will be hidden and the gesture hints will appear Tap More...

Страница 25: ...ards to open the Apps screen To return to the Home screen swipe upwards or downwards on the Apps screen Alternatively tap the Home button or the Back button Home screen Apps screen Finder Favourite apps If you add the Apps button on the Home screen you can open the Apps screen by tapping the button On the Home screen tap and hold an empty area tap Settings and then tap the Show Apps screen button ...

Страница 26: ...eme Visual elements of interface such as colours icons and wallpapers will change depending on the selected theme Widgets Widgets are small apps that launch specific app functions to provide information and convenient access on your Home screen Select a widget and tap Add The widget will be added on the Home screen Settings Configure settings for the Home screen such as the screen layout Displayin...

Страница 27: ...tcut to an app on the Home screen tap and hold an item on the Apps screen and then tap Add to Home A shortcut to the app will be added on the Home screen You can also move frequently used apps to the shortcuts area at the bottom of the Home screen Creating folders Create folders and gather similar apps to quickly access and launch apps On the Home screen or the Apps screen tap and hold an app and ...

Страница 28: ...ted The folder s apps will be relocated to the Apps screen Edge panel You can quickly access your favourite apps and features from the Edge panels Drag the Edge panel handle towards the centre of the screen If the Edge panel handle is not visible launch the Settings app tap Display and then tap the Edge panels switch to activate it Edge panel handle Edge panel Edge panel settings ...

Страница 29: ...nting others from accessing your device After setting the screen lock method the device will require an unlock code whenever unlocking it You can set your device to perform a factory data reset if you enter the unlock code incorrectly several times in a row and reach the attempt limit Launch the Settings app tap Lock screen Secure lock settings unlock the screen using the preset screen lock method...

Страница 30: ... Alarm activated Mute mode Vibration mode Flight mode activated Error occurred or caution required Battery charging Battery power level The status bar may not appear at the top of the screen in some apps To display the status bar drag down from the top of the screen Some indicator icons appear only when you open the notification panel The indicator icons may appear differently depending on the ser...

Страница 31: ...r at the bottom of the screen Capture the current content and the hidden content on an elongated page such as a webpage When you tap the screen will automatically scroll down and more content will be captured Write or draw on the screenshot or crop a portion from the screenshot You can view the cropped area in Gallery Share the screenshot with others If the options are not visible on the captured ...

Страница 32: ...functions on the notification panel View the notification details and perform various actions Clear all notifications Launch Settings Access the notification settings Quick setting buttons Control media on your device and connected nearby devices Control connected nearby devices and SmartThings devices and scenes Using quick setting buttons Tap quick setting buttons to activate certain features Sw...

Страница 33: ... device 1 Open the notification panel and tap Media 2 Tap the icons on the controller to control the playback To continue playback on another device tap and select the device you want Controlling nearby devices Launch quickly and take control of nearby connected devices and frequently used SmartThings devices and scenes on the notification panel 1 Open the notification panel and tap Devices Nearby...

Страница 34: ...the languages to use When you select two or more languages you can switch between the input languages by swiping to the left or right on the space key Changing the keyboard On the navigation bar tap to change the keyboard To change the keyboard type tap Languages and types select a language and then select the keyboard type you want If the keyboard button does not appear on the navigation bar laun...

Страница 35: ...ard Open the text editing panel Change the keyboard mode Change the keyboard size Enter stickers Some features may not be available depending on the service provider or model Copying and pasting 1 Tap and hold over text 2 Drag or to select the desired text or tap Select all to select all text 3 Tap Copy or Cut The selected text is copied to the clipboard 4 Tap and hold where the text is to be inse...

Страница 36: ...pps and then select an option Play Store Purchase and download apps Launch the Play Store app Browse apps by category or search for apps by keyword To change the auto update settings tap Settings Auto update apps and then select an option Managing apps Uninstalling or disabling apps Tap and hold an app and select an option Uninstall Uninstall downloaded apps Disable Disable selected default apps t...

Страница 37: ...iew or change app permission settings by permission category launch the Settings app and tap Apps Permission manager Select an item and select an app If you do not grant permissions to apps the basic features of the apps may not function properly Phone Introduction Make or answer voice and video calls Making calls 1 Launch the Phone app and tap Keypad 2 Enter a phone number 3 Tap to make a voice c...

Страница 38: ...al numbers 10 and up tap the first digit s of the number and then tap and hold the last digit For example if you set the number 123 as a speed dial number tap 1 tap 2 and then tap and hold 3 Making an international call 1 Launch the Phone app and tap Keypad 2 Tap and hold 0 until the sign appears 3 Enter the country code area code and phone number and then tap Receiving calls Answering a call When...

Страница 39: ...l Dial a second call The first call will be put on hold When you end the second call the first call will be resumed Record Record a call conversation When you record a call conversation the file will be saved to My Files Internal storage Call Hold call Hold a call Bluetooth Switch to a Bluetooth headset if it is connected to the device Speaker Activate or deactivate the speakerphone When using the...

Страница 40: ...them from other storages to your device 1 Launch the Contacts app and tap Manage contacts Import or export contacts Import 2 Follow the on screen instructions to import contacts Syncing contacts with your web accounts Sync your device contacts with online contacts saved in your web accounts such as your Samsung account 1 Launch the Settings app tap Accounts and backup Manage accounts and select th...

Страница 41: ...tap More Delete Sharing contacts You can share contacts with others by using various sharing options 1 Launch the Contacts app and tap Share contacts 2 Select contacts and tap Share 3 Select a sharing method Creating groups You can add groups such as family or friends and manage contacts by group 1 Launch the Contacts app and tap Groups Create group 2 Follow the on screen instructions to create a ...

Страница 42: ...p to send the message Enter recipients Enter a message Enter stickers Attach files Recipient Send the message Viewing messages 1 Launch the Messages app and tap Conversations 2 On the messages list select a contact or a phone number To reply to the message tap the message input field enter a message and then tap To adjust the font size spread two fingers apart or pinch on the screen Sorting messag...

Страница 43: ...or information and bookmark your favourite webpages to access them conveniently 1 Launch the Internet app 2 Enter the web address or a keyword and then tap Go To view the toolbars drag your finger downwards slightly on the screen To switch between tabs quickly swipe to the left or right on the address field Bookmark the current webpage Open the homepage Move between pages More options Refresh the ...

Страница 44: ... videos of other people without their permission Do not take pictures or record videos where legally prohibited Do not take pictures or record videos in places where you may violate other people s privacy Taking pictures 1 Launch the Camera app You can also launch the app by pressing the Side key twice quickly or dragging to the left on the locked screen Some camera features are not available when...

Страница 45: ...ke appear blurry clean the camera lens and try again Make sure that the lens is not damaged or contaminated Otherwise the device may not work properly in some modes that require high resolutions Your device s camera features a wide angle lens Minor distortion may occur in wide angle pictures or videos and does not indicate device performance problems The maximum capacity for recording a video may ...

Страница 46: ...e focus and exposure setting will be locked The setting remains locked even after you take a picture This feature may not be available depending on the shooting mode Using the camera button Tap and hold the camera button to record a video To take burst shots swipe the camera button to the edge of the screen and hold it If you add another camera button you can move it anywhere on the screen and tak...

Страница 47: ...me and blur the image outside the frame In FOOD mode adjust the colour tone The available options may vary depending on the model or shooting mode Photo mode The camera adjusts the shooting options automatically depending on the surroundings to capture pictures easily On the shooting modes list tap PHOTO and tap to take a picture Scene optimiser When the camera recognises the subject the scene opt...

Страница 48: ...select a filter effect and modify facial features such as your skin tone or face shape before taking a picture 1 On the preview screen tap 2 Select effects and take a picture If you use the My filters feature you can create your own filter using an image with a colour tone you like from Gallery Video mode The camera adjusts the shooting options automatically depending on the surroundings to record...

Страница 49: ...tment bar to adjust the blur level 3 When Ready appears on the preview screen tap to take a picture Background blur adjustment bar Use this feature in a place that has sufficient light The background blur may not be applied properly in the following conditions The device or the subject is moving The subject is thin or transparent The subject has a similar colour to the background The subject or ba...

Страница 50: ...t moving or poorly lit objects However higher ISO settings can result in noise in pictures Select an appropriate white balance so images have a true to life colour range You can set the colour temperature Change the exposure value This determines how much light the camera s sensor receives For low light situations use a higher exposure Separating the focus area and the exposure area You can separa...

Страница 51: ... of indistinct backgrounds such as an empty sky or a plain wall Food mode Take pictures of food with more vibrant colours 1 On the shooting modes list tap MORE FOOD 2 Tap the screen and drag the circular frame over the area to highlight The area outside the circular frame will be blurred To resize the circular frame drag a corner of the frame 3 Tap and drag the adjustment bar to adjust the colour ...

Страница 52: ...n section and the video will start playing Up to two slow motion sections will be created based on the video To edit the slow motion section tap Editor and drag the section editing bar to the left or right Slow motion section Start bracket End bracket Section editing bar Hyperlapse mode Record scenes such as passing people or cars and view them as fast motion videos 1 On the shooting modes list ta...

Страница 53: ...ency Image Format HEIF Selfies Use wide angle for group selfies Set the device to automatically switch to a wide angle selfie when there are more than two people in the frame Save selfies as previewed Set the device to save pictures as they appear on the preview screen when taken with the front camera without flipping them Videos Video stabilisation Activate anti shake to reduce or eliminate blurr...

Страница 54: ... location tag setting Shooting methods Select additional shooting methods for taking a picture or recording a video Settings to keep Keep the last settings you used such as the shooting mode when you launch the camera Storage location Select the memory location for storage This feature will appear when you insert a memory card Watermark Add a watermark in the bottom left corner when taking picture...

Страница 55: ...features 56 Gallery Introduction View images and videos stored in your device You can also manage images and videos by album or create stories Using Gallery Launch the Gallery app Search for images More options ...

Страница 56: ... right on the screen More options Delete the image Share the image with others Modify the image Add the image to favourites Cropping enlarged images 1 Launch the Gallery app and select an image 2 Spread two fingers apart on the area you want to save and tap The cropped area will be saved as a file Saved image thumbnail ...

Страница 57: ... next video Tap and hold to fast forward Pause and resume playback Change the screen ratio Configure the caption settings Drag your finger up or down on the left side of the playback screen to adjust the brightness or drag your finger up or down on the right side of the playback screen to adjust the volume To rewind or fast forward swipe to the left or right on the playback screen Albums Create al...

Страница 58: ...deos select a story and tap Add or Edit Deleting images or videos Launch the Gallery app tap and hold an image a video or a story to delete and then tap Delete Using the recycle bin feature You can keep the deleted images and videos in the recycle bin The files will be deleted after a certain period Launch the Gallery app tap Settings and then tap the Recycle bin switch to activate it To view file...

Страница 59: ...run multiple apps at the same time in the pop up view Split screen view Pop up view Some apps may not support this feature Split screen view 1 Tap the Recents button to open the list of recently used apps 2 Swipe to the left or right tap an app s icon and then tap Open in split screen view 3 On the apps list select another app to launch ...

Страница 60: ...m together in the split screen view with a single tap 1 In the split screen view tap the circles between the app windows 2 Tap The two apps you are using in the split screen view will be saved on the Edge panel as an app pair Adjusting the window size Drag the circles between the app windows up or down to adjust the size of the windows When you drag the circles between the app windows to the top o...

Страница 61: ... to a new location Samsung Notes Create notes by entering text from the keyboard or by handwriting or drawing on the screen You can also insert images or voice recordings into your notes Creating notes 1 Launch the Samsung Notes app tap and then create a note You can change the input method by tapping or Enter a title Insert files Reading mode 2 When you are finished composing the note tap the Bac...

Страница 62: ... Galaxy Shop app Calendar Manage your schedule by entering upcoming events in your planner Creating events 1 Launch the Calendar app and tap or double tap a date If the date already has saved events or tasks in it tap the date and tap 2 Enter event details and tap Save Syncing events with your accounts 1 Launch the Settings app tap Accounts and backup Manage accounts and then select the account to...

Страница 63: ... will be added to the Apps screen Creating reminders 1 Launch the Reminder app 2 Tap Write a reminder or enter the details and then tap Save Completing reminders On the reminders list select a reminder and tap Complete Restoring reminders Restore reminders that have been completed 1 On the reminders list tap Completed 2 Select a category and tap Edit 3 Tick items to restore and tap Restore Reminde...

Страница 64: ... to insert a bookmark 3 Tap to finish recording 4 Enter a file name and tap Save My Files Access and manage various files stored in the device Launch the My Files app To check for unnecessary data and free up the device s storage tap Analyse storage To search for files or folders tap Clock Set alarms check the current time in many cities around the world time an event or set a specific duration La...

Страница 65: ...Play Store and Galaxy Store into one place for easy access You can set the device to game mode to play games more easily Launch the Game Launcher app and select the game you want If Game Launcher does not appear launch the Settings app tap Advanced features and then tap the Game Launcher switch to activate it Games downloaded from Play Store and Galaxy Store will be automatically shown on the Game...

Страница 66: ...p and select an image 2 On the other device open the notification panel swipe downwards and then tap Quick Share to activate it 3 Tap Quick Share and select a device to transfer the image to 4 Accept the file transfer request on the other device Setting who can find your device Set who is allowed to find and send content to your device 1 Open the notification panel swipe downwards and then tap Qui...

Страница 67: ...Maps Find your location on the map search the world map and view location information for various places around you YT Music Enjoy various music and videos provided byYouTube Music You can also view the music collections stored on your device and play them Play Movies TV Purchase or rent videos such as movies andTV programmes from Play Store Drive Store your content on the cloud access it from any...

Страница 68: ...ections Wi Fi Activate theWi Fi feature to connect to aWi Fi network and access the Internet or other network devices Refer toWi Fi for more information Bluetooth Use Bluetooth to exchange data or media files with other Bluetooth enabled devices Refer to Bluetooth for more information NFC and contactless payments Set the device to allow you to read near field communication NFC tags that contain in...

Страница 69: ...ustomise the SIM card settings Refer to SIM card manager dual SIM models for more information Mobile Hotspot andTethering Use the device as a mobile hotspot to share the device s mobile data connection with other devices For more information about the mobile hotspot refer to Mobile Hotspot You may incur additional charges when using this feature More connection settings Customise settings to contr...

Страница 70: ...ord 4 Accept the share request on the other device TheWi Fi password is entered on your device and it is connected to the network Wi Fi Direct Wi Fi Direct connects devices directly via aWi Fi network without requiring an access point 1 On the Settings screen tap Connections Wi Fi and tap the switch to activate it 2 Tap Wi Fi Direct The detected devices are listed If the device you want to connect...

Страница 71: ...r illegally tapping communications for commercial purposes Samsung is not responsible for the repercussion of illegal use of the Bluetooth feature Pairing with other Bluetooth devices 1 On the Settings screen tap Connections Bluetooth and tap the switch to activate it The detected devices will be listed 2 Select a device to pair with If the device you want to pair with is not on the list set the d...

Страница 72: ...s Your device allows you to read near field communication NFC tags that contain information about products You can also use this feature to make payments and buy tickets for transportation or events after downloading the required apps The device contains a built in NFC antenna Handle the device carefully to avoid damaging the NFC antenna Reading information from NFC tags Use the NFC feature to rea...

Страница 73: ... payment app open the Settings screen and tap Connections NFC and contactless payments Contactless payments Payment and then select an app The payment services list may not include all available payment apps Data saver Reduce your data usage by preventing some apps running in the background from sending or receiving data On the Settings screen tap Connections Data usage Data saver and tap the swit...

Страница 74: ...as a mobile hotspot to share your device s mobile data connection with other devices 1 On the Settings screen tap Connections Mobile Hotspot andTethering Mobile Hotspot 2 Tap the switch to activate it The icon appears on the status bar You can change the level of security and the password by tapping Configure 3 On the other device s screen search for and select your device from theWi Fi networks l...

Страница 75: ...nfigure network settings Printing Configure settings for printer plug ins installed on the device You can connect the device to a printer viaWi Fi orWi Fi Direct and print images or documents Some printers may not be compatible with the device Adding printer plug ins Add printer plug ins for printers you want to connect the device to 1 On the Settings screen tap Connections More connection setting...

Страница 76: ...l ringtone Notification sound Change the notification sound Volume Adjust the device s volume level Call vibration pattern Change the call vibration pattern Notification vibration pattern Change the notification vibration pattern Vibration intensity Adjust the force of the vibration notification System sound vibration control Set the device to sound or vibrate for actions such as controlling the t...

Страница 77: ...r games while playing games Depending on the model you must connect an earphone to use some features Notifications Change the notification settings On the Settings screen tap Notifications Notification pop up style Select a notification pop up style and change the settings Recently sent View the apps that received recent notifications and change the notification settings To customise notification ...

Страница 78: ...moothness for more information Eye comfort shield Reduce eye strain by limiting the amount of blue light emitted by the screen You can set a schedule for applying this feature Font size and style Change the font size and style Screen zoom Make the items on the screen larger or smaller Full screen apps Select apps to use with the full screen aspect ratio Screen timeout Set the length of time the de...

Страница 79: ...h rate High Get smoother animations and scrolling by automatically adjusting your screen refresh rate up to 90 Hz Standard Use a standard refresh rate in normal situations to conserve battery power Wallpaper Change the wallpaper settings for the Home screen and the locked screen On the Settings screen tap Wallpaper Themes Apply various themes to the device to change the visual elements of the Home...

Страница 80: ... show contact information such as your email address on the locked screen Notifications Set how to show notifications on the locked screen Shortcuts Select apps to display shortcuts to them on the locked screen About Lock screen View the Lock screen version and legal information The available options may vary depending on the screen lock method selected Smart Lock You can set the device to unlock ...

Страница 81: ... version of your device s software and check for updates Google Play system update View the Google Play system version and check for updates Find My Mobile Activate or deactivate the Find My Mobile feature Access the Find My Mobile website findmymobile samsung com to track and control your lost or stolen device Install unknown apps Set the device to allow the installation of apps from unknown sour...

Страница 82: ...r using face recognition Before using the face recognition to unlock your device keep the following precautions in mind Your device could be unlocked by someone or something that looks like your image Face recognition is less secure than Pattern PIN or Password For better face recognition Consider the following when using face recognition Consider the conditions when registering such as wearing gl...

Страница 83: ...Unlock the screen using the preset screen lock method 3 Tap the Face unlock switch to activate it 4 On the locked screen look at the screen When your face is recognised you can unlock the screen without using any additional screen lock method If your face is not recognised use the preset screen lock method Deleting the registered face data You can delete face data that you have registered 1 On the...

Страница 84: ...ed to unlock the screen for the first time after turning on the device To use the device you must unlock the screen using the pattern PIN or password you set when registering the fingerprint Be careful not to forget your pattern PIN or password If your fingerprint is not recognised unlock the device using the pattern PIN or password you set when registering the fingerprint and then re register you...

Страница 85: ...y metal objects such as coins keys and necklaces Covering the fingerprint recognition sensor with protective films stickers or other accessories may decrease the fingerprint recognition rate If the fingerprint recognition sensor is initially covered with a protective film remove it before using the fingerprint recognition sensor Ensure that the fingerprint recognition sensor and your fingers are c...

Страница 86: ...e 3 Set a screen lock method 4 Place your finger on the Side key After the device detects your finger lift it up and place it on the Side key again Repeat this action until the fingerprint is registered 5 When you are finished registering your fingerprints tap Done You can check whether your fingerprint is registered by tapping Check added fingerprints ...

Страница 87: ... using the preset screen lock method 3 Tap the Fingerprint unlock switch to activate it 4 On the locked screen place your finger on the fingerprint recognition sensor and scan your fingerprint Deleting registered fingerprints You can delete registered fingerprints 1 On the Settings screen tap Biometrics and security Fingerprints 2 Unlock the screen using the preset screen lock method 3 Select a fi...

Страница 88: ...er or model Location Change settings for location information permissions On the Settings screen tap Location App permissions View the list of apps that have permission to access the device s location and edit the permission settings Improve accuracy Set the device to use theWi Fi or Bluetooth feature to increase the accuracy of your location information even when the features are deactivated Rece...

Страница 89: ...rmation app data and settings safe on your device You can back up your sensitive information You must sign in to your Google account to back up data Smart Switch Launch Smart Switch and transfer data from your previous device Refer to Transferring data from your previous device Smart Switch for more information Regularly back up your data to a safe location such as Samsung Cloud or a computer so t...

Страница 90: ...s Options Activate advanced features and change the settings that control them On the Settings screen tap Advanced features Android Auto Connect your device to a vehicle and control some of your device s features on the vehicle s display Side key Select an app or feature to launch using the Side key Refer to Setting the Side key for more information Motions and gestures Activate the motion feature...

Страница 91: ...ble tap to turn on screen Set the device to turn on the screen by double tapping anywhere on the screen while the screen is turned off Double tap to turn off screen Set the device to turn off the screen by double tapping an empty area on the Home screen or the locked screen Turn over to mute Set the device to mute certain sounds by using motions or gestures Finger sensor gestures Set the device to...

Страница 92: ...be installed The second app s icon will be displayed with Second app The Dual Messenger feature may not be available depending on the app Some features of the app may be limited for the second app Uninstalling a second app 1 On the Settings screen tap Advanced features Dual Messenger 2 Tap the switch of the app you want to uninstall and tap Uninstall All data related to the second app will be dele...

Страница 93: ...me mode to reduce eye strain before sleeping and prevent your sleep from being disturbed Parental controls Manage your children s digital use Battery and device care Introduction The device care feature provides an overview of the status of your device s battery storage memory and system security You can also automatically optimise the device with a tap of your finger Optimising your device On the...

Страница 94: ...notifications from some apps that use power saving mode Storage Check the status of the used and available memory On the Settings screen tap Battery and device care Storage To delete files or uninstall apps that you do not use anymore select a category Then tap and hold or select an item and tap Delete or Uninstall The actual available capacity of the internal memory is less than the specified cap...

Страница 95: ...re may not be available depending on the service provider or model Some webpages or content may not be available when this feature is activated depending on the service provider or the mobile network conditions Apps Manage the device s apps and change their settings You can view the apps usage information change their notification or permission settings or uninstall or disable unnecessary apps On ...

Страница 96: ...ory data reset Contact us Ask questions or view frequently asked questions Adding device languages You can add languages to use on your device 1 On the Settings screen tap General management Language Add language To view all the languages that can be added tap All languages 2 Select a language to add 3 To set the selected language as the default language tap Set as default To keep the current lang...

Страница 97: ... help Visibility enhancements Customise the settings to improve accessibility for visually impaired users Hearing enhancements Customise the settings to improve accessibility for users with hearing impairment Interaction and dexterity Customise the settings to improve accessibility for users who have reduced dexterity Advanced settings Configure settings for Direct access and notification features...

Страница 98: ... update If emergency software updates are released for your device s security and to block new types of security threats they will be installed automatically without your agreement Security updates information Security updates are provided to strengthen the security of your device and protect your personal information For security updates for your model visit security samsungmobile com The website...

Страница 99: ...formation such as the SIM card status Wi Fi MAC address and serial number Legal information View legal information related to the device such as safety information and the open source licence Software information View the device s software information such as its operating system version and firmware version Battery information View the device s battery status and information ...

Страница 100: ...ature by using the Lock SIM card menu PUK Your SIM or USIM card is blocked usually as a result of entering your PIN incorrectly several times You must enter the PUK supplied by your service provider PIN2 When you access a menu requiring the PIN2 you must enter the PIN2 supplied with the SIM or USIM card For more information contact your service provider Your device displays network or service erro...

Страница 101: ...utions If the problem is still not resolved contact a Samsung Service Centre Restarting the device If your device freezes or hangs you may need to close apps or turn off the device and turn it on again Forcing restart If your device is frozen and unresponsive press and hold the Side key and theVolume Down key simultaneously for more than 7 seconds to restart it Resetting the device If the methods ...

Страница 102: ...nnectivity problems due to issues with the service provider s base station Move to another area and try again When using the device while moving wireless network services may be disabled due to issues with the service provider s network The battery does not charge properly For Samsung approved chargers Ensure that the charger is connected properly Visit a Samsung Service Centre and have the batter...

Страница 103: ...a files If you receive error messages or multimedia files do not play when you open them on your device try the following Free some memory by transferring files to a computer or deleting files from your device Ensure that the music file is not Digital Rights Management DRM protected If the file is DRM protected ensure that you have the appropriate licence or key to play the file Ensure that the fi...

Страница 104: ...tion when performing the reset If the tips above do not solve the problem contact a Samsung Service Centre The screen brightness adjustment bar does not appear on the notification panel Open the notification panel by dragging the status bar downwards and then drag the notification panel downwards Tap Quick panel layout and tap the Show brightness control above notifications switch to activate it A...

Страница 105: ...up storage space The Home button does not appear The navigation bar containing the Home button may disappear while using certain apps or features To view the navigation bar drag upwards from the bottom of the screen Removing the battery To remove the battery contact an authorised service centre To obtain battery removal instructions please visit www samsung com global ecodesign_energy For your saf...

Страница 106: ...ion storage and retrieval system Trademarks SAMSUNG and the SAMSUNG logo are registered trademarks of Samsung Electronics Co Ltd Bluetooth is a registered trademark of Bluetooth SIG Inc worldwide Wi Fi Wi Fi Direct Wi Fi CERTIFIED and theWi Fi logo are registered trademarks of theWi Fi Alliance Manufactured under license from Dolby Laboratories Dolby Dolby Atmos and the double D symbol are tradema...

Отзывы: