background image

Basics

27

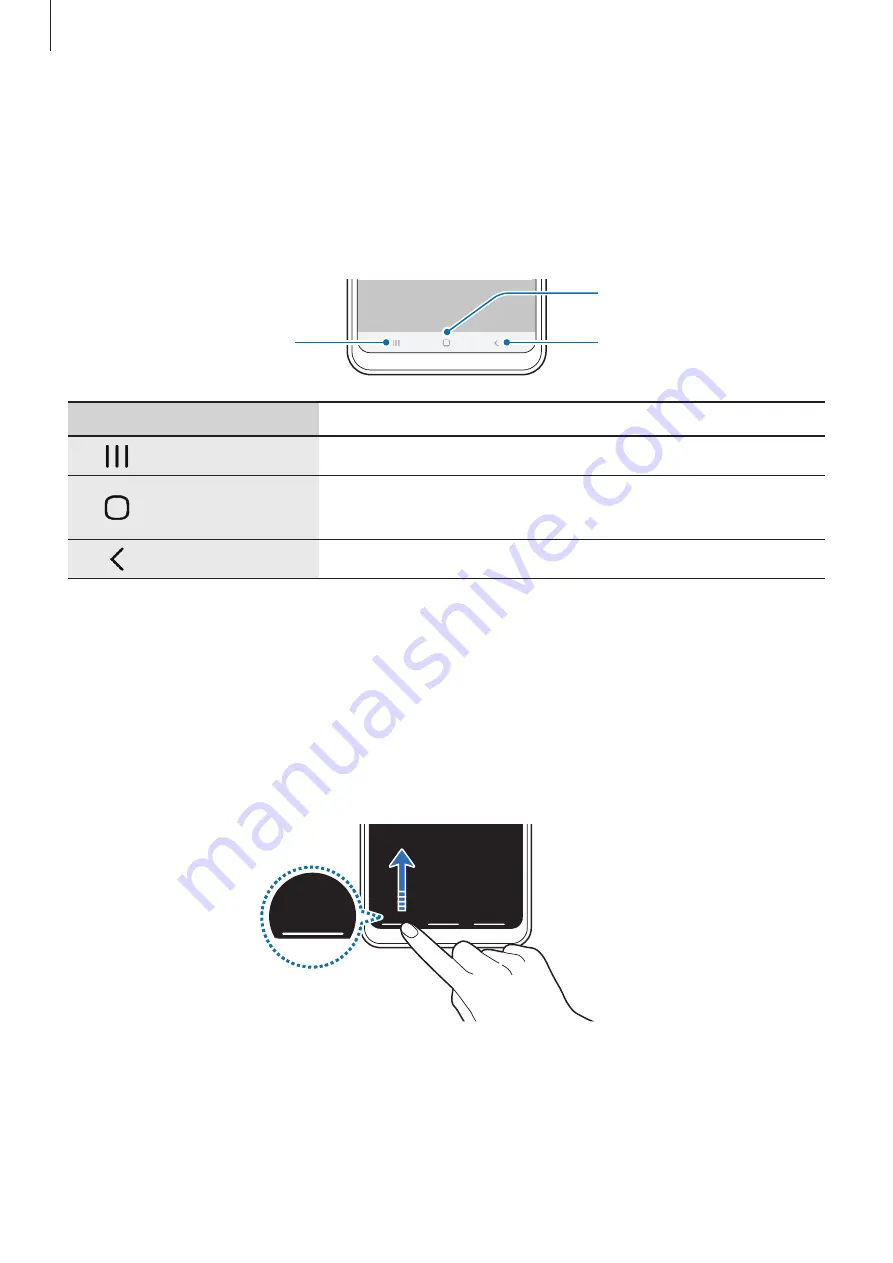
Navigation bar (soft buttons)

When you turn on the screen, the soft buttons will appear on the navigation bar at the 
bottom of the screen. The soft buttons are set to the Recents button, Home button, and Back 
button by default. The functions of the buttons can change according to the app currently 
being used or usage environment.

Back button

Home button

Recents button

Button

Function

Recents

•  

Tap to open the list of recent apps.

Home

•  

Tap to return to the Home screen.

•  

Tap and hold to launch the 

Google Assistant

 app.

Back

•  

Tap to return to the previous screen.

Hiding the navigation bar

View files or use apps on a wider screen by hiding the navigation bar.
Launch the 

Settings

 app, tap 

Display


Navigation bar

, and then tap 

Full screen gestures


under 

Navigation type

. The navigation bar will be hidden and the gesture hints will appear 

where the soft buttons are located. To use the soft buttons, drag the gesture hint of the 
desired button upwards.

If you want to hide the gesture hints at the bottom of the screen, tap the 

Gesture hints


switch to deactivate it.

Содержание SM-A107F/DS

Страница 1: ...www samsung com USER MANUAL English 07 2019 Rev 1 0 SM A107F SM A107F DS...

Страница 2: ...tup 22 Samsung account 23 Transferring data from your previous device Smart Switch 24 Understanding the screen 36 Notification panel 38 Entering text Apps and features 40 Installing or uninstalling ap...

Страница 3: ...tions 81 Wi Fi 83 Bluetooth 84 Data saver 85 Mobile data only apps 85 SIM card manager dual SIM models 86 Mobile Hotspot andTethering 87 More connection settings 88 Sounds and vibration 89 Dolby Atmos...

Страница 4: ...registry settings or modified operating system software Attempting to customise the operating system may cause the device or apps to work improperly Software sound sources wallpapers images and other...

Страница 5: ...ice You can set the touchscreen to turn off automatically when you are not using it Launch the Settings app tap Display Screen timeout and then select the length of time you want the device to wait be...

Страница 6: ...e the connected USB cable is damaged Replace the damaged USB cable with a new Samsung approved one When using a wireless charger do not place foreign materials such as metal objects magnets and magnet...

Страница 7: ...t When using the mobile hotspot and tethering feature When using the device in areas with weak signals or no reception When charging the battery with a damaged USB cable When the device s multipurpose...

Страница 8: ...further increase of the device s temperature the device will turn off Do not use the device until the device s temperature drops below the specified level If the second warning message appears during...

Страница 9: ...s and specifications are subject to change without prior notice You can purchase additional accessories from your local Samsung retailer Make sure they are compatible with the device before purchase U...

Страница 10: ...Speaker Power key Microphone Touchscreen Volume key Multipurpose jack Proximity sensor Light sensor SIM card Memory card tray Fingerprint recognition sensor Flash Rear camera Dual GPS antenna Earphone...

Страница 11: ...ions If you attach metallic stickers on the antenna area of the device If you attach a device cover made with metallic material to the device If you cover the device s antenna area with your hands or...

Страница 12: ...ded periods Use only Samsung approved chargers batteries and cables Unapproved chargers or cables can cause the battery to explode or damage the device Connecting the charger improperly may cause seri...

Страница 13: ...unnecessary apps Deactivate the Bluetooth feature when not in use Deactivate auto syncing of apps that need to be synced Decrease the backlight time Decrease the screen brightness Battery charging ti...

Страница 14: ...arge the device while the multipurpose jack is wet the device may be damaged Thoroughly dry the multipurpose jack before charging the device If the device is not charging properly take the device and...

Страница 15: ...SIM models 4 2 1 3 5 Dual SIM models 4 2 1 3 5 1 Insert the ejection pin into the hole next to the tray to loosen the tray Ensure that the ejection pin is perpendicular to the hole Otherwise the devic...

Страница 16: ...into the tray slot to prevent liquid from entering your device Using dual SIM or USIM cards dual SIM models If you insert two SIM or USIM cards you can have two phone numbers or service providers for...

Страница 17: ...ite Some memory cards may not be fully compatible with the device Using an incompatible card may damage the device or the memory card or corrupt the data stored in it Use caution to insert the memory...

Страница 18: ...be disabled 3 Place a memory card on the tray with the gold coloured contacts facing downwards 4 Gently press the memory card into the tray to secure it If the card is not fixed firmly into the tray...

Страница 19: ...ay not be compatible with the device Format the memory card on the device Launch the Settings app and tap Device care Storage Storage settings SD card Format Before formatting the memory card remember...

Страница 20: ...ions will be restricted In emergency mode you can make an emergency call send your current location information to others sound an emergency alarm and more Activating emergency mode To activate emerge...

Страница 21: ...instructions to set up your device 1 Turn on the device 2 Select your preferred device language and select Select a language 3 Follow the on screen instructions to complete the setup The Home screen w...

Страница 22: ...Accounts Add account Samsung account Alternatively launch the Settings app and tap 2 Tap Create account 3 Follow the on screen instructions to complete creating your account Signing in to your Samsun...

Страница 23: ...ettings app and tap Accounts and backup Smart Switch This feature may not be supported on some devices or computers Limitations apply Visit www samsung com smartswitch for details Samsung takes copyri...

Страница 24: ...s and backup Smart Switch Restore 4 Follow the on screen instructions to transfer data from external storage Understanding the screen Controlling the touchscreen Do not allow the touchscreen to come i...

Страница 25: ...ics 25 Tapping Tap the screen Tapping and holding Tap and hold the screen for approximately 2 seconds Dragging Tap and hold an item and drag it to the target position Double tapping Double tap the scr...

Страница 26: ...Basics 26 Swiping Swipe upwards downwards to the left or to the right Spreading and pinching Spread two fingers apart or pinch on the screen...

Страница 27: ...apps Home Tap to return to the Home screen Tap and hold to launch the Google Assistant app Back Tap to return to the previous screen Hiding the navigation bar View files or use apps on a wider screen...

Страница 28: ...of the device s features It displays widgets shortcuts to apps and more The Apps screen displays icons for all apps including newly installed apps The screen may appear differently depending on the re...

Страница 29: ...Apps screen Alternatively tap the Home button or the Back button Home screen Apps screen If you add the Apps button on the Home screen you can open the Apps screen by tapping the button On the Home sc...

Страница 30: ...w the screen in landscape mode Moving items Tap and hold an item and then drag it to a new location To move the item to another panel drag it to the side of the screen To add a shortcut to an app on t...

Страница 31: ...d apps will be created Tap Enter folder name and enter a folder name Adding more apps Tap Add apps on the folder Tick the apps to add and tap Add You can also add an app by dragging it to the folder M...

Страница 32: ...panels Tap on the panel Wallpapers Change the wallpaper settings for the Home screen and the locked screen Themes Change the device s theme Visual elements of interface such as colours icons and wallp...

Страница 33: ...cons listed in the table below are most common The status bar may not appear at the top of the screen in some apps To display the status bar drag down from the top of the screen Some indicator icons a...

Страница 34: ...y power level Lock screen Pressing the Power key turns off the screen and locks it Also the screen turns off and automatically locks if the device is not used for a specified period To unlock the scre...

Страница 35: ...haracters numbers or symbols to unlock the screen None Do not set a screen lock method Face Register your face to unlock the screen Refer to Face recognition for more information Fingerprints Register...

Страница 36: ...drag the status bar downwards To close the notification panel swipe upwards on the screen You can use the following functions on the notification panel View the notification details and perform vario...

Страница 37: ...n features Swipe downwards on the notification panel to view more buttons To change feature settings tap the text under each button To view more detailed settings tap and hold a button To rearrange bu...

Страница 38: ...ions Enter symbols Enter a space View more keyboard functions Changing the input language Tap Languages and types Manage input languages and select the languages to use When you select two or more lan...

Страница 39: ...ap Enter emoticons Enter stickers Change the keyboard mode or size Enter text by voice Change the keyboard settings Open the text editing panel Copying and pasting 1 Tap and hold over text 2 Drag or t...

Страница 40: ...Install To purchase and download apps where charges apply tap the price and follow the on screen instructions To change the auto update settings tap Settings Auto update apps and then select an option...

Страница 41: ...device When you open an app a pop up window may appear and request access to certain features or information Tap Allow on the pop up window to grant permissions to the app To view your app permission...

Страница 42: ...a preceding character Access additional options Search for a contact Add the number to the contacts list Making calls from call logs or contacts list Launch the Phone app tap Recents or Contacts and...

Страница 43: ...ocked screen On the locked screen drag outside the circle Making calls by searching for nearby places You can easily make calls to places near your current location by searching for their information...

Страница 44: ...n the notification panel to view the list of missed calls Alternatively launch the Phone app and tap Recents to view missed calls Blocking phone numbers Block calls from specific numbers added to your...

Страница 45: ...the speakerphone When using the speakerphone keep the device away from your ears Mute Turn off the microphone so that the other party cannot hear you Keypad Hide Open or close the keypad End the curr...

Страница 46: ...nd tap Recents 2 Tap a caller s image and tap Add or tap a phone number and tap Add to Contacts 3 Tap Create contact to create a new contact or tap Update existing to add the number to an existing con...

Страница 47: ...ing a new contact 1 Launch the Contacts app and tap 2 Select a storage location and tap Select 3 Enter contact information Select a storage location Add an image Open more information fields Enter con...

Страница 48: ...ontacts with online contacts saved in your web accounts such as your Samsung account 1 Launch the Settings app tap Accounts and backup Accounts and select the account to sync with 2 Tap Sync account a...

Страница 49: ...haring feature To use this feature you must sign in to your Samsung account The profile sharing feature may not be available depending on the region or service provider The profile sharing feature is...

Страница 50: ...embers at the same time Launch the Contacts app tap Groups select a group and then tap Send message Merging duplicate contacts When you import contacts from other storages or sync contacts with other...

Страница 51: ...ges when you are roaming 1 Launch the Messages app and tap 2 Add recipients and enter a message To record and send a voice message tap and hold say your message and then release your finger The record...

Страница 52: ...Settings Block numbers and messages Block numbers 2 Tap Inbox and select a contact or a phone number Or tap Contacts select contacts and then tap Done To manually enter a number enter a phone number...

Страница 53: ...e then tap Delete To delete multiple messages tick messages you want to delete 4 Tap Delete Internet Introduction Browse the Internet to search for information and bookmark your favourite webpages to...

Страница 54: ...tab manager View your bookmarks Using secret mode In secret mode you can separately manage open tabs bookmarks and saved pages You can lock secret mode using a password and your biometric data Activat...

Страница 55: ...e In the toolbar at the bottom of the screen tap Turn off Secret mode Alternatively close the Internet app Email Setting up email accounts Set up an email account when opening Email for the first time...

Страница 56: ...ette Do not take photos or record videos of other people without their permission Do not take photos or record videos where legally prohibited Do not take photos or record videos in places where you m...

Страница 57: ...ew thumbnail Shooting modes Current mode Switch between the front and rear cameras Options for current shooting mode The preview screen may vary depending on the shooting mode and which camera is bein...

Страница 58: ...a adjusts the shooting options automatically depending on the surroundings to capture photos easily On the shooting modes list tap Photo and tap to take a photo Taking selfies You can take self portra...

Страница 59: ...reen tap and select a screen ratio Live focus mode The camera allows you to take photos where the background is blurred and the subject stands out clearly Use this feature in a place that has sufficie...

Страница 60: ...r adjustment bar to the left or right to adjust the blur level Background effect intensity adjustment bar Using shooting modes To change the shooting mode drag the shooting modes list to the left or r...

Страница 61: ...u can set the colour temperature Change the exposure value This determines how much light the camera s sensor receives For low light situations use a higher exposure Panorama mode Using panorama mode...

Страница 62: ...re area of the shot to calculate the exposure of the shot Matrix averages the entire scene Camera settings On the preview screen tap Some options may not be available depending on the shooting mode Pi...

Страница 63: ...low lying areas or in poor weather conditions Your location may appear on your photos when you upload them to the Internet To avoid this deactivate the location tag setting Camera modes View available...

Страница 64: ...create stories Viewing images 1 Launch the Gallery app and tap Pictures 2 Select an image Access additional options Delete the image Share the image with others Modify the image Add the image to favou...

Страница 65: ...deo Tap and hold to rewind Switch to the pop up video player Capture the current screen Rewind or fast forward by dragging the bar Create an animated GIF Access additional options Rotate the screen Sk...

Страница 66: ...Location information People information Auto created content Tags Edit information Viewing photos or videos by category You can view photos and videos by category Launch the Gallery app tap Pictures...

Страница 67: ...2 Tap Hide or unhide albums 3 Tap an album switch to hide Viewing stories When you capture or save images and videos the device will read their date and location tags sort the images and videos and th...

Страница 68: ...d a story to delete and tap Delete Deleting images or videos 1 Launch the Gallery app 2 Select an image or a video to delete To delete multiple files tap and hold a file to delete on the list and tick...

Страница 69: ...nts button to open the list of recently used apps 2 Swipe to the left or right tap an app s icon and then tap Open in split screen view The selected app will launch in the upper window 3 On the lower...

Страница 70: ...d tips Samsung Members can help you solve any problems you might encounter while using your device To submit your feedback or post your comments you must sign in to your Samsung account Refer to Samsu...

Страница 71: ...hedule by entering upcoming events or reminders in your planner Creating events 1 Launch the Calendar app and tap or double tap a date If the date already has saved events or tasks in it tap the date...

Страница 72: ...your accounts 1 Launch the Settings app tap Accounts and backup Accounts and then select the account to sync with 2 Tap Sync account and tap the Calendar switch to activate it For the Samsung account...

Страница 73: ...play voice memos 1 Launch the Voice Recorder app 2 Tap to start recording Speak into the microphone Tap to pause recording While making a voice recording tap BOOKMARK to insert a bookmark Start record...

Страница 74: ...ation Alarm Launch the Clock app and tap Alarm Setting alarms Tap in the alarms list set an alarm time select the days on which the alarm will repeat set other various alarm options and then tap Save...

Страница 75: ...Delete Stopwatch 1 Launch the Clock app and tap Stopwatch 2 Tap Start to time an event To record lap times while timing an event tap Lap 3 Tap Stop to stop timing To restart the timing tap Resume To c...

Страница 76: ...o app Before you use this app you must connect an earphone which serves as the radio antenna The FM radio scans and saves available stations automatically when running for the first time Select the ra...

Страница 77: ...may incur additional charges when sharing files via the mobile network 1 Launch the Gallery app and select an image 2 Tap and select a sharing method such as message and email When you have a communi...

Страница 78: ...provider Google Search quickly for items on the Internet or your device Chrome Search for information and browse webpages Gmail Send or receive emails via the Google Mail service Maps Find your locat...

Страница 79: ...s 79 Play Movies TV Purchase or rent videos such as movies andTV programmes from Play Store Duo Make a simple video call Photos Search for manage and edit all your photos and videos from various sourc...

Страница 80: ...connect to aWi Fi network and access the Internet or other network devices Refer toWi Fi for more information Bluetooth Use Bluetooth to exchange data or media files with other Bluetooth enabled devic...

Страница 81: ...nnections can be made viaWi Fi USB or Bluetooth Refer to Mobile Hotspot andTethering for more information More connection settings Customise settings to control other features Refer to More connection...

Страница 82: ...ction request Sending and receiving data You can share data such as contacts or media files with other devices The following actions are an example of sending an image to another device 1 Launch the G...

Страница 83: ...or example pirating copies of files or illegally tapping communications for commercial purposes Samsung is not responsible for the repercussion of illegal use of the Bluetooth feature Pairing with oth...

Страница 84: ...hat the device turns on its visibility option 3 Accept the Bluetooth connection request on the other device Unpairing Bluetooth devices 1 On the Settings screen tap Connections Bluetooth The device di...

Страница 85: ...onal charges when using this feature SIM card manager dual SIM models Activate your SIM or USIM cards and customise the SIM card settings Refer to Using dual SIM or USIM cards dual SIM models for more...

Страница 86: ...e s mobile data connection with computers or other devices via Bluetooth USB tethering Use USB tethering to share the device s mobile data connection with a computer via USB When connected to a comput...

Страница 87: ...can for nearby devices to connect to Printing Configure settings for printer plug ins installed on the device You can search for available printers or add one manually to print files Refer to Printing...

Страница 88: ...n select a printer Printing methods may vary depending on the content type Sounds and vibration Options Change settings for various sounds on the device On the Settings screen tap Sounds and vibration...

Страница 89: ...ounds and vibration Advanced sound settings Sound quality and effects Dolby Atmos tap the switch to activate it and then select a mode Before you use this feature you must connect an earphone Notifica...

Страница 90: ...s backlight Home screen Configure settings for the Home screen such as the screen grid or layout Navigation bar Change the navigation bar settings Refer to Navigation bar soft buttons for more inform...

Страница 91: ...p the switch to activate it 2 Select an option If you select Photo Frame or Photos a slideshow with selected images will start If you select PhotoTable selected images will appear as small cards and o...

Страница 92: ...ings of the items displayed on the locked screen Contact information Set the device to show contact information such as your email address on the locked screen Notifications Set how to show notificati...

Страница 93: ...Google Play Protect Set the device to check for harmful apps and behaviour and warn about potential harm and remove them Find My Mobile Activate or deactivate the Find My Mobile feature Access the Fin...

Страница 94: ...must unlock the screen using the pattern PIN or password you set when registering the face Be careful not to forget your pattern PIN or password If you change the screen lock method to Swipe or None w...

Страница 95: ...Select whether you are wearing glasses or not and tap Continue 5 Hold the device with the screen facing towards you and look at the screen 6 Position your face inside the frame on the screen The came...

Страница 96: ...een using the preset screen lock method 3 Tap the Face unlock switch to activate it If you want to set the device to unlock the screen without swiping on the locked screen after recognising your face...

Страница 97: ...a screen lock method your fingerprint cannot be used to unlock the screen for the first time after turning on the device To use the device you must unlock the screen using the pattern PIN or password...

Страница 98: ...sensor with protective films stickers or other accessories may decrease the fingerprint recognition rate If the fingerprint recognition sensor is initially covered with a protective film remove it bef...

Страница 99: ...hen you are finished registering your fingerprints tap Done Checking registered fingerprints You can check whether your fingerprint is registered by placing your finger on the fingerprint recognition...

Страница 100: ...rprint unlock switch to activate it 4 On the locked screen place your finger on the fingerprint recognition sensor and scan your fingerprint Accounts and backup Options Sync back up or restore your de...

Страница 101: ...a safe location such as Samsung Cloud or a computer so that you can restore it if the data is corrupted or lost due to an unintended factory data reset Samsung Cloud Sync the data saved in your device...

Страница 102: ...ta will be backed up on the Settings screen tap Accounts and backup Samsung Cloud Back up this phone To view the backup data for other devices in your Samsung Cloud on the Settings screen tap Accounts...

Страница 103: ...same messenger app Refer to Dual Messenger for more information Send SOS messages Set the device to send help messages by pressing the Power key three times Motions and gestures Activate the motion fe...

Страница 104: ...fications from the second app the notifications will be displayed with to distinguish them from the first app s notifications Second app The Dual Messenger feature may not be available depending on th...

Страница 105: ...e the screen was on Number of notifications Activate wind down mode Setting timers for apps You can limit the daily usage time for each app by setting a timer When you reach the limit the app will be...

Страница 106: ...activate wind down mode tap the Turn on as scheduled switch to activate it tap Set schedule and then set the time Device care Options The device care feature provides an overview of the status of your...

Страница 107: ...ry levels conserve battery power by activating power saving features On the Settings screen tap Device care Battery The usage time left shows the time remaining before the battery power runs out Usage...

Страница 108: ...s of the used and available memory On the Settings screen tap Device care Storage The actual available capacity of the internal memory is less than the specified capacity because the operating system...

Страница 109: ...region or service provider Some webpages or content may not be available when this feature is activated depending on the service provider or the mobile network conditions On the Settings screen tap De...

Страница 110: ...more information Date and time Access and alter the settings to control how the device displays the time and date If the battery remains fully discharged the time and date is reset Contact us Ask que...

Страница 111: ...s voice feedback To view help information to learn how to use this feature tap Tutorial Visibility enhancements Customise the settings to improve accessibility for visually impaired users Hearing enha...

Страница 112: ...guages User manual View help information to learn how to use the device and apps or configure important settings On the Settings screen tap User manual About phone Access your device s information On...

Страница 113: ...or USIM card is blocked usually as a result of entering your PIN incorrectly several times You must enter the PUK supplied by your service provider PIN2 When you access a menu requiring the PIN2 you...

Страница 114: ...hed or damaged visit a Samsung Service Centre Your device freezes or encounters a fatal error Try the following solutions If the problem is still not resolved contact a Samsung Service Centre Restarti...

Страница 115: ...pressing theVolume key or move to another area A cellular network or the Internet is often disconnected or audio quality is poor Ensure that you are not blocking the device s internal antenna When yo...

Страница 116: ...after trying these tips contact a Samsung Service Centre Photo quality is poorer than the preview The quality of your photos may vary depending on the surroundings and the photography techniques you...

Страница 117: ...device launch the Settings app tap Connections and then tap the Bluetooth switch to re activate it On your device launch the Settings app tap General management Reset Reset network settings Reset set...

Страница 118: ...ightly There is not enough space in the device s storage Delete unnecessary data such as cache using the device care feature or manually delete unused apps or files to free up storage space The Home b...

Страница 119: ...he prior written permission of Samsung Electronics Trademarks SAMSUNG and the SAMSUNG logo are registered trademarks of Samsung Electronics Bluetooth is a registered trademark of Bluetooth SIG Inc wor...

Отзывы: