background image

SHR-4081N/P USER’S MANUAL

5-7

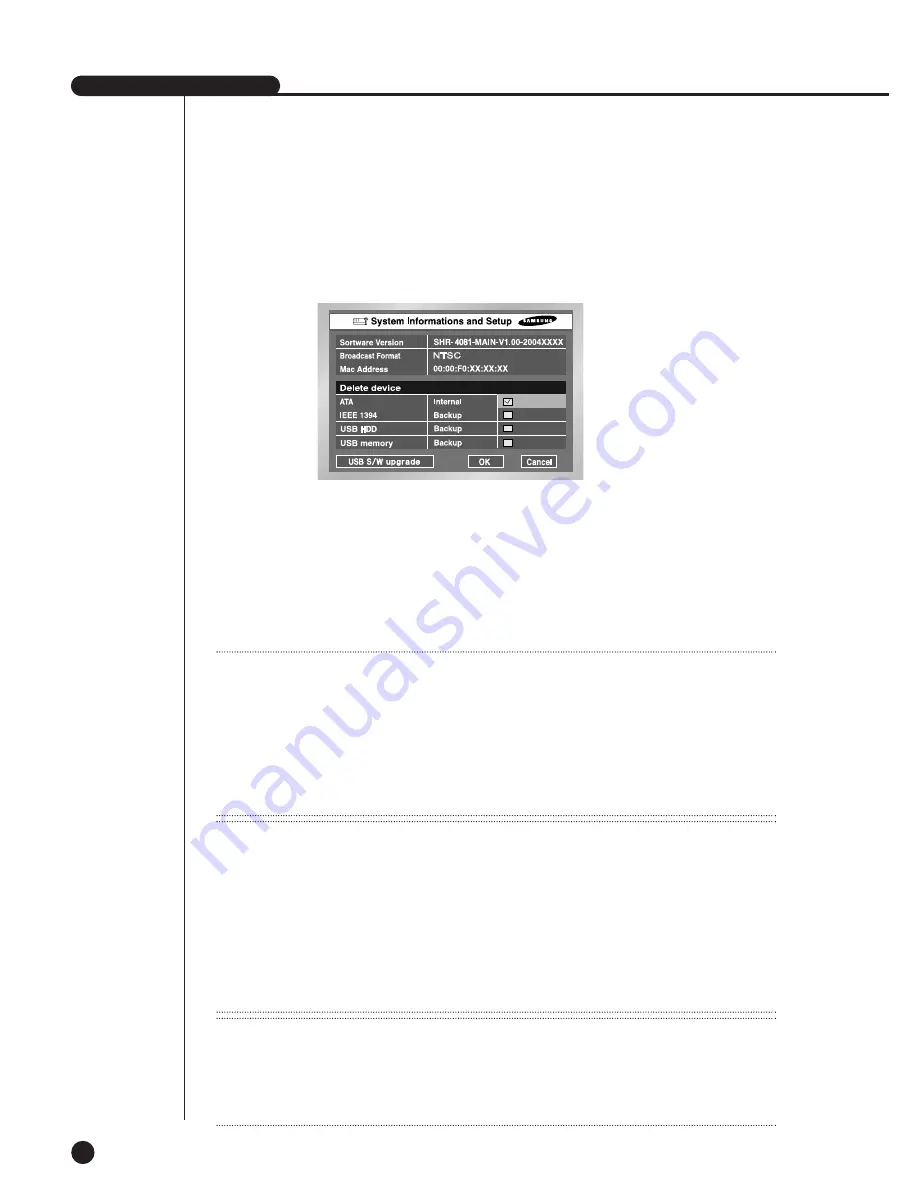
System Information and Setup

Software Version 

: Displays the current version. Setup is not available.

Broadcast Format 

: Displays the current Format(NTSC/PAL). Setup is not available.

Mac Address

: 6 Byte hardware address. Setup is not available.

Delete device

Deletes the data in the ATA / IEEE1394 / USB / USB memory.
Check the box that you want to delete and press "OK".
Data is undeletable during Backup.

USB S/W Upgrade

When there is no device, USB S/W Upgrade is failed.

Note 1

Note 1

Being a physical hard disk inside the SHR-4081N/P main body connected by an IDE cable, this
stores data.
[External HDD]
Being a physical hard disk connected with the port and terminal in the back of the 
SHR-4081N/P main body, this stores data.
This can be used as Extended HDD or Backup HDD.
- Extended HDD : Supplements Internal HDD quantity. Connected, it takes the place of Internal

HDD.

- Backup HDD : Backs up the data recorded in the set.

Note 2

Note 2

[ATA]
Usage : Internal HDD
This is a physical hard disk connected with SHR 4160 through the IDE cable.
[USB]
Usage : External HDD (Extended HDD or Backup HDD)
A physical hard disk connected with the USB port in the back of the SHR-4081N/P main body
[IEEE1394]
Usage : External HDD (Extended HDD or Backup HDD)
A physical hard disk connected with the IEEE1394 port in the back of the SHR-4081N/P main
body

Note 3

Note 3

[USB S/W upgrade]
1. You can download the data(tgz file) for upgrade from www.sec.co.kr, CCTV Part.
2. The USB memory should have only one tgz file for upgrade.
3. In case of other memory format than supported by SHR-4081 model, please delete the 

memory and set it up according to the set format.

Содержание SHR-4081N/P

Страница 1: ...8 Channel DVR SHR 4081N P User s Manual ...

Страница 2: ...se fire Keep the surrounding temperature between 0 C to 40 C and keep the product off humidity This may cause breakdown Secure sufficient ventilation This may cause abnormal operation due to high temperature Keep the product off direct ray of light or heat from the heating device This may cause fire Do not disassemble repair or remodel the product This may cause fire electric shock or injury due t...

Страница 3: ...ble for any or all losses to the product incurred by your use of non standard product or violation of User s Manual If you want to open the system case to touch the inside please consult with an expert who works for the shop where you bought the product You may download open source codes from the following website See CCTV Part of http www sec co kr Before we start Standards Approvals Note This eq...

Страница 4: ...r 3 Connecting with Other Equipment 1 Connecting Video Audio Monitor 2 Connecting Network 3 Connecting IEEE1394 Device 4 Connecting USB Device 5 Connecting Alarm Input Output 6 Connecting RS 485 Device Chapter 4 Live 1 System Motion 2 Live Screen Mode 3 Live Channel Selection and Audio On Off Setup 4 Freeze and Zoom 5 Event Monitoring 6 Spot out Monitoring Contents 1 iii ii 1 1 1 2 1 3 2 2 1 2 2 2...

Страница 5: ...ILT ZOOM 3 PRESET Setup 4 Camera Menu Setup 5 Preset View 6 Other Views Chapter 7 Recording 1 PANIC Emergency Recording 2 REC Normal Recording 3 Record Schedule 4 Event Recording Chapter 8 Search Play Before Use 1 Calendar Search 2 Event Search 3 Date Time Search 4 Go to First Search 5 Go to Last Search 6 Play 5 6 7 8 5 1 5 2 5 12 5 16 5 18 5 19 5 24 5 26 5 28 5 32 6 1 6 3 6 4 6 6 6 7 6 8 7 1 7 2 ...

Страница 6: ...ckup Viewer 1 Introduction 2 Features 3 PC Specification Recommendation 4 Backup Viewer Installation 5 Executing Backup Viewer Program 6 Initial Screen of Backup Viewer 7 Using Backup Viewer Appendix 1 Product Specification 2 HDD Specifications 3 Outline Drawing 4 Factory Default 5 SHR 4081N P Smart Viewer Play Frame Specification 6 Troubleshooting FAQ 9 10 11 12 9 1 9 4 10 1 10 2 10 3 10 4 10 7 1...

Страница 7: ......

Страница 8: ...Chapter 1 Overview 1 ...

Страница 9: ...ile and the voice input data into a G 726 audio file respectively to record them in the Hard Disk or retrieve them from the Hard Disk simultaneously In addition it transmits the video or audio file out through a network on real time basis so that you can monitor either file remotely by your PC SHR 4081N P USER S MANUAL ...

Страница 10: ...IEEE1394 and USB2 0 USB2 0 Memory Backup function by using an external CD DVD writer Able to record play and transmit both audio and video files to Windows Network Viewer Smart Viewer simultaneously Able to reacord and replay 8 channels of Audio Variable Search Mode Time Date Event Camera Variable Recording Mode Time Lapse Event Schedule Emergency Extended Hard Disk Connection IEEE1394 USB2 0 Alar...

Страница 11: ...ts Single Channel in the Display Mode Used for Number Input Button in the Number Input Mode Recording starts as set in the Normal Record Mode while LED is on 4 1 2 3 1 8 9 MODE 5 6 MODE REC Audio On Off setup during play mode 9 Displays Split Screen 8 Displays Split Screen 4 Displays Split Screen 6 Displays Split Screen 7 Displays Split Screen Displays PIP Picture In Picture Screen Screen change M...

Страница 12: ...ng the PTZ Displays the system setup menu or enters an upper menu Performs the PRESET setup function by pressing the PTZ Changes or edits the left setup value for the detailed menu item setup Moves the cursor up in a menu or increases the setup value for the detailed menu item setup Changes or edits the right setup value for the detailed menu item setup Moves the cursor down in a menu or decreases...

Страница 13: ...CA Jack SPOT Out Output Port BNC Style Connector Composite Video Signal Output Port BNC Style Connector Audio Signal Output Port RCA Jack VGA Video Signal Output Port S VIDEO Video Signal Output Port Network Connection Port IEEE1394 Type Device Connection Port ALARM IN 1 8 Alarm Input Port ALARM RESET IN Alarm Reset Port ALARM OUT1 4 Alarm Output Port TX TX RX RX RS 485 Communication Port Supports...

Страница 14: ......

Страница 15: ...Chapter 2 Installation 2 ...

Страница 16: ...following before you use the product 1 Do not use it outdoor 2 Do not let water or liquid in the connection part or the product itself 3 Do not impose excessive shock or force 4 Do not pull out the power plug unreasonably 5 Do not disassemble the product on your own 6 Do not exceed the rated input or output range 7 Use certified power cord only 8 Match a product with an input ground with a power c...

Страница 17: ...f the following items are in it Main Body User s Manual One Power Cord Two Brackets Brackets are used to attach the product to the rack Smart Viewer Software CD Incl PDF Manual 12 Screw Specials Please keep screw specials well to be used for HDD addition 2 EA of RS 485 Alarm Terminal Block Main Body RS 485 Alarm Terminal Block Screw User s Manual Bracket CD Power Cord ...

Страница 18: ...tion you shall consult with an expert of the agency where you bought the product Caution for HDD Addition Do not let the cable stuck improperly nor uncoated This may cause breakdown or fire Be careful not to cut yourself by sharp edges of the product Be careful not to miss the disassembled screws or parts Imperfect assembly due to short of screws or parts may cause breakdown or malfunctioning HDD ...

Страница 19: ... the cover from the product Pull out the cover slightly and lift from the back side to detach 3 A bracket is fixed to each side of HDD Please loosen the screw of the bracket to which you want to fix HDD BRACKET HDD ...

Страница 20: ...he product center to detach the fixed part at the bottom to detach BRACKET HDD from the product 5 Tighten 4 SCREW SPECIALs BWH 6 32UNC L10 5 supplied as an accessory to fix HDD to BRACKET HDD Screw tighten force shall be strong enough to resist vibration ...

Страница 21: ...Signal Transmission Cable IDE Cable Power Supply Cable 6 Restore HDD installed BRACKET HDD Assembly shall be done in the reverse procedure of disassembly as follows Align the 5 fixing points at the bottom with the BRACKET HDD fixing holes respectively and push BRACKET HDD out of the product to align the screw fixing holes Then tighten the screws firmly ...

Страница 22: ...ition please select the same HDD with the existing HDD fixed to the product as far as possible This product can accept 4 more HDDs 2 at Primary Slot and 2 at Secondary Slot respectively Both HDDs attached to Primary Slot and Secondary Slot shall be set to Master and Slave respectively Refer to User s Manual for Master or Slave Jumper Setting In the event of only one HDD installation it shall be in...

Страница 23: ...ing the sub fan you need additional brackets and sub fans as follows The sub fan is shaped like this when viewed from the front and back Please pay attention to the fan direction to let wind go through the fan Fix the fan as follows ...

Страница 24: ...SHR 4081N P USER S MANUAL 2 9 Please install the fan to be seen from the front view of the set ...

Страница 25: ...2 10 Fixing the fan to the left ...

Страница 26: ...Chapter 3 Connecting with Other Equipment 3 ...

Страница 27: ...1Connecting Video Audio Monitor 3 1 SHR 4081N P USER S MANUAL ...

Страница 28: ...3 2 2Connecting Network Connecting to Internet through Ethernet 10 100BaseT Connecting Internet through ADSL ...

Страница 29: ...ess Connect Disconnect in Menu System HDD Setup HOT PLUG will be recognized or deleted SHR 4081N P USER S MANUAL 3 3 Note Note See 5 8 System HDD Setup of User s Manual Caution Caution Wait until the HOT PLUG connected hard disk is stabilized enough approx 2 seconds per each hard disk and click CONNECT in SHR 4081N P MENU before use Be sure to click DISCONNECT in SHR 4081N P MENU to delete IEEE139...

Страница 30: ...3 4 Note Note Refer to Appendix 2 to see which HDD specifications are supplied ...

Страница 31: ...the USB device be sure to click Disconnect from SHR 4081N P SHR 4081N P Menu Otherwise the USB device may be in trouble Menu Otherwise the USB device may be in trouble A Available to use with connecting the same kinds of USB device to the vailable to use with connecting the same kinds of USB device to the USB terminal on the front and back of SHR 4081N P USB terminal on the front and back of SHR 4...

Страница 32: ...M IN OUT Connection Name Function ALARM IN1 ALARM IN2 ALARM IN3 ALARM IN4 ALARM IN5 ALARM IN6 ALARM IN7 1 ALARM IN8 On receiving an ALARM RESET signal the 2 ALARM RESET IN system cancels the current ALARM input or output signal and resumes sensing ALARM OUT1 ALARM OUT2 3 ALARM OUT3 ALARM OUT4 ALARM Output Port ALARM Input Port ...

Страница 33: ...SHR 4081N P USER S MANUAL 3 7 ALARM IN OUT Connection ...

Страница 34: ... can adopt either Half Duplex or Full Duplex method for the connection Baud Rate covers 600 1200 2400 4800 9600 19200 and 38400 Half Duplex Type Data Data Full Duplex Type Rx Rx Tx Tx Tx Tx Rx Rx PTZ device SHR 4081N P Rear Caution Caution Check if RS 485 Device is compatible with SHR 4081N P first Then pay attention to the polarity of RS 485 which has two poles and ...

Страница 35: ...Chapter 4 Live 4 ...

Страница 36: ... the button in front of SHR 4081N P repeats blinking please check the connection across the product body If you find any error please ask the shop where you bought the product Note Note If you see no more Live screen you shall check if video data comes out in Composite mode or VGA mode If you whish to change the video output mode you shall hold on to the MODE button in front of SHR 4081N P and kee...

Страница 37: ... icon and turns yellow when you execute PTZ Audio Icon This icon represents Audio On Off status and turns yellow for On It does not appear for Video or Audio Disable Sensor In Event Icon This icon appears in the channel synchronized with the external sensor signal input with Sensor On Motion Event Icon This icon appears in the Motion Event channel with Motion Detection On Zoom Icon This icon appea...

Страница 38: ...want to which is displayed in the full screen or reduced screen area You may move the PIP screen at 5 stages in the Full screen with the or key Screen change Mode Displays the time when FULL SCREEN has been set to each channel in sequence and the channel LED concerned is turned on CAM_01 CAM_02 CAM_01 CAM_05 CAM_01 CAM_06 CAM_07 CAM_08 CAM_04 CAM_03 CAM_02 9 Split Mode 6 Split Mode 8 Split Mode PI...

Страница 39: ...n order in the 4 split mode 1 CH 8 CH are displayed in the 9 split mode Other modes than Full Screen may be selected by pressing the Mode button and button in sequence Every time you press the Mode button the mode changes in the following procedure 16Split 9Split 1 4Split 1 6Split 7Split 8Split PIP Screen Mode 16Split Every time you press the button the mode changes in the following procedure 9Spl...

Страница 40: ...lit mode 9 If you press Enter in the Split mode the following cursor will appear and the channel will be selected Press the CH button with a channel selected to set Audio on off Now the Audio icon turns yellow white depending on Audio On or Off 16 You may not choose a channel in the Split mode on your own CH Selection and Audio On Off Setup in the 4 6 7 8 Split mode and PIP mode As in the 9 Split ...

Страница 41: ...only available in Full Screen Mode If you press ZOOM button in Full Screen Mode the zoomed area will appear now you are able to adjust the selected area position If you select an area and press ENTER button the area will be displayed in double size If you press ENTER button again the previous screen to select Zoom area will appear again and you will be capable of Zoom Off with ZOOM button after th...

Страница 42: ... CH2 event the three events are split into 4 screens Likewise CH2 CH5 and CH7 events within 5 seconds after both CH1 and CH3 events are integrated with the existing 2 events and all the 5 events are split into 9 screens Without further event during Event Duration the system will return to the previous Live Mode If you press ALARM button during Event Duration Event Monitoring will stop On sensing a...

Страница 43: ...st priority to be spotted out Caution Caution If the built in HDD is not connected or it operates with power applying in error indicating built in HDD error is displayed at the top of left At this time 1 Live screen mode 2 Monitoring mode by Smart Viewer operate only and the other functions including recording search playback menu setup and PTZ do not operate If the above problem is occurred Be su...

Страница 44: ...Chapter 5 Menu Setup 5 ...

Страница 45: ...r on your desirable menu OK or Cancel in Menu Setup Window Once changed the new menu setup procedure will be finalized by pressing OK Pressing Cancel will cancel the previous setup and return to the upper menu Front MENU and SEARCH Button The MENU button or SEARCH button if pressed first acts as an entrance button Once entering it reverses the page to the previous one The or V mark beside the titl...

Страница 46: ... or button to change the date Press the Enter button to come out of the mode Time Press the Enter button and the or button to move to H M S Use the or button to change the time Press the Enter button to come out of the mode Once changed the date and time will remain unchanged until you press OK or Cancel Date Time Language Setup ...

Страница 47: ...remains inactivated Note Note Date Time Change Pressing OK after you change date and time you will be asked by a pop up window if you really confirm the change Here press Yes to change the time Since Date Time does not change in backup process be sure to stop the backup process before you change Date Time Note Note When the DST is operated The proceeding backup is cancelled Recording in progress w...

Страница 48: ...first Without New Password input New Password Confirm input has no effect Password Lock Pressing the Menu button while it is set to On you will be asked by a pop up window of the password Pressing the Menu button while it is set to Off you will enter Menu Mode immediately not being asked of the password All Key Lock On If you select this the system will enter Live Mode immediately If you press a b...

Страница 49: ...ion window to start initializing System Log System Log is used by a controller to check crucial records This displays such contents of a system related log and its execution date time as System Start System Termination and Menu Setup Change First Returns to the first page Prev Back to the previous page Next Forwards to the next page Last Moves to the recent ...

Страница 50: ... Default System Initialization Login User Viewer Login User System Upgrade System S W Change Logout User Viewer Logout User Disk Full No Space for HDD Setup Start Local Set Menu Entering Backup Start Backup Start Setup End Local Set Menu Escape Backup End Backup End Setup Remote Viewer Menu Setup Backup Stop Backup Stop Play Back Start Play Start Backup Fail Backup Failure Play Back End Play End A...

Страница 51: ... body this stores data This can be used as Extended HDD or Backup HDD Extended HDD Supplements Internal HDD quantity Connected it takes the place of Internal HDD Backup HDD Backs up the data recorded in the set Note 2 Note 2 ATA Usage Internal HDD This is a physical hard disk connected with SHR 4160 through the IDE cable USB Usage External HDD Extended HDD or Backup HDD A physical hard disk connec...

Страница 52: ...l HDD if you press the Enter button and turn to External Caution Caution HDD Erase Data will not be deleted in backup or recording process Please be sure to suspend backup or recording before you delete any data If the recording is in progress stop the recording to delete a data 2 Hot Plug Connect Disconnect You may connect or disconnect IEEE1394 Hard Disk while power is supplied to the SHR 4081N ...

Страница 53: ... recording of HDD Stop Stops recording when HDD is full during recording Overwrite Deletes the original data and save a new data when HDD is full during recording HDD End Beep On Beeps when HDD is full during recording Off When HDD is full the beep sound is not heard Caution Caution IEEE 1394 Hot Plug Connect Disconnect Function Both IEEE1394 and USB support Hot Plug Backup HDD You may set both th...

Страница 54: ...unicate with SSC 2000 Be sure to be identical to SSC 2000 Baudrate for communication Parity Sets up one of None Even Odd Data Sets up either 7 or 8 Stop Sets up either 1 or 2 Duplex Sets up either Half Duplex or Full Duplex Caution Caution Disk End Mode Overwrite In the Overwrite mode delete the old Event data in advance Note Note If you select Remote Control Device you may not PTZ device with SHR...

Страница 55: ...ress OK in the confirmation window and plug out when you see Safe to Power Off Remote Control Device Caution Caution System Shutdown Power off without terminating the system in the System Shutdown menu may incur improper motion like data loss and disk failure Power off shall be done in the System Shutdown menu ...

Страница 56: ...annel disappear Covert1 Displays other information than the image information on the selected channel Covert2 Hides all the information on the selected channel In this case you are not allowed to set Audio Title Screen change Audio On You can hear voices from a selected channel Off You cannot hear voices from a selected channel Camera Configuration ...

Страница 57: ...rsor you can type text by text Up to 15 texts can be typed Keyboard cannot be composed of all spaces Pressing Caps Lock changes the keyboard that can be selected 2 Modes SHR 4081N P USER S MANUAL 5 13 Auto Seq You may define the duration of each channel at the Screen change channel in Live Mode A channel set of Off does not operate in Screen change Mode ...

Страница 58: ...mond Kalatel Baudrate Baudrate supported by PTZ device 600 1200 2400 4800 9600 19200 38400 Parity Defines one among None Even and Odd Data Defines either 7 or 8 Stop Defines either 1 or 2 Serial Mode Defines either Half Duplex or Full Duplex Caution Caution The above items shall be aligned with the PTZ device setup condition For the details please refer to User s Manual of the PTZ device manufactu...

Страница 59: ...on the channel that you want to adjust and set up Brightness Contrast Color Once selected the channel appear in the PIP area on the right Press the or button to adjust the value from 0 to 100 If you select CH all the channel values will become the same as the finally selected channel value Default resets the current channel to the basis value of 50 ...

Страница 60: ...s On or Off Status Audio Ptz is displayed on the screen or not depending Status remains On or Off Spot Out Channel Spot Out channel is used to let one of two monitors monitor a channel focusing on it Spot Out channel supplies two functions continuous monitoring of only one channel and Screen change to display all the channels one by one Screen change setup ranges from CH1 to CH8 Set to Screen chan...

Страница 61: ...nnel to be played back in Play Back 9 Split Mode Right Down Designates a location on the bottom right corner Center Designates a location in the center MultiChannel Seq The change of split screen is available to be set It can be set to 3 Sec 5 Sec 10 Sec 20 Sec 30 Sec SHR 4081N P USER S MANUAL 5 17 Caution Caution Monitor Out Set to Composite Output VGA does not come out Set to VGA Composite Outpu...

Страница 62: ...s PAL CIF setup for the resolution is available from the recording sheet number of 15ips NTSC 12 5ips PAL Recording Resolution Selects the recording resolution HH Very High H High N Normal L Low Rate Determines Frame Rate to be recorded Frame Rate means the number of screen recorded every second Set to 15ips NTSC 12 5ips PAL the system records too many screens per second and play continues intermi...

Страница 63: ...de Determines a mode to be recorded when an event occurs V Size Video Size Determines the size of a screen to be recorded Full D1 720 x 480 NTSC 720 x 576 PAL Large L Half D1 720 x 240 NTSC 720 x 288 PAL Normal N CIF 352 x 240 NTSC 352 x 288 PAL CIF C SHR 4081N P USER S MANUAL 5 19 NTSC PAL ...

Страница 64: ...et to 15ips NTSC 12 5ips PAL the system records too many screens per sec ond and play continues intermittently since recording is more detailed This is appropriate for concentrated monitoring zone setup Set to the one of 30ips 15ips 10ips 7 5ips 5ips 3ips 1ips NTSC Set to the one of 25ips 12 5ips 8 33ips 6 25ips 5ips 2 5 ips 1ips PAL Pre Event Post Event Records the situation until Event is issued...

Страница 65: ...hronize with the current sensor The default is currently set to the sensor number A sensor shall be synchronized with at least a camera Multi synchronization is possible SHR 4081N P USER S MANUAL 5 21 Alarm Out Arranges Alarm Out when Alarm Sensor sounds At this moment this supports 5 Alarm Outs Choose an alarm out that you want to synchronize with the current sensor Multi choice is possible Beep ...

Страница 66: ...You are forbidden to determine 4 block rows Up Down Left Right to allow them to be displayed in all monitors Select All Selects the whole area Select One Selects a block every time Selection is done by a toggle system Select Quarter Split the whole area into 4 pieces which enables selecting a fourth of the whole area Clear All Cancels the whole area Save Exit Saves and exits Exit Exits without sav...

Страница 67: ...larm Out continues for the determined duration Off 3sec 5sec 10sec 20sec 30sec Video Loss Detection Setup SHR 4081N P USER S MANUAL 5 23 Video Loss State Off Image Loss Sensing does not operate On Image Loss Sensing starts operation Alarm Out Selects Alarm Out scope when the current Image Loss occurs At this moment this supports 5 Alarm Outs Choose an alarm out that you want to synchronize with th...

Страница 68: ...rall setting of the selection window into Continuous Event Both None Continuous Recording Recording starts automatically on the preset time Recording follows the condition established in 5 18 Record Mode of MENU Refer to 7 3 Record Schedule of MENU Event Recording Recording starts automatically when Event occurs to Alarm Motion Detection Video Loss within a designated time Recording follows the co...

Страница 69: ...h Event Recording Mode Holiday If you press Holiday a calendar pops up and you are able to designate holidays Move to a date and press Enter to complete designation Press Enter once more to cancel designation H at the bottom of the table means a holiday SHR 4081N P USER S MANUAL 5 25 ...

Страница 70: ...box at the left bottom In the absence of the backup device a warning message appears Select and connect the backup device in Menu 5 8 HDD Setup before the backup process Press Stop to suspend backup Press Cancel during backup to return to the upper menu but the process continues nevertheless Caution Caution In the Backup process Press Cancel to return to the upper menu but the process continues ne...

Страница 71: ...e backup date and time and the camera number then press Start Whenever you change the start date time the end date time the free space is updated and displayed In case that two devices are connected select the backup device by clicking the box at the left bottom In the absence of the backup device a warning message appears Select and connect the backup device in Menu 5 8 HDD Setup before the backu...

Страница 72: ... set with the authority of general user IP Set up the IP address to connect the SHR 4081N P main body to the network In case of a fixed IP you must input IP yourself In case of a flexible IP or ADSL PPPoE the IP allocated from the DHCP server or ADSL company If you fail to connect DHCP or ADSL 000 000 000 000 is displayed Then press OK to receive IP If you repeatedly fail to connect DHCP or ADSL t...

Страница 73: ...dress in the main body of SHR 4081N P The default of DNS is 168 126 63 1 Generally you don t have to alter the DNS default but you may be hard to connect to the network sometimes if you use DHCP or ADSL In this case call the network manager or ADSL company to set up a new DNS address ADSL User ID If the main body of SHR 4081N P is connected with the ADSL PPPoE network input User ID subscribed to t...

Страница 74: ...N P and input the determined IP and Port number in IP Router than use the DHCP function Please refer to the IP Router User s Manual or call the manufacturer to set up IP Router Transfer Protocol Settings You may choose the protocol type either TCP or UDP ADSL setup in the IP setup page can be made only to TCP Port TCP can be selected from 554 to 998 increasing by 4 Once the first digit is chosen t...

Страница 75: ...is set to On Sets up the IP address of a PC where SmartViewer is already running Port UDP You may choose a value from 7900 to 7999 increasing by 1 Sets up the port value of Callback Connection set by SmartViewer Retry You may choose a value from 1 to 20 increasing by 1 Caution Caution Though Callback is set to ON there will be no Callback message unless Alarm Motion Detection or Video Loss is set ...

Страница 76: ...SmartViewer connection and those set in Port UDP shall be used to transmit Stream In case of Multicast The MultiCast IP and TTL Setup menu will be activated MultiCast IP indicates the group address for Multicast transmission D Class IP Address 224 0 0 0 239 255 255 255 TTL Time To Live indicates how many routers Multicast shall get through If you are unable to Multicast due to the network LAN or A...

Страница 77: ...Chapter 6 PTZ device Control 6 ...

Страница 78: ...ear in the monitor screen Use direction keys to move this bar until you reach the channel with the PTZ symbol and press the PTZ button in front of SHR 4081N P to enter PTZ device Control Mode If you succeed in entering PTZ device Control Mode the PTZ symbol on the monitor screen will turn yellow from white while the PTZ button in front of SHR 4081N P will turn blue PTZ device Control Mode supports...

Страница 79: ... Zoom operation basically and Preset Camera Menu and other functions additionally Press the PTZ button in Live Mode to cancel PTZ device Control Mode After cancellation the PTZ symbol on the screen will turn white from yellow while the PTZ button will lose its blue light Note Note If you select Remote Control Device you may not control PTZ device with SHR 4081N P It s because the PTZ button in fro...

Страница 80: ...l Mode to control PTZ device horizontally TILT Press the UP or DOWN button in front SHR 4081N P in PTZ device Control Mode to control PTZ device vertically PTZ TELE WIDE VIEW PRESET PTZ TELE WIDE VIEW PRESET ZOOM Press the TELE WIDE button in front SHR 4081N P in PTZ device Control Mode to zoom in or out PTZ device PTZ TELE WIDE VIEW PRESET ...

Страница 81: ...p to 20 PTZ device positions at the moment Press the SET button in front of SHR 4081N P in Single Screen PTZ device Control Mode to set up Preset After PRESET setup press ENTER PTZ TELE WIDE VIEW PRESET Note Note For AD Protocol PTZ device this memorizes only 7 positions ...

Страница 82: ... the PIP screen and press Enter again to cancel P T Z Motion Mode Press Enter at the Position Name position to see Virtual Keyboard Type Position Name and press OK to save Position and Position Name Press Del to delete both Position and Position Name with the number Press Del on the top to delete all Positions and Position Names in memory ...

Страница 83: ...ress the SET button in front of SHR 4081N P in Single Screen PTZ device Control Mode to select Camera Menu Press the SET button in front of SHR 4081N P to return to the upper menu from SET button Camera Menu Note Note Either Panasonic or Samsung Protocol Camera only is authorized for Camera Menu setup PTZ TELE WIDE VIEW PRESET ...

Страница 84: ...e Press the VIEW button in front of SHR 4081N P in Single Screen PTZ device Control Mode to select Preset Control the cursor until it reaches a Preset position number that you want to move to and you can check the right movement through in PIP Screen on your right PTZ TELE WIDE VIEW PRESET For example Samsung Protocol ...

Страница 85: ... or enter Preset Setup or Camera Menu Setup Menu while this function is in action the function in action will be suspended and unchecked Restart of SHR 4081N P System in action has no effect The function continues its duty and remains checked PTZ TELE WIDE VIEW PRESET For example Samsung Protocol Preset Auto Pan Scan Pattern EXIT Preset Auto Pan Sequence Sort EXIT Preset Auto Scan Frame Scan Patte...

Страница 86: ...Chapter 7 Recording 7 ...

Страница 87: ...ng PANIC Recording LED lights on and a recording icon appears on the screen During recording in HDD HDD LED in front blinks During PANIC Recording you may stop PANIC Recoding by pressing the button then LED lights out SHR 4081N USER S MANUAL W Warning arning If you carry out the functions necessary to stop recording Time Change File Delete HDD Connect Disconnect etc recording will be paused ...

Страница 88: ... REC Recording you may stop REC Recoding by pressing the REC button then REC LED lights out If you press the REC LOCK button during REC Recording REC LOCK LED will light on and the REC button will be locked Cancel REC LOCK first and press the REC button to cancel REC W Warning arning If you carry out the functions necessary to stop recording Time Change File Delete HDD Connect Disconnect etc recor...

Страница 89: ...e event recording the auto recording is operated when the event occurs In this case the event recording is saved according to the related channel setup within the event recording items Resolution Frame Pre alarm Post alarm of recording menu Note Note Even in case of an event Event Recording will not start unless Event Recording or Both is selected in Record Schedule W Warning arning If you carry o...

Страница 90: ...Video Loss Detection Image Loss State in Event Record Image Loss of MENU shall be set to On Event Record Mode Setup When Event occurs it designates recording type In particular depending on Pre Event Off or Post Event Off Pre Event or Post Event Recording is disabled respectively W Warning arning If you carry out the functions necessary to stop recording Time Change File Delete HDD Connect Disconn...

Страница 91: ...Chapter 8 Search Play 8 ...

Страница 92: ...es video files Go To First searches video files from the oldest one Go To Last searches video files from the latest one Backup Data Search searches backed up video files If you select the external HDD you are able to search IEEE1394 HDD and USB HDD If you select the external USB device you are able to search Memory Device and USD CD DVD SHR 4081N USER S MANUAL Note Note During Backup Pressing the ...

Страница 93: ...corded video image will turn blue Use to move to the row where you are able to choose a year month and press Enter and to select a year month as you wish Press Enter to select a date with a recorded image and the box on the right of the number indicating the date will appear after checked Press to move to Time Bar and press and to move to the time that you want and press Enter to select the time P...

Страница 94: ...ne channel is allowed for video search Press Enter and to select a channel and the event list for the selected channel only will be displayed After channel selection press and Enter to select a channel from the event list The box on the left of the selected event number will be checked Press to move to Start and press Enter to start search and move to Cancel and press Enter to cancel search Press ...

Страница 95: ...here you can choose the search time To change the search time press Enter The search time can be controlled by years months days hours minutes seconds and each value can be changed by pressing For your convenience keep pressing the button to change the value continuously Press to move to Start and enter Enter to initiate search and move to Cancel and press Enter to cancel search The time informati...

Страница 96: ... among recorded video files Up to 4 channels can be searched at once Press Enter to select a channel and the box on the right of the channel will be checked Press Start to start searching and press Cancel to return to the previous menu 4Go to First Search ...

Страница 97: ...4 channels can be searched at once Press Enter to select a channel and the box on the right of the channel will be checked Press Start to start searching and press Cancel to return to the previous menu Recent Search is used to search the image at the moment that you start searching ...

Страница 98: ...l be paused 6Play SHR 4081N P USER S MANUAL 8 7 Press the PLAY PAUSE button to play the data recorded in HDD This chooses out a channel with the oldest data among recorded channels and plays the data from the first part of the channel If you used the SEARCH button for play just before the system would remember the information of the played channel until you click the PLAY PAUSE button again then t...

Страница 99: ...creen Press Mode during Single screen play and it will be displayed in the PIP screen The larger screen displays the channel in play and the smaller screen in the bottom right corner displays Live CH in the form of PIP Use to move the smaller PIP screen Live CH vertically Press Enter and a blue bar will appear in Live CH Press the CH button and the Live screen will become the selected channel 9 Sp...

Страница 100: ...se the Jog shuttle with the system paused you will be able to see still screens forwardly or reversely During reverse search the interval between cuts varies depending on the record ing specification Audio On Off If you press the 16 button in other screen than 4 Split Screen i e Single Screen PIP Screen and 9 Split Screen you will be able to turn Audio of the channel in play on or off In 4 Split S...

Страница 101: ...Chapter 9 Backup and Backup Search 9 ...

Страница 102: ...NUAL Note Note Pressing Cancel does not cancel nor stop backup but move to the upper menu while back continues Pressing Stop stops backup Note Note Backup can not be played during backup Refer to the User s Manual 8 7 Backup Search 1 2 Backup Stop Select Stop in the backup process to stop backup Then the Backup menu will be displayed in the screen If you change the system time or terminate the sys...

Страница 103: ...h USB CD DVDs are not allowed in the USB connection port in front of and behind SHR 4081N P 4 Both Memory Devices are not allowed in the USB connection port in front of and behind SHR 4081N P Note Note Backup can not be played during backup Refer to the User s Manual 8 7 Backup Search 1 2 Backup Stop Select Stop in the backup process to stop backup Then the Backup menu will be displayed in the scr...

Страница 104: ...rnal Device Setup 4 In case of backup by using a USB memory be sure to format with FAT32 and use a USB memory device with one partition In addition delete the USB memory at SHR 4081N P for safe backup refer to 5 7 System Information and Setup 5 When you connect the backup device to SHR 4081N P it takes some time for SHR 4081N P to recognize the backup device Consequently connecting the backup devi...

Страница 105: ...2Backup Search 9 4 1 Backup search menu 1 1 External HDD Search If you select an external HDD you may search the data by using Date Event Origin or Late Refer to p8 2 p8 5 for this purpose ...

Страница 106: ...o the time search line Click Enter to change the search time The search time may be changed by Year Month Day Hour Minute Second by clicking or For your convenience just keep pressing a button and the value will continue to change Click Start to start searching and Cancel to return to the previous menu The time information in the bottom left corner 2004 03 06 17 47 27 indicates when to start repla...

Страница 107: ...Chapter 10 Smart Viewer 10 ...

Страница 108: ... USER S MANUAL Smart Viewer is a program that a general PC user is able to install SHR 4081N P to his PC to monitor the search video and audio data through Network without going to the site where SHR 4081N P is installed by himself ...

Страница 109: ...eed in whole abruptly Command Control by RTSP Real Time Streaming Protocol enables safety control through Network Supports various transmission protocols TCP IP UDP Unicast Multicast Connection is open to you at any time to monitor video and audio data by inputting IP Address only You can not only perform real time recording dvr format whereas necessary during monitoring but also convert recorded ...

Страница 110: ...commendation CPU Pentium3 1GHz or higher RAM 256 Mb or higher VGA RAM 32Mb or higher DirectX 8 1 or higher Note Note Depending on Recording Rate Video Size and user s PC specification set to SHR 4081N P the number of Smart Viewer play frame varies For the detailed specification refer to Appendix 5 ...

Страница 111: ...4Smart Viewer Installation 10 4 Smart Viewer Installation Put a Smart Viewer Program CD in and open the Smart Viewer folder in CD Run the Setup exe file ...

Страница 112: ...SHR 4081N P USER S MANUAL 10 5 Click the Next button If you agree with Smart Viewer License click Yes Designate a folder to install Smart Viewer in it and click Next ...

Страница 113: ...10 6 The system proceeds with setup file installation and system setup Installation is complete Press Finish to terminate installation ...

Страница 114: ...SHR 4081N P USER S MANUAL 5Smart Viewer Program Execution 10 7 Double click the Smart Viewer icon in the background screen to run the program ...

Страница 115: ...ed to select the window to display event messages and came connection condition This window displays the event message from SHR 4081N P real time These buttons display the status of channel being played in the present This button adjusts Audio Volume and Video Brightness Contrast or records video data This button is used for PTZ related functions 1 This button is used for screen split and Sequence...

Страница 116: ...ce retry of password input 2 Admin User Connection Failure Where SHR 4081N P that you wish to connect to has been already occupied by other user in an Admin Capacity you are authorized with access to SHR 4081N P concerned in a User capacity Note Note You can determine the name IP and password of DVR SHR 4081N P for connection in Setup Mode Also setup of a site which permits simultaneous connection...

Страница 117: ...ows as many as 3 users 1 Admin and 2 Users for simultaneous connection or as many as 6 users including 5 Users for Multicast Caution Caution Only 3 users can be connected to the SHR 4081N P 6 Users in Multicast Caution Caution If you alter Resolution or Color Quality from the setup tab of Display Registration Information while Smart Viewer is running Smart Viewer will fall into an unexpected condi...

Страница 118: ...nnection button will display connection status If you click the connection button here connection will be cancelled Play Screen OSD Information Channel no camera name and video size will be displayed Video Size C CIF N Normal L Large The Video data of the current channel are recorded in your PC with REC mark displayed Audio ON OFF Button is marked Displays the name IP address and play time of the ...

Страница 119: ... MUTE Once TCP IP is selected Audio will be turned off Note Note Where Alarm or Motion Detection occurs at a channel of SHR 4081N P with Alarm or Motion Detection established an icon pops up on the screen real time Motion Detection Alarm Event Note Note If you connect and set up PTZ device in SHR 4081N P PTZ controllability of the channel will be displayed Select a channel capable of PTZ and use t...

Страница 120: ...eo Loss CH N Video Loss at the N channel of SHR 4081N P encountered Alarm Detection CH N Alarm issued at the N channel of SHR 4081N P Motion Detection CH N Motion detected at the N channel of SHR 4081N P Time Change Date Time of SHR 4081N P changed Load Factory Default SHR 4081N P System initialized Network Change SHR 4081N P Network setup changed System Shutdown SHR 4081N P System terminated Hdd ...

Страница 121: ...mera Connecting Indication Window List displays the connection condition of DVR and CAMERA Note Note DVR Icon Mark If you succeed in SHR 4081N P connection the icon will be turned yellow otherwise black DVR Icon Mark During monitoring by connecting with CAMERA it will turn yellow Depending on the availability of connection it turns blue Able or black Disable ...

Страница 122: ...de Button Note Note If you connected with multi DVRs SHR 4081N P through a site Sequence will operate as follows In Single Mode DVR1 1CH DVR1 8CH DVR2 1CH DVR1 1CH In Quad Mode DVR1 1 2 3 4CH DVR1 1 2 3 4CH In Nine Split Mode DVR1 1 2 3 4 5 6 7 8CH DVR2 1 2 3 4 5 6 7 8CH Changes the channel to be played at the preset interval The sequence time interval setup follows the procedure of Setup Mode Vie...

Страница 123: ...gure in a screen icon indicates the screen position in SmartViewer The orange icon indicates the current channel is connected to a camera The gray icon indicates the channel is connected to a camera but not displayed on the screen The black icon with a diagonal line indicates no camera is connected ...

Страница 124: ...CALLBACK button to activate the CALLBACK window and it is ready to receive a message Upon receiving a message Smart Viewer will automatically try to connect the DVR A message is received at the time of Video Loss Alarm and Motion Detection Mode Note Note If you connected with multi DVRs SHR 4081N P through a site Sequence will oper ate as follows In Single Mode DVR1 1CH DVR1 16CH DVR2 1CH DVR1 1CH...

Страница 125: ...the FAVORITE settings You can select a new FAVORITE number and name Alters FAVORITE at the selected intervals Note Note The FAVORITE button can be activated for use only when the site is contacted The FAVORITE setup information will remain in the Config file even after the site contact is cancelled If you revise the DVR list composing the site in the Setup menu the FAVORITE value will be initializ...

Страница 126: ...ghtness or contrast of the image The default is set to 5 You can increase or decrease brightness or contrast by 1 between 0 and 10 Press the Button to recover the default Video Recording Button If you select a channel in play and click the REC button the image will be saved in a file format with the extension of dvr in a designated folder of your PC The name of the directory in which an image will...

Страница 127: ... camera But POWER ZOOM is supported only by Samsung Smart Dome Camera with TILT below 45 ZOOM IN OUT POWER ZOOM Click P to activate POWER ZOOM POWER ZOOM is a function to enlarge or reduce a video screen by touching the screen itself After POWER ZOOM is dominant ZOOM IN OUT will zoom in or out the video screen POWER ZOOM Operation Procedure Click POWER ZOOM Select ZOOM IN or OUT Click ZOOM IN or O...

Страница 128: ...oes not support any of those functions The Samsung camera supports all the functions and names The Panasonic camera supports all the functions but with different names SEQUENCE AUTOPAN SORT The PELCO camera supports all the functions but with different names FRAME SCAN AUTO SCAN PATTERN Other cameras do not support the AUTOPAN SCAN and PATTERN functions AUTOPAN The camera executes this function re...

Страница 129: ...een from Viewer Use the button for the movement between menus This is a button for the role of Enter You may set up the Function Menu in PTZ device 1 1 2 3 Caution Caution As far as SHR 4081N P uses the PTZ device control related functions Smart Viewer can not control PTZ device The PTZ device control related functions are authorized with the user with Admin authority ...

Страница 130: ...e local mode for the playback of dvr files recorded in your PC Calendar window to select Year Month Day for search To control the audio volume and video brightness contrast To change the screen split Button for the Record Convert File Print Setup functions To control the playback of searched video To display the next channel in order 1 To change the channel and DVR or renew the calendar window and...

Страница 131: ...owed for simultaneous search and playback The video information at the time indicated by the timebar will be displayed in the playback screen When clicking it changes to the remote mode DVR SHR 4081N P Selection Change by contacting SITE Select SHR 4081N P from the Contact list SHR 4081N P turns black if contacted with the ADMIN authority and turns gray if contacted with the USER authority Without...

Страница 132: ...teen split mode Note Note In the remote mode Nine split Mode is not available and in the local mode Quad Nine split Mode is not available Video Save Backup Video Conversion Print Setup Video save button During the playback Play Reverse Play Fast Forward Fast Backward If you select a channel in the playback and click the SAVE button the video is saved in a file format with the extension of dvr in a...

Страница 133: ...de is available at the Stop status File Converting Button This function converts dvr files into jpg files Click the Open button to select a dvr file to be converted Select the JPEG Frame or AVI Video If the JPEG Frame is selected the file is converted into the jpg file by clicking the Start button The converted jpg file is saved according to the setting route Setup Viewer Setup File Converting Jpe...

Страница 134: ... up the setup mode window Play Buttons Play Play Reverse Play Reverse Play Stop Stop Fast Forward Faster Play Fast Backward Faster Reverse Play Step Forward Forward playback per second Step Backward Reverse playback per second Go to First Playback of the first image in the time Line Go to Last Playback of the latest last image in the time Line 2 1 5 3 4 9 7 6 8 ...

Страница 135: ...s Time Line turns Green Normal Red Panic Orange Alarm Blue Motion Yellow Schedule or Purple Video Loss depending on the recording condition Time Line Displays the time information on the video data in SHR 4081N P on the calendar window for the selected day The General mode indicates the 24 hour information from 0 o clock to 24 o clock while the Zoom mode indicates the time information every 2 hour...

Страница 136: ...only one channel You are free for access to the user being connected to SHR 4081N P Other functions than the calendar display function are as same as those of Remote Mode The time information on Local File will be displayed at the first channel position in Time Line together with the file name Clicking selects a file to be played in the file selection window and enters Local Mode Note Note During ...

Страница 137: ...tup Viewer Setup Site Setup and S W Version setup Shows what the selected Setup item can set up in detail This button terminates the Setup window This button saves the information revised in the Setup window remarks the information prior to such a revision or terminates the Setup window 1 3 2 4 ...

Страница 138: ...e for control S W Version S W Version shows the current version of Smart Viewer system requirement and the System S W version of on line SHR 4081N P and upgrades SHR 4081N P System S W remotely Save Cancellation of Revised Information Click the Apply button to save the information revised in the Setup window click the Cancel button to display the information before such a revision Closing Setup Wi...

Страница 139: ...DVR Setup is for only ADMIN Among more than one on line SHR 4081N P the name of SHR 4081N P connect ed in the Admin capacity will be listed Depending on you are connected to a SHR 4081N P or the site the name of SHR 4081N P or the name of SHR 4081N P connected in the Admin capacity among those composing the site will be listed You may choose one to set up SHR 4081N P Menu The setup menu for select...

Страница 140: ...ystem Information Information shows the information on on line SHR 4081N P Note Note For the detailed items of DVR Setup refer to Chapter 5 MENU Password Password determines the password for the control of SHR 4081N P Menu or SHR 4081N P key input SHR 4081N P ...

Страница 141: ...e SHR 4081N P will automatically cut the connection with Smart Viewer to apply a new time setup Upon completion of new time setup of SHR 4081N P you are permitted to resume connection with Smart Viewer But Display Format or Summer Time can be set up without disconnection Date Time Date Time is used to set up the information on Date Time Form and Summer Time of on line SHR 4081N P Caution Caution S...

Страница 142: ...on setup of SHR 4081N P In short the language setup of Smart Viewer does not change Language specification to be supported is subject to change later Language Language sets up the language in which on line SHR 4081N P will be expressed Disk Mode In Disk Mode you may set up Writing Mode of HDD attached to SHR 4081N P ...

Страница 143: ...u fix Remote Control Device to the main body of SHR 4081N P and activate the setting values Viewer will be disabled to control PTZ Remocon Remote Control Device Remocon can set up Remote Control Device fixed to SHR 4081N P ...

Страница 144: ...ation of Ctrl C or Ctrl V in the keyboard are not supplied to Title input Use the BACKSPACE key to delete content Caution Caution Title supports English only If you type in and apply Title in your native language Warning message will pop up to ask your retyping Title shall be composed of no more than 15 texts If you leave Title blank and apply it Warning message will pop up to ask your retyping ...

Страница 145: ...e If a dome camera is connected to all channels sets up Camera ID Protocol Baud Rate Parity Data Bit Stop Bit and Serial Mode Monitoring Monitoring Monitoring sets up both Event Monitoring and OSG Display of Live Mode ...

Страница 146: ...values to be recorded when Event occurs Recording Rec Mode Rec Mode sets up Live Mode decision Video Size during recording Quality and Rate Note Note Full D1 L Video Size does not support 15ips 10ips NTSC 12 5ips 8 33 ips PAL Note Note Full D1 L Video Size does not support 15ips 10ips NTSC 12 5ips 8 33 ips PAL ...

Страница 147: ...sets up the information necessary for Alarm Recording Motion Rec Motion Rec sets up the information necessary for recording by Motion Detection Note Note At least one camera should be selected in advance to be coupled with Alarm ...

Страница 148: ...Loss of SHR 4081N P Network Password This sets up the password for Admin and User to let you connect with SHR 4081N P through Network in Smart Viewer Caution Caution Network Password shall be composed of no more than 8 texts If you leave Password blank and apply it Warning message will pop up to ask your retyping ...

Страница 149: ...the connection with Static IP Dynamic IP and ADSL PPPoE Sets up the network Bandwidth Please adjust the bandwidth to the network con dition in which SHR 4081N P is connected Sets up IP Address Gateway Subnet Mask and DNS Please input both ID and password of the sub scriber in the event of ADSL Caution Caution Be sure to inquire the network manager before you input Network IP Gateway Subnet Mask or...

Страница 150: ...back message in the event of Alarm Motion Detection or Video Loss Sets up the value for retrial in the event of message delivery failure Translation Protocol Changes the Transmission Protocol setting values The protocol supports TCP IP and UDP Unicast Multicast Control Port TCP IP and Port UDP to change the connection port Multicast IP or TTL will be used for UDP Multicast ...

Страница 151: ...e OSD Display and Auto Connection This is used for the setup of information necessary for saving the video data in display in dvr file format while you are connected to SHR 4081N P This is used for the setup of information necessary for converting the file saved in your PC in dvr file format into JPEG This is used for the setup of information necessary for Screen change Mode This is used for the s...

Страница 152: ...rrent default directory is Smart Viewer Program Installed Directory video dvr Recording Time As long as you are connected to SHR 4081N P in Monitoring or Search Mode while recording the video data in display this sets up the longest recording time Time setup ranges from 1 to 10 minutes If recording exceeds the preset time at Recording Time recording will be automatically stopped File Converting JP...

Страница 153: ...on event icon will not be affected by the OSD Display condition Callback Connection Selects the port to allow the connection of Callback Auto Connection Determines if Smart Viewer shall be automatically connected to SHR 4081N P or Site as soon as it starts running If you check Auto Connection On the name of SHR 4081N P and Sites that are currently registered in DVR Site List will be listed as foll...

Страница 154: ...User registered DVR SHR 4081N P list will be displayed here This button adds a new DVR SHR 4081N P or deletes or revises the already registered DVR SHR 4081N P User registered Site list will be displayed here This button adds a new site or deletes or revises the already registered Site This button adds DVR SHR 4081N P selected from DVR List to the Site selected from Site List But if the selected D...

Страница 155: ... DVR SHR 4081N P that you want to contact by Smart Viewer You may register a new DVR SHR 4081N P or delete and edit the DVR SHR 4081N P selected from the registered list and the name and IP MAC Address of the registered DVR will be enlisted in DVR List ...

Страница 156: ...P uses Static IP select Static IP from Address Type and input the name and IP Address of DVR SHR 4081N P You shall select PORTs in accordance with the PORT number determined by the DVR SHR 4081N P network menu If Dynamic IP has been allocated to the LAN connected to DVR SHR 4081N P through DHCP select DHCP from Address Type and input the DVR SHR 4081N P name and DVR SHR 4081N P MAC Address You sha...

Страница 157: ...Dynamic IP has been allocated to the ADSL connected to DVR SHR 4081N P through DHCP or PPPoE select DHCP PPPoE from Address Type and input the DVR SHR 4081N P name and DVR SHR 4081N P MAC Address You shall select PORTs in accordance with the PORT number determined by the DVR SHR 4081N P network menu Note Note DVR may be named in English or Korean up to 15 digits Login Password shall be as same as ...

Страница 158: ...e average number of replay frame is 0 5 ips but flexible depending on the num ber of channel and size of image under simultaneous monitoring Deletion of Already Registered DVR SHR 4081N P If you select one DVR SHR 4081N P in DVR List for deletion and press the Delete button the following message box will pop up If you press OK button then DVR SHR 4081N P will be deleted As long as DVR SHR 4081N P ...

Страница 159: ... following message box will pop up If you press OK button then DVR SHR 4081N P will be modified As long as DVR SHR 4081N P for modification is connected with the current Smart Viewer the following message box will pop up and DVR SHR 4081N P will not be modified Be sure to cut the connection between DVR SHR 4081N P and Smart Viewer before you modify it ...

Страница 160: ... P to the Site selected from Site List or delete it In Site List both the name of a registered Site and the name of DVR SHR 4081N P composing the Site will be listed One Site can be composed of no more than 4 DVRs SHR 4081N P Site Addition If you press the New button the following window will pop up where you can input the information on the new Site The information to be typed in is the Site name...

Страница 161: ...omposi tion and so is the information on DVR SHR 4081N P As long as Site or DVR SHR 4081N P for deletion is connected with the current Smart Viewer the following message box will pop up and Site or DVR SHR 4081N P will not be deleted Be sure to cut the connection between both Site and DVR SHR 4081N P and Smart Viewer before you delete it Modification of Already Registered Site If you select one Si...

Страница 162: ...nd DVR SHR 4081N P composing Site may be deleted from Site List If you press the Add button unless a Site is registered in Site List a new Site naming Site 0 as a default will be created to which DVR SHR 4081N P will be added As long as Site for DVR SHR 4081N P addition is connected with the current Smart Viewer the following message box will pop up and DVR SHR 4081N P will not be added to the Sit...

Страница 163: ...em S W remotely You are authorized with S W upgrade in an Admin capacity only In the capacity of user or if you are isolated with DVR SHR 4081N P your access will be denied Smart Viewer Version and system requirements will be displayed Here displays the version and name of DVR if any DVR SHR 4081N P is being connected with Smart Viewer You are also able to upgrade DVR SHR 4081N P S W by transmitti...

Страница 164: ...composing a site if any DVR SHR 4081N P is being con nected with the site but also displays DVR SHR 4081N P S W version Smart Viewer will be expressed in gray when disconnected from DVR SHR 4081N P and Status will be marked as Not Connected Each DVR Version has a check box which is used for S W Upgrade DVR SHR 4081N P S W Upgrade Smart Viewer upgrades on line DVR SHR 4081N P S W remotely Check a D...

Страница 165: ... necessary for DVR SHR 4081N P S W upgrade shall be downloaded from CCTV Part in Products Section at http www samsungelectronics com Caution Caution Be sure to suspend all the DVR system functions in action such as recording MENU backup and play before you upgrade DVR SHR 4081N P S W Never try to turn the DVR SHR 4081N P power off during such S W upgrade S W upgrade requires about 5 minutes If S W...

Страница 166: ...Chapter 11 Backup Viewer 11 ...

Страница 167: ...ack up the video data by using External HDD USB Memory and CD In the Backup Viewer the backup image data can be searched or played in the PC through the CD DVD or connecting the external HDD USB Memory to the user s PC SHR 4081N P USER S MANUAL ...

Страница 168: ...2Features 11 2 The video data backed up in any method among External HDD USB Memory and CD can be searched or played in your PC Backup Viewer is optimized in the resolution of 1024 x 768 ...

Страница 169: ...SHR 4081N P USER S MANUAL 3PC Specification Recommendation 11 3 OS Windows 2000 Windows XP Recommendation CPU Pentium 3 1GHz or higher RAM 256Mb or higher VGARAM 16Mb or higher Direct X 8 1 or higher ...

Страница 170: ...4Backup Viewer Installation 11 4 Put the Smart Viewer Program CD in CD ROM and open the Backup Viewer folder in the CD Run the Setup exe file ...

Страница 171: ...SHR 4081N P USER S MANUAL 11 5 Click Next If you agree with the Backup Viewer license click Yes ...

Страница 172: ...11 6 Select a folder to install Backup Viewer and click Next Install the execution file and set up the system as necessary ...

Страница 173: ...SHR 4081N P USER S MANUAL 11 7 Installation is complete Click Finish to terminate the whole installation process ...

Страница 174: ...5Executing Backup Viewer Program 11 8 Double click the Backup Viewer 1 0 icon in the background screen to execute the program ...

Страница 175: ...HDD USB Memory or CD DVD for connection Displays the image in play Selects the Year Month Date that you wish to search Controls Audio volume and Video brightness contrast Plays the searched images These are buttons for CH change and update of the Calendar window and Timeline Displays the time when a video file was recorded in External HDD USB Memory and CD DVD for the search date ...

Страница 176: ...u may access and search the video data recorded in External HDD USB Memory or CD DVD installed in your PC Select a device that you wish to connect and click the Connecting button Connecting Screen Display of Time Displays the date weekday and time of your PC ...

Страница 177: ... disconnection Display of Play Screen OSD Displays the CH number and replay time Displays the Audio On Off button Note Note If the video file in play has an audio image the Audio icon will be enabled to turn Audio on off Audio Off Audio On If the video file in play has no audio image the Audio icon will be disabled Audio Disable If Audio is turned on you can control the volume or select Mute ...

Страница 178: ...to the previous month Goes on to the next month Audio Volume Control If you play a video file with audio recorded in you can control the autio volume or select Mute The audio volume can be controlled by 10 steps from 0 to 10 Brightness Contrast You can control the brightness and constrast of the file in play The default is 5 The brightness and constrast can be controlled by 10 steps from 0 to 10 P...

Страница 179: ...Forward Forward by 1 second Step Backward Backward by 1 second Go to Last Plays the first image of Timeline Go to First Plays the recent last image of Timeline Note Note Disconnect is not available during Play Reverse Play Fast Forward Fast Backward In this case click the Stop button 2 1 5 3 4 9 7 6 8 ...

Страница 180: ...e current time of the video image in play Enlargement Mode Displays the timeline one hour earlier Displays the timeline one hour later Note Note Double click the Time Bar surrounding area to return to the Zoom mode Each column of Timeline corresponds to one hour The Timeline color changes according to the recording condition Green Normal Red Panic Orange Alarm Blue Motion Yellow Schedule or Purple...

Страница 181: ...SHR 4081N P USER S MANUAL 11 15 Next Button Displays the next channel Note Note Channel change is not available in the process of Play Reverse Play Fast Forward Fast Backward ...

Страница 182: ......

Страница 183: ...Appendix 12 ...

Страница 184: ...rough Out 16 Channel Auto Termination Video Composite 2 Channel Normal Video Output 1 Channel Spot Output 1 Channel Video Output BNC Type S Video 1 Channel 1 0Vp p VGA 1 Channel Mono 8 Channel Audio Input 5dBm 600Ω RCA Type Audio Mono 1 Channel Audio Output 6dBm RCA Type Resolution Frame Rate 1Ch 8Ch 720X480 NTSC 15fps 240fps NTSC 720X576 PAL 12 5fps 200fps PAL Single Quad Multi Screen 6 7 8 9 Liv...

Страница 185: ... is supported Normal REC Key Emergency PANIC Key Recording Schedule Schedule Table Mode Event Alarm Detection Motion Detection Video Loss Pre Post Recording NTSC 1ips 3ips 5ips 7 5ips 10ips 15ips PAL 1ips 2 5ips 5ips 6 25ips 8 33ips 12 5ips ATA HDD x 4 MAX Internal Primary Secondary IDE Connector MAX HDD Size 250GB x 4 1Tera Byte Storage IEEE1394 HDD MAX 6 Daisy chain connection Capacity MAX HDD S...

Страница 186: ...A Output 4 Relay Output 2A 30VDC 0 5A 125VAC Reset 1 Input 5mA Network Ethernet 10 100 Base T ADSL PPPoE DHCP Serial I F RS 485 PTZ Device Control Remote Control Device CPU Pentium III 1GHz or higher RAM SDRAM 256MB or higher Remote Graphic Accelerator Graphic Memory Viewer 32MB or higher DirectX 8 1 or higher Support OS Win98se WinME Win2000 WinXP Live Image Monitoring Mode Function Local File Se...

Страница 187: ...CD RW DVD R DVD R DVD RW DVD RW is not supported Internal ATA HDD IEEE1394 USB HDD I F External HDD Maker Model Remark FDISK V2 ActiveDrive CellDisk MICRO X AnyDrive eXtreme USB Flash disk cruzer mini Attache Jump Drive P C IOCELL Stormblue ALTech Bayon SanDisk PNY GeekSquad Lexar USB I F CD RW DVD RW Drive Maker RPM Disk Remark Plextor SONY Liteon PX W5232TU PX 708UF DRX 700UL SHOW 1633SX Samsung...

Страница 188: ...SHR 4081N P USER S MANUAL 3Outline Drawing 12 5 ...

Страница 189: ...conds the system will return to the Factory default condition Classification Detailed Items Factory Setup Date Format YYYY MM DD Time Format 24 Hours Language English DST Off Password 4321 Password Lock On Disk End Mode Stop Disk End Beep Off Video On Audio On Title CAM_01 CAM_8 Auto Seq 5 sec ID Camera No Protocol None Baudrate 9600 Parity None Data 8 Stop 1 Serial Mode Half Duplex Brightness 50 ...

Страница 190: ...F Setup Quality Very High Rate 15ips NTSC 12 5ips PAL Record Schedule Continuous Recording Off Setup Event Recording On Video Size CIF Recording resolution Very High Event Record Mode Rate 15ips NTSC 12 5ips PAL PreEvent 10 sec PostEvent 1 min Sensor State Off Alarm Camera Camera No Event Record Alarm Out None Setup A O Dwell Time 10 sec M D State Off Area All Area Motion Detection Sensitivity Med...

Страница 191: ...rame sec 3 frame sec Quad 3 frame sec 3 frame sec Single 3 frame sec 3 frame sec Half D1 N CIF C Nine split 1 frame sec 1 frame sec Quad 1 frame sec 1 frame sec Single 1 frame sec 1 frame sec Note Note The play frame specification of Smart Viewer varies on the setup of SHR 4081N P Recording Rate and Video Size or the screen split mode of Smart Viewer The above specification is applicable only when...

Страница 192: ...c 10 frame sec Half D1 N CIF C Nine split 7 5 frame sec 7 5 frame sec Quad 7 5 frame sec 7 5 frame sec Single 7 5 frame sec 7 5 frame sec Half D1 N CIF C Nine split 5 frame sec 5 frame sec Quad 5 frame sec 5 frame sec Single 5 frame sec 5 frame sec Half D1 N CIF C Nine split 3 frame sec 3 frame sec Quad 3 frame sec 3 frame sec Single 3 frame sec 3 frame sec Half D1 N CIF C Nine split 1 frame sec 1...

Страница 193: ...eck the HDD space Please check the Record Mode setup in MENU It should be On 4 All the front LEDs are in operation but the monitor remains black Video out may come out differently with the connected monitor In short Video Out is set to Composite Output but connected to VGA Input Monitor or vice versa Press the MODE button and 0 button of front left at the same time for 5 seconds and press them to ...

Страница 194: ...e screen by pushing the PTZ button Press Menu Camera PTZ Device to check if the protocol and other items were set to PTZ Camera 11 When you connect several IEEE1394 armored HDDs to SHR 4081N P DVR through Menu SHR 4081N P DVR cannot recognize all the HDDs It requires time to recognize several armored HDDs Please try again in a few minutes If retrial makes no improvement HDD could be abnormal Pleas...

Страница 195: ... or has some problem with Audio play of an Audio driver the Audio icon will be inactivated Please check Audio driver installation status 15 When I select the channel which PTZ device is connected to in the Live mode of Smart Viewer click the Menu Control button among PTZ setup buttons to enter the Function Menu mode in PTZ device and return from the other channel the PTZ related buttons have been ...

Страница 196: ...nment or human health from uncontrolled waste disposal please separate this from other types of wastes and recycle it responsibly to promote the sustainable reuse of material resources Household users should contact either the retailer where they purchased this product or their local government office for details of where and how they can take this item for environmentally safe recycling Business ...

Отзывы: