


C
ARE AND
M
AINTENANCE
C
HAPTER
S
EVEN :
C
ARE AND
M
AINTENANCE
7
.9
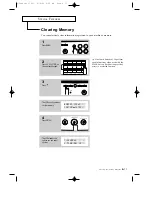
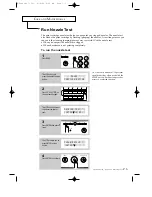
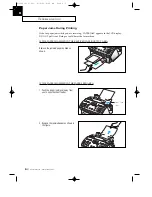
7. Press the CARTRIDGE button.
6. Plug the power cord in.
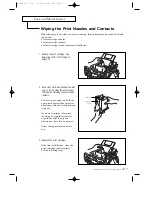
8. Install the print cartridge. See
ÔReplacing the print cartridgeÕ on
page 7.10.
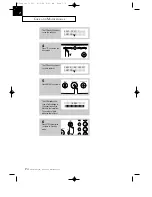
Notes :
¥ If print quality does not improve after this cleaning process, release the cartridge from
the holder as described in step 3 under ÔReplacing the print cartridgeÕ on page 7.10,
and push it firmly until it clicks into place, then repeat this procedure 3-4 times.
¥ If print quality still does not improve, replace your print cartridge.
FORM FEED
CARTRIDGE
PRINTER RESET
BUSY
01
02
03
04
05
5. Use a CLEAN, DRY CLOTH to clean the
carrier deflector inside the printer.
carrier deflector
B-Chapter 7(US) 4/16/98 8:44 AM Page 7.9
Содержание SF4000
Страница 6: ...C h a p t e r O n e YOUR NEW MACHINE J Chapter 1 US 4 16 98 8 23 AM Page 7 ...
Страница 16: ...C h a p t e r T w o INSTALLATION AND SETUP G Chapter 2 US 4 16 98 8 30 AM Page 1 ...
Страница 45: ...C h a p t e r T h r e e AUTOMATIC DIALLING F Chapter 3 US 4 16 98 8 35 AM Page 1 ...
Страница 57: ...C h a p t e r F o u r THE FAX MACHINE E Chapter 4 US 4 16 98 8 37 AM Page 1 ...
Страница 71: ...C h a p t e r F i v e ADVANCED OPERATIONS D Chapter 5 US 4 16 98 8 39 AM Page 1 ...
Страница 85: ...C h a p t e r S i x SPECIAL FEATURES C Chapter 6 US 4 16 98 8 41 AM Page 1 ...
Страница 98: ...C h a p t e r S e v e n CARE AND MAINTENANCE B Chapter 7 US 4 16 98 8 43 AM Page 1 ...
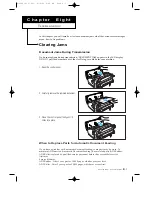
Страница 112: ...C h a p t e r E i g h t TROUBLESHOOTING A Chapter 8 US 4 16 98 8 46 AM Page 1 ...