background image

U

SING


P

RI

NTING

7.5

U

SI

NG


P

RINTING

U

SING


P

RI

NTING

U

SI

NG


P

RINTING

U

SI

NG


P

RINTI

N

G

U

SING


P

RI

NTING

U

SI

NG


P

RI

NTING

U

SI

NG


P

RI

NTING

Removing Printer Software

1

You can select 

Start


>


Programs


>


Samsung SF-370_CF-370 Series 

>


Maintenance

.

2

Select 

Remove 

and click

 Next

.

3

After the software is removed, click 

Finish

.

Printing a Document

The following procedure describes the general steps required for printing from various Windows applications. 

The exact steps for printing a document may vary depending on the application program you are using. Refer to 

the user’s guide of your software application for the exact printing procedure.

1

Open the document you want to print. 

2

Select 

Print

 from the 

File

 menu. The Print window is displayed. It may look slightly different depending 

on your application. Make sure that Samsung SF-370_CF-370 Series is selected as your default printer.

• The basic print settings are selected within the Print window. These settings include the number of copies and the 

print range. 

3

Click 

Features

 if you want to make any adjustments that are appropriate for printing your document. 
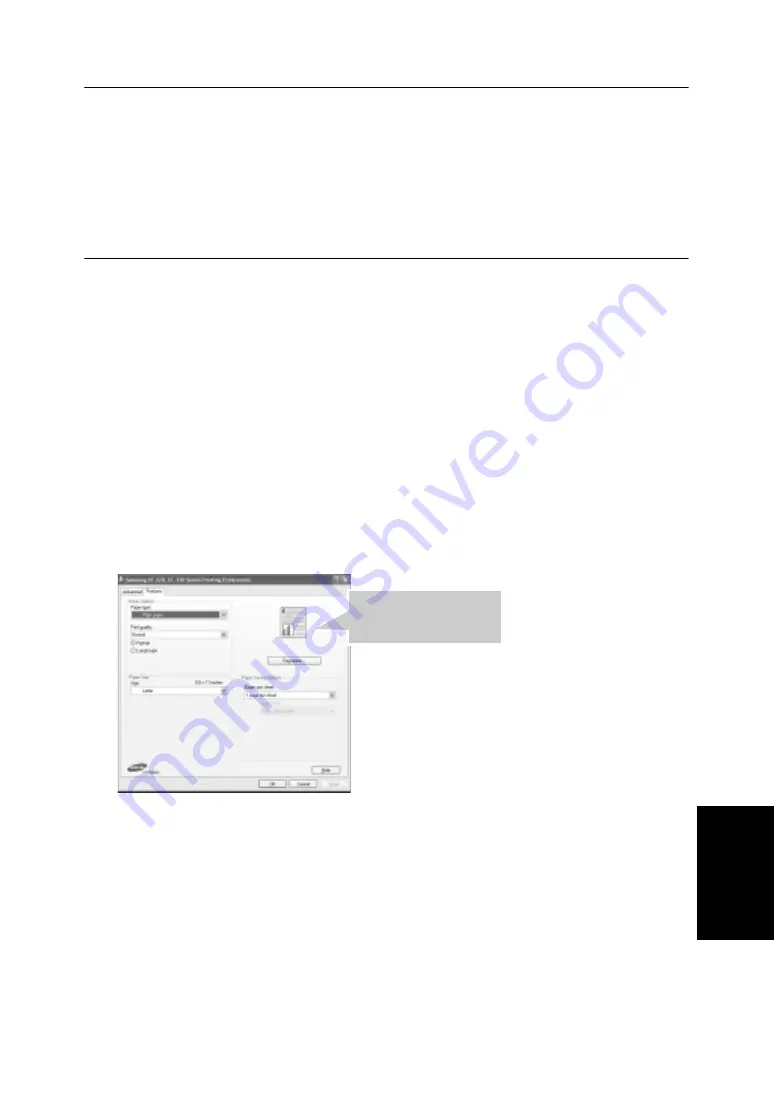
4

Now you see the Samsung SF-370_CF-370 Series Printing Preferences window, which allows you to 

access all of information you need when using your machine.

The 

Features

 tab first displays. 

You can choose only in the plain paper in the 

Paper Type

You can select the printing quality by choosing from 

Fast Draft

Normal

 or 

Best

. The higher the setting, 

the sharper the printed characters and graphics. Higher settings may increase the time it takes to print a 

document.

The preview image shows

the sample page with the

settings you specified.

Содержание SF-370 Series

Страница 1: ...SAMSUNG Inkjet Telephone Fax User s Guide SF 370 series ...

Страница 2: ...ine should never be placed on near or over a radiator heater air conditioner or ventilation duct 8 Do not allow anything to rest on the power or telephone cords Do not locate your fax machine where the cables may be damaged by people walking on them Do not place the machine where the power or telephone cord may be bent Any case of above may cause the hazardous result or malfunction 9 Do not overlo...

Страница 3: ...ent of other controls may result in damage and may require extensive work by a qualified service technician to restore the product to normal operation 15 Avoid using this fax machine during a lightning storm There may be a remote risk of electric shock from lightning If possible unplug the AC power and telephone for the duration of the lightning storm 16 Do not install the machine on a wet place T...

Страница 4: ... Redialling 2 4 To redial the last number called 2 4 To redial the number in memory 2 4 To find a number received via the Caller ID service 2 4 Chapter 3 The Fax Machine Sending a fax 3 2 Loading documents 3 2 Acceptable documents 3 2 Setting document resolution and contrast 3 3 Sending a fax manually 3 3 Sending a fax automatically 3 3 Automatic redial 3 4 Receiving a fax 3 4 Reception modes 3 4 ...

Страница 5: ...6 2 Using Caller ID 6 2 Using the Mute 6 2 To mute a call 6 2 To release the mute 6 2 Recording a conversation SF 375TP only 6 3 Sound setup 6 3 User reports 6 4 To print a report 6 4 Re Printing faxes 6 5 Registering deleting the junk fax numbers 6 5 Entering junk fax setup mode 6 5 Using Short Message Service SMS 6 6 Reading SMS messages 6 6 Sending SMS messages 6 6 Printing SMS messages 6 7 Del...

Страница 6: ...ng problems 8 11 Clearing jams 8 12 Document jams during transmission 8 12 Paper jams during printing 8 12 Chapter 9 Appendix Specifications 9 2 General specifications 9 2 Printer specifications SF 371P and SF 375TP only 9 2 Scanner and copier specification 9 3 Facsimile specifications 9 3 A sample of ITU 1 chart reduced to 60 5 9 4 Font List for Print 9 5 Font List for LCD 9 6 Replacing the fitte...

Страница 7: ...sung com it JAMAICA 1 800 234 7267 www samsung com latin JAPAN 0120 327 527 www samsung com jp LATVIA 800 7267 www samsung com lv index htm LITHUANIA 8 800 77777 www samsung com lt LUXEMBURG 0035 0 2 261 03 710 www samsung com be MALAYSIA 1800 88 9999 www samsung com my MEXICO 01 800 SAMSUNG 7267864 www samsung com mx NETHER LANDS 0900 20 200 88 0 10 min www samsung com nl NEW ZEALAND 0800SAMSUNG ...

Страница 8: ...ribes the preliminary setup procedure A full installation instruction is explained in the separate Quick Install Guide If you are installing or reinstalling the machine from the beginning refer to the Quick Install Guide provided with the machine ...

Страница 9: ...es TEL FAX AUTO TAM1 Telephone Answering Machine and DRPD Broadcasting to send the same document to multiple destinations Delayed FAX to send the document at a later time Send Receive Polling Automatic Telephone line checking Last 10 number redial Report management sending confirmation Journal report and Phonebook etc Transmit and Receive short messages Stored FAX to send the document without orig...

Страница 10: ...h your new machine Take a moment to familiarise yourself with your new machine by looking at the pictures on the next few pages Front view2 Rear view 2 Note that all of illustrations on this User s Guide are from SF 375TP so some parts may be different from your machine Paper Support USB Connector SF 371P SF 375TP Document Guide Dust Cover Document Tray Handset Paper Guide AC Power Socket ...

Страница 11: ... item to adjust the volume or to move the cursor to the digit you want to edit 10 OK Used to activate the selection shown in the display 11 Menu Used to choose special functions such as system setup and maintenance etc 12 Back Used to return to the previous menu level 13 1 Used to repeat the current message or to skip back to the previous one 14 3 Used to skip forward to the next message 15 Number...

Страница 12: ...ined with many types of plain paper Since the quality of plain paper varies widely test the print quality before buying large quantities of paper Your machine uses a variety of papers including Xerographic paper Bond paper Dual purpose paper Because all paper varies in physical characteristics you can receive mixed results from different packages of paper even though the packages contain the same ...

Страница 13: ...ct the sorting order Normal Reverse 9 Press OK when all options have been selected When the machine runs out of paper Load paper and press OK appears in the display Supply additional paper and press OK Setting date and time The current date and time are shown in the display when the machine is on and ready for use Standby Mode The date and time will be printed on all faxes you send 1 Press Menu 2 ...

Страница 14: ...he number you entered then enter the correct digit 5 Press OK when finished 6 Press OK when the display shows Fax Name 7 Enter the fax name up to 40 characters by using the number keypad You can include special characters space plus sign etc 8 Press OK when the name in the display is correct The machine returns to Standby Mode when you have finished or when Stop Clear has been pressed How to enter...

Страница 15: ...g volume Adjust it as you prefer Press Left right arrow buttons with machine in standby Whenever you press the button different ring is ringing The volume 0 indicates that the machine will not ring when the call is received Adjusting speaker volume When you are speaking via the speaker phone you can adjust the volume as you follows 1 Press Speaker Phone or On Hook Dial You can adjust it when you a...

Страница 16: ...CHAPTER 2 PROGRAMMING AND DIALLING ...

Страница 17: ...et Speak into the microphone on the Control Panel when the call is answered Phone book dialling There are two types of Phonebook dialling One Touch and Speed dial The way to programme numbers into memory is the same for both but how you dial stored numbers is different To One Touch dial you just press and hold a number 0 9 on the keypad and the number will be dialled Phone Book dialling provides y...

Страница 18: ...begins to transmit if a document is loaded in the document feeder To send a fax directly without scanning into memory turn off the Send From Memory option See Send From Memory on page 6 10 You can refer to the number assigned to each location by printing the Phonebook See To print a report on page 6 4 Regardless of the setting of the Send From Memory option the machine will first dial and then sen...

Страница 19: ...e number in memory 1 Press and hold Redial Pause for about two seconds 2 Select Recent Numbers and press OK The display shows the most recent numbers 3 Press Left right arrow buttons to find the number you are dialling 4 Press Start Fax when the correct number appears If a document is loaded the machine automatically begins to send To find a number received via the Caller ID service You sometimes ...

Страница 20: ...CHAPTER 3 THE FAX MACHINE ...

Страница 21: ... t feed correctly open the Control Panel remove the document and try loading it again 3 Choose the proper resolution and contrast by pressing Rcv Mode Darkness and Resolution respectively Acceptable documents For multiple sheets all pages of the document must be the same size and paper type DO NOT try to send documents that are wet covered with wet ink or paste wrinkled curled or folded too thin l...

Страница 22: ...g document by using memory broadcasting delayed tx for example SUPER FINE will be changed back to FINE even though you selected SUPER FINE 3 Press Rcv Mode Darkness as many times as you want to adjust the darkness NORMAL works well for normal handwritten typed or printed documents LIGHTEN works with very dark print PHOTO is used when faxing photographs or other documents containing color or gray s...

Страница 23: ...he following chart describes how each reception mode works If you rarely use the fax line for voice conversation set the machine to receive faxes automatically by selecting either FAX or AUTO Mode 4 TAM Telephone Answering Machine SF 375TP only Reception mode Your model How it works Reference section FAX All The machine answers an incoming call and immediately goes into receive mode expecting a fa...

Страница 24: ...ight hand corner of the display When a call comes in the machine answers it If a fax is being received the machine goes into receive mode If the machine does not sense a fax signal it will continue ringing to tell you it is a phone call You should pick up the handset to answer the call or it will switch to automatic reception mode after approximately 25 seconds Receiving in TAM mode SF 375TP only ...

Страница 25: ...ss button as FAX TEL and AUTO To set up DRPD see DRPD Mode on page 6 10 Press Rcv Mode Darkness repeatedly until DRPD Mode appears in the display Now the machine will manage faxes and call as programmed In Standby Mode DRPD appears in the right hand corner of the display DRPD must be set up again if you reassign your fax number or connect the machine to another telephone line After DRPD has been s...

Страница 26: ...coming calls play erase messages and access your machine from a remote telephone All the instructions in this chapter assume that your fax machine is set to TAM Mode The SF 375TP uses electronic memory as a recording medium Recording time is dependent on the content of the message The total recording time which consists of TAM greeting and ICM InComing Message is about 30 minutes ...

Страница 27: ...en it displays the elapsed time as the message plays back automatically Checking your TAM message The TAM Telephone Answering Machine message plays back when your machine is in TAM Mode and receives a call Press Greeting The display shows the time when the message was recorded The display then counts down the seconds as the message is playing back Monitoring an incoming call Call Monitoring is use...

Страница 28: ...ime counts down as the message plays back Playing back all messages Press and hold Play Record until you hear a beep All the messages are played back The display briefly shows recorded time of each message then plays ALL the messages recorded When the display reads 50s 01 03 01 is the number of the caller message currently being played and 03 is the total number of caller messages in memory 50s is...

Страница 29: ...ecorded messages This is why you should erase old messages To erase a selected message Press Erase while the message is playing BE CAREFUL Once you have pressed Erase while a message is playing there s no way to cancel or recover it The selected message is erased and Erasing is displayed To erase all recorded messages 1 Press Erase The display asks if you want to erase ALL messages 2 Press OK if y...

Страница 30: ... commands The chart below describes which Remote Code you have to enter for remote operation Code Operation 0 Exits remote control mode 1 Skips a message backward The machine skips the current message and plays the previous one 2 Plays back new messages The machine beeps and plays messages one by one When a message is played back the machine waits for another command To listen to next message pres...

Страница 31: ......

Страница 32: ...chapter you will learn how to use the advanced fax features of your machine For example how to send the same documents to many different locations Broadcasting or how to set up your machine to send faxes at a preset time Delayed Fax ...

Страница 33: ...ayed fax You can set your machine to send a fax at a later time when you will not be present Normally it is cheaper to send a fax at night because telephone rates are lower than they are during the day 1 Turn the document face down and feed it into the machine 2 Press Menu repeatedly until ADVANCED FAX appears and press OK 3 Select Set Delayed Fax by pressing Left right arrow buttons and press OK ...

Страница 34: ...2 You can select one or all to delete the stored documents 3 Select the document to delete by pressing Left right arrow buttons and when the correct document ID is displayed press OK The document will be deleted Sending stored documents 1 Press My Favorites repeatedly and press OK when Send appears 2 Select the document to be sent by pressing Left right arrow buttons and when the correct document ...

Страница 35: ...preset to 0000 at the factory which represents no poll code When it is polled the page in memory will be deleted automatically and receiving mode returns to the state before setting polling To cancel Send Polling see To cancel the scheduled job on page 5 4 Setting receive polling 1 Lift the handset or press Speaker Phone or On Hook Dial and enter the telephone number of the remote machine which is...

Страница 36: ...ar in the display at Fax Forward start time and every fax will be forwarded to your new location till the end time During forwarding time the receive mode temporarily changes to Message forwarding SF 375TP only When you re out of the office or home and you want to be notified whenever there s a new message left on your machine you need to use the Message Forwarding feature supplied with your machi...

Страница 37: ...tons and press OK The display shows Off or On whenever you press Left right arrow buttons Off disables auto fax notice On dials the number and leaves the voice message to notify the new fax 3 Press OK after selecting On 4 Enter the telephone number and press OK If you have ever recorded a Fax auto notice outgoing message OGM before the machine asks if you want to change If there is no recorded out...

Страница 38: ...CHAPTER 6 SPECIAL FEATURES ...

Страница 39: ...s of callers Once you have subscribed to Caller ID services your machine can display caller information To switch the Caller ID feature on 1 Press Menu repeatedly until SETUP SYSTEM appears and press OK 2 Select Caller ID by pressing Left right arrow buttons and press OK 3 Choose the desired option and press OK On Activates the Caller ID feature On w Junk Fax Activates Caller ID and ignores any fa...

Страница 40: ... is unlimited before memory is full The recorded conversation will be treated as an incoming message ICM To stop recording Press Stop Clear to stop recording Sound setup You can set the alarm key and wakeup sound 1 Press Menu repeatedly until SETUP SOUND appears and press OK The display shows the three options you can set Wakeup Sound Alarm Sound and Key Sound 2 Press Left right arrow buttons to s...

Страница 41: ... machine s memory as One Touch Dial and Speed Dial Manual Sending Confirm This report shows the fax number the number of pages elapsed time of the operation the communication mode and the communication results Set up your machine as described in Sending Confirm on page 6 10 to automatically print Sending Confirm Manual Automatic Schedule Inform This report shows the document currently stored for D...

Страница 42: ...entered a junk fax number and activated the Caller ID option by selecting On w Junk Fax your machine will not receive any faxes registered as a junk fax To set up the Caller ID see Using Caller ID on page 6 2 NOTE It depends on the country whether Caller ID system is supported or not Entering junk fax setup mode 1 Press Menu repeatedly until SETUP SYSTEM appears and press OK 2 Select Set Junk Fax ...

Страница 43: ...ou do not read are marked with an asterisk The machine can save up to 30 messages Messages will not be lost even if power is disrupted Sending SMS messages You can send new SMS messages 1 Press Menu repeatedly until SHORT MESSAGE appears and press OK 2 Select Send by pressing Left right arrow buttons and press OK 3 The first available option New SMS appears then press OK 4 Enter the text and press...

Страница 44: ...rs and press OK You can choose Delete All or Delete One in Delete Sent SMS or Delete RCV SMS menu If you select Delete All then all sent or received messages stored in the machine will be deleted 5 The list of messages appears Select one by pressing Left right arrow buttons and press OK The selected message is deleted Setup SMS messages The Message Transmitting and Receiving Center number is prese...

Страница 45: ...ss OK 3 REGISTER is displayed in LCD press OK 4 Send Register is displayed press OK The fax machine will send a registration SMS to the SMS Center and register the device Registration is now complete Editing Registration Number 1 Press Menu button repeatedly until SHORT MESSAGE appears press OK 2 Using Left right arrow buttons keys scroll along to SET SMS press OK 3 REGISTER is displayed in LCD pr...

Страница 46: ...ttings related to fax operation and TAM Telephone Answering Machine Setup has settings related to answering machine operations 1 Press Menu 2 Select SETUP SYSTEM or SETUP TAM6 by pressing Left right arrow buttons 3 Press OK to enter specified Setup mode 4 Scroll up or down by pressing Left right arrow buttons to select the option you want to change 5 Press OK when the option you want appears in th...

Страница 47: ...least 4 to give you time to answer ECM Modea This mode compensates for poor line quality and ensures accurate error free transmission with any other ECM equipped facsimile machine If the line quality is poor transmission time may be increased when ECM is enabled Send From Memory This determines how to transmit the document manually If it is on the machine will scan documents into memory and then s...

Страница 48: ... to Answer option If there is no message the machine answers on the second ring after the number of Rings to Answer This gives you time to hang up the phone before the machine answers and saves the price of the call Call Monitor Enables you to hear callers leave messages on your machine ICM Record Time You can select the maximum time allowed for caller s incoming message ICM messages Remote Passwo...

Страница 49: ......

Страница 50: ...CHAPTER 7 USING PRINTING This chapter is only for SF 371P and SF 375TP users ...

Страница 51: ...net Explorer 5 0 Installing Printer Software For Windows 2000 XP Vista users cancel the New Hardware Found screen when the computer boots up Make sure that your machine is plugged in and connected to your computer s USB port before installing Printer Software from the Printer Software CD 1 Insert the supplied Printer Software CD into your CD ROM drive The Printer Software CD should automatically r...

Страница 52: ... the installation will start and a test page will not be printed at the end of the installation 3 After the installation is finished a window asking you to print a test page appears If you choose to print a test page select the checkbox and click Next 4 If the test page prints out correctly click Yes If not click No to reprint it 5 To register yourself as a user of Samsung Printers in order to rec...

Страница 53: ...stalling Software You can reinstall the software if installation fails 1 You can select Start All Programs Samsung SF 370_CF 370 Series Maintenance 2 Select Repair and click Next NOTE If your machine is not already connected to the computer the following window will appear If the machine is already connected and turned on this screen does not appear Skip to the next step After connecting the machi...

Страница 54: ...ndow is displayed It may look slightly different depending on your application Make sure that Samsung SF 370_CF 370 Series is selected as your default printer The basic print settings are selected within the Print window These settings include the number of copies and the print range 3 Click Features if you want to make any adjustments that are appropriate for printing your document 4 Now you see ...

Страница 55: ...t the page mirror view The Page Order option allows you to select the printing order in all pages Front to Back or Back to Front 5 Click OK to close the printer Preferences window 6 Click OK to start printing The printer s Preferences window may differ depending on your operating system This User s Guide shows the Preferences window on windows XP NOTE Most Windows applications overrides the settin...

Страница 56: ...ollows Click the Windows Start menu For Windows 2000 Select Settings and then Printers For Windows XP select Printers and Faxes For Windows Vista select Control Panel Hardware and Sound Printers Double click the Samsung SF 370_CF 370 Series icon From the Document menu select Cancel NOTE You can access this window simply by double clicking the printer icon at the bottom right corner of the Windows ...

Страница 57: ......

Страница 58: ...CHAPTER 8 CARE AND MAINTENANCE ...

Страница 59: ... there is a bushing that is secured with a small tab Push the tab slightly inward then rotate towards you Then pull up the right hand part to take it out 3 Wipe the roller surface with a soft cloth dampened with water 4 Clean the ADF Automatic Document Feeder Rubber piece at the back of the Control Panel too 5 Carefully wipe the Scanning Glass with a soft dry cloth If the glass is very dirty first...

Страница 60: ...nstall position 3 Open the Control Panel and Cartridge Compartment cover 4 Push down the cartridge and remove it 5 To load the cartridge insert the cartridge below the metal clip and pointing down at the front When the cartridge is pushed to the back of the cartridge carrier lift the front of the cartridge up until it clicks into place If the cartridge moves loosely in the Carrier it has not click...

Страница 61: ...ber which represents the straightest line and press OK Ink level view Your machine allows you to check the amount of ink remaining To view the current ink level 1 Press Menu repeatedly until MAINTENANCE appears and press OK 2 Scroll to View Ink Level by pressing Left right arrow buttons and press OK The machine displays a fractional number For examples 1 8 means that ink is low and you need to rep...

Страница 62: ...ridge The warranty will not cover damage caused by using refilled cartridges Cleaning the cartridge To maintain good printing quality we recommend you occasionally wipe the Print Nozzles and Contacts as described below Wiping the print nozzles and contacts When the print is not clear or dots are missing the problem may be caused by dried ink on the Print cartridge nozzles Print cartridge contacts ...

Страница 63: ...ge 2 Open the Control Panel and Cartridge Compartment Cover and remove the cartridge 3 Remove the print cartridge 4 Unplug the power cord from the electrical outlet of the rear of the machine BE CAREFUL Once you have unplugged the power cord from the machine all scheduled job such as Delayed Fax Send Polling or faxes received into memory will be lost 5 Clean the Cartridge Carrier contacts with cle...

Страница 64: ...ne can hold 3 My Favorites but you tried to add more Fax Exceeded Job Memory Cancel scheduled job and try again The broadcasting and delayed fax can hold 5 jobs in total Cancel scheduled job and try again Fax Exceeded Total Message Memory The machine can hold up to 200 messages which include Greetings ICM InComing Messages and recorded conversations Erase old messages to make a room in the memory ...

Страница 65: ... The machine can not receive a new fax while printing the stored faxes Fax Not Found The number you are searching does not exist in memory Telephone Number already registered The number you are trying to register already exists in the phonebook or junk fax list Telephone Number Not Assigned There is no number assigned to the One Touch or two digit Speed number Telephone OK Again The number that yo...

Страница 66: ...ered Fax Send Error Try again There is an error while sending a fax Fax System Initial It indicates that the machine is initializing when the power is on System To Clear Carrier Stall Error Press Stop Clear The cartridge carrier is stalled during printing or copying Paper To redial now press Start Fax The machine is waiting to automatically redial the fax number that was busy or did not answer Fax...

Страница 67: ...ch you are sending can receive your fax You cannot poll another machine The fax machine you are polling may be using a poll code The fax you received has blank bits on it The machine sending to you may be faulty A noisy phone line can cause line errors Check your machine by making a copy Spots or lines missing from the fax you receive Check if your phone line is noisy Check if the printhead is cle...

Страница 68: ...ibed in Replacing the print cartridge on page 8 3 Remove and reinstall the print cartridge Clean the print cartridge see Cleaning the cartridge on page 8 5 Improperly formed or misaligned characters Clean the print cartridge see Cleaning the cartridge on page 8 5 Abnormal black horizontal lines Clean the cartridge carrier see Cleaning the cartridge carrier contacts on page 8 6 Problem Solution Pap...

Страница 69: ...or printing Remove jammed paper and press Stop Clear appears in the message If the paper is jammed in the Received Paper Output Area 1 Remove the jammed paper by pulling it out smoothly in the direction of the arrow as shown If the paper tears when it is being removed check to ensure that no small pieces have been left inside the machine 2 Press Stop Clear If the paper is jammed in the Paper Feed ...

Страница 70: ...CHAPTER 9 APPENDIX ...

Страница 71: ... INK M41S 43S About 265 sheets based on ITU 1 chartc See A sample of ITU 1 chart reduced to 60 5 on page 9 4 Replacement Cartridge to be purchased in the market INK M41 41V for European countries INK M43 for India and South Africa About 750 sheets based on ITU 1 chart See A sample of ITU 1 chart reduced to 60 5 on page 9 4 c ITU 1 chart Standardized test chart published by International Telecommun...

Страница 72: ...n Best mode Zoom rate 50 150 Multiple copies 1 50 Grayscale 64 Grayscale Item Description Compatibility ITUa T30 a ITU International Telecommunication Union Application line Public Switched Telephone Network PSTN or behind PABX Data coding MH MR MMR Modem speed 14400 12000 9600 7200 4800 2400 bps Transmission speed About 6 seconds Standard mode b b Transmission time applies to memory transmission ...

Страница 73: ...9 4 A sample of ITU 1 chart reduced to 60 5 ...

Страница 74: ...A PPENDIX 9 5 A PPENDIX A PPENDIX A PPENDIX A PPENDIX A PPENDIX A PPENDIX A PPENDIX Font List for Print ...

Страница 75: ...9 6 Font List for LCD ...

Страница 76: ...A PPENDIX 9 7 A PPENDIX A PPENDIX A PPENDIX A PPENDIX A PPENDIX A PPENDIX A PPENDIX Replacing the fitted plug UK Notes for use of this device New Zealand ...

Страница 77: ...9 8 Declaration of conformity European countries ...

Страница 78: ...A PPENDIX 9 9 A PPENDIX A PPENDIX A PPENDIX A PPENDIX A PPENDIX A PPENDIX A PPENDIX ...

Страница 79: ...9 10 In case of interference US Fax branding US See Chapter 1 for instructions on how to enter this information into your Samsung FAX machine s memory ...

Страница 80: ...A PPENDIX 9 11 A PPENDIX A PPENDIX A PPENDIX A PPENDIX A PPENDIX A PPENDIX A PPENDIX Telephone company information US ...

Страница 81: ...t or human health from uncontrolled waste disposal please separate this from other types of wastes and recycle it responsibly to promote the sustainable reuse of material resources Household users should contact either the retailer where they purchased this product or their local government office for details of where and how they can take this item for environmentally safe recycling Business user...

Страница 82: ... fax 1 2 3 3 5 1 5 2 6 4 8 6 8 7 dialling 1 2 1 4 2 4 3 4 8 8 8 9 discard size 6 10 E ECM mode 6 10 F fax auto notice OGM 5 6 fax forward 5 5 feeder 1 2 1 5 1 6 2 3 3 2 3 3 8 8 8 11 H help use 7 7 howler action 6 11 I ICM record time 6 11 image TCR 6 10 6 11 ink save mode 1 8 installing software 7 2 ITU 1 chart 9 4 J junk fax 6 2 6 4 6 5 6 10 8 7 8 8 K keypad character 1 8 L language 6 10 M making...

Страница 83: ...e 1 8 rings to answer 3 5 6 10 6 11 S save charge 6 11 scanning glass 8 2 scheduled job 5 4 8 6 8 7 8 8 search 1 4 send from memory 2 3 3 3 6 10 sending confirm 3 3 6 4 6 10 setting date and time 1 6 setting fax number 1 7 shading 8 4 8 7 short message service 6 6 silence action 6 11 smart fax 5 3 software install 7 2 Speaker Phone dial 2 2 speaker volume 1 8 specifications 9 2 speed dial caller I...

Страница 84: ...www samsungprinter com ...

Отзывы: