background image

English - 8

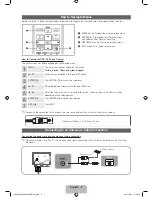
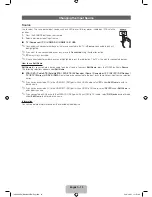
How to Navigate Menus

Before using the TV, follow the steps below to learn how to navigate the menu and select and adjust different functions.

1


MENU

 button: Displays the main on-screen menu.

2


ENTER

E

 / Direction button: Move the cursor 

and select an item. Confirm the setting.

3


RETURN

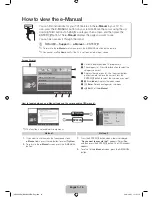
 button: Returns to the previous menu.

4


EXIT

 button: Exits the on-screen menu.

How to Operate the OSD (On Screen Display)

The access steps may differ depending on the selected menu.

1

MENU

The main menu options appear on the screen:

Picture, Sound, Channel, System, Support

.

2

 / 

Select an icon or option with the 

 or 

 button.

3

ENTER

E

Press 

ENTER

E

 to access the sub-menus.

4

 / 

Select the desired submenu with the 

 or 

 button.

5

 / 

Adjust the value of an item with the 

 or 

 button. The adjustment in the OSD may differ 

depending on the selected menu.

6

ENTER

E

Press 

ENTER

E

 to confirm the selection.

7

EXIT

e

Press 

EXIT

.


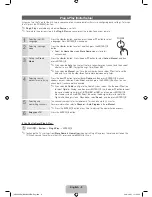
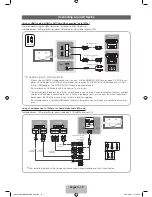
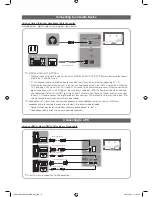
For best cable connection to this product, be sure to use cables with a maximum thickness as below:


x

Maximum thickness - 0.55 inches (14mm)

Connecting to an Antenna or Cable Connection

Connecting the power cord and an antenna or cable connection


When you move or swivel the TV with Antenna cable tightly connected, there is high risk antenna jack on TV will be 
broken off

ANT OUT

VHF/UHF Antenna

or

Cable

Antenna Cable (Not Supplied)

[UD4000-ZA]BN68-03373A-Eng.indb   8

2011-06-21   �� 1:50:54

Содержание Series 4000

Страница 1: ...DA 1 800 SAMSUNG 726 7864 www samsung com Samsung Electronics Canada Inc Customer Service 55 Standish Court Mississauga Ontario L5R 4B2 Canada U S A 1 800 SAMSUNG 726 7864 www samsung com Samsung Electronics America Inc 85 Challenger Road Ridgefield Park NJ 07660 2112 LED TV User Manual imagine the possibilities Thank you for purchasing this Samsung product To receive more complete service please ...

Страница 2: ...inal Purchaser only The above described warranty repairs must be performed by a SAMSUNG Authorized Service Center Along with this Statement the Original Limited Warranty Statement and a dated Bill of Sale as Proof of Purchase must be presented to the Service Center Transportation to and from the Service Center is the responsibility of the purchaser Conditions covered are limited only to manufactur...

Страница 3: ...nstructions y y Warranty Card Safety Guide y y Cleaning Cloth BN63 01798B y y Power Cord Component Adapter BN39 01154W Input Cables Sold Separately To purchase the RS232 cable contact www SamsungParts com RS232 AA39 00311A HDMI HDMI DVI Audio Component Composite AV Coaxial RF VGA Check the cable before plug in Cable Ports HDMI USB Optical Do not plug cable upside down Be sure to check before plug ...

Страница 4: ...en display of your TV s features y Adjusts the volume In the OSD use the y buttons as you would use the and buttons on the remote control z Changes the channels In the OSD use the z buttons as you would use the and buttons on the remote control P Power Turns the TV on or off Standby mode Your TV enters Standby mode when you turn it off and continues to consume a small amount of electric power To b...

Страница 5: ...O NOT USE OIL ATTENTION 1 2 3 Place a soft cloth over the table to protect the TV and then place the TV on the cloth screen side down Insert the Stand Guide into the slot of TV bottom side C M4 X L12 x2 Make sure to distinguish between the front and back of each component when assembling them Make sure that at least two persons lift and move the TV Caution UD4000 ZA BN68 03373A Eng indb 5 2011 06 ...

Страница 6: ...msung wall mount kits contain a detailed installation manual and all parts necessary for assembly x x Do not use screws that do not comply with the VESA standard screw specifications x x Do not use screws that are longer than the standard length or do not comply with the VESA standard screw specifications Screws that are too long may cause damage to the inside of the TV set x x For wall mounts tha...

Страница 7: ...screen Automatically shuts off the TV at a preset time Displays information on the TV screen Exits the menu Press to directly access to channels Press to select additional digital channels being broadcast by the same station For example to select channel 54 3 press 54 then press and 3 Adjusts the volume Quickly select frequently used functions Returns to the previous menu Selects the on screen men...

Страница 8: ...n with the or button 3 ENTERE Press ENTERE to access the sub menus 4 Select the desired submenu with the or button 5 Adjust the value of an item with the or button The adjustment in the OSD may differ depending on the selected menu 6 ENTERE Press ENTERE to confirm the selection 7 EXITe Press EXIT For best cable connection to this product be sure to use cables with a maximum thickness as below x x ...

Страница 9: ...search options for auto tuning Press the or button to select Air or Cable and then press ENTERE A check appears on your selection Select Next and then press the ENTERE button You can check both if you have both connected If you selected Cable you ll go to the Cable System screen Use the or button to select Digital or Analog and then press ENTERE Use the or button to select the correct cable signal...

Страница 10: ... problem occurs ask the manufacturer of the external device about the HDMI version and if out of date request an upgrade x x Be sure to purchase a certified HDMI cable Otherwise the picture may not display or a connection error may occur Using a Component up to 1080p or an Audio Video Cable 480i only Available devices DVD player Blu ray player cable box STB satellite receiver VCR HDMI OUT DVI OUT ...

Страница 11: ...DMI you will only hear 2 CH audio from the home theater receiver If you want to hear 5 1 CH audio connect the digital audio out jack from your DVD player Blu ray player cable box STB satellite receiver directly to an amplifier or home theater Headphones H You can connect your headphones to the headphones output on your set While the headphones are connected the sound from the built in speakers wil...

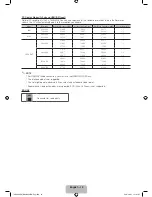
Страница 12: ... x 624 49 726 74 551 57 284 VESA DMT 640 x 480 31 469 59 940 25 175 37 861 72 809 31 500 37 500 75 000 31 500 800 x 600 37 879 60 317 40 000 48 077 72 188 50 000 46 875 75 000 49 500 1024 x 768 48 363 60 004 65 000 56 476 70 069 75 000 60 023 75 029 78 750 1360 x 768 47 712 60 015 85 500 NOTE x x For HDMI DVI cable connection you must use the HDMI IN 1 DVI jack x x The interlace mode is not suppor...

Страница 13: ...vice name to an input source To access Edit Name press the TOOLS button In Source The following selections appear under Edit Name VCR DVD Cable STB Satellite STB PVR STB AV Receiver Game Camcorder PC DVI PC DVI Devices TV IPTV Blu ray HD DVD DMA Name the device connected to the input jacks to make your input source selection easier If you have connected a PC to the HDMI IN 1 DVI port with an HDMI ...

Страница 14: ...tion is not enabled in some menus Method 1 Method 2 1 If you want to use the menu that corresponds to an e Manual topic press the red button to select Try Now 2 To return to the e Manual screen press the E MANUAL button 1 Press the ENTERE button when a topic is displayed Do you want to execute this appears Select Yes and then press the ENTERE button The OSD window appears 2 To return to the e Manu...

Страница 15: ...s to previous or next page Using the Zoom mode UMove R Return Select Zoom and then press ENTERE to magnify the screen You can scroll through the magnified screen by using the or buttons To return to the screen to normal size press the RETURN button How to search for a topic on the index page 1 To search for a topic press the left or right arrow button to select a letter The Index displays a list o...

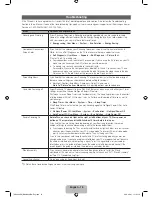
Страница 16: ... be an issue with either your Timer settings or your Eco friendly No Signal Power Off feature First make sure you Sleep Timer is not accidentally set The sleep timer allows you the comfort of falling asleep with the TV still on but turns it off after a certain period of time so as not to waste energy y y Sleep Timer User Menu System Time Sleep Timer If the Sleep Timer is not activated you may have...

Страница 17: ...nnected device by unplugging and then reconnecting the device s power cable The remote control does not work Replace the remote control batteries Make sure the batteries are installed with their correct polarities in the correct direction Clean the transmission window located on the top of the remote Try pointing the remote directly at the TV from 5 6 feet away The cable set top box remote control...

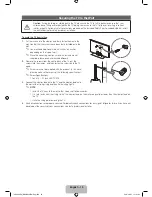
Страница 18: ... additionally 2 Remove the screws from the centre back of the TV put the screws into the clamps and then fasten the screws onto the TV again Screws may not be supplied with the product In this case please purchase the screws of the following specifications Screw Specifications x x For a 19 22 Inch LED TV M4 3 Connect the clamps fixed onto the TV and the clamps fixed onto the wall with a strong str...

Страница 19: ... C 5 to 95 non condensing Model Name UN19D4000ND UN19D4010ND Screen Size Diagonal 19 Class 18 5 measured diagonally Sound Output 3 W X 2 Dimensions WxDxH Body With stand 17 9 X 1 2 X 11 2 inches 455 4 X 29 9 X 285 6 mm 17 9 X 5 7 X 13 4 inches 455 4 X 144 8 X 339 5 mm Weight Without Stand With Stand 6 8 Ibs 3 1kg 7 5 Ibs 3 4kg Design and specifications are subject to change without prior notice Th...

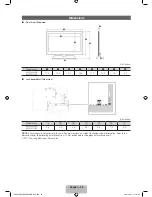
Страница 20: ...5 6 7 UN19D4000ND UN19D4010ND 3 0 3 0 3 9 4 8 2 6 7 4 4 4 NOTE All drawings are not necessarily to scale Some dimensions are subject to change without prior notice Refer to the dimensions prior to performing installation of your TV Not responsible for typographical or printed errors 2011 Samsung Electronics America Inc 1 2 3 4 5 6 7 8 5 6 7 3 4 1 2 UD4000 ZA BN68 03373A Eng indb 20 2011 06 21 1 51...

Страница 21: ...This page is intentionally left blank UD4000 ZA BN68 03373A Eng indb 21 2011 06 21 1 51 26 ...

Отзывы: