Samsung SDP-900DXA Скачать руководство пользователя страница 27

English

French

German

Italian

Spanish

Page 

27

FOCUS

EXIT

NTSC/P

AL

PRESET

SA

VE

SA

VE

RECALL

DIVIDE

SHIFT

ACTIVE

Nega/P

osi

FREEZE

WIDE

TELE

BRIGHT -

ROTA

TE

AF

AW

C

3X3

F

+

-

+

-

N

RED

1

2

3

4

7

8

5

6

BLUE

 TXT/IMG

LAMP

DIGIT

A

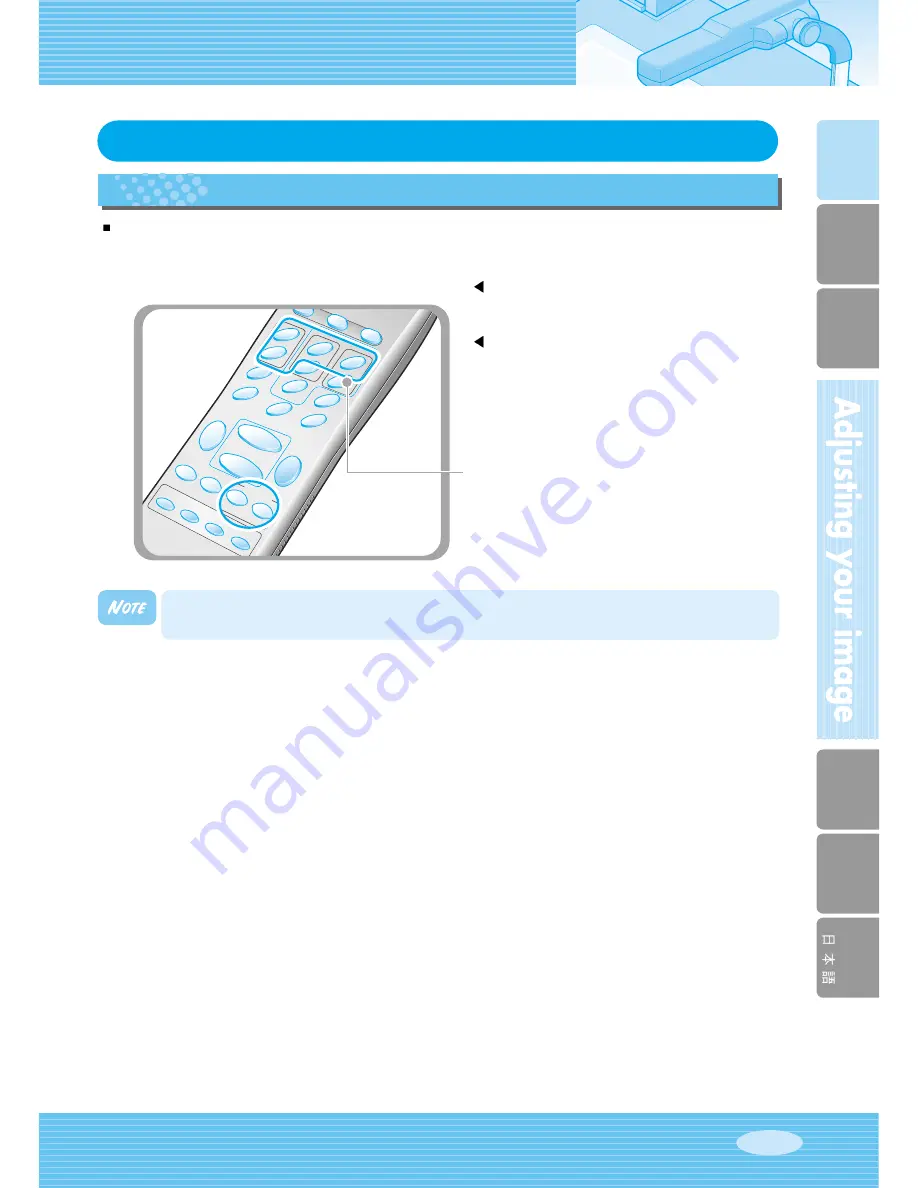
You can not save the setting on the FREEZE, RECALL, DIVIDE, SHIFT and ROTATE 
functions.

Adjusting your image

Saving custom user setting

After you adjust feature value, you can save the value for next time use. You can save up to 4 different custom
user settings. (You can save the setting on the Zoom, Focus, Iris, Lamp state and Color level buttons.) 

To save the current value, press 

SAVE

button

and specify the memory location within 4 seconds
using the number keys from 1 through 4.

To recall your custom setting, press the 

ACTIVE

button and press the memory location number
within 4 seconds.

The memory location numbers are printed on the
right side of these buttons, For example, if you want
to save the feature into memory location 4, press

SAVE

then press 

FOCUS N

button printed 4 at right

side.

Содержание SDP-900DXA

Страница 1: ...L PRESENTER USER S MANUAL ENGLISH ENGLISH Before attempting to operate this product Please read the instructions carefully www samsungpresenter com Before attempting to operate this product Please rea...

Страница 2: ...sible to view or store the real time image in a PC and control the functions in a moment Also it is possible to control the functions by using RS 232C port By adopting DVI Digital Visual Interface out...

Страница 3: ...en your computer presentation and your document presentation with the INT EXT button on the control panel or on the remote controller To avoid any interruption of presentation to reset the digital pre...

Страница 4: ...porting device 15 Desktop computer 16 Computer 17 PS 2 Mouse 17 Using the presenter 18 To show the image received from external device 18 To project an object on the digital presenter 20 Adjusting you...

Страница 5: ...nter 11 Except as specifically explained in this User s Manual do not attempt to service this product yourself Refer all servicing to qualified service personnel Opening or removing covers may expose...

Страница 6: ...t books as well as audiovisual materials educational materials and especially for students art works Medicine and science areas It is possible to present various visual data including slides and X ray...

Страница 7: ...Spanish User s Manual C Composite cable DVI cable S video cable Remote controller USB Cable SDP 900DXA program etc Power cable Lens cap Dust cover PC Monitor cable PS 2 Mouse When you unpack your Digi...

Страница 8: ...SDP 900DXA Page 8 Name and function of each part Front side...

Страница 9: ...Italian Spanish 1 2 3 4 5 6 Page 9 7 Lens Can rotate to the front and back Main support Main lock button Press to move the main support Lamp unit Upper lamp Document plate built in light box Main con...

Страница 10: ...this to control the size of an object projected on the screen TXT IMG Use this to control the sharpness of the output image ROTATE Use this to rotate the image AF Use this adjust the focus automatica...

Страница 11: ...V that has S video input terminal TV OUTPUT Connect this to the TV input terminal Even when the external input menu is selected only the image on the main unit is displayed on TV output terminal POWER...

Страница 12: ...DIVIDE SHIFT ACTIVE Nega Posi FREEZE BRIGHT WIDE TELE BRIGHT ROTATE AF AWC 3X3 F N RED 1 2 3 4 7 8 5 6 BLUE TXT IMG LAMP DIGITAL PRESENTER SDP 900DXA Page 12 1 2 5 7 8 12 15 16 3 4 6 10 11 9 14 13 17...

Страница 13: ...REEZE Keeps the current image on the screen 3X3 MODE Switches to 3X3 Multi ON or 3X3 Multi OFF ROTATE Use this to rotate the image by 90 180 270 0 WIDE TELE Reduces the image size Enlarges the image s...

Страница 14: ...s the main lock button and raise the main support Raise the lamp unit until it is convenient for use and set it to the center of the document plate Adjust the angle of the lamps properly Turn the lens...

Страница 15: ...nitor cable DVI cable Monitor projector etc Digital Presenter Digital Presenter Digital Presenter Connecting to output device Connect a TV PC monitor Projector and DVI supporting devices Monitor or Pr...

Страница 16: ...t side USB port or USB hub without power in accordance with computers Be sure to use the USB cable shorter than 5 0 m Caution Connecting to output device Connecting computer USB connection RS 232C con...

Страница 17: ...is not provided with the presenter You can obtain one from your computer dealer Connecting to output device PS 2 Mouse Kensington Security Slot Connection If you connect a computer through VGA IN port...

Страница 18: ...per lamp turns on To turn it off press LAMP button of the presenter twice Using the presenter To show the image received from external devices Set up your digital presenter properly See page 15 Connec...

Страница 19: ...the image from external device Using the presenter Choose the video source with the INT EXT button of the presenter Open the image on the computer Now you see the image through a PC monitor or a proje...

Страница 20: ...XT button of the presenter to select the input mode to INT OUT Using the presenter To project an object on the digital presenter Set up your digital presenter properly See page 15 Connect the presente...

Страница 21: ...ghtbox on then all lightings off Remove or attach the adapter lens according to the object Rotate the lens to remove or attach it Remove the adaptor lens in the camera mode possible focal length 1m At...

Страница 22: ...reeze the image on the screen by using FREEZE button of the presenter and change it To release the FREEZE mode press FREEZE button again or EXIT button on the remote controller Using the presenter Foc...

Страница 23: ...e presenter to adjust the projected image Some of the main features are described below Press WIDE or TELE button on the remote controller to change the image size displayed on the screen You can also...

Страница 24: ...stment press AWC button If you want fine level adjustment press BLUE or RED button on the remote controller to increase or decrease blue or red color factor manually Press TXT IMG button to control th...

Страница 25: ...age Saving image in memory Image rotate control NTSC PAL switching For image rotation press ROTATE button To rotate the image by 90 180 270 0 press ROTATE button Switches Video output mode to NTSC or...

Страница 26: ...em press the number button to recall it For example if you want to see the image in memory location 3 press BLUE button and the image is displayed on the screen Screen 2 divide and image shift You can...

Страница 27: ...lue for next time use You can save up to 4 different custom user settings You can save the setting on the Zoom Focus Iris Lamp state and Color level buttons To save the current value press SAVE button...

Страница 28: ...peared on the screen And then click the right mouse button GUI main menu is appeared on the screen and GUI menu system is activated When Exit menu is clicked GUI main menu disappears and only the mous...

Страница 29: ...Far Near menu with the left mouse button focus is activated Click Auto menu to work auto focus function Zoom Allow to change the image size When holding down Tele Wide menu with the left mouse button...

Страница 30: ...alance control When you click AWC menu with the left mouse button AWC function is executed once Red Blue Allow to adjust image color through the red blue gain control When holding down Up Down menu wi...

Страница 31: ...reeze mode is activated and Freeze menu turns checked state To release freeze mode click freeze menu again or click Cancel menu with the left mouse button and then Freeze menu turns unchecked state Ro...

Страница 32: ...l Allow to save the projected image into the memory of digital presenter or recall the image from the memory To save recall the image with the proper save number Click numbers menu with the left mouse...

Страница 33: ...imultaneously on one screen Click numbers menu with the left mouse button screen is divided and selected number of the image is recalled from memory Shift Allow to shift the recalled image shown in th...

Страница 34: ...on 9 divide mode is activated and GUI menu disappeared If you click the image number on screen selected image will be expanded to full screen and GUI menu is appeared on the screen To Release 3x3 Mult...

Страница 35: ...w to save the customized user setting values or to activate the preset user setting Click numbers menu with the left mouse button current setting value is saved to flash ROM or load setting value from...

Страница 36: ...Effect Allow to switch for negative positive image default positive Click NEGA Effect menu with the left mouse button current image turns negative image and menu turns checked state To return positiv...

Страница 37: ...ng point of main menu and then drag and drop to any position of screen where you want 1 Click the moving point image 2 Drag the GUI main menu 3 Drop the GUI menu Exit section GUI main menu disappears...

Страница 38: ...Then Draw menu is now being activated See page 28 When Draw menu is clicked GUI Draw toolbar is appeared on the screen and GUI main menu disappeared 1 Exit Button 5 Line Width Selection 2 Tool Select...

Страница 39: ...and then 1 Place the cursor at a corner of the area you want to select 2 Click and drag the mouse until the selection is the size you want 3 Release the mouse button Drawing the freehand line To creat...

Страница 40: ...e Color Palette Foreground Background Color Palette Use the Color Palette to select the colors that you want to draw the line Move the cursor over the available colors panel Click left button to selec...

Страница 41: ...alian Spanish 1 2 3 4 Page 41 Turn the power off and unplug the power cord Attach the lens cap Turn the head upside down While you pull the main lock button toward the front of the presenter fold the...

Страница 42: ...SDP 900DXA 1 5 Page 42 Fold the lamps on both sides completely...

Страница 43: ...er detailed information please refer to the program manual supplied with the product The image is out of focus When you use GUI the mouse is not seen or does not work normally Check if the adaptor len...

Страница 44: ...s the battery shall be replaced by the same battery And the used batteries shall be disposed carefully because they can cause environment pollutions Caution Battery replacement Open the battery compar...

Страница 45: ...e Selectable Freeze built in Video Input terminals VGA 2 Output terminals VIDEO 1 VGA 2 USB 1 DVI 1 RS 232C 1 S Video 1 NTSC PAL Selectable Remote controller Supplied GUI Graphic User Interface Suppli...

Страница 46: ...SDP 900DXA Page 46 Memo...

Отзывы: