background image

17

G

Ge

ettttiin

ng

g  S

Stta

arrtte

ed

d

16

Getting Started

Using a Battery

Your Samsung phone comes packaged with a partially
charged, rechargeable Lithium Ion (Li-ion) battery.

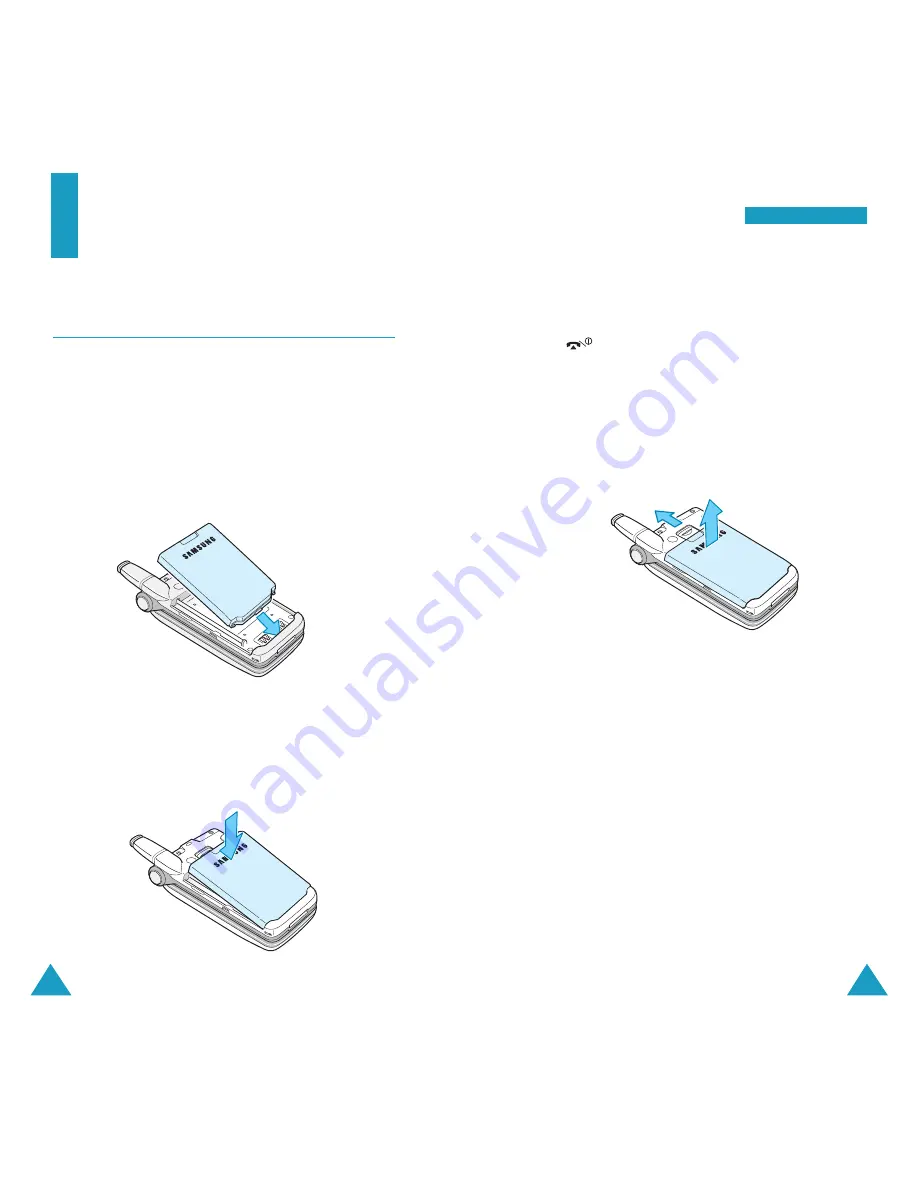
Installing the battery 

1. Place the battery back on the phone so that its tabs

match the slots on the phone.

2. Press the battery down until it snaps into place.

Make sure that the battery is correctly installed
before switching on the phone.

Removing the battery

1. If necessary, switch off the phone by holding down

the 

key until the power-off image displays.

2. To remove the battery: 

➀ 

Pull the catch above the battery toward the top
of the phone and hold it in that position.

➁ 

Lift the battery away, as shown.

Charging the Battery

The travel adapter is provided with your phone to
allow you to charge your phone’s battery from a
standard AC wall outlet. Use only approved batteries
and chargers.

Note:

You need to fully charge the battery before
using your phone for the first time.

You can use your phone while the battery is charging,
but this increases time it will take to charge the
battery. An “empty” standard battery can be fully
charged in approximately 4 hours.

Содержание SCH-A633

Страница 1: ...ure reference Draft version 2003 05 14 All phone functions couldn t be checked because the software of the current working sample was unstable The descriptions in this manual were borrowed from the other manuals The functions will be checked and therefore the contents will be corrected in the next version Some contents of this manual may differ from your phone depending upon the software of the ph...

Страница 2: ...ards Use only the supplied antenna or one that is approved Unauthorized antennas modifications or attachments could impair call quality damage the phone or result in a violation of FCC regulations Do not use the phone with a damaged antenna If a damaged antenna comes into contact with the skin a minor burn may result Please contact your local dealer for a replacement antenna Body worn Operation Th...

Страница 3: ...l History Missed Menu 3 1 71 Received Menu 3 2 72 Dialled Menu 3 3 73 Erase History Menu 3 4 73 Call Duration Menu 3 5 74 Sounds Ringer Tones Menu 4 1 75 Ringer Volume Menu 4 2 76 Alerts Menu 4 3 77 Key Tone Menu 4 4 78 Power On Off Melody Menu 4 5 78 Display Language Menu 5 1 79 Service Area Menu 5 2 79 Menu Theme Menu 5 3 79 Wallpaper Menu 5 4 80 Banner Menu 5 5 81 Backlight Menu 5 6 82 Set Dual...

Страница 4: ...l wireless phones may be subject to interference which could affect their performance Special Regulations Meet any special regulations in force in any area and always switch off your phone whenever it is forbidden to use it or when it may cause interference or danger in a hospital for example 6 R World R Menu Menu 9 1 110 Multimedia Menu 9 2 115 Games Menu 9 3 116 Reset R Menu Menu 9 4 1167 Photos...

Страница 5: ...n permission to do so Water Resistance Your phone is not water resistance Keep it dry Accessories and Batteries Use only Samsung approved accessories and batteries Use of unauthorised accessories could damage your phone and may be dangerous Qualified Service Only qualified service personnel may install or repair your phone For more detailed safety information see Health and Safety Information on p...

Страница 6: ...rophone Earpiece Folder Main display Your Phone Phone s Parts The following illustrations shows the main elements of your phone Quickly launches R World External display Camera module Camera module Closed View Volume keys During a call adjust the voice volume In Standby Mode with the folder open adjust the key tone volume In Menu Mode scroll through the menu options Open View soft keys Navigation ...

Страница 7: ... Also use this key when you make a call to an automated system especially when using teleservices Key s Functions continued Ends a call Also switches the phone on and off when held down In Menu Mode cancels your input and returns to Standby Mode Deletes characters from the display In Menu Mode returns to the previous menu level Menu Find Quickly enters the Photos menu Turns the camera on when held...

Страница 8: ... setting in the Backlight menu to conserve your battery power Press any key to turn the display on Camera The camera module on the top left of your phone allows you to take a picture while on the move For further details about the Camera feature see page xx Roaming Appears when you are out of your home area and have logged onto a different network when travelling in other countries for example Rin...

Страница 9: ... the phone by holding down the key until the power off image displays 2 To remove the battery Pull the catch above the battery toward the top of the phone and hold it in that position Lift the battery away as shown Charging the Battery The travel adapter is provided with your phone to allow you to charge your phone s battery from a standard AC wall outlet Use only approved batteries and chargers N...

Страница 10: ...icator You can easily tell if your battery needs to be recharged by checking the Battery Status icon at the upper right corner of your phone s display The presence of all three bars indicates a full charge two bars indicates a smaller charge and one bar indicates an even smaller charge When the battery charge level becomes low the battery sensor blinks an empty Battery Status icon and sounds a war...

Страница 11: ... and receive calls You can try again later when service is available Note You can change the display language To change the language use the Language menu Menu 5 1 For further details see page xx 2 When you wish to switch the phone off hold down the key more than two seconds WARNING Do not switch the phone on when mobile phone use is prohibited or when it may cause interference or danger Note As w...

Страница 12: ...k Service Provider The 13 May 10 30 Menu Find Your Phone s Modes Standby Mode Standby is the most basic state of your phone The phone goes into Standby Mode after you turn it on or whenever you briefly press the key When your phone is in Standby Mode you will typically see the greeting message and the current date and time If you enter a phone number you can press the key to dial it or press the S...

Страница 13: ...u cannot use the phone In the lock mode you can receive messages and calls but you cannot place an outgoing call until you unlock the phone To unlock the phone you need to enter the lock code For details about locking and unlocking your phone see page xx Vibrate Mode Vibrate Mode disables all sounds on the phone This feature is best used in situations where the phone might disturb others such as i...

Страница 14: ...tes When you enter a number corresponding to a Phonebook location the Speed Dial option is available For details about speed dialling see page xx When you enter four digits the 4 digit Dial option is available For details about four digit dialling see page xx Correcting the Number To clear the Press last digit displayed CLR key whole display CLR key for more than one second Ending a Call When you ...

Страница 15: ...bout the Phonebook feature see page xx 29 C Ca al ll l F Fu un nc ct ti io on ns s Prepend Dialling The prepend option lets you add digits such as area codes and network feature activation codes to a phone number that is in your Phonebook To prepend a phone number stored in your phone 1 Press the Find soft key to access the Phonebook entries 2 Press the Up or Down key to scroll to the number you w...

Страница 16: ... Three Touch Dial Memory locations 100 through 250 are special three touch locations Press the first two digits briefly and then hold down the third digit of the memory location For example Location no 123 Press the 1 key and the 2 key briefly then hold down the 3 key The number and name stored is displayed and then dialled Four digit Dialling You can quickly dial a phone number in Phonebook by en...

Страница 17: ... P displays meaning that a hard pause will occur at that point in the dialling sequence 4 Enter the digits that need to follow the pause such as your account number 5 Repeat steps 2 through 4 to add more pauses and numbers if necessary 6 Store the number in your Phonebook as you normally would by pressing the Save soft key and following from step 2 on page xx Pause Dialling from a Stored Phonebook...

Страница 18: ...ce Dial menu Menu 6 1 For further details see page xx 1 To place a call press and hold the key or open the folder depending on the Activate By menu Menu 6 1 4 See page xx 2 At a voice prompt say a name into the microphone If the phone recognises the name the phone attempts a connection If the phone does not recognise the name the phone sounds an alert and prompts for the name again 3 The phone dia...

Страница 19: ...u can set the phone to answer the call by playing a greeting message and record callers messages For further details see page xx Options During a Call Your phone provides you with a number of functions that you can use during a call Press the Options soft key during a call to access the following options Phone Book allows you to access the Phone Book menu For details see page xx Mute Quit allows y...

Страница 20: ...the current phone Call Forwarding When the Call Forwarding menu Menu 8 1 3 is enabled your phone forwards incoming calls to another phone number even if your phone turns off Activating Call Forwarding does not affect outgoing calls made from this phone For further details for activating Call Forwarding see page xx Call Waiting You can answer an incoming call while you have a call in progress when ...

Страница 21: ...t At many times when using your phone you will need to enter text for example when storing a name in Phonebook creating your personal greeting or scheduling events on your calendar You can enter alphanumeric characters into your phone using your phone s keypad Your phone has the following text input modes T9 English This mode allows you to enter words with only one key press per letter Each key on...

Страница 22: ...re typing 1 Press alphanumeric keys on the keypad just once per letter For example to enter Hello press the 4 3 5 5 and 6 keys The word you are typing appears on the display It may change with each key press 2 Type to the end of the word before editing or deleting any keystrokes 3 Put a space between words by pressing the key If the word that appears on the display is not the word that you desire ...

Страница 23: ...delete the letters one by one to the left Press and hold the CLR key to clear the display Using the Alphabet Mode When typing in the alphabet mode you need to press the keys labeled with the required letter once for the first letter twice for the second letter and so on This method is called multi tap typing For example you press the 2 key three times to display the letter C and the 5 key two time...

Страница 24: ...LR key one or more times to delete the letters one by one to the left Press and hold the CLR key to clear the display You can display more symbols by pressing the Left or Right key Press the number key corresponding to the symbol you want to enter The phone automatically switches back to the text entry mode used just prior to selecting the symbol mode Using the Number Mode The number mode enables ...

Страница 25: ... with the Up or Down key to find the setting of your choice 5 Press the OK or Save soft key to confirm the chosen setting Notes You can return to the previous menu level by pressing the CLR key or the Back soft key You can exit the menu without changing the menu settings by pressing the key Accessing a Menu Function by Using Its Shortcut Menu submenus and setting options are numbered and can be qu...

Страница 26: ...se History 1 Missed 2 Received 3 Dialled 4 All 5 Call Duration 1 Last Call 2 Total Dialled Call 3 Total Received Call 4 Reset All 5 Life Time Main menu Main menu 1 Main menu 2 4 Sound 1 Ringer Tones 1 Calls 2 Messages 3 Schedules 2 Ringer Volume 1 Calls 2 Messages 3 Alarm Schedules 3 Alerts 1 Service 2 Call Connect 3 Call Disconnect 4 Folder Open Closed 4 Key Tone 1 Volume 2 Type 3 Length 5 Power ...

Страница 27: ...ly used phone numbers and the associated names in your personal directory to make it easy for you to make a call without having to remember or enter the phone number You can store up to 250 entries including e mail and URL addresses Find Menu 1 1 This option allows you to find an entry in your Phonebook Note You can access this menu by pressing the Find soft key in Standby Mode 1 Press the Left or...

Страница 28: ... This menu allows you to store a number with a name in your Phonebook You can save a person s numbers such as workplace number mobile number and fax number into one entry A Phonebook entry can contain up to six numbers one in each category Add Number Menu 1 2 1 1 Enter a phone number and press the Save soft key 2 Press the Select soft key to confirm to add a new entry If you are creating an entry ...

Страница 29: ... an image to be displayed for alerting you to an incoming call from the person 6 Press the Edit soft key to enter information or use the Left or Right key to change the setting 7 When you finish setting the options press the Save soft key to store the entry After storing the phone displays the Phonebook entry number that you just saved and the remaining slots you can further store phone numbers Ad...

Страница 30: ...ep 4 in Add Number on page xx P Ph ho on ne eb bo oo ok k Groups Menu 1 3 This option allows you to change the settings for the caller groups To change a ringer melody indicated when a call comes in from a member of a group 1 Press the Up or Down key to scroll to the group you want to edit 2 Press the Ringer soft key 3 Select the ringer category you want by pressing the Left or Right key and press...

Страница 31: ...reen does not display information about the message To access a message you must unlock the phone If you receive an incoming message during a conversation your phone automatically mutes the ringer This is to avoid ringing in your ear while you are trying to converse You can quickly enter the Messages menu by pressing the Up key in Standby Mode Write Menu 2 1 You can create a short text message and...

Страница 32: ...ge the setting using the Left or Right key The following options are available Priority select the message priority Validity select how long your message is valid at the SMS centre while attempts are made to deliver them to the recipients Send Later select how long the delivery of the message will be delayed at the SMS centre if you do not want to send it immediately Delivery ACK turn the delivery...

Страница 33: ...ress the key again or the Call soft key on the callback list to dial the number or the Save soft key to save it in Phonebook Cannot be checked with the current phone Outbox Menu 2 3 Your phone can store up to 99 messages total in the Inbox Outbox and Send message box When you access the Outbox menu the message list appears A red number means that it is an urgent message To review a message press t...

Страница 34: ...list and press the key again or the Call soft key to dial the number or the Save soft key to save it in Phonebook Templates Menu 2 5 Using this menu you can preset up to ten message templates that you use most frequently and use them when you send a message Scroll to the message you want by pressing the Up or Down key Press the Select soft key to send the message using the template For further det...

Страница 35: ... default settings of the options for creating a new message The following options are available Save Message allows you to set whether or not you want the transmitted message to be saved in the Outbox Do not Save the phone does not save the message Prompt Save the phone asks you if you want to save the message or not Auto Save the phone automatically saves the message Entry Method allows you to se...

Страница 36: ...ry You can use the Call History menu to view and dial the last calls you dialled received or missed erase the numbers in the call log memory view the length of calls Note You can also access the numbers in the three call type by pressing the key in Standby Mode Missed Menu 3 1 If Caller Line Identification service is available your phone keeps a list of the last 10 incoming calls that you failed t...

Страница 37: ...e Caller Line Identification service Contact Reliance for more information about this service When you access this menu a list of the calls you received displays For more information about scrolling through the list and accessing the call log see Missed on page xx Dialled Menu 3 3 The phone stores up to 10 of the last calls you dialled When you access this menu a list of the outgoing calls display...

Отзывы: