background image

ENGLISH

60

60

Photo Mode : Viewing

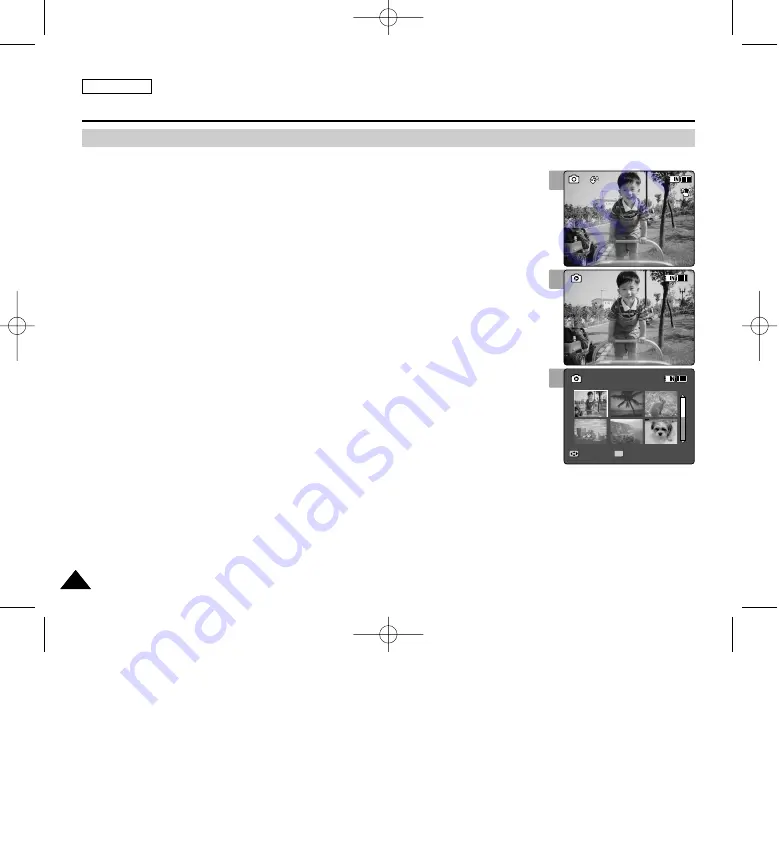
Viewing Multiple Photo Files

Using the [W/T] switch in Photo View mode, you can display multiple images on one LCD screen.

1. Press the [POWER] button to turn on the Sports Camcorder.

The Movie Record screen appears.

2. Set the 

Photo

mode by pressing the [MODE] button.

The Photo Capture screen appears.

3. Press the [PLAY] button or [Joystick(OK)] and slide the [W/T] switch to

W(WIDE).

The Multi-view screen appears.

4. Move the [Joystick] to the left / right / up or down to find the photo file you

want to View.

5. Press [PLAY] button or [Joystick(OK)] to view the photo file you want.

The full screen is displayed.

[ Notes ]

If there is no file stored to view, the message <No Files...> appears.

Display time may vary depending on the picture size.

The image edited or turned in Image Viewer program on your PC may not be displayed.

2

3

4

100

720X480

S

S

12:00AM 2006/01/01

01

Sepia

01

Move

View

100-0001

100-0001

Capturing...

Sepia

12:00AM 2006/01/01


100

720X480

S

12:00AM 2006/01/01

01

Sepia

01

Move

View

100-0001


100-0001

Capturing...

Sepia

12:00AM 2006/01/01

100

720X480

S

12:00AM 2006/01/01

01

Sepia

01

Move

View

100-0001

OK

100-0001

Capturing...

Sepia

12:00AM 2006/01/01

SC-X205 00994A 058~075  2006.1.27 8:24 PM  페이지60   001 PagePro 9100

Содержание SC-X205

Страница 1: ...cks Otherwise there is a danger of overheating fire or explosion Samsung is not responsible for problems occurring due to using unapproved batteries RoHS compliant Our product complies with The Restriction Of the use of certain Hazardous Substances in electrical and electronic equipment and we do not use the 6 hazardous materials Cadmium Cd Lead Pb Mercury Hg Hexavalent Chromium Cr 6 Poly Brominat...

Страница 2: ... The wide blade or the third prong are provided for your safety If the provided plug does not fit into your outlet Consult an electrician for replacement of the obsolete outlet 10 Protect the power cord from being walked on or pinched particularly at plugs convenience receptacles and the point where they exit from the apparatus 11 Only use attachments accessories specified by the manufacturer 12 U...

Страница 3: ...he plug fully into the outlet try reversing the plug If the plug still fails to fit contact your electrician to replace your outlet Do not defeat the safety purpose of the polarized plug 19 POWER CORD PROTECTION Power supply cords should be routed so that they are not likely to be walked on or pinched by items placed upon or against them paying particular attention to cords or plugs convenient rec...

Страница 4: ...to dangerous voltage or other hazards Refer all servicing to qualified service personnel 26 DAMAGE REQUIRING SERVICE Unplug this CAMCORDER from the wall outlet and refer servicing to qualified service personnel under the following conditions a When the power supply cord or plug is damaged b If any liquid has been spilled onto or objects have fallen into the CAMCORDER c If the CAMCORDER has been ex...

Страница 5: ...r in a particular installation If this equipment does cause harmful interference to radio or television reception which can be determined by turning the equipment off and on the user is encouraged to try to correct the interference by one or more of the following measures Reorient or relocate the receiving antenna Increase the separation between the equipment and receiver Connect the equipment int...

Страница 6: ...xternal Camera Module View SC X205L X210L X220L only 16 LCD Display 17 OSD On Screen Display in Movie Record Mode Movie Play Mode 17 OSD On Screen Display in Photo Capture Mode Photo View Mode 18 OSD On Screen Display in MP3 Mode 19 OSD On Screen Display in Voice Record Mode Voice Play Mode 20 OSD On Screen Display in File Browser Mode System Settings Mode 21 Battery Pack Installation Ejection 22 ...

Страница 7: ...not supplied 34 Recording 36 Recording 36 Zooming In and Out 37 Playing 38 Playing Movie Files on the LCD monitor 38 Playing Multiple Movie Files 39 Setting the Recording Options 41 Setting the Movie Size 41 Setting the Movie Quality 42 Setting the White Balance 43 Setting the Program AE Programmed Auto Exposure 44 Setting the Effects 45 Setting the EIS Electronic Image Stabilizer 46 Setting the F...

Страница 8: ... the Program AE Programmed Auto Exposure 62 Setting the Effects 63 Setting the Flash 64 Setting the Continuous Shot 65 Setting the EIS Electronic Image Stabilizer 66 Setting the Focus 67 Setting the BLC Backlight Compensation 68 Setting the Digital Zoom 69 Setting the Viewing Options 70 Deleting Photo Files 70 Setting the Slide show 71 Setting the DPOF Digital Print Order Format Function 72 Lockin...

Страница 9: ...ing the Voice Play Options 86 Deleting Voice Files 86 Setting the Play Mode 87 Locking Voice Files 88 Copying Voice Files 89 Viewing Files or Folders 91 Deleting Files or Folders 92 Locking Files 93 Copying Files or Folders 94 Viewing File Information 95 Setting Memory 97 Selecting the Storage Type 97 Setting USB Mode 98 Setting USB Mode 98 ENGLISH Contents 5 5 Voice Recorder Mode 83 Using File Br...

Страница 10: ...Camcorder 110 Selecting Language 111 Setting the Auto Shut off 112 Setting the Demonstration Function 113 Viewing Version Information 114 Using USB Mode 115 Transferring files to a computer 115 Printing with PictBridge 116 Using the PC Cam Function 117 Recording with the External Camera Module 119 Recording Video using the External Camera Module 119 Wearing the External Camera Module 120 Mounting ...

Страница 11: ...ent from other digital devices 129 Printing Photos 130 Printing with DPOF 130 Cleaning and Maintaining the Sports Camcorder 131 After using the Sports Camcorder 131 Cleaning the Body 132 Using the Built in Rechargeable Battery 132 Regarding the Battery 133 Using the Sports Camcorder Abroad 134 Self Diagnosis Display 135 ENGLISH 7 7 Specifications 139 Index 141 Warranty SEA users only 143 Using the...

Страница 12: ...king properly please consult your nearest dealer or authorized Samsung service facility Disassembling the device yourself may cause irrecoverable damage which will be difficult to repair Clean the device with a dry soft cloth Use a soft cloth moistened with a mild detergent solution for removing stains Do not use any type of solvent especially benzene as it may seriously damage the finish Keep you...

Страница 13: ...rs and is contrary to copyright laws All the trade names and registered trademarks mentioned in this manual or other documentation provided with your Samsung product are trademarks or registered trademarks of their respective holders Notes Regarding the Sports Camcorder Notes Regarding COPYRIGHT Notes Regarding Moisture Condensation 1 Do not leave the Sports Camcorder exposed to high temperature a...

Страница 14: ...y in place The new battery pack provided with the product is not charged Before using the battery pack you need to fully charge it Do not drop the battery pack Dropping the battery pack may damage it Fully discharging a Lithium Polymer battery damages the internal cells The battery pack may be prone to leakage when fully discharged To avoid damage to the battery pack make sure to remove the batter...

Страница 15: ...Direct sunlight can damage the CCD Charge Coupled Device the imaging sensor Notes Regarding the Lens Notes Regarding the LCD Display Do not attempt to service the Sports Camcorder yourself Opening or removing covers may expose you to dangerous voltage or other hazards Refer all servicing to qualified service personnel Precautions Regarding Service Precautions Regarding Replacement Parts When repla...

Страница 16: ...cord voices and store it in the internal memory memory card not supplied and play back the recorded voice files Plus Advantage MP3 With the Sports Camcorder you can play back MP3 files stored in the internal memory or memory card not supplied Enjoy your favorite songs with your Sports Camcorder A Sports Camcorder equipped with External Camera Module SC X205L X210L X220L only The Sports Camcorder i...

Страница 17: ...sory for SC X205L Parts and accessories are available at your local Samsung dealer and service center You can download programs the latest driver software and audio video CODECs from the Samsung Electronics webpage Accessories Supplied with the Sports Camcorder 3 Audio Video Cable 2 AC Power Adapter 1 Lithium Polymer Battery pack 5 Earphones 4 USB Cable 9 Lens Cover 8 Software CD 14 Extended life ...

Страница 18: ... button 14 DC IN jack 15 Multi jack ENGLISH 14 14 Location of Controls MENU MODE DC IN W T HOLD DISPLAY DELETE 1 3 2 8 7 9 10 11 12 13 14 15 5 4 6 MENU MODE DC IN W T HOLD DISPLAY DELETE How to Connect Earphones Connect the earphones to the multi jack as shown in the figure Notes Multi jack is a unified Earphones AV Input Output and External Camera Module jack Items apply to the SC X205L X210L X22...

Страница 19: ...ject switch 5 Front cover 6 USB port 7 Built in microphone 8 Memory card slot 9 Tripod receptacle 10 Strap hook Usable Memory Cards 2GB Max SD MMC 1 2 4 3 10 Hanging Lens Cover on the Sports Camcorder USB MMC SD 7 8 6 9 Left Side 5 SC X205 00994A 008 036 2006 1 27 8 23 PM 페이지15 001 PagePro 9100 ...

Страница 20: ...220L only 1 Built in microphone 2 Lens 3 Rubber Mount 4 Picture Rotator 5 Record Power indicator 6 POWER Record Stop button 7 Clip 8 External Camera Module cable 9 Rubber Mount receptacle 2 3 4 6 5 1 7 8 9 Bottom View SC X205 00994A 008 036 2006 1 27 8 23 PM 페이지16 001 PagePro 9100 ...

Страница 21: ...nter Elapsed time Recorded time S S F F Sepia Recording STBY 12 00AM 2006 01 01 Move Play 00 00 00 00 40 05 100 0001 12 00AM 2006 01 01 720X480 00 00 15 00 05 20 100 0001 720i W T 1X 10X W T 1X 10X 1 3 2 4 5 6 7 17 9 8 10 11 12 13 15 14 Movie Play Mode S F Sepia Recording STBY 12 00AM 2006 01 01 Move Play 00 00 00 00 40 05 100 0001 12 00AM 2006 01 01 720X480 00 00 15 00 05 20 OK ERROR 100 0001 W T...

Страница 22: ... W T 1X 10X W T 1X 10X 6 7 Photo View Mode Capturing 12 00AM 2006 01 01 Move View 100 0001 12 00AM 2006 01 01 100 0001 1 1 Sepia W T 1X 10X W T 1X 10X Notes Settings indicated with will not be retained when the Sports Camcorder is turned off The OSD indicators are based on internal memory 4 5 15 1 3 2 8 9 10 10 11 1 Mode indicator 2 White balance indicator 3 Program AE indicator 4 Date Time indica...

Страница 23: ... indicator 14 Battery life indicator 15 Memory type indicator 16 File number indicator Current Total Move Play 00 12 OK Life is cool mp3 Everytime mp3 Toxic mp3 Don t push me mp3 Love you mp3 Search 1 10 Pause List Life is cool mp3 Sweetbox POP 1 2 3 MP3 Mode Move Play 00 12 Life is cool mp3 Everytime mp3 Toxic mp3 Don t push me mp3 Love you mp3 Search 1 10 Pause OK List Life is cool mp3 Sweetbox ...

Страница 24: ... Memory type indicator 9 File number indicator Current Total 10 Counter Elapsed time 11 Repeat indicator Voice Play Mode Stop 2006 01 01 12 00 00 AM SWAV0001 WAV 00 00 12 34 59 48 2006 01 01 12 00 00 AM SWAV0001 WAV 00 00 02 00 00 12 1 3 Search Pause List Move Play 1 3 OK 2006 01 01 12 00 00 AM 2006 01 01 12 00 10 AM 2006 01 01 12 00 20 AM 00 12 1 8 7 1 File name indicator 2 Date Time indicator 3 ...

Страница 25: ...004 JPG DCAM0001 JPG Move Play Dart Coin 1 2 3 4 7 6 Location of Controls LCD Display OSD On Screen Display in File Browser Mode System Settings Mode 1 Mode indicator 2 Menu tab 3 Setup item 4 Move Help Key 5 Select Help Key 6 Battery life indicator 7 Memory type indicator System Settings Mode System Settings Move Select OK TYPE Ver Storage Type External Internal Move Play DCAM0002 JPG DCAM0003 JP...

Страница 26: ...il it clicks To insert the battery pack Pull the Battery eject switch to eject the battery pack To eject the battery pack Notes Clean the terminals to remove foreign substances before inserting the battery pack If the Sports Camcorder will not be in use for a while remove the battery pack from the Sports Camcorder SB P120A 1200mAh SB P190A 1900mAh Battery Insert Eject 1 2 SC X205 00994A 008 036 20...

Страница 27: ...ack that is available at the retailer where you purchased the Sports Camcorder Warning When you eject the battery pack from the Sports Camcorder hold the battery pack to prevent it from dropping to the floor Notes Prepare an extra battery if you use the Sports Camcorder outdoors Contact a Samsung retailer to purchase a new battery pack If you zoom in or out the recording time becomes shorter The C...

Страница 28: ...ower is on The charging time with the USB cable may differ depending on the PC Battery Level Indicator State Message Fully charged 20 40 used 40 60 used 60 80 used 80 95 used Exhausted flickers The device will soon turn off Change the Battery Pack as soon as possible flickers The device will be forced to turn off after 5 seconds Low battery 12 00AM 2006 01 01 12 00AM 2006 01 01 Sepia Sepia Recordi...

Страница 29: ...the cable make sure that you don t have any foreign substances between connectors Connecting the AC Power Adapter Connecting the USB Cable USB MMC SD DC IN jack USB port 1 Turn off the Sports Camcorder by pressing the POWER button 2 Insert the Battery Pack to the unit 3 Open the connector cover of the unit 4 Charge the battery pack with using AC Power Adapter or USB Cable AC Power Adapter Connect ...

Страница 30: ...ts Camcorder refer to this page for easy operation The memory card is not supplied 1 Insert the Battery Pack and insert a memory card into the Memory Card slot page 34 2 Charge the Battery Pack by directly connecting the AC Power Adapter to the Sports Camcorder page 25 3 Press the POWER button to turn on the Sports Camcorder 4 Select the desired mode by pressing the MODE button 5 Press the Record ...

Страница 31: ...e Browser mode You can delete lock copy the file and view file information System Settings mode Using this mode you can set adjust settings regarding the LCD display Date Time Reset and Memory management Setting the Mode Functions of Each Mode MP3 Voice Recorder Game System Settings Movie Photo Power Saving Function The LCD monitor is turned off after a certain period of time has passed in each mo...

Страница 32: ...ving the Joystick up down left right to select desired menu item and then press the Joystick OK to confirm 4 Press the MENU button to finish The joystick is used to make a selection move the cursor select functions and exit from the menu 1 Move the cursor left right by moving the Joystick 2 Move the cursor up down by moving the Joystick You can adjust the volume by moving the Joystick up down in M...

Страница 33: ...deleted All All files will be deleted Cancel Cancels deletion HOLD DISPLAY DELETE Once All indicators will disappear on the screen Twice The backlight turns off 3 times It returns to the initial screen Note Above description applies to the Movie and Photo mode If you press the DISPLAY button in Movie and Photo modes Once The back light turns off Twice It returns to the initial screen Note Above de...

Страница 34: ...ie files made on other manufacturers equipment may not play on this Sports Camcorder Warning Do not turn the power off while recording playing erasing files or formatting Turn the power off before you insert or eject the memory card to avoid losing data Save important files separately Memory cards are made with precision technology They are sensitive and vulnerable to electric shock temperature an...

Страница 35: ...ime Media Internal Memory SD MMC Capacity 512MB SC X205 L 1GB SC X210 L 2GB SC X220 L 32MB 64MB 128MB 256MB 512MB 1GB 2GB Super Fine 352p approx 21min approx 43min approx 86min approx 1min 20sec approx 3min approx 4min approx 11min approx 21min approx 43min approx 86min 720i 720p approx 14min approx 29min approx 58min approx 50sec approx 2min approx 3min approx 7min approx 14min approx 29min appro...

Страница 36: ... slow We recommended using a Memory Card of 1 25MB sec or greater Media Internal Memory SD MMC Capacity 512MB SC X205 L 1GB SC X210 L 2GB SC X220 L 32MB 64MB 128MB 256MB 512MB 1GB 2GB Quality 640x480 approx 2875 approx 5754 approx 11511 approx 177 approx 357 approx 716 approx 1436 approx 2875 approx 5754 approx 11511 Media Internal Memory SD MMC Capacity 512MB SC X205 L 1GB SC X210 L 2GB SC X220 L...

Страница 37: ...d new data In this case you have to purchase a new memory card Do not bend drop or apply a strong impact to the Memory Card Do not use or store in a hot dusty or humid environment Do not allow foreign substances on the memory card terminals Use a soft dry cloth to clean the terminals if required Use a memory card case to avoid losing data from moving and static electricity After a period of use th...

Страница 38: ...ou insert a locked memory card the icon is displayed next to the memory type indicator Inserting a memory card 1 Open the Front cover 2 Slightly push the memory card inwards to pop it out 3 Pull the memory card out of the memory card slot and close the Front cover Ejecting a memory card S S F F STBY STBY 00 00 00 00 40 05 00 00 00 00 40 05 720i External memory inserted External memory inserted Do ...

Страница 39: ...ing the Digital Zoom 49 Setting the Record Mode 50 Setting the Line In Out 51 Setting the Viewing Options 52 Deleting Movie Files 52 Setting the Play Mode 53 Locking Movie Files 54 Copying Movie Files 55 Save important data recordings separately on other media to avoid accidental loss due to a system failure or other reasons How to set to Movie mode How to set to Movie mode 12 00AM 2006 01 01 Sepi...

Страница 40: ...ck when you finish recording to prevent unnecessary battery power consumption To adjust the LCD screen brightness set the LCD Brightness in System Settings mode page 102 The LCD monitor brightness will not affect the brightness of the recording Reading the Counter 1 2 3 12 00AM 2006 01 01 Sepia Recording S S F F STBY 00 00 00 00 40 05 12 00AM 2006 01 01 Sepia Recording S F STBY 00 00 02 00 40 03 1...

Страница 41: ...10X 10X 12 00AM 2006 01 01 Sepia S F 00 00 04 00 40 01 W T 1X 10X 12 00AM 2006 01 01 Sepia S F 00 00 00 00 40 05 W T 1X 10X 12 00AM 2006 01 01 Sepia S F 00 00 02 00 40 03 W T 1X 10X 12 00AM 2006 01 01 12 00AM 2006 01 01 Sepia Sepia S S 720i F F 00 00 04 00 40 01 00 00 04 00 40 01 W T 1X 1X 10X 10X Zoom In Zoom Out Notes Frequent use of zooming may result in higher battery power consumption Optical...

Страница 42: ...tedly Note If there is no file stored to view the message No Files appears 2 3 12 00AM 2006 01 01 720X480 00 00 00 00 05 20 100 0001 Sepia Recording 12 00AM 2006 01 01 S F STBY 00 00 00 00 40 05 720X480 00 00 15 00 16 15 100 0004 1 12 00AM 2006 01 01 720X480 00 00 00 00 05 20 100 0001 Sepia Recording 12 00AM 2006 01 01 S S 720i F F STBY 00 00 00 00 40 05 720X480 00 00 15 00 16 15 100 0004 12 00AM ...

Страница 43: ...le or External Camera Module is connected to the Sports Camcorder the built in speaker will automatically turn off Items apply to SC X205L X210L X220L only Movie Mode Playing Playing Multiple Movie Files 1 2 3 12 00AM 2006 01 01 720X480 00 00 05 00 05 20 100 0001 720X480 00 00 00 00 05 20 100 0001 Sepia Recording 12 00AM 2006 01 01 S S 720i F F STBY 00 00 00 00 40 05 Move Play 100 0001 12 00AM 200...

Страница 44: ... The volume bar disappears after 1 2 seconds 3 Move the Joystick down to decrease the volume Each time you move the Joystick down the volume bar decreases and the sound level will get quieter The volume bar disappears after 1 2 seconds Notes You can adjust the volume up to 10 steps You can also play the movie file on a TV screen by connecting the Sports Camcorder to a TV page 127 A video codec is ...

Страница 45: ...size than 720 720x480 on PC While the menu screen is displayed pressing the Record Stop button will move to Movie record mode 1 2 3 4 Sepia Recording 12 00AM 2006 01 01 S S 720i F F STBY 00 00 00 00 40 05 Sepia Recording 12 00AM 2006 01 01 S F STBY 00 00 00 01 00 07 Movie Move Exit Select Size 352x240 720x480 Movie Move Exit Select Size 352x240 720x480 Sepia Recording 12 00AM 2006 01 01 S F STBY 0...

Страница 46: ...M 2006 01 01 S S 720i F F STBY 00 00 00 00 40 05 Sepia Recording 12 00AM 2006 01 01 S STBY 00 00 00 00 26 43 Movie Move Exit Select Quality Fine Super Fine Normal N F SF SF Movie Move Exit Select Quality Fine Super Fine Normal N F SF Sepia Recording 12 00AM 2006 01 01 S F STBY 00 00 00 00 40 05 Sepia Recording 12 00AM 2006 01 01 S STBY 00 00 00 00 26 43 Movie Move Exit MENU Select OK Quality AE Fi...

Страница 47: ...06 01 01 S F STBY 00 00 00 00 40 05 Sepia Recording 12 00AM 2006 01 01 S STBY 00 00 00 00 40 05 Movie Move Exit MENU Select OK White Balance AE Auto F A Daylight Fluorescent Movie Move Exit Select White Balance Auto Fluorescent Daylight SF Sepia Recording 12 00AM 2006 01 01 S F STBY 00 00 00 00 40 05 Sepia Recording 12 00AM 2006 01 01 S STBY 00 00 00 00 40 05 Movie Move Exit Select White Balance A...

Страница 48: ...05 Sepia Recording 12 00AM 2006 01 01 S STBY 00 00 00 00 40 05 Movie Move Exit Select Program AE Sports Auto Spotlight F Movie Move Exit MENU Select OK Program AE AE Sports Auto Spotlight SF SF Sepia Recording 12 00AM 2006 01 01 S F STBY 00 00 00 00 40 05 Sepia Recording 12 00AM 2006 01 01 S S 720i STBY 00 00 00 00 40 05 Movie Move Exit Select Program AE Sports Auto Spotlight F F Movie Move Exit S...

Страница 49: ...ding 12 00AM 2006 01 01 S F STBY 00 00 00 00 40 05 STBY 00 00 00 00 40 05 Movie Move Exit Select Effect Art Off Mosaic F Movie Move Exit MENU Select OK Effect AE Mirror Mirror Negrtive B W Recording 12 00AM 2006 01 01 S S SF SF Sepia Recording 12 00AM 2006 01 01 S F STBY 00 00 00 00 40 05 720i STBY 00 00 00 00 40 05 Movie Move Exit Select Effect Art Off Mosaic F F Movie Move Exit Select Effect Mir...

Страница 50: ...te While the menu screen is displayed pressing the Record Stop button will move to Movie record mode SF Sepia Recording 12 00AM 2006 01 01 S F STBY 00 00 00 00 40 05 Sepia Recording 12 00AM 2006 01 01 S STBY 00 00 00 00 40 05 Movie Move Exit MENU Select OK EIS Off On F Movie Move Exit Select EIS Off On TV PC SF Sepia Recording 12 00AM 2006 01 01 S F STBY 00 00 00 00 40 05 Sepia Recording 12 00AM 2...

Страница 51: ...focus is set to AF automatically when the Sports Camcorder is turned off While the menu screen is displayed pressing the Record Stop button will move to Movie record mode Sepia Recording 12 00AM 2006 01 01 S S 720i F F STBY 00 00 00 00 40 05 Movie Move Exit Select Focus MF AF Sepia Recording 12 00AM 2006 01 01 S F STBY 00 00 00 00 40 05 Movie Move Exit Select Focus MF AF Sepia Recording 12 00AM 20...

Страница 52: ...amcorder is turned off While the menu screen is displayed pressing the Record Stop button will move to Movie record mode Sepia Recording 12 00AM 2006 01 01 S F STBY 00 00 00 00 40 05 Movie Move Exit MENU Select OK BLC Off On Sepia Recording 12 00AM 2006 01 01 S F STBY 00 00 00 00 40 05 Movie Move Exit Select BLC Off On TV PC Sepia Recording 12 00AM 2006 01 01 S F STBY 00 00 00 00 40 05 Movie Move ...

Страница 53: ... the menu screen is displayed pressing the Record Stop button will move to Movie record mode Sepia Recording 12 00AM 2006 01 01 S F STBY 00 00 00 00 40 05 Movie Move Exit MENU Select OK Digital Zoom Off On Sepia Recording 12 00AM 2006 01 01 S F STBY 00 00 00 00 40 05 Movie Move Exit Select Digital Zoom Off On W T 1X 10X TV PC Sepia Recording 12 00AM 2006 01 01 S F STBY 00 00 00 00 40 05 Movie Move...

Страница 54: ...n the size is set to 352 PC is automatically selected for movie files recording While the menu screen is displayed pressing the Record Stop button will move to Movie record mode Sepia Recording 12 00AM 2006 01 01 S F STBY 00 00 00 00 40 05 Sepia Recording 12 00AM 2006 01 01 S F STBY 00 00 00 00 40 05 Movie Move Exit MENU Select OK Record Mode PC TV Movie Move Exit Select Record Mode PC TV TV PC Se...

Страница 55: ...utton to exit the menu The Sports Camcorder is set to the selected setting Note While the menu screen is displayed pressing the Record Stop button will move to Movie record mode Movie Mode Setting the Recording Options Setting the Line In Out 1 2 3 Movie Move Exit Select Line In Out In Out Movie Move Exit Select In Out Sepia Recording 12 00AM 2006 01 01 S S 720i F F STBY 00 00 00 00 40 05 Line In ...

Страница 56: ...n by moving the Joystick up down and then press the Joystick OK OK Deletes the selected movie file using the Joystick OK Multi Select Multiple movie files can be selected using the Joystick OK indicator appears on the selected files Press the PLAY button to delete All All movie files will be deleted Cancel Cancels the deletion Note While the menu screen is displayed pressing the Record Stop button...

Страница 57: ...e Record Stop button will move to Movie record mode 3 4 Movie Mode Setting the Viewing Options Setting the Play Mode 720X480 00 00 00 00 10 40 100 0001 720X480 00 00 10 00 10 30 100 0001 Movie Move Exit MENU Select OK Play Mode Play All Play One Repeat One 1 Movie Move Exit Select Play Mode Play All Play One Repeat One 1 720X480 00 00 00 00 10 40 100 0001 720X480 00 00 10 00 10 30 100 0001 Movie M...

Страница 58: ...ct an option and then press the Joystick OK Lock Locks the selected movie file using the Joystick OK Multi Select Multiple movie files can be selected using the Joystick OK indicator appears on the selected files Press the PLAY button to lock Lock All All movie files are locked Unlock All Unlocking all movie files Notes The icon is displayed on the locked file While the menu screen is displayed pr...

Страница 59: ...movie files can be selected using the Joystick OK indicator appears on the selected files Press the PLAY button to copy All Cancel copying movie file Notes The Sports Cam copies from the currently used memory to another If the internal memory was used it copies to a memory card If the memory card is not inserted you cannot perform the Copy To function While the menu screen is displayed pressing th...

Страница 60: ...cklight Compensation 68 Setting the Digital Zoom 69 Setting the Viewing Options 70 Deleting Photo Files 70 Setting the Slide show 71 Setting the DPOF Digital Print Order Format Function 72 Locking Photo Files 73 Copying Photo Files 74 Save important data recordings separately on other media to avoid accidental loss due to a system failure or other reasons How to set to Photo mode How to set to Pho...

Страница 61: ...corder to prevent battery power consumption Notes If the battery is low the flash will not operate automatically In order to take pictures on the memory card insert a memory card and then set the storage type to External page 97 3 S S Capturing Sepia 12 00AM 2006 01 01 S S S S Sepia 12 00AM 2006 01 01 Capturing 2 S S S S Capturing Sepia 12 00AM 2006 01 01 S S Sepia 12 00AM 2006 01 01 Capturing 1 S...

Страница 62: ...6 01 01 W T 1X 10X S 100 Sepia 12 00AM 2006 01 01 S W T 1X 10X Sepia 12 00AM 2006 01 01 S S W T 1X 1X 10X 10X Sepia 12 00AM 2006 01 01 W T 1X 10X S S 100 Sepia 12 00AM 2006 01 01 S W T 1X 10X Sepia 12 00AM 2006 01 01 S W T 1X 10X Sepia 12 00AM 2006 01 01 W T 1X 1X 10X 10X Zoom In Zoom Out Slide the W T switch up to zoom out The shot subject s size is reduced and you can take a picture as if you we...

Страница 63: ...he message No Files appears Moving the Joystick right at the last photo will move to the first photo Moving the Joystick left at the first photo will move to the last photo Moving the Joystick left right for more than 1 second will start fast search While the menu screen is displayed pressing the Record Stop button will move to Photo Capture mode 2 1 3 100 Sepia 12 00AM 2006 01 01 01 Sepia 12 00AM...

Страница 64: ... to View 5 Press PLAY button or Joystick OK to view the photo file you want The full screen is displayed Notes If there is no file stored to view the message No Files appears Display time may vary depending on the picture size The image edited or turned in Image Viewer program on your PC may not be displayed 2 3 4 100 720X480 S S 12 00AM 2006 01 01 01 Sepia 01 Move View 100 0001 100 0001 Capturing...

Страница 65: ... select White Balance 4 Move the Joystick up down to select an option and then press the Joystick OK To set Custom frame your Sports Camcorder on a white area such as a wall filling the LCD monitor with white color Press the Joystick OK to set 5 Press the MENU button to exit the menu The selected function icon is displayed If Auto is selected no icon will be displayed Notes When taking pictures ou...

Страница 66: ...rogram AE allows allows you to adjust the aperture setting to suit different conditions 1 Press the POWER button to turn on the Sports Camcorder The Movie Record screen appears 2 Set the Photo mode by pressing the MODE button The Photo Capture screen appears 3 Press the MENU button Move the Joystick left right to select Program AE 4 Move the Joystick up down to select an option and then press the ...

Страница 67: ...3 Press the MENU button Move the Joystick left right to select Effect 4 Move the Joystick up down to select an option and then press the Joystick OK 5 Press the MENU button to exit the menu The selected effect and icon are displayed If you select Off no icon is displayed Note While the menu screen is displayed pressing the Record Stop button will move to Photo Capture mode 2 Mirror 100 S S S S Cap...

Страница 68: ...ss the POWER button to turn on the Sports Camcorder The Movie Record screen appears 2 Set the Photo mode by pressing the MODE button The Photo Capture screen appears 3 Press the MENU button Move the Joystick left right to select Flash 4 Move the Joystick up down to select an option and then press the Joystick OK On Flash will go on Auto Flash will be set automatically according to lighting conditi...

Страница 69: ... button to turn on the Sports Camcorder The Movie Record screen appears 2 Set the Photo mode by pressing the MODE button The Photo Capture screen appears 3 Press the MENU button Move the Joystick left right to select Continuous Shot 4 Move the Joystick up down to select an option and then press the Joystick OK Off Disables Continuous Shot and takes one photo at a time 3 shots Enables Continuous sh...

Страница 70: ...Capturing with zooming Capturing small objects Capturing while walking or moving Capturing through the window in moving vehicle 1 Press the POWER button to turn on the Sports Camcorder The Movie Record screen appears 2 Set the Photo mode by pressing the MODE button The Photo Capture screen appears 3 Press the MENU button Move the Joystick left right to select EIS 4 Move the Joystick up down to sel...

Страница 71: ...ture mode 100 S S S S 100 Capturing Sepia 12 00AM 2006 01 01 Capturing Sepia 12 00AM 2006 01 01 Photo Move Exit MENU Select OK Focus MF AF Photo Move Exit Select Focus MF AF 100 S S S S 100 Capturing Sepia 12 00AM 2006 01 01 Capturing Sepia 12 00AM 2006 01 01 Photo Move Exit Select Focus MF AF Photo Move Exit MENU Select OK Focus MF AF 100 S S S S S S 100 Capturing Sepia 12 00AM 2006 01 01 Capturi...

Страница 72: ...n when using the Sports Camcorder in the bright backgrounds including snow scenes 1 Press the POWER button to turn on the Sports Camcorder The Movie Record screen appears 2 Set the Photo mode by pressing the MODE button The Photo Capture screen appears 3 Press the MENU button Move the Joystick left right to select BLC 4 Move the Joystick up down to select an option and then press the Joystick OK O...

Страница 73: ...y produce a grainy picture 1 Press the POWER button to turn on the Sports Camcorder The Movie Record screen appears 2 Set the Photo mode by pressing the MODE button The Photo Capture screen appears 3 Press the MENU button Move the Joystick left right to select Digital Zoom 4 Move the Joystick up down to select an option and then press the Joystick OK On Enables digital zoom Attempts to zoom in mor...

Страница 74: ...y moving the Joystick up down and then press the Joystick OK OK Deletes the selected photo file using the Joystick OK Cancel Cancels the deletion 6 Press the MENU button to exit the menu 4 Slide the W T switch to W WIDE The screen switches to multi view 5 Press the DELETE button on the LCD monitor 6 Select an option by moving the Joystick up down and then press the Joystick OK OK Deletes the selec...

Страница 75: ...he slide show press the Joystick OK Notes The interval between photos may vary depending on the size of the photo Slide show starts from the current photo displayed Slide show cannot start from a damaged photo file Damaged photos wiill be skipped during the slide show While the menu screen is displayed pressing the Record Stop button will move to Photo Capture mode 5 7 Sepia 01 100 0001 Sepia 01 1...

Страница 76: ...T switch to W WIDE The screen switches to multi view 6 Press the MENU button Move the Joystick left right to select DPOF 7 Select an option by moving the Joystick up down and then press the Joystick OK Copies Move the Joystick up down to select the number of copies you want to print and press the Joystick OK copy range 0 30 Set All All photo files will be marked with DPOF printing Reset All All ph...

Страница 77: ...right to select Lock 6 Select an option by moving the Joystick up down and then press the Joystick OK Lock Locks the selected photo file using the Joystick OK Multi Select Multiple photo files can be selected using the Joystick OK indicator appears on the selected files Lock All All photo files are locked Unlock All Unlocking all photo files Notes The icon is displayed on the locked file While the...

Страница 78: ...tes The Sports Cam copies from the currently used memory to another If the internal memory was used it copies to a memory card If the memory card is not inserted you cannot perform the Copy To function While the menu screen is displayed pressing the Record Stop button will move to Photo Capture mode Copying Photo Files in Full Screen View Copying Photo Files in Multi View 4 5 Sepia 01 100 0001 OK ...

Страница 79: ...lizer 80 Locking MP3 Files 81 Copying MP3 Files 82 Save important data recordings separately on other media to avoid accidental loss due to a system failure or other reasons How to set to MP3 mode How to set to MP3 mode MP3 2 Set the MP3 mode by pressing the MODE button MENU MODE DC IN HOLD Power button 1 Press the POWER button to turn on the Sports Camcorder ENGLISH SC X205 00994A 058 075 2006 1 ...

Отзывы: