background image

English 

_75

TRANSFERRING FILES FROM THE MEMORY CAMCORDER TO YOUR PC

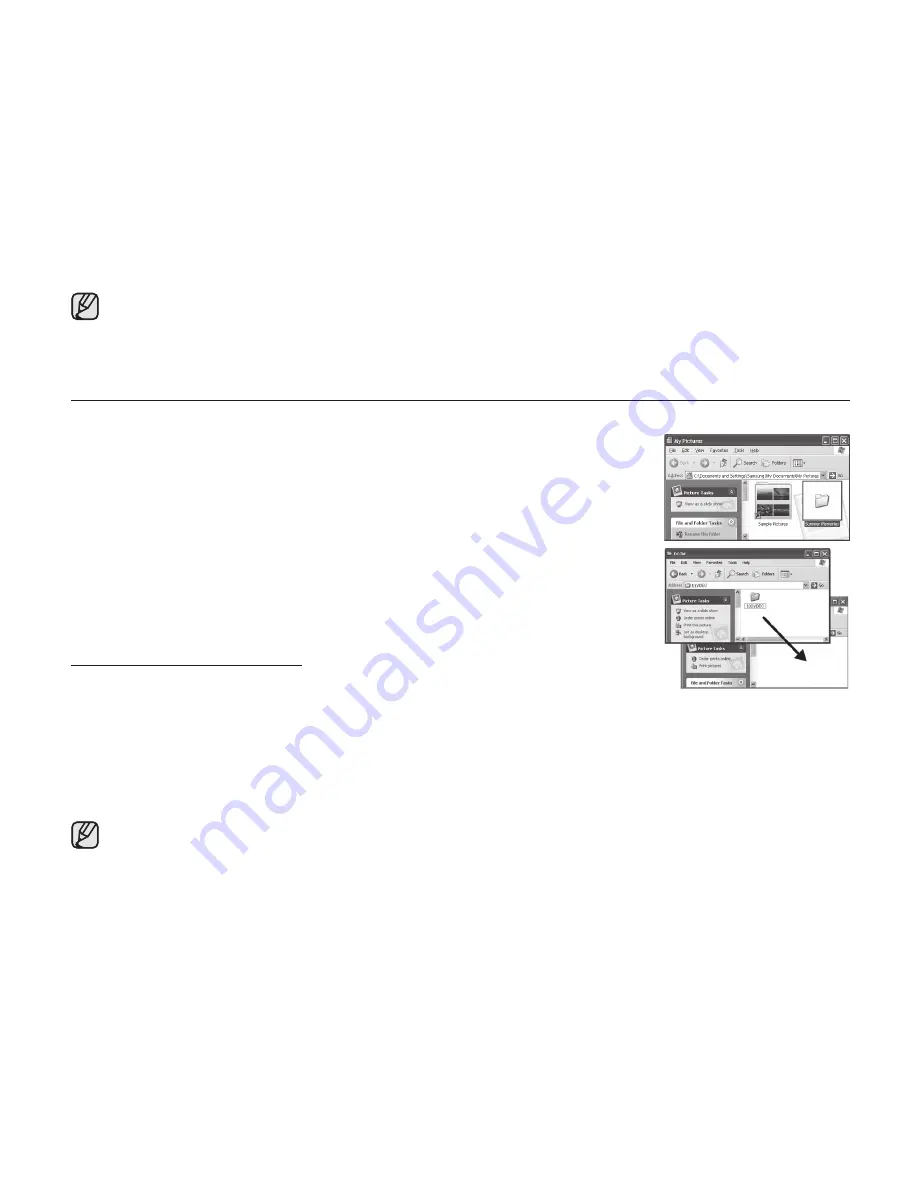
You can copy the movie images to your PC.

1.

  Execute the procedure in 

"

Viewing the contents of storage media.

"


page 74


The folders in the storage media appear.

2.

  Create a new folder, enter the folder name, and then double-click it.

3.

  Select the folder to copy, and then drag and drop it into the destination folder.

 The folder is copied from the storage media (memory card (all models) or internal  

memory (SC-MX10A/MX10AU) to the PC.

 Saving the wrong kinds of files in a recording medium or deleting files or folders  

from a recording medium can cause problems with the operation of the memory  

camcorder. When it is necessary to delete a file from a storage media (memory card  

(all models) or internal memory (SC-MX10A/MX10AU), delete it through the memory  

camcorder. Also, do not move or rename folders and files within the medium on PC.

Playing Back Files on the PC

Movie  Images 

Use the "DV Media Pro".

-  You can install this software from the provided CD. 

 For more details of "Video Codec". 

page 71


When 999 folders and 9,999 files are recorded, you cannot record any more.  

In this case, format your storage media. (memory card, etc.)

 You may modify the name of a file/folder stored in the memory card using a PC.  

This memory camcorder may not recognize modified files.


When playing back a file in the recording medium on your PC, copy the file to your PC, and then play it back.  

If video file is played back directly from recording medium (i.e. the memory camcorder is connected 

through USB to your PC), it may be not played back properly due to the inadequate processing speeds or 

other problems.

Содержание SC-MX10

Страница 1: ... user manual SC MX10 SC MX10P SC MX10A SC MX10AU imagine the possibilities Thank you for purchasing this Samsung product To receive more complete service please register your product at www samsung com global register ...

Страница 2: ...xels You can see the bigger picture by enlarging the 4 3 aspect ratio into 16 9 wide screen with the 2 7 wide 16 9 LCD screen The 112K pixel LCD monitor rotates up to 270 degrees for flexible viewing angles and provides sharp detailed image for monitoring and playback Capture Visions Farther Than The Eye Can See 34x Optical 1200x Digital Zoom Samsung s powerful optical zoom lenses bring the world ...

Страница 3: ...movies on your PC page 75 PC Cam for multi entertaining Connect the memory camcorder to a PC via a USB 2 0 cable and instantly communicate via live video with business associates friends and family wherever you are Versatile 16 9 Wide 4 3 Display option You can easily select the display option when recording or playback 16 9 Wide 4 3 Samsung s 16 9 Wide display option lets you monitor more widely ...

Страница 4: ...afety instructions CAUTION RISK OF ELECTRIC SHOCK DO NOT OPEN CAUTION TO REDUCE THE RISK OF ELECTRIC SHOCK DO NOT REMOVE COVER OR BACK NO USER SERVICEABLE PARTS INSIDE REFER SERVICING TO QUALIFIED SERVICE PERSONNEL Warning To Reduce The Risk Of Fire Or Electric Shock Do Not Expose This Apparatus To Rain Or Moisture Caution Apparatus shall not be exposed to dripping or splashing and no objects fill...

Страница 5: ...ipod bracket or table specified by the manufacturer or sold with the apparatus When a cart is used use caution when moving the cart apparatus combination to avoid injury from tip over 13 Unplug this apparatus during lightning storms or when unused for long periods of time 14 Refer all servicing to qualified service personnel Servicing is required when the apparatus has been damaged in any way such...

Страница 6: ... of the polarized plug 19 POWER CORD PROTECTION Power supply cords should be routed so that they are not likely to be walked on or pinched by items placed upon or against them paying particular attention to cords or plugs convenient receptacles and the point where they exit from the unit 20 OUTDOOR ANTENNA GROUNDING CAMCORDER be sure the antenna or cable system is grounded to provide some protecti...

Страница 7: ...AMCORDER from the wall outlet and refer servicing to qualified service personnel under the following conditions a When the power supply cord or plug is damaged b If any liquid has been spilled onto or objects have fallen into the CAMCORDER c If the CAMCORDER has been exposed to rain or water d If the CAMCORDER does not operate normally by following the operating instructions adjust only those cont...

Страница 8: ...d and used in accordance with the instructions may cause harmful interference to radio communications However there is no guarantee that interference will not occur in a particular installation If this equipment does cause harmful interference to radio or television reception which can be determined by turning the equipment off and on the user is encouraged to try to correct the interference by on...

Страница 9: ...ding connection Caution Danger of explosion if battery is incorrectly replaced Replace only with the same or equivalent type If this power supply is used at 240V ac a suitable plug adaptor should be used CLASS 1 LASER PRODUCT KLASSE 1 LASER PRODUKT LUOKAN 1 LASER LAITE KLASS 1 LASER APPARAT PRODUCTO LASER CLASE 1 ...

Страница 10: ... handling this memory camcorder or memory card etc Samsung shall not be responsible for compensation for damages due to the loss of recorded contents Make a backup of important recorded data Protect your important recorded data by copying the files to a PC We also recommend you copy it from your PC to other recording media for storage Refer to the software installation and USB connection guide Cop...

Страница 11: ...he current technology and does not indicate a fault that will interfere with recording The LCD screen will be slightly dimmer than usual when the camcorder is at low temperature as in cold areas or right after the power is turned on Normal brightness will be restored when the temperature inside the camcorder rises This has no effect on the images in the storage media so there is no cause for conce...

Страница 12: ...a malfunction Do not use the memory camcorder near TV or radio This could cause noise to appear on the TV screen or in radio broadcasts Do not use the memory camcorder near strong radio waves or magnetism If the memory camcorder is used near strong radio waves or magnetism such as near a radio transmitter or electric appliances noise could enter video and audio that are being recorded During playb...

Страница 13: ...o not use the memory camcorder near corrosive gas If the memory camcorder is used in a place where there is dense exhaust gas generated by gasoline or diesel engines or corrosive gas such as hydrogen sulfide the external or internal terminals could corrode disabling normal operation or the battery connection terminals could corrode so that power will not turn on Do not use the memory camcorder nea...

Страница 14: ... see on the LCD screen Designs and specifications of storage media and other accessories are subject to change without any notice NOTES REGARDING A TRADEMARK All the trade names and registered trademarks mentioned in this manual or other documentation provided with your Samsung product are trademarks or registered trademarks of their respective holders Windows is registered trademark or trademark ...

Страница 15: ...en indicators 25 Turning the screen indicators on off 26 Using the LCD enhancer 27 Adjusting the LCD screen 27 Using the MENU button 28 Using the Control buttons 29 Shortcut menu OK Guide 30 Initial setting OSD Language date and time 32 Selecting the storage media SC MX10A MX10AU only 33 Inserting ejecting the memory card 34 Selecting the suitable memory card 36 Recordable time and capacity 38 Rec...

Страница 16: ...lution 56 Digital Zoom 57 Setting the play option 58 Deleting movie images 59 Protecting movie images 60 Copying movie images SC MX10A MX10AU only 61 16 9 Wide 61 File Information 62 Changing the menu settings in Settings 63 Setting menu items 64 Date Time set 64 Date format 64 Time format 64 Date Time 65 LCD Brightness 65 LCD color 65 Auto Power Off 66 Beep Sound recording options play back optio...

Страница 17: ...Default set 68 Version 68 Language 68 USB Connect 68 Demo 69 System requirements 71 Installing the software 73 Connecting the USB cable 74 Viewing the contents of storage media 75 Transferring files from the memory camcorder to your PC 76 Using the PC Cam function 77 Viewing on TV Screen 78 Recording Dubbing Images on Other Video Devices 79 Maintenance 80 Additional information 81 Troubleshooting ...

Страница 18: ...cting a power source page 12 Check out the storage media page 32 Setting the Date Time and OSD Language page 30 Preparation Step1 Recording Recording the movie page 38 Step2 Playing back Selecting an image to play back from the thumbnail index views page 42 Viewing playback from your camcorder on your PC or TV page 73 77 Playing back Step3 1 2 06_English ...

Страница 19: ...s and accessories are available at your local Samsung dealer The Cradle is not supplied with your camcorder To buy this optional accessory contact your nearest Samsung dealer Battery pack IA BP85ST AD43 00180A AC power adapter AA E9 type AD44 00116A Multi AV cable AD39 00119D USB cable AD39 00132A Software CD AD46 00093B AD46 00097A User manual AD68 01307A Button type battery type CR2025 AD43 1013...

Страница 20: ...D screen Internal microphone Built in speaker MENU button button OK button LCD ENHANCER button Control button Zoom lever W T Recording start stop button 5 4 1 2 3 6 9 8 7 10 11 getting to know your memory camcorder 9 10 11 08_English 6 3 ...

Страница 21: ...V Grip belt USB jack USB Swivel Hand grip DC IN jack DC IN Grip belt hook EASY Q button Tripod receptacle Charging indicator CHG Cradle receptacle POWER switch Memory card Battery slot cover MODE button Button type battery slot 5 4 1 2 3 6 1 15 10 12 13 7 9 8 10 12 11 13 8 14 16 15 14 7 S 11 16 English_0 ...

Страница 22: ... camcorder up to the base of your thumb Put your hand in a position where you can easily operate the Recording start stop button and the Zoom lever Adjust the length of grip belt so that the memory camcorder is stable when you press the Recording start stop button with your thumb 1 Detach the belt 2 Adjust the length of grip belt 3 Attach the belt Angle Adjustment Rotate the swivel hand grip at th...

Страница 23: ...cap 2 Attach the string to the attachment hole of memory camcorder Detaching the grip belt makes things easier 3 Push both sides of cap inward and attach it over the lens Using the cradle optional accessory The Cradle is a connection plate which can be used to make the camcorder more stable when charging the battery or connecting to a TV or a PC DC IN jack Multi cable jack USB jack Cradle receptac...

Страница 24: ...tery packs to allow continuous use of your memory camcorder Inserting the battery pack 1 Slide and open the battery slot cover as shown in the figure 2 Insert the battery pack into the battery slot until it softly clicks Make sure that the SAMSUNG logo is facing up and the camcorder is placed as shown in the figure 3 Slide and close the battery slot cover Ejecting the battery pack 1 Slide and open...

Страница 25: ...nd conditions vary the remaining battery time may differ from the approximate continuous recording times given in the instructions On handling a battery pack To preserve battery power keep your memory camcorder turned off when you are not operating it For power saving purposes the memory camcorder automatically turns off after 5 minutes in standby mode Only if you set Auto Power Off from the menu ...

Страница 26: ...he internal cells The battery pack may be prone to leakage when fully discharged Remove the battery from the camcorder when it is not in use Even when the power is switched off the battery pack will still discharge if it is left attached to the memory camcorder When not using the memory camcorder for an extended period It is recommended that you fully charge the battery pack once a year attach it ...

Страница 27: ...msung s test environment and may differ from your actual use Continuous Recording without zoom The continuous recording time of memory camcorder in the table shows the available recording time when the memory camcorder is in the recording mode without using any other functions In actual recording the battery pack may discharge 2 3 times faster than this reference since the record start stop and zo...

Страница 28: ... 2 3 seconds to display the remaining battery capacity Press the button again or any other button to return to the initial OSD while the battery information is displayed When the battery is installed and the AC adapter is connected if you press button the remaining battery capacity is displayed When the AC adapter alone is connected pressing the button will display No Battery message 154 Min Batte...

Страница 29: ...e battery pack Battery Level Indicator State Message Fully charged 20 40 used 40 60 used 60 80 used 80 95 used Exhausted flickers The device will soon turn off Change the Battery Pack as soon as possible flickers The device will be forced to turn off after 5 seconds Low battery STBY 00 00 00 00 58 00 120 MIN ...

Страница 30: ...charging 6 When the battery pack is fully charged disconnect the AC power adapter from the memory camcorder Do not use the AC adaptor placed in a narrow space such as between a wall and furniture Before detaching the power source make sure that the camcorder s power is turned off Failure to do so can result in camcorder malfunction Use a nearby wall outlet when using the AC power adaptor Disconnec...

Страница 31: ...mcorder with AC power adaptor It is recommended that you use the AC power adaptor to power the memory camcorder from a household AC outlet when you perform settings on it play back or use it indoors Make the same connections as you do when charging the battery pack page 18 Be sure to use the provided AC power adaptor to power the memory camcorder Using other AC power adaptors could cause electric ...

Страница 32: ...ns regarding the button type battery There is a danger of explosion if button type battery is incorrectly replaced Replace only with the same or equivalent type Battery installation for the internal clock The button type battery for the memory camcorder lasts about 6 months under normal operation from the time of installation When the button type battery becomes weak or dead the date time indicato...

Страница 33: ...ff Setting the operating modes You can switch the operating mode in the following order each time you press the MODE button Movie Record mode Movie Play mode Movie Record mode Each time the operational mode changes the respective mode indicator lights up Movie Record mode To record movie images Movie Play mode To play movie images Power saving function In the setting at the time of purchase the po...

Страница 34: ...om Date Time White balance Scene Mode AE Exposure Manual Video quality Resolution 1 2 3 4 5 6 7 8 9 10 11 12 13 14 15 16 The above screen is an example for explanation The displays in this user manual may not be exactly the same as those you see on the LCD screen The OSD indicators are based on memory capacity of 2GB MMC plus Functions marked with won t be kept when the memory camcorder is shut do...

Страница 35: ...ovie Record mode Shortcut menu OK Guide 2 3 4 5 Movie Play mode Menu name Delete Protect Copy Protect File Name Storage media Built in memory SC MX10A MX10AU only or memory card Battery info Remaining battery level time Copy Selected SC MX10A MX10AU only Scroll bar Button Guide Delete Selected Movie Play mode 1 2 3 4 5 6 7 8 9 10 5 4 3 2 WB 120 MIN Move OK 100 0001 Play Delete 1 2 4 3 10 9 8 7 5 6...

Страница 36: ...ng battery level time LCD Enhancer Protect File Name Date Time Volume Play Option Resolution Movie Play mode 1 2 3 4 5 6 7 8 9 10 11 12 FF fast forward Volume Down Button Guide Play Pause REW rewind Volume Up Movie Play mode Shortcut menu OK Guide 1 2 3 4 5 6 00 00 00 00 23 00 100 0001 List ZOOM 120 MIN 00 00 00 00 23 00 100 0001 2007 01 01 12 00AM 120 MIN 1 2 3 5 6 7 8 11 9 10 12 4 1 3 6 5 4 2 ...

Страница 37: ...ery and memory capacity When the camcorder is turned off battery is installed press and release the button to display the remaining capacity of the battery capacity When the camcorder is turned on battery is installed press and hold the button for more than 2 3 seconds to display the remaining battery capacity The approximate recordable time in the selected storage Internal Memory or Memory Card a...

Страница 38: ...e Settings USB Sub mode STBY Mode While Recording Play single view Play thumbnail view Demo Mode PC Camera Mass Storage Time 10 min None None 10 min None 60 sec 60 sec 60 sec LCD ENHANCER function does not affect the quality of the image being recorded LCD POWER SAVING FUNCTION The LCD screen is turned off after a certain period of time has passed see below in each mode in order to prevent unneces...

Страница 39: ...he LCD screen Over rotation may cause damage to the inside of the hinge that connects the LCD screen to the memory camcorder Do not lift the memory camcorder with holding the LCD screen It can be a cause of sudden fall WARNING USING THE MENU BUTTON 1 Set the desired mode by pressing the MODE button 2 Press the MENU button 3 Move the cursor by pressing the Control button to select desired menu item...

Страница 40: ...tton Movie Record mode Movie Play mode Menu selection OK Access the Shortcut menu Playback Pause Confirms selection Zoom wide Increases the volume Moves the cursor up Zoom tele Decreases the volume Moves the cursor down Search playback RPS Reverse Playback Search rate x2 x4 x8 x16 x32 x64 Skip Playback Moves to the previous menu Search playback FPS Forward Playback Search rate x2 x4 x8 x16 x32 x64...

Страница 41: ...shortcut menu Shortcut function using the Control buttons Button Movie Record mode Movie Play mode OK Access the shortcut menu Confirm selection Exit the shortcut menu Shortcut menu OK guide is displayed Playback Pause Exposure Auto Manual lncreases the volume Focus Auto Manual Decreases the volume White Balance Auto Custom WB Search playback RPS Reverse Playback Search rate x2 x4 x8 x16 x32 x64 S...

Страница 42: ...ress the MENU button 3 Press the Control button to select Settings 4 Press the OK button The settings menu screen appears Selecting the OSD language You can select the desired language to display the menu screen and the messages 1 Set the Settings mode The settings menu screen appears Refer to How to set the settings mode for accessing to Settings mode 2 Press the Control button to select Language...

Страница 43: ...and AM PM 5 After setting the last item press the OK button to finish the setting Press the MENU button to exit the menu You can set the year up to 2037 After setting the date and time are automatically recorded on a special data area of the storage media The button type battery maintains the clock function and preset contents of the memory even if the battery pack or AC power adapter is removed T...

Страница 44: ... Selecting the storage media SC MX10A MX10AU only Selecting the recording medium is available in the Movie record Movie Play modes Movie images can be stored and played back using the built in memory or a memory card Set the memory type before recording and playing back images Memory Card Memory Type Move OK Select 120 MIN Settings MENU Exit SELECTING THE STORAGE MEDIA SC MX10A MX10AU ONLY You can...

Страница 45: ... to pop it out 4 Pull the memory card out of the memory card slot and close the cover If you insert a memory card when the memory camcorder is on the pop up message will prompt you automatically to select the storage type If there is no memory card inserted only the built in memory will be available label pasting portion Using the built in memory SC MX10A MX10AU only This memory camcorder has an e...

Страница 46: ...HC memory card supports a mechanical write protection switch Setting the switch prevents accidental erasure of files recorded on the SDHC memory card To enable writing move the switch up to the direction of terminals To set write protection move the switch down Due to change In File Allocation System and physical specifications SDHC memory card can not be used with current SD enabled host devices ...

Страница 47: ...ard out of the reach of children who might swallow it The memory camcorder supports SDHC and MMCplus memory cards for data storage The data storage speed may differ according to the manufacturer and production system SLC single level cell system faster write speed enabled MLC multi level cell system only lower write speed supported The user using a lower write speed memory card for recording a mov...

Страница 48: ... 112min approx 256min approx 170min approx 512min approx 256min 1GB 1 000 000 000bytes actual formatted capacity may be less as the internal firmware uses a portion of the memory 240p 480i 480p refer to resolutions the camcorder will record at The above figures are measured under Samsung s standard recording test conditions and may differ depending on actual use The memory camcorder provides three...

Страница 49: ...lity Fine Normal or set the movie size to 352p Memory cards of bigger than 8GB in capacity may not work properly The memory card that is used to store a movie can cause unwritable area which may result in reduced recording time and free memory space The maximum size of a movie MPEG4 file that can be recorded at one time is 2GB You can store up to 5000 movie images on a memory card Movie image file...

Страница 50: ... memory card 2 Check the subject on the LCD screen 3 Press the Recording start stop button The recording indicator will display and recording will start Pressing the Recording start stop button again during recording will set the memory camcorder to recording pause mode 4 When recording is finished turn the memory camcorder off 00 00 00 00 58 00 120 MIN Recording STBY 00 00 30 00 57 30 120 MIN Set...

Страница 51: ... Take care that this microphone is not blocked While recording don t insert or eject the memory card as it may record noise SC MX10A MX10AU only Do not operate the power switch or remove the memory card while accessing the storage media Doing so may damage the storage media or the data on storage media Before recording an important movie make sure to test on the recording function to check if ther...

Страница 52: ...Shake EIS indicator appear on the screen at the same time 4 To record movie images press the Recording start stop button Recording will begin using the basic automatic settings To cancel EASY Q mode Press the EASY Q button again The EASY Q and Anti Shake EIS indicators disappear from the screen Unavailable buttons during operation The following button and menu operations are unavailable because th...

Страница 53: ...e movie quality but during digital zoom the image quality may suffer ZOOMING Use the zoom function for close up or wide angle recording This memory camcorder allows you to record using optical 34x power zoom and 1200x digital zoom You can zoom with the Zoom lever or the zoom W T button on the LCD panel The further you slide the Zoom lever the quicker the zoom action To zoom in Slide the Zoom lever...

Страница 54: ...mode The recorded movie images are displayed in thumbnail index view 4 Use the Control button to select the desired movie images and the press the OK button Shortcut menu for playback will be displayed for a while Each time you press the OK button play or pause is toggled If you move the zoom lever during playback the camcorder switches to thumbnail index view Move OK 100 0001 Play 00 00 00 00 23 ...

Страница 55: ...ta to be played back it may take some time for the playback images to appear Image data edited on PC or certain types of image data may not be displayed on this memory camcorder Image data recorded on another camcorder may not be playable on this memory camcorder You can also play movie images on a TV screen by connecting the memory camcorder to a TV page 77 A video codec is required to play the r...

Страница 56: ...tton to locate the start point of next file Pressing the Control button repeatedly skips files in forward direction During playback press the Control button to locate the start point of the current file pressing the Control button repeatedly skips files in reverse direction Press the Control button within 3 seconds from the start point it skips to the first image of the previous file Frame by fram...

Страница 57: ...screen by following the steps below then change the various settings 1 Slide POWER switch downward to turn the memory camcorder on 2 Select the operation mode For Movie Record Menus Press MODE button to set Record For Movie Play Menus Press MODE button to set Play 3 Press MENU button The menu screen appears 4 Select the desired sub menu and menu item with the Control buttons and the OK button To r...

Страница 58: ...lect White Balance 5 Select the desired sub menu item with the Control button and then press the OK button 6 Press MENU button to exit the menu The selected item is applied and the indicator is displayed In Auto mode the item indicator may not displayed on the screen While the menu screen is displayed pressing the Recording start stop button will move to Movie Record mode You can also change the m...

Страница 59: ...ult value Page Scene Mode AE Auto 48 White Balance Auto 49 Exposure Auto 50 Anti Shake EIS Off 51 Digital Effect Off 52 Focus Auto 53 Back Light Off 54 16 9 Wide On 55 Quality Super Fine 55 Resolution 720x480i 56 Digital Zoom Off 56 Menu items in Movie Play Items Default value Page Play Option Play All 57 Delete OK 58 Protect On 59 Copy SC MX10A MX10AU only 60 16 9 Wide On 61 File Info OK 61 ...

Страница 60: ...itions The shutter speed is automatically adjusted from 1 60 to 1 250 per second depending on the scene None Sports Reduces blurring when recording rapidly moving subjects such as in golf or tennis If the Sports mode is used under a fluorescent light the image may flicker In this case use the Auto mode for recording Portrait Creates a shallow depth of field so that the person or subject appears ag...

Страница 61: ...you make a recording under white fluorescent lights Tungsten This option is used when the surroundings are less than 3200K of tungsten light Custom WB You can manually adjust white balance to match the light source or situation Setting the white balance manually 1 Select Custom WB The indicator and the message Set White Balance are displayed 2 Frame a white object such as a piece of paper so that ...

Страница 62: ...t exposure to manual the higher the exposure the brighter the recorded picture will be A subject can be recorded under various types of lighting conditions indoors natural fluorescent candlelight etc Because the color temperature is different depending on the light source the subject tint will differ depending on the white balance settings Use this function for a more natural result The white bala...

Страница 63: ... entirely corrected even if Anti Shake EIS On is specified Firmly hold the memory camcorder with both hands It is recommended that you specify Anti Shake EIS Off when using the memory camcorder on a desk or tripod When you record pictures with 34x or more magnification and the Anti Shake EIS is On in dim places after images may stand out In this case we recommend using a tripod and turning the Ant...

Страница 64: ...m contents on screen display Off Disables the function None Black White Changes the images into Black and White Sepia This mode gives the images a reddish brown pigment Negative Reverses the colors creating the look of a negative Art Adds artistic effects to your movie file Mosaic A mosaic overlay appears on your movie file Mirror This mode cuts the image in half using a Mirror effect The digital ...

Страница 65: ... lever to zoom in on subject 3 Press the Control button to adjust the focus while viewing the subject on the LCD screen Focusing on a further subject To focus on a further subject press the Control button Focusing in a nearer subject To focus on a nearer subject press the Control button The focus also can be set in the shortcut menu page 29 EASY Q mode automatically sets the Focus to Auto Be sure ...

Страница 66: ...tion is executed Backlight compensation brightens the subject quickly Back lighting influences recording when the subject is darker than the background The subject is in front of a window The subject is against a snowy background The subject is outdoors and the background is overcast The light sources are too bright The person to be recorded is wearing white or shiny clothes and is placed against ...

Страница 67: ... in the shortcut menu page 29 Please note that all movies recorded with this memory camcorder have 4 3 aspect ratio regardless of the display option 16 9 Wide 4 3 When it is set to 16 9 Wide the displayed picture may appear wider or rougher than that of 4 3 screen aspect ratio Quality You can select the quality of a movie to be recorded This memory camcorder can record in the SF super fine F fine ...

Страница 68: ...t is played back in smaller size than 720 720x480p on a PC You can also zoom with the zoom W T button on the LCD panel The image quality may deteriorate depending on how much you zoom in on the subject Maximum zooming may result in lower image quality Digital Zoom You can select the maximum zoom level in case you want to zoom to a level greater than 34x the default setting during recording Up to 3...

Страница 69: ... played Repeat All All movies will be played repeatedly Repeat One The selected movie will be played repeatedly 5 Press the MENU button to exit the menu During playback the selected item is applied While the menu or thumbnail image screen is displayed pressing the Recording start stop button will move to the Movie Record mode It operates identically in the full image display single image displayed...

Страница 70: ...on Then press the MENU button to delete The indicator is displayed on the selected movie images Pressing the OK button toggles between the movie image being selected for deletion indicator appears on image or not indicator is removed from image All Deletes all movie images 6 The pop up selection menu will appear depending on the selected menu item In this case select the desired item with the Cont...

Страница 71: ... by pressing the OK button Then press the MENU button to confirm The indicator is displayed on the selected movie thumbnail images Pressing the OK button toggles between the movie image being selected for protection indicator appears on image or not indicator is removed from image All On Protects all movie images from deletion All Off Cancels the protection for all movie images 6 The pop up select...

Страница 72: ...ages Multi Select Copies the individual selected movie images To copy individual movie images select desired movie images by pressing the OK button The indicator is displayed on the selected movie thumbnail images Press the MENU button to confirm Pressing the OK button toggles between the movie image being selected for copying indicator appears on image or not indicator is removed from image All C...

Страница 73: ...sh_61 OK Back 120 MIN 100 0004 Date 2007 01 01 Duration 00 00 01 Size 3 876 KB 100VIDEO SDV_0004 AVI 16 9 WIDE 16 9 Wide Move OK Select MENU Exit 120 MIN 100 0004 Off On OK File Info Move OK Select MENU Exit 120 MIN 100 0004 You can select the desired LCD display aspect ratio for recording or playback 16 9 Wide 4 3 aspect ratio item contents on screen display Off Disables the function Displays the...

Страница 74: ...o the normal screen press MENU button Even if the menu item is displayed some items cannot be set depending on the selected mode movie recording playback settings In this case the sub menu cannot be accessed or a setting cannot be changed Button Tips a MENU button Use it to enter or exit the menu b Control button Use it to move up down left right c OK button Use it to select or confirm the menu Th...

Страница 75: ... 64 Date Format YY MM DD 64 Time Format 12 Hr 64 Date Time Off 64 LCD Brightness 40 65 LCD Color 50 65 Auto Power Off Off 65 Beep Sound On 66 File No Series 66 Memory Type SC MX10A MX10AU only 66 Memory Info OK 67 Format OK 67 Default Set OK 68 Version 68 Language English 68 USB Connect Mass Storage 68 Demo Off 68 These Items and Default values may be changed without notice ...

Страница 76: ...format to display settings contents on screen display 12 Hr The time is displayed in 12 hour units 24 Hr The time is displayed in 24 hour units Date Time You can set the date and time to display on the LCD screen Before you use the Date Time function you must set the date time page 31 settings contents on screen display Off The date and time are not displayed None Date The date is displayed 2007 0...

Страница 77: ...the figures the brighter the LCD monitor will be Auto Power Off To save battery power you can set the Auto Power Off function which turns off the memory camcorder if there is no operation for a certain period of time settings contents on screen display Off Cancels the Auto Power Off function None 5 Min The memory camcorder automatically turns off when there is no operation for 5 min None The Auto ...

Страница 78: ...mes It is convenient when you want to manage your files on a PC Beep Sound You can set the beep sound to on off When on the beep sounds when any operation is performed settings contents on screen display Off Disables the function None On The beep sounds when operate the menu settings the power is turned on None Memory Type SC MX10A MX10AU only You can record movie images on the built in memory or ...

Страница 79: ...ents on screen display Memory Formats the built in storage media SC MX10A MX10AU only None Card Formats the memory card None WARNING Do not format the recording medium on the PC or a different device Make sure to format the recording medium on the memory camcorder Make sure to format the recording medium on the memory camcorder Do not remove the recording medium or perform any other operation such...

Страница 80: ...eb camera page 76 None Demo Demonstration automatically shows you the major features that are included with your memory camcorder so that you may use them more easily settings contents on screen display Off Disables the function None On Activates demonstration mode and shows various features on the LCD screen After it exit to the menu the demonstration is automatically operated Demonstration mode ...

Страница 81: ...ws 2000 High speed USB on a system with Service Pack 4 or later installed Windows XP High speed USB on a system with Service Pack 1 or later installed Windows Vista High speed USB on a system with Service Pack 1 or later installed System Requirements Windows operating systems CPU Intel Pentium 4 2GHz or higher or the equivalent Operating systems Windows 2000 XP Vista Standard installation is requi...

Страница 82: ... an unformatted memory card is inserted the PC will not recognize your memory camcorder as a removable disk If you disconnect the USB cable from the PC or the memory camcorder during the data transfer the data transfer will stop and the data may be damaged If you connect the USB cable to a PC using a USB HUB or with other devices at the same time it may cause conflict and may not work properly If ...

Страница 83: ...treaming driver USB video transfer 2 Click on Confirm to finish driver installation 3 If the DirectX 9 0 is not installed it is installed automatically after setting DV Driver After installing DirectX 9 0 PC needs to be restarted If DirectX 9 0 is installed already there is no need to restart the PC Application Installation Video Codec Click on Video Codec on the setup screen Video Codec is requir...

Страница 84: ...s automatically Follow the instruction to start installation This manual only refers to software installation and PC connection For more details on software refer to the Online help Readme on the CyberLink Power Director CD Please install by using the Software CD that came with this memory camcorder We do not guarantee compatibility with other CDs For movie playback on a PC install software in thi...

Страница 85: ...ass Storage Device or USB Disk and then click Stop 3 Click OK 4 Disconnect the USB cable from the memory camcorder and PC If you disconnect the USB cable from the PC or the memory camcorder while transferring the data transmission will stop and the data may be damaged If you connect the USB cable to a PC via a USB HUB or simultaneously connect the USB cable along with other USB devices the memory ...

Страница 86: ...mcorder appears in the My Computer window b Doubleclick the Removable Disk icon 4 The folders in the storage media appear Different file types are stored in different folders If the Removable Disk window does not appear confirm the connection or perform the steps 1 and 2 Structure of folders and files on the storage media The folder and file structure for built in memory or memory card is as follo...

Страница 87: ... media memory card all models or internal memory SC MX10A MX10AU delete it through the memory camcorder Also do not move or rename folders and files within the medium on PC Playing Back Files on the PC Movie Images Use the DV Media Pro You can install this software from the provided CD For more details of Video Codec page 71 When 999 folders and 9 999 files are recorded you cannot record any more ...

Страница 88: ...dvantage of the PC Cam function Refer to respective product documentation for further details When finished disconnect the USB cable We recommended using the AC Power Adapter during data transfer to avoid unintended power outages When the USB port connection is changed it may require DV Driver re installation page 71 If you connect more than two USB devices to a single PC or use a hub for USB conn...

Страница 89: ...3 Perform playback You can perform playback recording or make settings in the menu while viewing on your TV screen Before connecting make sure that the volume on TV is turned down forgetting this may cause feedback from the TV speakers Carefully connect the input and output cables to the corresponding connections on the device the memory camcorder is being used with When a copy protected movie is ...

Страница 90: ...nother video device as shown in the following figure 1 Press the MODE button to set Player page 21 2 Choose the recorded dubbed movie on the thumbnail view and then press the OK button 3 Press the record button on the connected device The memory camcorder will start playback and the recording device will record dub it Using S VIDEO will deliver clearer images Be sure to use the AC adaptor to power...

Страница 91: ...o not store the memory camcorder in a place where the humidity is high or in a dusty place Dust entering the memory camcorder could cause malfunctions If humidity is high the lens could become moldy and the memory camcorder could become inoperative It is recommended that you put the memory camcorder in a box together with a desiccant when storing it in a closet etc Do not store the memory camcorde...

Страница 92: ...sing the AC power adaptor supplied with your camcorder within the AC 100 V to 240 V 50 60 Hz range Use a commercially available AC plug adaptor if necessary depending on the design of the wall outlet About TV color systems Your camcorder is an NTSC system based camcorder If you want to view your recordings on a TV or to copy it to an external device it must be an NTSC system based TV or an externa...

Страница 93: ...call Warning indicators and messages Power source Message Informs that Action Low Battery The battery pack is almost discharged Change to a charged one or use AC adaptor Charge the battery pack Auto Power Off If no button is pressed for about 5 minutes the memory camcorder is automatically turned off Auto Power Off To disable this option change the setting of Auto Power Off to Off page 65 ...

Страница 94: ...ace to record on memory card Delete unnecessary files on the memory card Use the built in memory SC MX10A MX10AU Card Error The memory card is corrupted Format the memory card or replace it with a new one Not Supported Card The memory card is not supported in this camcorder Change the memory card that we recommended Editing files Message Informs that Action Not Formatted The memory card is not for...

Страница 95: ...urn the power off and detach the battery pack and leave it in a dry area for 1 2 hours before using it When does the dew condensation occur When the device is relocated to a place with a higher temperature than the previous location or when using it in a hot area suddenly it will cause condensation When recording outside in cold weather during the winter and then using it in indoors When recording...

Страница 96: ...corder has been left for more than 5 minutes without any button operation To turn on your memory camcorder press the Record start stop button Is Auto Power Off set to On If no button is pressed for about 5 minutes the memory camcorder is automatically turned off Auto Power Off To disable this option change the setting of Auto Power Off to Off page 65 The battery pack is almost discharged Charge th...

Страница 97: ...screen This occurs if you disconnect the AC power adaptor or remove the battery pack before turning the power off The image on the LCD screen looks dark Ambient light is too bright Adjust the brightness and angle of LCD Symptom Explanation Solution Menu items are grayed out You cannot select grayed items in the current recording playback mode There are some functions you cannot activate simultaneo...

Страница 98: ...otect tab of the memory card SDHC standard SD memory card etc if any page 34 You cannot format the memory card Release the lock on the write protect tab of the memory card SDHC standard SD memory card etc if any page 34 Copy any important recorded files to your PC before formatting Samsung shall not be responsible for any loss of data It is recommended that you copy the data to your PC or other st...

Страница 99: ...mp and moist inside condensation Turn off your camcorder and leave it for about 1 hour in a cool place page 79 The actual recording time is less than the estimated time The recording time is measured under Samsung s standard recording test conditions and may differ depending on actual use When you record an object that moves fast the actual recording time may be shorten The recording stops automat...

Страница 100: ...tart stop button and the point where the recorded movie starts stops On your camcorder there may be a slight time delay between the point when you press Recording start stop button and the actual point where the recorded movie starts stops This is not an error The recording stops The internal temperature of your camcorder is unusually high Turn off your camcorder and leave it for a while in a cool...

Страница 101: ...ht up to brighten the place The image appears too bright or flickering or changes in color This occurs when recording images under a fluorescent lamp sodium lamp or mercury lamp Cancel Scene Mode AE to minimize this phenomena page 48 Color balance of image is not natural White balance adjustment is required Set proper White Balance page 49 Unknown indicator appears on the screen A warning indicato...

Страница 102: ... Explanation Solution You cannot view the image or hear the sound on the connected device Connect the audio line of the multi AV cable to your camcorder or to the connected device TV DVD recorder etc Red color right White color left The multi AV cable is not connected properly Make sure that the multi AV cable is connected to the proper jack page 77 When you are using the S VIDEO cable make sure t...

Страница 103: ...amcorder restart the computer then connect it again correctly Cannot play a movie file properly on a PC A video codec is needed to play the file recorded on your memory camcorder Install the software provided with your camcorder page 71 Please install by using the software CD that came with this camcorder We do not guarantee compatibility for different CD versions Make sure you insert the connecto...

Страница 104: ...to a computer that does not support Hi speed USB USB2 0 the images or sound may not be played back correctly The images and sound is copied to your computer is not affected The playback screen is paused or distorted Check the system requirements to play a movie page 69 Exit other all applications running on the current computer Overall operations Symptom Explanation Solution The date and time are ...

Страница 105: ...ectors S Video output Y 1V p_p 75Ω analog C 0 286Vp_p 75Ω analog Composite video out 1 0V p_p 75Ω analog Audio output 7 5dBm 47KΩ analog stereo USB output mini USB B type USB2 0 High Speed General Power source 8 4V Using AC adapter 7 4V Using Lithium Ion battery pack Power source type Power supply 100V 240V 50 60Hz Lithium Ion battery pack Power consumption LCD on LCD off 2 96W 0 4A 2 4W 0 3A Oper...

Страница 106: ...presented to the authorized service center EXCLUSIONS WHAT IS NOT COVERED This warranty does not cover damage due to accident fire flood and or other acts of God misuse incorrect line voltage improper installation improper or unauthorized repairs commercial use or damage that occurs in shipping Exterior and interior finish lamps and glass are not covered under this warranty Customer adjustments wh...

Страница 107: ...00 SAMSUNG 726 7864 www samsung com it LUXEMBURG 0035 0 2 261 03 710 www samsung be NETHERLANDS 0900 20 200 88 0 10 Min www samsung com nl NORWAY 815 56 480 www samsung com no POLAND 0 801 801 881 022 607 93 33 www samsung com pl PORTUGAL 80 8 200 128 www samsung com pt SLOVAKIA 0800 SAMSUNG 726 7864 www samsung com sk SPAIN 902 10 11 30 www samsung com es SWEDEN 0771 400 200 www samsung com se U ...

Страница 108: ...864 www samsung com us RoHS compliant Our product complies with The Restriction Of the use of certain Hazardous Substances in electrical and electronic equipment and we do not use the 6 hazardous materials Cadmium Cd Lead Pb Mercury Hg Hexavalent Chromium Cr 6 Poly Brominated Biphenyls PBBs Poly Brominated Diphenyl Ethers PBDEs in our products Code No AD68 01307A 00 ...

Отзывы: