


设定自动程序曝光
1. 设置模式
[Mode]
开关到光盘
[DISC]
位置。
(仅限SC-DC173(U)/DC175/DC575)
2. 设置电源
[Power]
开关到摄录
[
(Camera)]
位置。
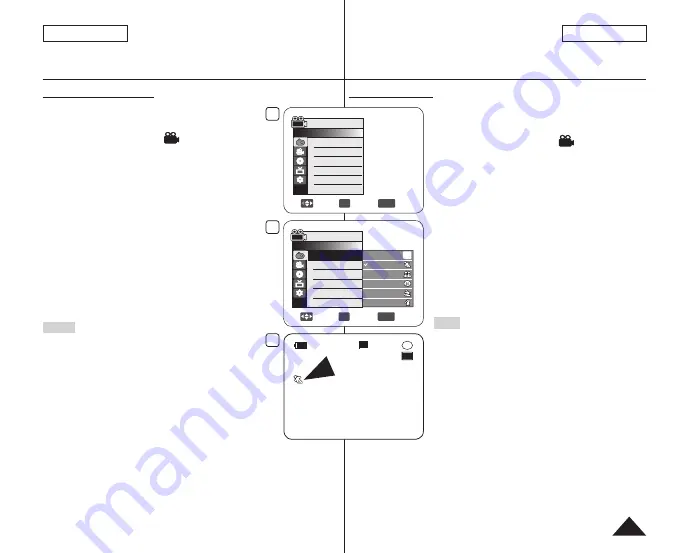
3. 按下
[MENU]
键。
显示菜单。
4. 向上或向下推动摇杆
[Joystick]
选择
<摄像>
,然后按下
[Joystick]
。
5. 向上或向下推动摇杆
[Joystick]
选择
<程序自动曝光>
,
然后按下
[Joystick]
。
显示选项菜单。
6. 上下移动
[Joystick]
选择所需的程序自动曝光选项,然
后按
[Joystick]
。
7. 想退出菜单,请按菜单
[MENU]
键。
显示所选择模式的图标。
选择
<自动>
模式时,没有图标显示。
注意
您可以直接使用
[Q.MENU]
来选择
程序自动曝光
功能。
27页
程序自动曝光
功能不能在EASY.Q模式下使用。
当将快门速度和曝光设置为手动时,不能设置
程序自
动曝光
。
52页
DVD摄像机:高级录像
Setting the Program AE
1. Set the
[Mode]
switch to
[DISC]
.
(SC-DC173(U)/DC175/DC575 only)
2. Set the
[Power]
switch to
[
(Camera)]
.
3. Press the
[MENU]
button.
The menu list will appear.
4. Move the
[Joystick]
up or down to select
<Camera>
, then press the
[Joystick]
.
5. Move the
[Joystick]
up or down to select
<Program
AE>
, then press the
[Joystick]
.
The available options are listed.
6. Move the
[Joystick]
up or down to select desired
program AE option, then press the
[Joystick]
.
7. To exit, press the
[MENU]
button.
The icon of the selected mode is displayed.
When the
<Auto>
mode is selected, no icon is
displayed.
Notes
You can directly access the
Program AE
function
by using the
[Q.MENU]
button.
page 27
The
Program AE
function will not operate in EASY.
Q mode.
The
Program AE
cannot be set when the Shutter
Speed or the Exposure is set to manual.
page 52
DVD Camcorder: Advanced Recording
55
ENGLISH
中 文
4
Move
OK
Select
MENU
Exit
Camera Mode
►Camera
Program AE
White Balance
Digital Effect
Shutter
Exposure
16:9 Wide
►Auto
►Auto
►Off
►Auto
►Auto
►On
6
Move
OK
Select
MENU
Exit
Camera Mode
►Camera
Program AE
White Balance
Digital Effect
Shutter
Exposure
16:9 Wide
▼
Auto
Sports
Portrait
Spotlight
Sand/Snow
High Speed
A
7
STBY
30 min
SP
-RW
VR
0:00:00
16:9 Wide
Содержание SC-DC173U
Страница 126: ......


