background image

- 16 -

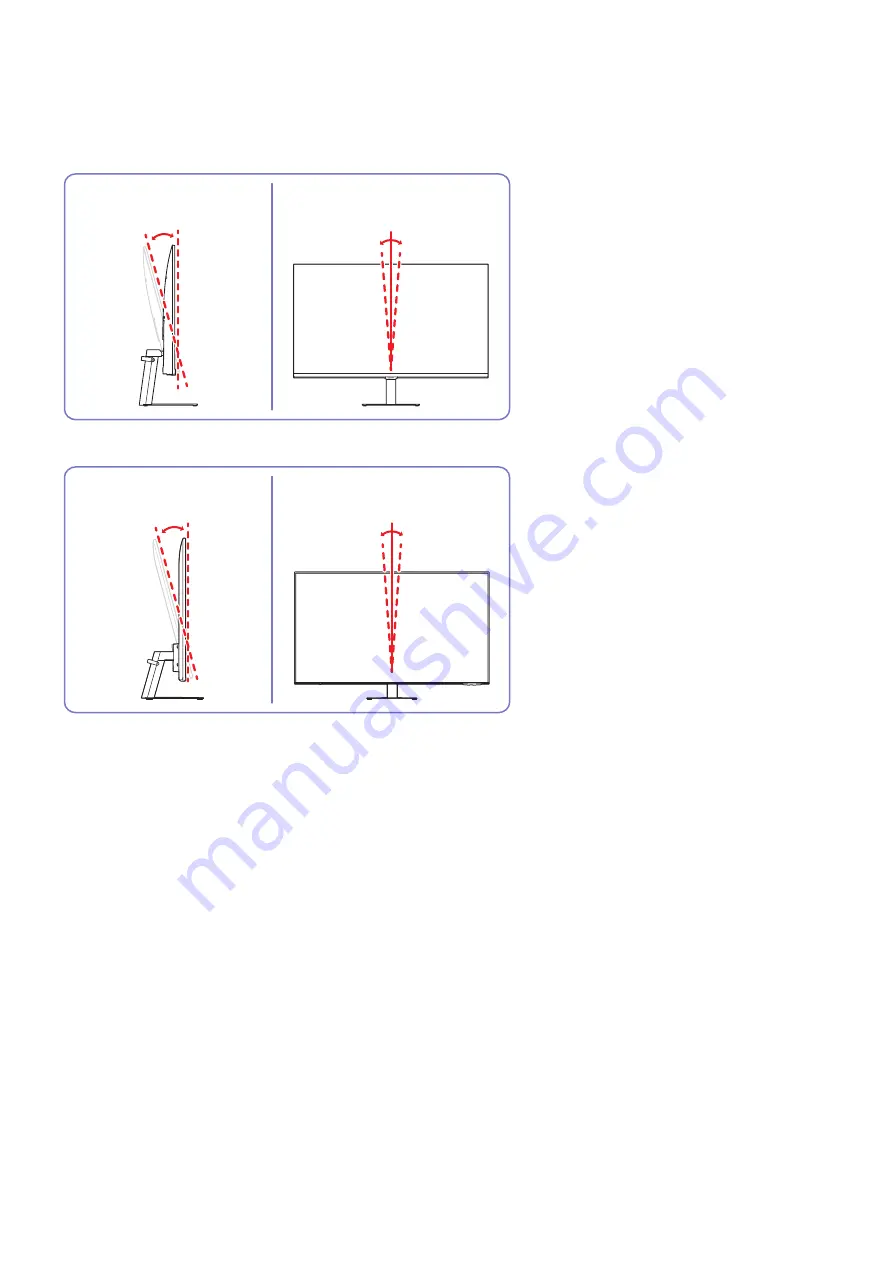
Adjusting the Product Tilt and Height


"

The colour and shape of parts may differ from what is shown. Specifications are subject to change without notice to 
improve quality.

S27BM50* / S32BM50* / S32BM70*

-2.0° (±2.0°) ~ 22.0° (±2.0°)

-2.0° (±1.0°) ~ 2.0° (±1.0°)

S43BM70*

-2.0° (±2.0°) ~ 20.0° (±2.0°)

-2.0° (±1.0°) ~ 2.0° (±1.0°)

Содержание S32BM70 Series

Страница 1: ...t the product has no defect i e where the user manual has not been read b You bring the unit to a repair centre but it is found that the product has no defect i e where the user manual has not been re...

Страница 2: ...rrect Disposal of This Product Waste Electrical Electronic Equipment 44 Correct disposal of batteries in this product Before Using the Product Safety Precautions 3 Electricity and Safety 4 Installatio...

Страница 3: ...this product has included important literature concerning operation and maintenance DC voltage Rated voltage marked with this symbol is DC voltage Class II product This symbol indicates that a safety...

Страница 4: ...TES ON TOP OF THE PRODUCT DO NOT INSTALL THE PRODUCT NEAR HEAT SOURCES Keep the plastic packaging out of the reach of children Children may suffocate Do not install the product on an unstable orvibrat...

Страница 5: ...Samsung Customer Service Centre if you want to install the product at such a place Before assembling the product place the product down on a flat and stable surface so that the screen is facing downwa...

Страница 6: ...etc into the product via the vent or input output ports etc Be sure to power off the product and disconnect the power cord when water or other foreign substances have entered the product Then contact...

Страница 7: ...glossy models can develop white stains on the surface if an ultrasonic wave humidifier is used nearby Contact your nearest Samsung Customer Service Centre if you want to clean the inside of the produc...

Страница 8: ...front of the screen Adjust the angle so light does not reflect on the screen Keep your forearms perpendicular to your upper arms and level with the back of your hands Keep your elbows at about a righ...

Страница 9: ...in the figure Check that the stand neck is firmly connected Tightly fasten the connecting screw at the bottom of the stand base Fasten the large screw in the middle for assembly As shown in the figur...

Страница 10: ...the connecting screw at the bottom of the stand base Push the assembled stand into the main body in the direction of the arrow as shown in the figure Tightly fasten the connecting screw at the bottom...

Страница 11: ...ted Tightly fasten the connecting screw at the bottom of the stand base As shown in the figure remove the product and foam cushion and then place the product on the table with its front side facing th...

Страница 12: ...cations Resolution 1920 x 1080 30 fps FHD Automatic light compensation O Privacy Cover O Viewing angle 85 Connection USB Type C USB 2 0 Before using the product use a soft dry cloth to wipe the camera...

Страница 13: ...Do not hold the product upside down only by the stand Do not press down on the product There is a risk of damaging the product S43BM70 Hold the lower corners or edges of the product when moving it Do...

Страница 14: ...the product when moving it Do not directly apply pressure on the screen Do not hold the screen when moving the product Do not hold the product upside down only by the stand Do not press down on the p...

Страница 15: ...emperature rise may cause fire and damage the product Maintain enough space around the product as shown in the diagram when installing the product The exterior may differ depending on the product S27B...

Страница 16: ...Height The colour and shape of parts may differ from what is shown Specifications are subject to change without notice to improve quality S27BM50 S32BM50 S32BM70 2 0 2 0 22 0 2 0 2 0 1 0 2 0 1 0 S43BM...

Страница 17: ...the tilt and height hold both sides of the product and avoid using excessive force to prevent damage When adjusting the stand height you may hear a noise This noise is generated because the ball insi...

Страница 18: ...anti theft locking device 1 Fix the cable of your anti theft locking device to a heavy object such as a desk 2 Put one end of the cable through the loop on the other end 3 Insert the locking device in...

Страница 19: ...e length of the screws may differ depending on the wall mount specifications Do not fasten the screws too firmly This may damage the product or cause the product to fall leading to personal injury Sam...

Страница 20: ...tton at the bottom of the product and then use the Control menu The Control menu appears when the Power button is pressed while the product is On S27BM50 S32BM50 S43BM70 S32BM70 S32BM80 Rear On Off On...

Страница 21: ...urned off All voice and sound features using microphone are not available The position and shape of the microphone switch may differ depending on the model During analysis using data from the micropho...

Страница 22: ...ction is available only in M7 B series Connects to a source device using a USB Type C cable When connecting a USB Type C source device make sure to use the USB Type C 3 1 Gen2 10G cable so that the sc...

Страница 23: ...Type C 3 1 Gen2 10G cable so that the screen is displayed properly Lowerversion cables do not support the video input function Displayport ALT The USB Type C port can be connected to a notebook or mob...

Страница 24: ...port the video input function Displayport ALT The USB Type C port can be connected to a notebook or mobile device for charging A maximum of 65 W charging power is supported The charging speed may vary...

Страница 25: ...ponding cables Pull the right side of the HOLDER STAND CABLE to remove from the stand The right side of the cable can be damaged when pulled forcibly 3 Put both cables in the cable holder on the stand...

Страница 26: ...ght side of the HOLDER STAND CABLE to remove from the stand The right side of the cable can be damaged when pulled forcibly 1 3 Put both cables in the cable holder on the stand HOLDER STAND CABLE to o...

Страница 27: ...27 S32BM80 1 1 1 2 Pass cables through the hole on the stand Connect the cables to the corresponding ports 1 3 Organise cables by passing them through the hole on the stand as shown in the figures...

Страница 28: ...ntrol product operations with your Samsung Smart Remote or Remote Control Pair external devices such as a keyboard for ease of use About the Samsung Smart Remote M7 B M8 B Series Models Learn about th...

Страница 29: ...This function may not be supported depending on the model or geographical area Voice Assistant Runs Voice Assistant Press and hold the button say a command and then release the button to run Voice Ass...

Страница 30: ...utton up or down to change the channel When pressed for1 second or more the Channel List screen appears Launch app button Launch the app indicated by the button App availability may vary by country Th...

Страница 31: ...31 About the Remote Control M5 B Series Model Learn about the buttons on the Remote Control...

Страница 32: ...Select Selects or runs a focused item Return Press to return to the previous menu Smart Hub Press to return to the Home Screen Play pause Using these controls you can control the media content that i...

Страница 33: ...the Samsung Smart Remote does not pair to the product automatically point it at the front of the product and then press and hold the and buttons simultaneously for 3 seconds or more The images buttons...

Страница 34: ...16 9 Standard Custom USB 3840 x 2160p 60 Hz 16 9 Standard Custom USB Type C 720p 16 9 Standard Custom 4 3 Screen Size USB Type C 1080p 60 Hz 16 9 Standard Custom 4 3 Screen Size USB Type C 3840 x 1600...

Страница 35: ...by M7 B M8 B series If Input Signal Plus is set to Off Frame rate fps Color Depth Chroma Sampling RGB 4 4 4 YCbCr 4 4 4 YCbCr 4 2 2 YCbCr 4 2 0 50 60 8 bit O If Input Signal Plus is set to On Frame r...

Страница 36: ...ive resolution is 3840 x 2160 at 60 Hz with the Input Signal Plus set to On The native resolution is 3840 x 2160 at 30 Hz with the Input Signal Plus set to Off VESA DMT Resolution Dots x lines Display...

Страница 37: ...O 1600 x 900 60 Hz 60 000 60 000 108 000 O O 1680 x 1050 60 Hz 65 290 59 954 146 250 O O 1920 x 1080 60 Hz 67 500 60 000 148 500 O O This input signal is supported by M5 B series VESA CVT Resolution...

Страница 38: ...50 Hz 37 500 50 000 74 250 O 1280 x 720 60 Hz 45 000 60 000 74 250 O O 1920 x 1080i 50 Hz 28 125 50 000 74 250 O 1920 x 1080i 60 Hz 33 750 60 000 74 250 O 1920 x 1080 24 Hz 27 000 24 000 74 250 O 192...

Страница 39: ...t Play Ready 3 0 Digital Rights Management for protected HDR content Use graphic cards listed below for HDR10 NVIDIA GeForce 1000 series or higher AMD Radeon RX 400 series or higher Intel UHD Graphics...

Страница 40: ...920 x 1080 60 Hz Maximum Resolution Model Name S32BM70 S43BM70 S32BM80 Size 32 Class 31 5 Inches 80 0 cm 43 Class 42 5 Inches 107 9 cm 32 Class 31 5 Inches 80 0 cm Display area 697 306 mm H x 392 234...

Страница 41: ...y However you can customise the installation settings if desired Panel Dots Pixels Due to the nature of the manufacturing of this product approximately1 pixel per million 1ppm may be brighter or darke...

Страница 42: ...Internet Antenna Wired Signal etc If a product is reinstalled or devices are connected additionally after installing the purchased product for the first time If a product is reinstalled to move to a d...

Страница 43: ...of Samsung Electronics Co Ltd Remodeling or repairing the product by customer Using it with incorrect voltage or non authorised electrical connections Not following the cautions in User Manual Others...

Страница 44: ...you intend to discard the product the waste collection site will take the appropriate measures for the recycling and treatment of the product including the battery Correct disposal of batteries in th...

Отзывы: