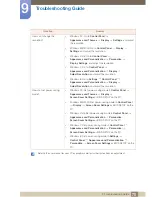
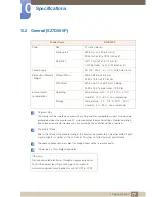
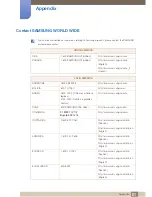
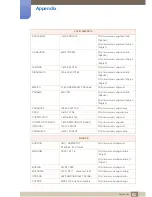
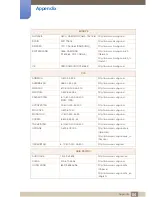
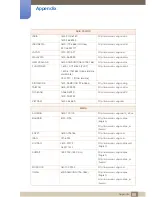
background image

89

Appendix

 Appendix

Terminology

OSD (On Screen Display)

On screen display (OSD) allows you to customize on-screen settings to optimize the picture quality as 

required. You can change the screen brightness, tint, size and many other settings using menus 

displayed on the screen.

Gamma

The Gamma menu adjusts the grey scale that represents middle tones on the screen. Adjusting the 

brightness brightens the whole screen, but adjusting Gamma only brightens the medium brightness.

Grey scale

Scale refers to levels of color intensity that show variations of color change from darker areas to 

brighter areas on the screen. Changes to the screen brightness are expressed with black and white 

variation, and grey scale refers to the medium area between black and white. Changing the grey scale 

through Gamma adjustment will change the medium brightness on the screen.
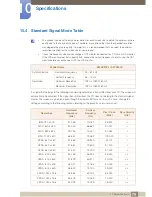
Scanning rate

Scanning rate, or refresh rate, refers to the frequency of screen refreshes. Screen data is transmitted 

as it refreshes to display an image, although the refreshing is invisible to the naked eye. The number of 

screen refreshes is called scanning rate and is measured in Hz. A scanning rate of 60Hz means that 

the screen refreshes 60 times per second. The screen scanning rate depends on the performance of 

the graphics cards in your PC and monitor. 

Horizontal Frequency

Characters or images displayed on the monitor screen consist of numerous dots (pixels). Pixels are 

transmitted in horizontal lines, which are then arranged vertically to create an image. The horizontal 

frequency is measured in kHz and represents how many times horizontal lines per second are 

transmitted and displayed on the monitor screen. A horizontal frequency of 85 means that the 

horizontal lines that make up an image are transmitted 85000 times per second. The horizontal 

frequency is indicated in 85kHz.

Vertical Frequency

One image is made of numerous horizontal lines. The vertical frequency is measured in Hz and 

represents how many images can be created per second by those horizontal lines. A vertical 

frequency of 60 means that an image is transmitted 60 times per second. The vertical frequency is 

also called "refresh rate" and affects screen flicker.

Содержание S27D590P

Страница 1: ...er manual S24D590PL S27D590P The color and the appearance may differ depending on the product and the specifications are subject to change without prior notice to improve the performance BN46 00385A 0...

Страница 2: ...ture to use the product PREPARATIONS 19 Checking the Contents 19 Checking the Components 20 Parts 20 Control Panel 21 Direct Key guide 22 Function Key Guide 24 Reverse Side 25 Installation 25 Attachin...

Страница 3: ...uring SAMSUNG MAGIC Bright 41 SAMSUNG MAGIC Upscale 41 Configuring SAMSUNG MAGIC Upscale 42 Image Size 42 Changing the Image Size 44 HDMI Black Level 44 Configuring the HDMI Black Level Settings 45 Re...

Страница 4: ...onfiguring Menu H Position Menu V Position 56 Display Time 56 Configuring Display Time 57 Transparency 57 Changing Transparency SETUP AND RESET 58 Reset All 58 Initializing Settings Reset All 59 Eco S...

Страница 5: ...69 Installing the Software 70 Removing the Software TROUBLESHOOTING GUIDE 71 Requirements Before Contacting Samsung Customer Service Center 71 Testing the Product 71 Checking the Resolution and Freque...

Страница 6: ...Table Of Contents Table Of Contents 6 88 Correct Disposal 88 Correct Disposal of This Product Waste Electrical Electronic Equipment 89 Terminology INDEX...

Страница 7: ...M and DDC are registered trademarks of the Video Electronics Standards Association Icons used in this manual An administration fee may be charged if either a an engineer is called out at your request...

Страница 8: ...by the plug and do not touch the cable with wet hands Otherwise an electric shock may result 3 Wipe the monitor screen using a clean soft and dry cloth Do not apply a cleaning agent that contains alc...

Страница 9: ...product Be sure to allow the amount of space as shown below or greater when installing the product The exterior may differ depending on the product Precautions for storage Be sure to contact Samsung...

Страница 10: ...t high voltage is present inside It is dangerous to make any kind of contact with any internal part of this product This symbol alerts you that important literature concerning operation and maintenanc...

Страница 11: ...s Otherwise an electric shock may result Insert the power plug all the way in so it is not loose An unstable connection may cause a fire Ensure you connect the power plug to a grounded power socket ty...

Страница 12: ...to completely cut the power to the product Power to the product cannot be completely cut off with the power button Hold the plug when disconnecting the power cord from the power socket An electric sho...

Страница 13: ...e Otherwise the product lifespan may be reduced or a fire may result Do not install the product within the reach of young children The product may fall and injure children Edible oil such as soybean o...

Страница 14: ...ng Customer Service Center page 81 for repair Before moving the product turn off the power switch and disconnect the power cable and all other connected cables Otherwise the power cord may be damaged...

Страница 15: ...result Do not use or keep combustible spray or an inflammable substance near the product An explosion or fire may result Ensure the vents are not blocked by tablecloths or curtains Otherwise a fire m...

Страница 16: ...age Use the product at the recommended resolution and frequency Otherwise Your eyesight may deteriorate Do not put DC power adapters together Otherwise a fire may result Remove the plastic bag from th...

Страница 17: ...een when the product has been turned on for an extended period of time as it will become hot Store the small accessories used with the product out of reach of children Exercise caution when adjusting...

Страница 18: ...look slightly downward at the screen Keep your eyes directly in front of the screen Adjust the angle so light does not reflect on the screen Keep your forearms perpendicular to your upper arms and lev...

Страница 19: ...old separately may differ from the image shown Components Components may vary depending on the country Quick setup guide Warranty card Not available in some locations User manual optional DC power ada...

Страница 20: ...ated on the rear left side of the product The button can be used to move up down left or right or as Enter Function Key Guide Press the JOG button when the screen is turned on The Function Key Guide w...

Страница 21: ...Brightness LEFT RIGHT Adjust Volume PRESS ENTER Display Function Key Guide Analog mode option UP DOWN Adjust Brightness LEFT RIGHT Adjust the screen settings automatically Changing the resolution in...

Страница 22: ...g the JOG button in the Function Key Guide screen A message will appear on the top left corner of the screen if the input signal has been changed Selects by moving the JOG button in the function key g...

Страница 23: ...ey guide screen Press to enable or disable Game Mode The items below are not available if the Game Mode function is enable PICTURE Contrast Sharpness Bright Upscale COLOR SETUP RESET Eco Saving Select...

Страница 24: ...ange without notice to improve quality Port About ports Connect to a source device using an HDMI cable Connect to an audio output device such as headphones This function is only available in HDMI mode...

Страница 25: ...at the stand neck is firmly connected Tightly fasten the connecting screw at the bottom of the stand base Place a soft cloth over the table to protect the product and place the product onto the cloth...

Страница 26: ...the product faces downwards While holding the stand neck with one hand pound the other fisted hand down onto the top of the stand base in the direction of the arrow to detach the stand base Turn the...

Страница 27: ...theft locking device for details The lock device is sold separately The color and shape of parts may differ from what is shown Specifications are subject to change without notice to improve quality T...

Страница 28: ...2 2 Connecting and Using a PC 2 2 1 Connecting to a PC Select a connection method suitable for your PC Connecting parts may differ in different products Connection Using the D SUB Cable Analog Type D...

Страница 29: ...onnecting the Power 3 Change the input source to HDMI 1 or HDMI 2 controlling the JOG button UP DOWN when input source is not set Connection Using an HDMI DVI Cable Do not connect the power cable befo...

Страница 30: ...onnect the power cable before connecting all other cables Ensure you connect a source device first before connecting the power cable 1 Connect an audio output device such as headphones or speakers to...

Страница 31: ...the power adapter to DC 14V jack on the rear of the product Plug in the power cable to the power socket The input voltage is switched automatically Power connection using detachable DC power adapter C...

Страница 32: ...32 Connecting and Using a Source Device 2 2 Connecting and Using a Source Device Changing the sound settings on Windows Control Panel Audio Speaker Speaker Setup 1 2 3 4...

Страница 33: ...product If the file provided is faulty visit the Samsung homepage http www samsung com and download the file 1 Insert the user manual CD provided with the product into the CD ROM drive 2 Click Windows...

Страница 34: ...e optimum setting 1 Select a language by moving the JOG button LEFT RIGHT Next press the JOG button 2 To hide the information message press the JOG button If the optimum resolution is not selected the...

Страница 35: ...ing on the model Refer to the actual product 3 1 1 Configuring Brightness 1 When the Function Key Guide appears select by moving the JOG button UP Next press the JOG button 2 Move to PICTURE controlli...

Страница 36: ...figuring Contrast 1 When the Function Key Guide appears select by moving the JOG button UP Next press the JOG button 2 Move to PICTURE controlling the JOG button UP DOWN and press the JOG button 3 Mov...

Страница 37: ...ring Sharpness 1 When the Function Key Guide appears select by moving the JOG button UP Next press the JOG button 2 Move to PICTURE controlling the JOG button UP DOWN and press the JOG button 3 Move t...

Страница 38: ...the JOG button UP DOWN and press the JOG button 3 Move to Game Mode controlling the JOG button UP DOWN and press the JOG button The following screen will appear 4 Move to the desired option controlli...

Страница 39: ...s as required Standard Obtain a picture quality suitable for editing documents or using Internet Cinema Obtain the brightness and sharpness of TVs suitable for enjoying video and DVD content Dynamic C...

Страница 40: ...ge than in Standard mode Standard Select this mode when the surroundings are bright This also provides a sharp image Movie Select this mode when the surroundings are dark This will save power and redu...

Страница 41: ...1 When the Function Key Guide appears select by moving the JOG button UP Next press the JOG button 2 Move to PICTURE controlling the JOG button UP DOWN and press the JOG button 3 Move to Upscale contr...

Страница 42: ...the JOG button UP DOWN and press the JOG button 3 Move to Image Size controlling the JOG button UP DOWN and press the JOG button The following screen will appear Auto Display the picture according to...

Страница 43: ...gital output device is connected using the HDMI cable The input signal is 480p 576p 720p or 1080p and monitor can display normally Not every model can support all of these signals This can only be set...

Страница 44: ...rs select by moving the JOG button UP Next press the JOG button 2 Move to PICTURE controlling the JOG button UP DOWN and press the JOG button 3 Move to HDMI Black Level controlling the JOG button UP D...

Страница 45: ...Guide appears select by moving the JOG button UP Next press the JOG button 2 Move to PICTURE controlling the JOG button UP DOWN and press the JOG button 3 Move to Response Time controlling the JOG bu...

Страница 46: ...V Position 1 When the Function Key Guide appears select by moving the JOG button UP Next press the JOG button 2 Move to PICTURE controlling the JOG button UP DOWN and press the JOG button 3 Move to t...

Страница 47: ...pears select by moving the JOG button UP Next press the JOG button 2 Move to PICTURE controlling the JOG button UP DOWN and press the JOG button 3 Move to Coarse controlling the JOG button UP DOWN and...

Страница 48: ...appears select by moving the JOG button UP Next press the JOG button 2 Move to PICTURE controlling the JOG button UP DOWN and press the JOG button 3 Move to Fine controlling the JOG button UP DOWN and...

Страница 49: ...will increase the intensity of the color 4 1 1 Configuring Red 1 When the Function Key Guide appears select by moving the JOG button UP Next press the JOG button 2 Move to COLOR controlling the JOG b...

Страница 50: ...n UP Next press the JOG button 2 Move to COLOR controlling the JOG button UP DOWN and press the JOG button 3 Move to Green controlling the JOG button UP DOWN and press the JOG button The following scr...

Страница 51: ...n UP Next press the JOG button 2 Move to COLOR controlling the JOG button UP DOWN and press the JOG button 3 Move to Blue controlling the JOG button UP DOWN and press the JOG button The following scre...

Страница 52: ...ress the JOG button The following screen will appear Cool 2 Set the color temperature to be cooler than Cool 1 Cool 1 Set the color temperature to be cooler than Normal mode Normal Display the standar...

Страница 53: ...ing Gamma 1 When the Function Key Guide appears select by moving the JOG button UP Next press the JOG button 2 Move to COLOR controlling the JOG button UP DOWN and press the JOG button 3 Move to Gamma...

Страница 54: ...ey Guide appears select by moving the JOG button UP Next press the JOG button 2 Move to MENU SETTINGS controlling the JOG button UP DOWN and press the JOG button 3 Move to Language controlling the JOG...

Страница 55: ...press the JOG button 3 Move to the Menu H Position or Menu V Position controlling the JOG button UP DOWN and press the JOG button The following screen will appear 4 Adjust the Menu H Position or Menu...

Страница 56: ...UP Next press the JOG button 2 Move to MENU SETTINGS controlling the JOG button UP DOWN and press the JOG button 3 Move to Display Time controlling the JOG button UP DOWN and press the JOG button The...

Страница 57: ...olling the JOG button UP DOWN and press the JOG button 3 Move to Transparency controlling the JOG button UP DOWN and press the JOG button The following screen will appear 4 Move to the desired option...

Страница 58: ...ress the JOG button 2 Move to SETUP RESET controlling the JOG button UP DOWN and press the JOG button 3 Move to Reset All controlling the JOG button UP DOWN and press the JOG button The following scre...

Страница 59: ...ton 2 Move to SETUP RESET controlling the JOG button UP DOWN and press the JOG button 3 Move to Eco Saving controlling the JOG button UP DOWN and press the JOG button The following screen will appear...

Страница 60: ...DOWN and press the JOG button 4 Move to Off Timer controlling the JOG button UP DOWN and press the JOG button The following screen will appear Off Deactivate the off timer so that the product does no...

Страница 61: ...e Turn Off After controlling the JOG button LEFT RIGHT 6 The selected option will be applied The off timer can be set within a range of 1 to 23 hours The product will automatically power off after the...

Страница 62: ...nction Key Guide appears select by moving the JOG button UP Next press the JOG button 2 Move to SETUP RESET controlling the JOG button UP DOWN and press the JOG button 3 Move to PC AV Mode controlling...

Страница 63: ...d press the JOG button 3 Move to Key Repeat Time controlling the JOG button UP DOWN and press the JOG button The following screen will appear Acceleration 1 sec or 2 sec can be selected If No Repeat i...

Страница 64: ...olling the JOG button UP DOWN and press the JOG button 3 Move to Source Detection controlling the JOG button UP DOWN and press the JOG button The following screen will appear Auto The input source is...

Страница 65: ...button UP DOWN and press the JOG button 3 Move to Power LED On controlling the JOG button UP DOWN and press the JOG button The following screen will appear Working The power LED is on when the product...

Страница 66: ...esolution 7 1 1 Displaying INFORMATION 1 When the Function Key Guide appears select by moving the JOG button UP Next press the JOG button 2 Move to INFORMATION controlling the JOG button UP DOWN and p...

Страница 67: ...is menu is not available when Eco Saving is enabled Contrast This option is not available when Bright is in Cinema or Dynamic Contrast mode This menu is not available when Game Mode is enabled 1 When...

Страница 68: ...function is only available in HDMI mode If the audio quality of a connected input device is poor the Auto Mute function on the product may mute the sound or cause choppy audio when applying the headph...

Страница 69: ...ructions given on the screen to proceed with installation The software may not work properly if you do not restart the computer after the installation The Easy Setting Box icon may not appear dependin...

Страница 70: ...re 8 8 Installing the Software 8 1 2 Removing the Software Click Start select Settings Control Panel and then double click Add or Remove Programs Select Easy Setting Box from the program list and clic...

Страница 71: ...agnosis test 1 Power off both the PC and product 2 Disconnect the cables from the product 3 Power on the product 4 If the message Check Signal Cable appears the product is working normally If the scre...

Страница 72: ...Refer to 2 2 Connecting and Using a PC The screen is not clear The screen is blurry Adjust Coarse page 47 and Fine page 48 Remove any accessories video extension cable etc and try again Set the resolu...

Страница 73: ...d The product is operating in power saving mode Press any key on the keyboard or move the mouse to return to normal operating mode Issues Solutions There is no sound Check the connection of the audio...

Страница 74: ...r and adjust Refresh rate under Monitor settings Windows Vista Go to Control Panel Appearance and Personalization Personalization Display Settings Advanced Settings Monitor and adjust Refresh rate und...

Страница 75: ...s Control Panel Appearance and Personalization Display Adjust Resolution and adjust the resolution How do I set power saving mode Windows XP Set power saving mode in Control Panel Appearance and Theme...

Страница 76: ...mprove quality This device is a Class B digital apparatus Model Name S24D590PL Panel Size 23 6 Inches 59 cm Display area 521 28 mm H x 293 22 mm V 20 52 Inches H x 11 54 Inches V Pixel Pitch 0 2715 mm...

Страница 77: ...improve quality This device is a Class B digital apparatus Model Name S27D590P Panel Size 27 Inches 68 cm Display area 597 9 mm H x 336 3 mm V 23 54 Inches H x 13 24 Inches V Pixel Pitch 0 3114 mm H...

Страница 78: ...US registered mark of the United States Environmental Protection Agency Energy Star power is measured with the test method in the current Energy Star Standard To reduce the power consumption to 0 wat...

Страница 79: ...m the PC does not belong to the standard signal modes the screen may be blank even though the power LED turns on In such a case change the settings according to the following table by referring to the...

Страница 80: ...allows you to view natural pictures The repeat frequency is called vertical frequency or refresh rate and is indicated in Hz VESA 1152 x 864 67 500 75 000 108 000 VESA 1280 x 720 45 000 60 000 74 250...

Страница 81: ...amsung com BRAZIL 0800 124 421 Demais cidades e regi es 4004 0000 Capitais e grandes centros http www samsung com br CHILE 800 SAMSUNG 726 7864 http www samsung com cl COLOMBIA http www samsung com co...

Страница 82: ...en English PARAGUAY 009 800 542 0001 http www samsung com py PERU 0 800 777 08 http www samsung com pe PUERTO RICO 1 800 682 3180 http www samsung com TRINIDAD TOBAGO 1 800 SAMSUNG 726 7864 http www s...

Страница 83: ...only from land line 30 210 6897691 from mobile and land line http www samsung com gr HUNGARY 06 80 SAMSUNG 726 7864 http www samsung com hu ITALIA 800 SAMSUNG 726 7864 http www samsung com LATVIA 800...

Страница 84: ...800 555 555 http www samsung com KAZAKHSTAN 8 10 800 500 55 500 GSM 7799 http www samsung com KYRGYZSTAN 00 800 500 55 500 http www samsung com MOLDOVA 0 800 614 40 http www samsung com MONGOLIA 7 80...

Страница 85: ...ng com sg TAIWAN 0800 32 9999 http www samsung com tw THAILAND 0 2689 3232 1800 29 3232 http www samsung com th VIETNAM 1800 588 889 http www samsung com MENA ALGERIA 0800 100 100 http www samsung com...

Страница 86: ...OON 7095 0077 http www samsung com africa_fr COTE D IVOIRE 8000 0077 http www samsung com africa_fr DRC 499999 http www samsung com GHANA 0800 10077 0302 200077 http www samsung com africa_en KENYA 08...

Страница 87: ...If customer requests software installation and setup for the product If a service technician removes cleans dusts or foreign materials inside of the product If customer requests an installation additi...

Страница 88: ...the environment or human health from uncontrolled waste disposal please separate these items from other types of waste and recycle them responsibly to promote the sustainable reuse of material resourc...

Страница 89: ...an image although the refreshing is invisible to the naked eye The number of screen refreshes is called scanning rate and is measured in Hz A scanning rate of 60Hz means that the screen refreshes 60 t...

Страница 90: ...me time E g A resolution of 1920 x 1080 consists of 1920 horizontal pixels horizontal resolution and 1080 vertical lines vertical resolution E g A resolution of 1920 x 1200 consists of 1920 horizontal...

Страница 91: ...18 D Display Time 56 E Easy Setting Box 69 Eco Saving 59 F Fine 48 G Game Mode 38 Gamma 53 General 76 77 Green 50 H HDMI Black Level 44 I Image Size 42 INFORMATION 66 Installation 25 K Key Repeat Tim...

Страница 92: ...Index Index 92 S Safety Precautions 10 SAMSUNG MAGIC Bright 39 SAMSUNG MAGIC Upscale 41 Sharpness 37 Source Detection 64 Standard Signal Mode Table 79 T Terminology 89 Transparency 57...

Отзывы: