Samsung S24C650PLS Скачать руководство пользователя страница 43

43

3 Screen Setup

Screen Setup

Configure the screen settings such as brightness.

3.1

Brightness

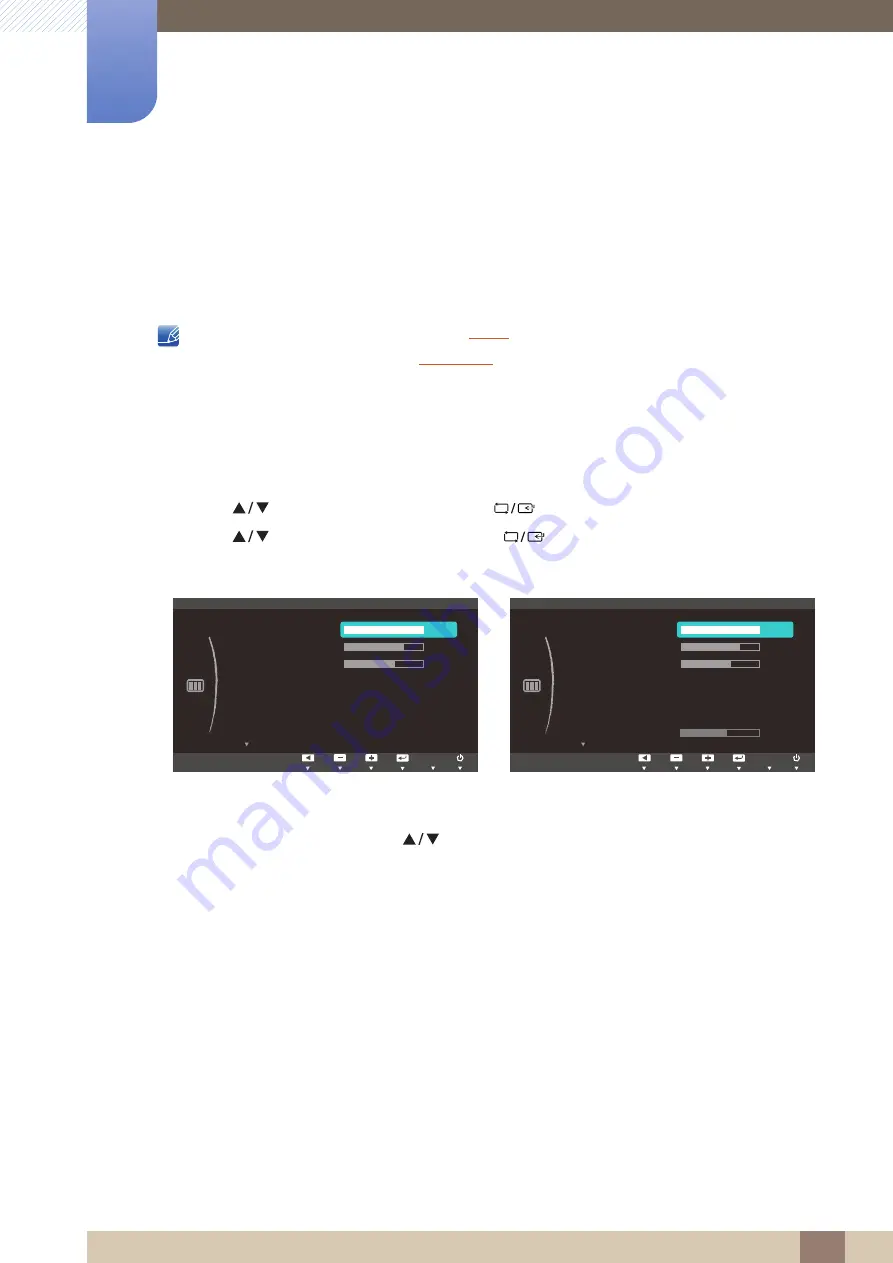
You can adjust the general brightness of the picture. (Range: 0~100)

A higher value will make the picture appear brighter.


This menu is not available when 

Bright

 is set to 

Dynamic Contrast

 mode.

This menu is unavailable when 

Eco Saving

 is set.


3.1.1

Configuring Brightness

1

Press any button on the front of the product to display the Key Guide. Next, press [

] to display 

the corresponding menu screen.

2

Press [

] to move to 

PICTURE

 and press [

] on the product.

3

Press [

] to move to 

Brightness

 and press [

] on the product. The following screen will 

appear.

4

Adjust the 

Brightness

 using the [

] buttons.

(S22C650K/S23C650K/S24C650PL/

S24C650PLS)

(S22C650D/S23C650D/S27C650D)

SAMSUNG

MAGIC

MENU

Custom

Auto

/RZ

)DVWHU

PICTURE

Brightness


Contrast 

Sharpness


Image Size

HDMI Black Level

Response Time

SAMSUNG

M A G I C Bright

AUTO

Custom

Auto

)DVWHU

PICTURE

Brightness


Contrast 

Sharpness


Image Size

Response Time

H-Position

SAMSUNG

M A G I C Bright

AUTO

50

Содержание S24C650PLS

Страница 1: ...650K S23C650D S23C650K S24C650PL S24C650PLS S27C650D The color and the appearance may differ depending on the product and the specifications are subject to change without prior notice to improve the p...

Страница 2: ...nd Safety 17 Correct posture to use the product PREPARATIONS 18 Checking the Contents 18 Removing the Packaging 19 Checking the Components 20 Parts 20 Frontal Buttons 22 Reverse Side 24 Right Side Vie...

Страница 3: ...ring Contrast 45 Sharpness 45 Configuring Sharpness 46 SAMSUNG MAGIC Bright 46 Configuring SAMSUNG MAGIC Bright 48 Image Size 48 Changing the Image Size 50 HDMI Black Level 50 Configuring the HDMI Bla...

Страница 4: ...61 Configuring Menu H Position Menu V Position 62 Display Time 62 Configuring Display Time 63 Transparency 63 Changing Transparency SETUP AND RESET 64 Reset 64 Initializing Settings Reset 65 Eco Savin...

Страница 5: ...6 What is MagicTune 76 Installing the Software 77 Removing the Software 78 MultiScreen 78 Installing the Software 79 Removing the Software 80 MagicRotation 80 Installing the Software 82 Removing the S...

Страница 6: ...sibility for the Pay Service Cost to Customers 109 Not a product defect 109 A Product damage caused by customer s fault 109 Others 110 Correct Disposal 110 Correct Disposal of This Product Waste Elect...

Страница 7: ...M and DDC are registered trademarks of the Video Electronics Standards Association Icons used in this manual An administration fee may be charged if either a an engineer is called out at your request...

Страница 8: ...able by the plug and do not touch the cable with wet hands Otherwise an electric shock may result 3 Wipe the monitor screen using a clean soft and dry cloth Do not apply a cleaning agent that contains...

Страница 9: ...product Be sure to allow the amount of space as shown below or greater when installing the product The exterior may differ depending on the product Precautions for storage Be sure to contact Samsung...

Страница 10: ...t high voltage is present inside It is dangerous to make any kind of contact with any internal part of this product This symbol alerts you that important literature concerning operation and maintenanc...

Страница 11: ...s Otherwise an electric shock may result Insert the power plug all the way in so it is not loose An unstable connection may cause a fire Ensure you connect the power plug to a grounded power socket ty...

Страница 12: ...to completely cut the power to the product Power to the product cannot be completely cut off with the power button Hold the plug when disconnecting the power cord from the power socket An electric sho...

Страница 13: ...e Otherwise the product lifespan may be reduced or a fire may result Do not install the product within the reach of young children The product may fall and injure children Edible oil such as soybean o...

Страница 14: ...stomer Service Center page 103 for repair Before moving the product turn off the power switch and disconnect the power cable and all other connected cables Otherwise the power cord may be damaged and...

Страница 15: ...Do not use or keep combustible spray or an inflammable substance near the product An explosion or fire may result Ensure the vents are not blocked by tablecloths or curtains Otherwise a fire may resul...

Страница 16: ...shock or electric leakage Use the product at the recommended resolution and frequency Otherwise Your eyesight may deteriorate Looking at the screen too close for an extended period of time can deteri...

Страница 17: ...n the volume too high Having the sound too loud may damage your hearing Use the product in the correct posture as follows Straighten your back Allow a distance of 45 to 50cm between your eye and the s...

Страница 18: ...careful not to damage the product when you open the packaging with a sharp instrument 2 Remove the styrofoam from the product 3 Check the components and remove the styrofoam and plastic bag This imag...

Страница 19: ...rately may differ from the image shown Components Components may vary depending on the country Quick setup guide Warranty card Not available in some locations User manual Power cable D SUB cable optio...

Страница 20: ...d OSD control press the button for more than 10 seconds If the OSD control is locked Brightness and Contrast can be adjusted and INFORMATION can be viewed The Customized Key function can be used by pr...

Страница 21: ...S24C650PLS If you power on the product or change the input source by pressing the button a message that shows the changed input source will appear at the top left corner of the screen Press the button...

Страница 22: ...to the POWER IN port on the back of the product Connect to a PC using the D SUB cable Connect to a PC using the DVI cable The DVI IN terminal is supplied for the digital DVI dedicated models only Conn...

Страница 23: ...dio input source using an audio cable Applicable to the models that have speakers only Connect to an audio output device such as headphones Applicable to the models that have speakers only Connect the...

Страница 24: ...Right Side View The color and shape of parts may differ from what is shown Specifications are subject to change without notice to improve quality Port Ports Connect to a USB device Applicable to the...

Страница 25: ...on a flat surface Next place the product with the face down on top of the cloth or cushion Do not remove the fixing pin until you are finished attaching the stand Insert the stand base into the stand...

Страница 26: ...itor tilt and height can be adjusted Hold the top center of the product and adjust the height carefully 1 3 3 Rotating the Monitor You can rotate your monitor as shown below Be sure to fully extend th...

Страница 27: ...on the product with the corresponding parts on the wall mount kit or desktop stand you want to attach Place a protective cloth or cushion on a flat surface Next place the product with the face down o...

Страница 28: ...10cm or farther away from the wall Be sure to use a wall mount kit that complies with the standards To install the monitor using a wall mount disconnect the stand base from the monitor 1 3 5 Anti thef...

Страница 29: ...rts on source devices may differ from device to device Do not connect the power cable until all connections are completed Connecting the power cable during connection may damage the product Check the...

Страница 30: ...fore connecting the power cable 1 Connect the D SUB cable to the RGB IN port on the back of the product and the RGB port on the PC 2 Press to change the input source to Analog Connection Using the DVI...

Страница 31: ...the HDMI port on the PC 2 Press to change the input source to DVI The DVI IN terminal is supplied for the DVI dedicated models only Connection Using an DP Cable Do not connect the power cable before...

Страница 32: ...models only Connection Using an HDMI DVI Cable Do not connect the power cable before connecting all other cables Ensure you connect a source device first before connecting the power cable 1 Connect th...

Страница 33: ...es or Speakers Do not connect the power cable before connecting all other cables Ensure you connect a source device first before connecting the power cable 1 Connect an audio output device such as hea...

Страница 34: ...vice such as a mouse keyboard Memory Stick or external hard disk drive by connecting them to the port of the monitor without connecting them to the PC The USB port of the monitor supports High Speed C...

Страница 35: ...on the storage device Examples of storage devices external memory memory card memory reader HDD type MP3 player etc You can use other USB devices that can be connected to a computer When connecting a...

Страница 36: ...36 Connecting and Using a Source Device 2 2 Connecting and Using a Source Device Changing the sound settings on Windows Control Panel Audio Speaker Speaker Setup 1 2 3 4...

Страница 37: ...product If the file provided is faulty visit the Samsung homepage http www samsung com and download the file 1 Insert the user manual CD provided with the product into the CD ROM drive 2 Click Windows...

Страница 38: ...lution on your PC to the optimum setting 1 Press to move to the language you want and press 2 To hide the information message press If the optimum resolution is not selected the message will appear up...

Страница 39: ...on Using a PC Adjust the resolution and refresh rate in Control Panel on your PC to obtain optimum picture quality The picture quality of TFT LCDs may degrade if the optimum resolution is not selected...

Страница 40: ...onnecting and Using a Source Device 2 2 Connecting and Using a Source Device Changing the Resolution on Windows Vista Go to Control Panel Personalization Display Settings and change the resolution 1 2...

Страница 41: ...41 Connecting and Using a Source Device 2 2 Connecting and Using a Source Device Changing the Resolution on Windows 7 Go to Control Panel Display Screen Resolution and change the resolution 1 2 3 4...

Страница 42: ...onnecting and Using a Source Device 2 2 Connecting and Using a Source Device Changing the Resolution on Windows 8 Go to Settings Control Panel Display Screen Resolution and change the resolution 1 2 3...

Страница 43: ...product to display the Key Guide Next press to display the corresponding menu screen 2 Press to move to PICTURE and press on the product 3 Press to move to Brightness and press on the product The fol...

Страница 44: ...e Next press to display the corresponding menu screen 2 Press to move to PICTURE and press on the product 3 Press to move to Contrast and press on the product The following screen will appear 4 Adjust...

Страница 45: ...o display the corresponding menu screen 2 Press to move to PICTURE and press on the product 3 Press to move to Sharpness and press on the product The following screen will appear 4 Adjust the Sharpnes...

Страница 46: ...rast and brightness as required Standard Obtain a picture quality suitable for editing documents or using Internet Game Obtain a picture quality suitable for playing games that involve many graphic ef...

Страница 47: ...ode to view a sharper image than in Standard mode Standard Select this mode when the surroundings are bright This also provides a sharp image Movie Select this mode when the surroundings are dark This...

Страница 48: ...io of 16 9 Screen Fit Display the picture with the original aspect ratio without cutting off Changing the screen size is available when the following conditions are satisfied A digital output device i...

Страница 49: ...and monitor can display normally Not every model can support all of these signals This can only be set when the external input is connected through HDMI DVI DP and PC AV Mode is set to AV 4 Press to...

Страница 50: ...ont of the product to display the Key Guide Next press to display the corresponding menu screen 2 Press to move to PICTURE and press on the product 3 Press to move to HDMI Black Level and press on the...

Страница 51: ...press to display the corresponding menu screen 2 Press to move to PICTURE and press on the product 3 Press to move to Response Time and press on the product The following screen will appear 4 Press to...

Страница 52: ...the product to display the Key Guide Next press to display the corresponding menu screen 2 Press to move to PICTURE and press on the product 3 Press to move to H Position or V Position and press The f...

Страница 53: ...ide Next press to display the corresponding menu screen 2 Press to move to PICTURE and press on the product 3 Press to move to Coarse and press on the product The following screen will appear 4 Adjust...

Страница 54: ...the Key Guide Next press to display the corresponding menu screen 2 Press to move to PICTURE and press on the product 3 Press to move to Fine and press on the product The following screen will appear...

Страница 55: ...00 A higher value will increase the intensity of the color 4 1 1 Configuring Red 1 Press any button on the front of the product to display the Key Guide Next press to display the corresponding menu sc...

Страница 56: ...1 Configuring Green 1 Press any button on the front of the product to display the Key Guide Next press to display the corresponding menu screen 2 Press to move to COLOR and press on the product 3 Pres...

Страница 57: ...1 Configuring Blue 1 Press any button on the front of the product to display the Key Guide Next press to display the corresponding menu screen 2 Press to move to COLOR and press on the product 3 Press...

Страница 58: ...rature to be cooler than Cool 1 Cool 1 Set the color temperature to be cooler than Normal mode Normal Display the standard color tone Warm 1 Set the color temperature to be warmer than Normal mode War...

Страница 59: ...ct to display the Key Guide Next press to display the corresponding menu screen 2 Press to move to COLOR and press on the product 3 Press to move to Gamma and press on the product The following screen...

Страница 60: ...t of the product to display the Key Guide Next press to display the corresponding menu screen 2 Press to move to MENU SETTINGS and press on the product 3 Press to move to Language and press on the pro...

Страница 61: ...product to display the Key Guide Next press to display the corresponding menu screen 2 Press to move to MENU SETTINGS and press on the product 3 Press to move to Menu H Position or Menu V Position an...

Страница 62: ...onfiguring Display Time 1 Press any button on the front of the product to display the Key Guide Next press to display the corresponding menu screen 2 Press to move to MENU SETTINGS and press on the pr...

Страница 63: ...y the Key Guide Next press to display the corresponding menu screen 2 Press to move to MENU SETTINGS and press on the product 3 Press to move to Transparency and press on the product The following scr...

Страница 64: ...to display the corresponding menu screen 2 Press to move to SETUP RESET and press on the product 3 Press to move to Reset and press on the product The following screen will appear 4 Press to move to t...

Страница 65: ...g menu screen 2 Press to move to SETUP RESET and press on the product 3 Press to move to Eco Saving and press on the product The following screen will appear 75 Change the monitor power consumption to...

Страница 66: ...d press on the product 3 Press to move to Off Timer and press on the product The following screen will appear Off Deactivate the off timer so that the product does not power off automatically On Activ...

Страница 67: ...move to SETUP RESET and press on the product 3 Press to move to Turn Off After and press on the product The following screen will appear 4 Press to configure Turn Off After For products for the market...

Страница 68: ...sage Check Signal Cable press the MENU button to display the On Screen Display OSD You can select PC or AV 6 5 1 Configuring PC AV Mode 1 Press any button on the front of the product to display the Ke...

Страница 69: ...ove to the option you want and press 5 The selected option will be applied S22C650K S23C650K S22C650D S23C650D S27C650D S24C650PL S24C650PLS 3 9 9 3 PC AV Mode 0 AUTO PC AV Mode DVI DisplayPort AUTO P...

Страница 70: ...RESET and press on the product 3 Press to move to Key Repeat Time and press on the product The following screen will appear Acceleration 1 sec or 2 sec can be selected If No Repeat is selected a comma...

Страница 71: ...to move to SETUP RESET and press on the product 3 Press to move to Source Detection and press on the product The following screen will appear Auto The input source is automatically recognized Manual M...

Страница 72: ...ext press to display the corresponding menu screen 2 Press to move to SETUP RESET and press on the product 3 Press to move to Customized Key and press on the product The following screen will appear B...

Страница 73: ...any button on the front of the product to display the Key Guide Next press to display the corresponding menu screen 2 Press to move to INFORMATION The current input source frequency and resolution wi...

Страница 74: ...ttons in the initial screen where no OSD menu is displayed 1 Press any button on the front of the product when no menu screen is displayed to display the Key guide Next press The following screen will...

Страница 75: ...olume by pressing the button when the Key Guide is displayed 1 Press any button on the front of the product when no menu screen is displayed to display the Key guide Next press The following screen wi...

Страница 76: ...does not appear on the main screen find and double click the MagicTune setup file on the CD ROM 3 Select the installation language and click Next 4 Complete the remaining software installation steps...

Страница 77: ...ick the Add or Remove Programs icon in the Control Panel 3 In the Add Remove window find and select MagicTune so that it is highlighted 4 Click Change or Remove Programs to remove the software 5 Selec...

Страница 78: ...nstallation The software may not work properly if you do not restart the computer after the installation The MultiScreen icon may not appear depending on the computer system and the product specificat...

Страница 79: ...tware 8 8 Installing the Software 8 2 2 Removing the Software Click Start select Settings Control Panel and then double click Add or Remove Programs Select MultiScreen from the program list and click...

Страница 80: ...the screen The software may not work properly if you do not restart the computer after the installation The MagicRotation icon may not appear depending on the computer system and the product specific...

Страница 81: ...are before doing so System Requirements OS Windows 98 SE Windows Me Windows NT 4 0 Windows 2000 Windows XP Home Edition Windows XP Professional Windows Vista 32bit Windows 7 32bit Windows 8 32bit For...

Страница 82: ...e Add or Remove Programs icon in the Control Panel 3 In the Add Remove window find and select MagicRotation so that it is highlighted 4 Click Change or Remove Programs to remove the software 5 Select...

Страница 83: ...ct is working normally If the screen remains blank check the PC system video controller and cable 9 1 2 Checking the Resolution and Frequency For a mode that exceeds the supported resolution refer to...

Страница 84: ...within the range of resolution and frequency compatible with the product Next if required change the settings referring to Standard Signal Mode Table page 95 in this manual and the INFORMATION menu on...

Страница 85: ...lume If the volume is still low after turning it up to the maximum level adjust the volume on your PC sound card or software program Source device issue A beeping sound is heard when my PC is booting...

Страница 86: ...r and adjust Refresh rate under Monitor settings Windows Vista Go to Control Panel Appearance and Personalization Personalization Display Settings Advanced Settings Monitor and adjust Refresh rate und...

Страница 87: ...s Control Panel Appearance and Personalization Display Adjust Resolution and adjust the resolution How do I set power saving mode Windows XP Set power saving mode in Control Panel Appearance and Theme...

Страница 88: ...tion 1920 x 1080 60Hz Maximum Pixel Clock 148 MHz Analog DVI DisplayPort 148 MHz Analog HDMI 148 MHz Analog DVI DisplayPort Power Supply This product uses 100 to 240V Refer to the label at the back of...

Страница 89: ...hes 12 02 lbs 542 9 x 479 65 x 224 0 mm 5 45 kg VESA Mounting Interface 3 9 Inches x 3 9 Inches 100 mm x 100 mm For use with Specialty Arm Mounting hardware Environmental considerations Operating Temp...

Страница 90: ...different countries Signal connectors 15pin to 15pin D sub cable Detachable HDMI to DVI Cable Detachable HDMI Cable Detachable 15pin to 15pin D sub cable Detachable DP to DP Cable Detachable HDMI to...

Страница 91: ...ith any Plug and Play compatible systems Two way data exchange between the monitor and PC system optimizes the monitor settings Monitor installation takes place automatically However you can customize...

Страница 92: ...of the product as the standard voltage can vary in different countries Signal connectors 15pin to 15pin D sub cable Detachable DP to DP Cable Detachable HDMI to DVI Cable Detachable HDMI Cable Detach...

Страница 93: ...can be installed and used with any Plug and Play compatible systems Two way data exchange between the monitor and PC system optimizes the monitor settings Monitor installation takes place automatical...

Страница 94: ...nvironmental Protection Agency Energy Star power is measured with the test method in the current Energy Star Standard To reduce the power consumption to 0 watts turn off the power switch on the back o...

Страница 95: ...transmitted from the PC does not belong to the standard signal modes the screen may be blank even though the power LED turns on In such a case change the settings according to the following table by r...

Страница 96: ...75 025 135 000 VESA 1440 x 900 55 935 59 887 106 500 VESA 1600 x 900 60 000 60 000 108 000 VESA 1680 x 1050 65 290 59 954 146 250 VESA 1920 x 1080 67 500 60 000 148 500 Resolution Horizontal Frequenc...

Страница 97: ...800 x 600 35 156 56 250 36 000 VESA 800 x 600 37 879 60 317 40 000 VESA 800 x 600 48 077 72 188 50 000 VESA 800 x 600 46 875 75 000 49 500 VESA 1024 x 768 48 363 60 004 65 000 VESA 1024 x 768 56 476...

Страница 98: ...800 x 600 35 156 56 250 36 000 VESA 800 x 600 37 879 60 317 40 000 VESA 800 x 600 48 077 72 188 50 000 VESA 800 x 600 46 875 75 000 49 500 VESA 1024 x 768 48 363 60 004 65 000 VESA 1024 x 768 56 476...

Страница 99: ...800 x 600 35 156 56 250 36 000 VESA 800 x 600 37 879 60 317 40 000 VESA 800 x 600 48 077 72 188 50 000 VESA 800 x 600 46 875 75 000 49 500 VESA 1024 x 768 48 363 60 004 65 000 VESA 1024 x 768 56 476...

Страница 100: ...A 800 x 600 35 156 56 250 36 000 VESA 800 x 600 37 879 60 317 40 000 VESA 800 x 600 48 077 72 188 50 000 VESA 800 x 600 46 875 75 000 49 500 VESA 1024 x 768 48 363 60 004 65 000 VESA 1024 x 768 56 476...

Страница 101: ...A 800 x 600 35 156 56 250 36 000 VESA 800 x 600 37 879 60 317 40 000 VESA 800 x 600 48 077 72 188 50 000 VESA 800 x 600 46 875 75 000 49 500 VESA 1024 x 768 48 363 60 004 65 000 VESA 1024 x 768 56 476...

Страница 102: ...8 322 MAC 640 x 480 35 000 66 667 30 240 MAC 832 x 624 49 726 74 551 57 284 MAC 1152 x 870 68 681 75 062 100 000 VESA 640 x 480 31 469 59 940 25 175 VESA 640 x 480 37 861 72 809 31 500 VESA 640 x 480...

Страница 103: ...sung com BOLIVIA 800 10 7260 http www samsung com BRAZIL 0800 124 421 4004 0000 http www samsung com CHILE 800 SAMSUNG 726 7864 From mobile 02 24 82 82 00 http www samsung com cl COLOMBIA http www sam...

Страница 104: ...nglish PARAGUAY 98005420001 http www samsung com PERU 0 800 777 08 Only from landline 336 8686 From HHP landline http www samsung com PUERTO RICO 1 800 682 3180 http www samsung com TRINIDAD TOBAGO 1...

Страница 105: ...4 only from land line 30 210 6897691 from mobile and land line http www samsung com HUNGARY 06 80 SAMSUNG 726 7864 http www samsung com ITALIA 800 SAMSUNG 726 7864 http www samsung com LATVIA 8000 726...

Страница 106: ...ch_fr French U K 0330 SAMSUNG 7267864 http www samsung com CIS ARMENIA 0 800 05 555 http www samsung com AZERBAIJAN 088 55 55 555 http www samsung com BELARUS 810 800 500 55 500 http www samsung com G...

Страница 107: ...0 SAMSUNG 0800 726 786 http www samsung com PHILIPPINES 1 800 10 SAMSUNG 726 7864 for PLDT 1 800 3 SAMSUNG 726 7864 for Digitel 1 800 8 SAMSUNG 726 7864 for Globe 02 5805777 http www samsung com ph SI...

Страница 108: ...44 77 11 http www samsung com U A E 800 SAMSUNG 726 7864 http www samsung com AFRICA ANGOLA 91 726 7864 http www samsung com BOTSWANA 0800 726 000 http www samsung com CAMEROON 7095 0077 http www sams...

Страница 109: ...If customer requests software installation and setup for the product If a service technician removes cleans dusts or foreign materials inside of the product If customer requests an installation addit...

Страница 110: ...the environment or human health from uncontrolled waste disposal please separate these items from other types of waste and recycle them responsibly to promote the sustainable reuse of material resour...

Страница 111: ...ay an image although the refreshing is invisible to the naked eye The number of screen refreshes is called scanning rate and is measured in Hz A scanning rate of 60Hz means that the screen refreshes 6...

Страница 112: ...the screen and is suitable for performing multiple tasks at the same time E g A resolution of 1920 x 1080 consists of 1 920 horizontal pixels horizontal frequency and 1 080 vertical lines vertical re...

Страница 113: ...isposal 109 Correct posture to use the product 17 Customized Key 71 D Display Time 61 E Eco Saving 64 F Fine 53 G Gamma 58 General 87 Green 55 H HDMI Black Level 49 I Image Size 47 INFORMATION 72 Inst...

Страница 114: ...x 114 Responsibility for the Pay Service Cost to Customers 108 S Safety Precautions 10 SAMSUNG MAGIC Bright 45 Sharpness 44 Source Detection 70 Standard Signal Mode Table 94 T Transparency 62 Turn Off...

Отзывы: