


14_
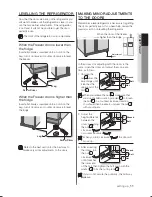
setting up
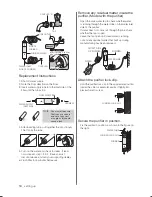
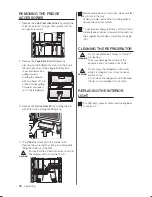
Replacement Instructions
1. Shut off water supply.
2. Note the Flow direction on the filter.
3. Insert water supply tube into the inlet side of the
filter until the tube stop.
4. After inserting tube, put together the clip strongly.
The Clip fix the tube.
5. Turn on the water and check for leaks. If leaks
occur, repeat step 1,2,3,4. If leaks persist,
discontinue use and call your supporting dealer.
6. Flush filter for 5 minutes before use.
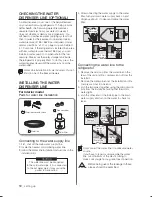
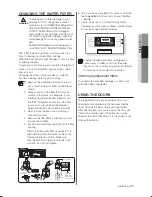
Remove any residual matter inside the
purifier. (Model with the purifier)
- Open the main water tap to check whether water
is running through the water tube on the water inlet
side of the purifier.
- If water does not come out through the line, check
whether the tap is open.
- Leave the tap open until clean water is running
out and any residual matter that built up during
manufacturing has been removed.
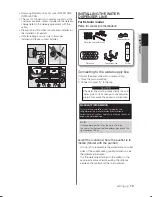
Attach the purifier lock-clip.
- Hold the purifier lock-clip in the appropriate position
(under the sink for example) and fix it tightly into
place where to screw.
Secure the purifier in position.
- Fix the purifier in position, as shown in the figure on
the right.
COUPLER “A”
TAP
COUPLER
SIDE OF
PURIFIER
WATER INLET
SIDE OF PURIFIER
LINE OUTLET
90 degree
PURIFIER WATER
CAUTION
Locking Clip
Insert Locking Clip After
tube seated
WATER SUPPLY
INLET SIDE
PERMEAT
FLOW DIRECTION
Note :
You must also ensure
that the cut is square
and not at any sort
of angle as this could
cause a leak
WATER LINE
PURIFIER
WATER
OUTLET SIDE
OF PURIFIER
PURIFIER LOCK-CLIP
WATER TUBE
PURIFIER LOCK-CLIP
PURIFIER
DA99-02318A(0.5).indd 14
2011.5.31 5:2:11 PM
DA99-02318A(0.5).indd 14
2011.5.31 5:12:41 PM
Содержание RSH5SBBP
Страница 23: ...memo ...


