Samsung RFG295AABP/XAA Скачать руководство пользователя страница 23

Operating


_23

02 
o

PER

atin
G

Energy saver

This icon will light up when you activate the “Energy Saver” function. The Energy Saver function is automatically set to 
“ON” when power is supplied to the Refrigerator. If condensation occurs on the doors, turn the Energy Saver function off.

Lock

This icon will light up when you activate the “Lock” feature. In this case, you won’t be able to use the control panel. 

If you press and hold the Ice Off/Hold button for 3 sec to unlock Child Lock, you will be able to use the control 

panel again.

Lighting

This icon will light up when you activate the “Lighting” feature. In this case, the dispenser light(under the

display) will be on constantly. If you would like the dispenser light to come on only when using the dispenser, 

turn the “Lighting” feature off.

alarm

This icon will light up when you activate the “Alarm” feature. The door alarm will sound if any door is open for 

more than 3 minutes. The beeping stops when you close the door. Initially the Alarm is set to on.

ice off

This icon will light up when you activate the “Ice Off” feature. In this case, the ice will not be produced.

usinG tHE ContRoL PanEL

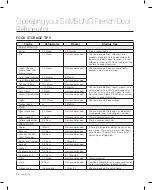
Basic temperature of Freezer and Refrigerator Compartments

The basic temperature and/or recommended temperature of Freezer and Refrigerator Compartments are -2°F 

and 38°F respectively.

If the temperature of Freezer and Refrigerator Compartments are too high or low, adjust the temperature manually.

Controlling the Freezer temperature

The Freezer temperature can be set between 8°F and -8°F to suit your particular needs. Press the Freezer 

button repeatedly until the desired temperature is shown in the temperature display. Keep in mind that foods like 

ice cream may melt at 4°F. The temperature display will move sequentially from -8°F to 8°F. When the display 

reaches 8°F, the temperature display goes back to -8˚F.

Five seconds after the new temperature is set, the display will again show the actual current freezer temperature 

until the new temperature is reached. 

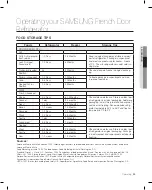
Controlling the Refrigerator temperature

The Refrigerator temperature can be set between 46°F and 34°F to suit your particular needs. Press the Fridge 

button repeatedly until the desired temperature is shown in the temperature display.

The temperature control process for the Fridge works just like the Freezer process.

Press the Fridge button to set your desired temperature. After a few seconds, the Fridge will begin adjusting 

towards the newly set temperature. This will be reflected in the digital display.

-   The temperature of the Freezer, Refrigerator or Pantry Room may rise when you open the doors too frequently, 

or if a large amount of warm or hot food is placed inside.

-   This may cause the digital display to blink. Once the Freezer and Refrigerator temperature return to their normal 

set temperatures, the blinking will stop.

-   If the blinking continues, you may need to “reset” the Refrigerator. Try unplugging the appliance, wait for around 

10 minutes and then plug the power cord back in.

-  The temperature of the Pantry Room may be a little different according to the location inside.
-   If communication between Display and Main Controller errors, Pantry Display light may blink.
   Once the communication return to their normal set temperatures, the blinking will stop.
   If the blinking continues for a long period of time, please contact to Samsung Electronics Service Center.

Содержание RFG295AABP/XAA

Страница 1: ...efrigerator user manual imagine the possibilities Thank you for purchasing this Samsung product To receive more complete service please register your product at www samsung com register RFG295 English...

Страница 2: ...eys Secure Auto Close The Secure Auto Close feature will automatically close a door that is slightly open Compact Ice Maker The Ice maker can dispense cubed or crushed ice Digital Display and Temperat...

Страница 3: ...follow these basic safety precautions Do NOT attempt Do NOT disassemble Do NOT touch Follow directions explicitly Unplug the power plug from the wall socket Make sure the machine is grounded to preve...

Страница 4: ...r before changing the interior light Changing the light while the Refrigerator is plugged in may cause electric shock If you wish to dispose the Refrigerator remove the doors and seals before throwing...

Страница 5: ...re articles on the top of the appliance When you open or close the door the articles may fall and cause personal injury and or damage to surrounding objects Do not store pharmaceutical products scient...

Страница 6: ...ion planned empty the Refrigerator and turn it off Wipe excess moisture from the inside and leave the doors open to keep odor and mold from developing Service Warranty and Modification Any changes or...

Страница 7: ...17 Adjusting the freezer drawer level 18 Checking the water dispenser line 19 Installing the water line 21 Using the control panel 22 Using the digital display 24 Using the cold water dispenser 25 Pa...

Страница 8: ...n of the cardboard carton and place under the refrigerator where you are working When moving be sure to pull the unit straight out and push back in straight Allow clearance to the right left back and...

Страница 9: ...lace you are ready to set up and enjoy the features and functions of the appliance By completing the following steps your Refrigerator should be fully operational 1 Place the Refrigerator in an approp...

Страница 10: ...bolts 7 attached to the upper left and right door hinges with a wrench 13 32 With a Philips head screwdriver remove the ground screw 8 attached to the upper left and right door hinges Remove the uppe...

Страница 11: ...same time 3 Take out the lower basket 3 by lifting the basket up from the rail system 1 Take out the upper drawer by lifting it up disassemble the freezer drawer 4 Remove four 10mm hex head bolts fro...

Страница 12: ...ighten the 2 hex head bolts 11 into the lower left and right door hinges 2 Place the hole in the bottom of the door over the lower hinge 12 Be careful not to miss the hinge cap because it can be easil...

Страница 13: ...o the Hinge Cover With the door opened reinsert the Top Table cap 1 and close the doors When reattaching the hinge cover make sure that the wires are not pressed or damaged by the top table REAttACHin...

Страница 14: ...y lock into place 6 Insert the upper drawer Slot Slot 2 Attach the freezer door front onto the open slots on the sides Slot Slot 3 Tighten 4 hex head bolts completely with a socket wrench 7 16inch Slo...

Страница 15: ...nsert a flat blade screwdriver into a notch on the left control lever turn it clockwise or counter clockwise to level the left door When the Left door is higher than the Right door Insert a flat blade...

Страница 16: ...ght by turning the hex wrench 3 clockwise or counter clockwise When you turn the hex wrench counter clockwise the door will move up 1 After adjusting the doors please insert the supplied fastener ring...

Страница 17: ...tly to loosen the door 2 Loosen the controller screw 3 with a Phillips screwdriver 3 Find the best level to align the door slope After adjustment first tighten screw 3 and then screw 2 1 2 3 Example T...

Страница 18: ...with low water pressure below 20psi you can install a booster pump to compensate for the low pressure Make sure the water storage tank inside the Refrigerator is properly filled To do this press the w...

Страница 19: ...ilter life is about 6 months 2 3 Sticker month indicator 1 1 Slip the compression nut through the supplied plastic tubing 2 Tighten the compression nut onto the 1 4 compression fitting If you are usin...

Страница 20: ...ply system and remove air from the lines 3 Additional flushing may be required in some households 4 Open the Refrigerator door and make sure there are no water leaks coming from the water filter Rever...

Страница 21: ...hold the Fridge Hold 3 sec for Power Cool button for 3 seconds to speed up the time needed to cool products in the Refrigerator It can be helpful if you need to quickly cool easily spoiled items or i...

Страница 22: ...y this happens about every 6 months The filter Indicator will be Blue when you initially insert the water filter The filter Indicator will be Light Pink when you have used your water filter for 5 mont...

Страница 23: ...tedly until the desired temperature is shown in the temperature display Keep in mind that foods like ice cream may melt at 4 F The temperature display will move sequentially from 8 F to 8 F When the d...

Страница 24: ...Function When selecting the Ice Off mode remove all ice cubes from the bucket If you are not using the ice dispenser the ice cubes may clump together Pull the lock lever forward to throw away ice cube...

Страница 25: ...nged Section is reversed put it back to the right position and close the door Moisture may occur at times on the Vertical Hinged Section The door handle may become loose over time If this happens tigh...

Страница 26: ...ity within the compartment Keep vegetables and fruits separate when possible 4 VEGETABLE FRUIT DRAWERS Designed to handle large bulky items such as gallons of milk or other large bottles and container...

Страница 27: ...i Drawer out to the stop position Lift the Deli Drawer up and past the stop 2 2 Tempered Glass Shelves To remove Tilt up the front of the shelf in the direction shown 1 and lift it up vertically 2 Pul...

Страница 28: ...hey may present a choking hazard to children 1 2 2 1 3 Freezer Drawer To remove the freezer drawer Pull the freezer drawer out fully Tilt up the rear of the bin and lift it out to remove To relocate t...

Страница 29: ...on the display may be erased if the stainless cleaner is applied directly to the area where the letters are printed Cleaning the Ice Water Dispenser Push down one end of the tray dispenser and remove...

Страница 30: ...ust before the capacity of the current filter runs out Changing the filter on time provides you with the freshest cleanest water from your fridge 1 Take a new water filter and put a month indicator st...

Страница 31: ...drinking Be sure to flush the dispenser thoroughly otherwise water may drip from the dispenser This means that there is still air in the line Do NOT use the water or ice dispenser without a water fil...

Страница 32: ...Reduction Average Influent Concentration NSF Specified Influent Challenge Concentration Units apply to each row Average Reduction Average Product Water Concentration Max Permissible Product Water Con...

Страница 33: ...Operating _33 Water Filter Certification 02 OPERATING Operating your SAMSUNG French Door Refrigerator...

Страница 34: ...eks Not recommended Cream Dips opened 1 week Not recommended Yogurt 10 14 Days Not recommended Check date code Keep covered Frozen Yogurt na 2 Months EGGS Eggs uncooked 3 4 Weeks Not recommended Check...

Страница 35: ...t 2 4 Days 6 12 Months Bacon 1 2 weeks 1 2 Months Sausage 1 2 Days 1 2 Months Steak 2 4 Days 6 9 Months Poultry 1 day 12 Months Lunch meat 3 5 Days 1 month Cooked Meat 2 3 Days 2 3 Months Check date c...

Страница 36: ...e appliance are hot and condensation is occurring Some heat is normal as anti condensators are installed in the vertical hinged section of the Refrigerator to prevent condensation Is the Refrigerator...

Страница 37: ...osmetic damage or exterior finish accidents abuse neglect fire water lightning or other acts of nature use of products equipment systems utilities services parts supplies accessories applications inst...

Страница 38: ...Y CALL OR VISIT US ONLINE AT WRITE U S 800 SAMSUNG 800 726 7864 www samsung com Samsung Electronics America Inc 85 Challenger Road Ridgefield Park NJ 07660 CANADA 800 SAMSUNG 800 726 7864 www samsung...

Отзывы: