


English - 23
SAFETY INFORMA
TION
SETTING UP
LEVELING THE REFRIGERATOR
AND ADJUSTING HEIGHT AND
GAP OF THE DOORS
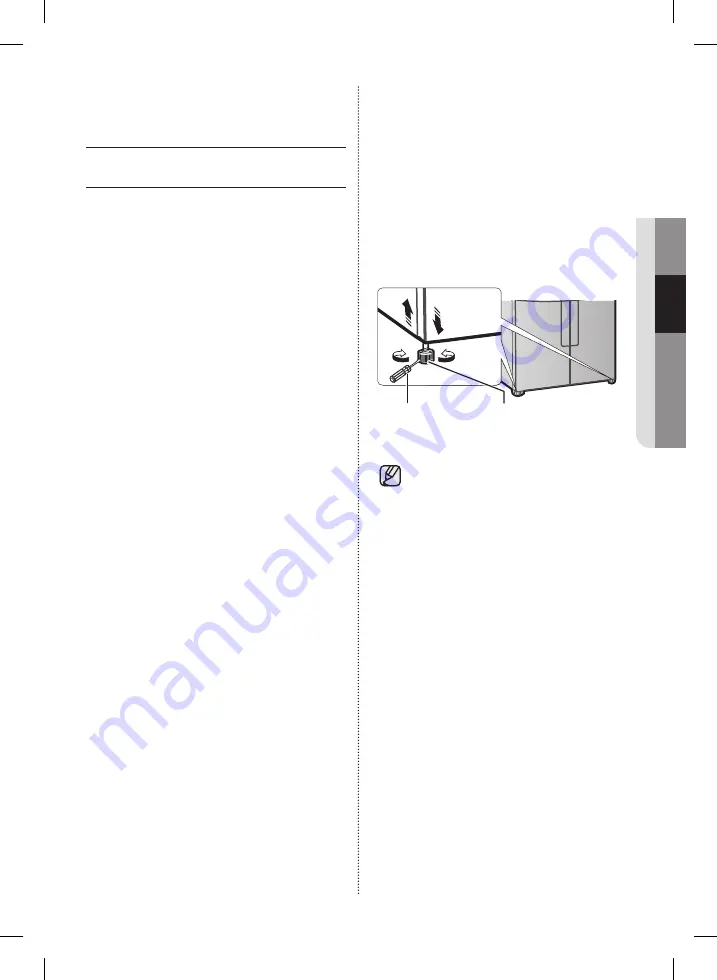
How to level the refrigerator
To avoid a hazard due to
instability of the refrigerator,
please place the refrigerator
on a horizontal support and
levelled in accordance with
the following instruction for
installation.
Failing to do so may result in
the refrigerator tipping and a
personal injury.
If the front of the appliance is
slightly higher than the rear,
the door can be opened and
closed more easily.
Setting up the refrigerator on
an uneven surface will cause
the refrigerator to be uneven.
- When install the refrigerator,
the legs should touch the
floor surely.
The legs should be located
on the back of under the
each door.
Insert it with flathead
screwdriver and tighten up to
arrow direction.
If the Refrigerator is put on a floor that is not level,
it can cause a height difference between the doors.
• Insert a Flat-Head (-) Screwdriver into the slot
in the Leveling Leg Control Lever and adjust the
level by turning the Control Lever clockwise or
counter-clockwise.
When you rotate the Lever clockwise, you raise
the refrigerator.
When you rotate the Lever counter-clockwise,
you lower the refrigerator.
Flat-blade
screwdriver(-)
Control Lever
• If the Refrigerator is not level back and
front, put a solid panel (such as a plastic
panel, a plastic ruler, etc.) on the floor
where the rear legs will rest, and then fix
it in place with plastic tape.
When you push in the Refrigerator, make
sure the rear legs rest on the panel.
• If you have a wooden floor or similar soft floor,
take care not to damage the floor when pushing
the Refrigerator into place.
DA68-03194Z-(EN+FR+AR)-01.indb 23
2018. 12. 13. 오후 5:23
Содержание RF56N9040SL
Страница 43: ...Memo DA68 03194Z EN FR AR 01 indb 43 2018 12 13 5 24...
Страница 87: ...M mo DA68 03194Z EN FR AR 01 indb 43 2018 12 13 5 24...
Страница 90: ...3 DA68 03194Z 01 AR indd 43 2018 12 13 3 17 06 3 DA68 DA68 03194Z EN FR AR 01 indb 2 2018 12 13 5 24...
Страница 92: ...41 3 DA68 03194Z 01 AR indd 41 2018 12 13 3 17 06 3 DA68 DA68 03194Z EN FR AR 01 indb 4 2018 12 13 5 24...
Страница 96: ...37 3 DA68 03194Z 01 AR indd 37 2018 12 13 3 17 05 3 DA68 DA68 03194Z EN FR AR 01 indb 8 2018 12 13 5 24...
Страница 110: ...23 3 DA68 03194Z 01 AR indd 23 2018 12 13 3 16 57 3 DA68 DA68 03194Z EN FR AR 01 indb 22 2018 12 13 5 24...
Страница 111: ...3 16 57 22 1 2 3 4 5 6 3 DA68 03194Z 01 AR indd 22 2018 12 13 3 16 57 DA68 03194Z EN FR AR 01 indb 23 2018 12 13 5 24...
Страница 116: ...17 3 DA68 03194Z 01 AR indd 17 2018 12 13 3 16 52 3 DA68 DA68 03194Z EN FR AR 01 indb 28 2018 12 13 5 24...
Страница 117: ...3 16 52 16 24 ISO 3 DA68 03194Z 01 AR indd 16 2018 12 13 3 16 52 DA68 03194Z EN FR AR 01 indb 29 2018 12 13 5 24...
Страница 119: ...3 16 52 14 3 DA68 03194Z 01 AR indd 14 2018 12 13 3 16 52 DA68 03194Z EN FR AR 01 indb 31 2018 12 13 5 24...
Страница 122: ...11 LED LED LED 3 DA68 03194Z 01 AR indd 11 2018 12 13 3 16 52 3 DA68 DA68 03194Z EN FR AR 01 indb 34 2018 12 13 5 24...
Страница 123: ...3 16 52 10 LED 3 DA68 03194Z 01 AR indd 10 2018 12 13 3 16 52 DA68 03194Z EN FR AR 01 indb 35 2018 12 13 5 24...
Страница 124: ...9 3 DA68 03194Z 01 AR indd 9 2018 12 13 3 16 52 S 3 DA68 DA68 03194Z EN FR AR 01 indb 36 2018 12 13 5 24...
Страница 126: ...7 3 DA68 03194Z 01 AR indd 7 2018 12 13 3 16 52 3 DA68 DA68 03194Z EN FR AR 01 indb 38 2018 12 13 5 24...
Страница 128: ...5 3 DA68 03194Z 01 AR indd 5 2018 12 13 3 16 52 3 DA68 DA68 03194Z EN FR AR 01 indb 40 2018 12 13 5 24...
Страница 129: ...3 16 52 4 R 600a 3 DA68 03194Z 01 AR indd 4 2018 12 13 3 16 52 DA68 03194Z EN FR AR 01 indb 41 2018 12 13 5 24...
Страница 132: ...Samsung DA68 03194Z 01 3 DA68 03194Z 01 AR indd 1 2018 12 13 3 16 51 DA68 03194Z EN FR AR 01 indb 44 2018 12 13 5 24...