INSTALLING THE HANDLES
(APPLICABLE MODELS ONLY)
The handles are included in the product
package.
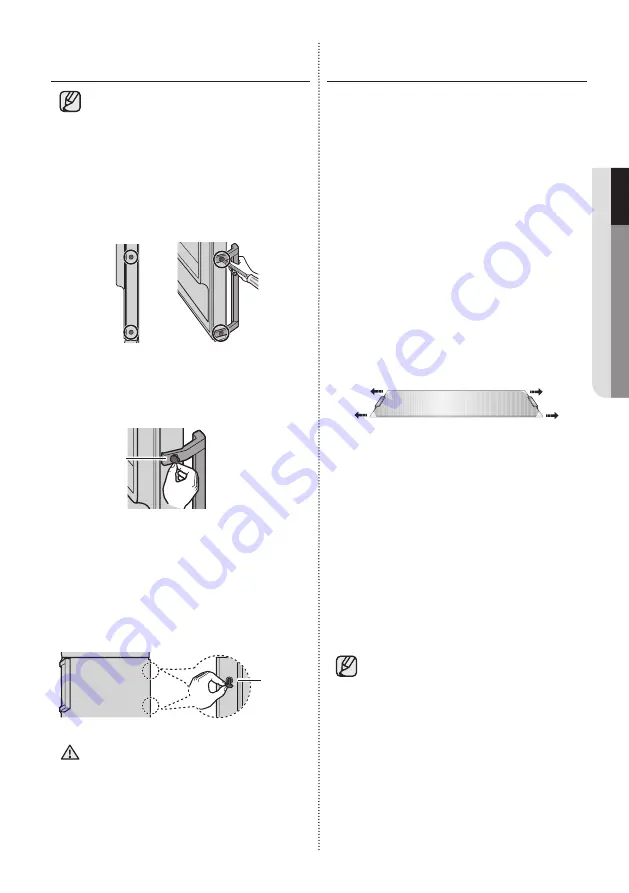
1. Align each screw hole of the handle to the
corresponding screw hole of the door.
Then, insert the provided screws (x2) and use
a Phillips screwdriver to tighten them.
2. Insert the Cap-Handle Screws (x2) into each
handle hole on both sides.
Cap-Handle
screw
3. Repeat the steps above to install the handle on
the other freezer or fridge door.
4. Insert the Cap Screws (x2) into the door holes
of the opposite side of the door where no
handle is installed.
Cap
screw
Use caution when installing the
handle.
The door may be scratched.
CAUTION
SETTING UP THE
REFRIGERATOR
Now that you have your new refrigerator installed
and in place, you are ready to set up and enjoy
the full features and functions of the appliance.
By completing the following steps, your
refrigerator should be fully operational.
If not, first check the power supply and electricity
source or try the troubleshooting section at the
back of this user guide.
If you have any further questions, contact your
Samsung Electronics service center.
1. Place the refrigerator in an appropriate location
with reasonable clearance between the wall
and the refrigerator.
Refer to installation instructions in this manual.
2. Before using the refrigerator please remove the
shelf corner covers shown on below figure.
(The covers are used to secure your
refrigerator during transportation).
3. Once the refrigerator is plugged in, make sure
the interior light comes on when you open the
doors.
4. Set the temperature control to the coldest
temperature and wait for an hour.
The freezer should get slightly chilled and the
motor should run smoothly.
5. After powering the refrigerator, it will take a few
hours to reach the appropriate temperature.
Once the refrigerator temperature is sufficiently
cool, you can store food and drink in the
refrigerator.
After powering the refrigerator, the alarm
will sound. Press Freezer or Fridge button.
(Only for Coolselect Zone function model
and RB37 series) Refer to on page 20
“Using the control Panel”.
setting up _
19
01 SETTING UP01 SETTING UP
Содержание RB31F Series
Страница 41: ......


