background image

33

ENG

PLAYBACK

Repeat Playback 

B

A

GD

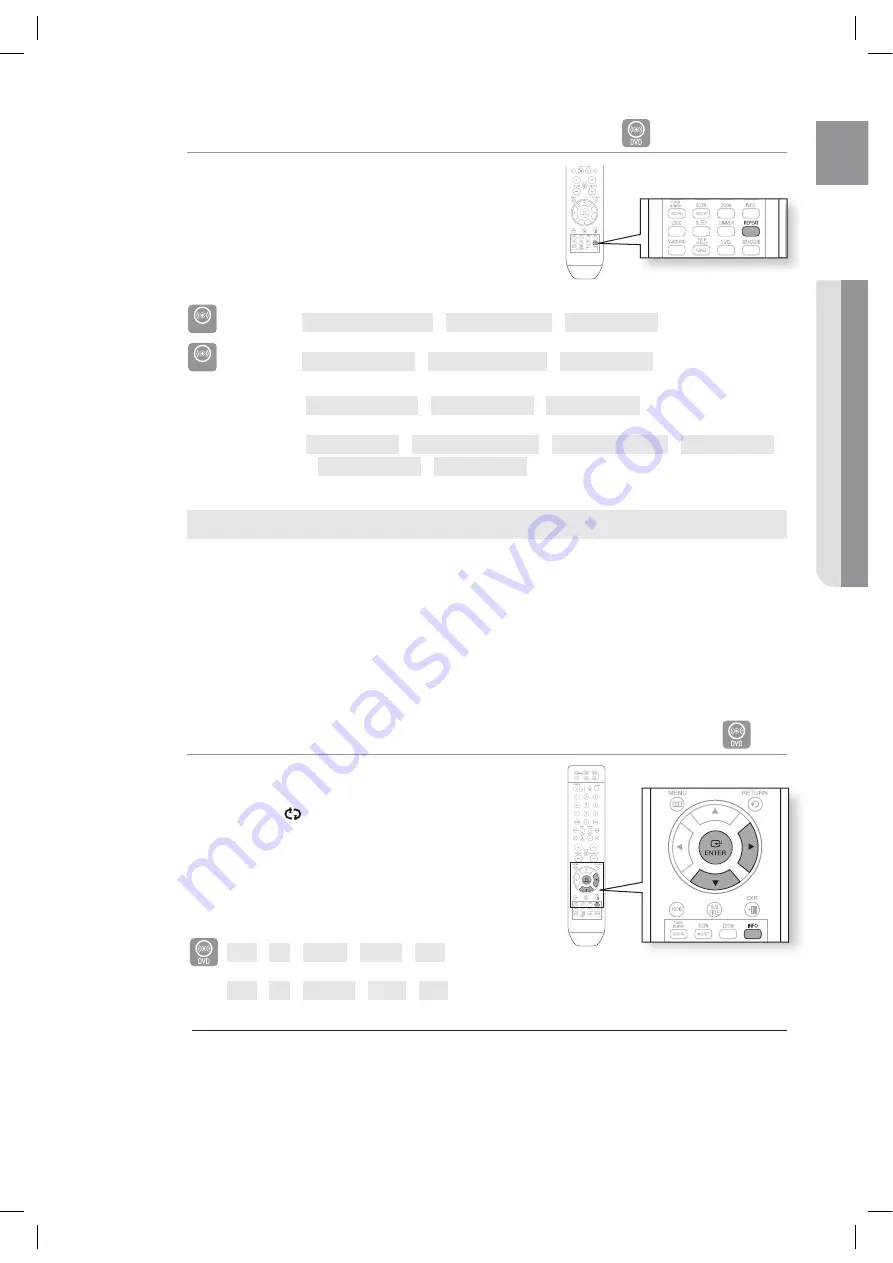
Repeat playback allows you to repeatedly play a chapter, title, 
track (song), or directory (MP3 fi le).

Press the 

REPEAT

 button.

Each time the button is pressed during playback, the repeat 
playback mode changes as follows:

DVD-VIDEO

REPEAT : CHAPTER 

 REPEAT : TITLE 

 REPEAT : OFF

DVD-AUDIO            

REPEAT : TRACK 

 REPEAT : GROUP 

 REPEAT : OFF

B

REPEAT : TRACK 

 REPEAT : DISC 

 REPEAT : OFF

A

GD

 REPEAT : OFF

REPEAT : RANDOM 

 REPEAT : TRACK 

 REPEAT : DIR 

 REPEAT : DISC 

 REPEAT : OFF

CHAPTER

 : Repeatedly plays the selected chapter.

TITLE

 : Repeatedly plays the selected title.

GROUP

 : Repeatedly plays the selected group.

RANDOM

 :  Plays tracks in random order. (A track that has already been played may be played again.)

TRACK

 : Repeatedly plays the selected track.

DIR

 : Repeatedly plays all tracks in the selected folder.

DISC

 : Repeatedly plays the entire disc.

OFF

 : Cancels Repeat Playback.

To Select a Repeat Playback Mode in the Disc Information Screen

B

 Press the 

INFO

 button twice.

Press the Cursor 

X

 button to move to REPEAT 

PLAYBACK (

) display.

Press the Cursor 

T

 button to select the desired Repeat 

Playback mode.

To select another album and track, repeat Steps 2 and 
3 above.  

Press the 

ENTER

 button.

OFF 

A- 

CHAP 

TITLE 

OFF

B  

OFF 

A- 

TRACK 

DISC 

OFF

 For DivX, MP3 and JPEG discs, you cannot select Repeat Play from the information display screen.

1.

2.

3.

4.

M

Repeat Playback Options

HT-X810_XAA_0303.indd   33

Содержание PSWX810

Страница 1: ...S COUNTRY CALL OR VISIT US ONLINE AT WRITE IN THE US 1 800 SAMSUNG 7267864 www samsung com us Samsung Electronics America Inc 105 Challenger Road Ridgefield Park NJ 07660 0511 Code No AH68 02062R 0 0 HT X810_XAA_0303 indd 2 ...

Страница 2: ...tem user manual imagine the possibilities Thank you for purchasing this Samsung product To receive more complete service please register your product at www samsung com global register HT X810 HT X810_XAA_0303 indd 3 PS WX810 ...

Страница 3: ...lay The HT X810 allows you to select your favorite image during JPEG DVD playback and set it as your background wallpaper HDMI HDMI transmits DVD video and audio signals simultaneously and provides a clearer picture AV SYNC Function Video may lag behind the audio if the unit is connected to a digital TV To compensate for this you can adjust the audio delay time to sync up with the video Anynet HDM...

Страница 4: ...NOTE for U S A This equipment has been tested and found to comply with the limits for a Class B digital device pursuant to Part 15 of the FCC Rules These limits are designed to provide reasonable protection against harmful interference in a residential installation This equipment generates uses and can radiate radio frequency energy and if not installed and used in accordance with the instructions...

Страница 5: ...ade or the third prong are provided for your safety If the provided plug does not fit into your outlet consult an electrician for replacement of the obsolete outlet 10 Protect the power cord from being walked on or pinched particularly at plugs convenience receptacles and the point where they exit from the apparatus 11 Only use attachment accessories specified by the manufacturer 12 Use only with th...

Страница 6: ...or continuous use Switching off the DVD player to the stand by mode does not disconnect the electrical supply In order to disconnect the player completely from the power sup ply remove the main plug from the wall outlet especially when left unused for a long period of time During thunderstorms disconnect the AC main plug from the wall outlet Voltage peaks due to lightning could damage the unit Pro...

Страница 7: ...anel REMOTE CONTROL 13 13 Setting the Remote Control 14 Tour of the Remote Control CONNECTIONS 17 17 Connecting the Wireless Subwoofer 18 Installing the Wall Mount 19 Connecting the Video Out to your TV 21 HDMI Function 22 Connecting Audio from External Components 24 Connecting the FM Antenna BEFORE USING YOUR HOME THEATER 25 PLAYBACK 26 26 Disc Playback 27 MP3 WMA CD Playback 28 JPEG File Playbac...

Страница 8: ... AV SYNC 48 Setting the HDMI Audio 48 Setting the Audio RADIO 49 49 Listening to Radio 49 Presetting Stations CONVENIENT FUNCTION 50 50 Sleep Timer Function 50 Adjusting Display Brightness 50 Mute Function 51 V SOUND Virtual Sound 51 S VOL Smart Volume 51 P BASS Audio Upscaling TROUBLESHOOTING 52 USB HOST FEATURE SUPPORTED PRODUCTS 55 55 Digital Camera 55 USB Flash Disc 55 MP3 Player APPENDIX 56 5...

Страница 9: ...ngs may be cancelled M Note This involves tips or instructions on the page that help each function operate In this manual the instructions marked with DVD are applicable to DVD VIDEO DVD AUDIO and DVD R RW discs that have been recorded in Video Mode and then finalized Where a particular DVD type is mentioned it is indicated separately If a DVD R RW disc has not been recorded properly in DVD Video f...

Страница 10: ... VCR results in a distorted picture from copy protected DVD discs This product incorporates copyright protection technology that is protected by methods claims of certain U S patents and other intellectual property rights owned by Macrovision Corporation and other rights owners Use of this copyright protection technology must be authorized by Macrovision Corporation and is intended for home and ot...

Страница 11: ... bit rate and high bit rate e g 32Kbps 320Kbps the sound may skip during playback A maximum of 500 tracks can be played per CD A maximum of 300 folders can be played per CD CD R JPEG Discs Only files with the jpg extensions can be played If the disc is not closed it will take longer to start playing and not all of the recorded files may be played Only CD R discs with JPEG files in ISO 9660 or Joliet ...

Страница 12: ...RONT PANEL POWER BUTTON TUNING DOWN SKIP BUTTON Volume Control DISC SLOT STOP BUTTON 10 SPEAKERS EJECT BUTTON PLAY PAUSE BUTTON 11 AUX IN 1 Jack FUNCTION BUTTON TUNING UP SKIP BUTTON 12 USB Port 7 12 8 9 11 10 HT X810_XAA_0303 indd 11 ...

Страница 13: ...t a TV with Component video inputs to these jacks VIDEO OUTPUT JACK Connect the TV s Video Input jack VIDEO IN to the VIDEO OUT jack AUX IN 2 JACKS Connect to the 2CH analog output of an external device such as a VCR HDMI OUT JACK Using an HDMI cable connect this HDMI output terminal to the HDMI input terminal on your TV for the best quality picture HDMI OUT HDMI OUT 1 2 3 4 5 6 HT X810_XAA_0303 i...

Страница 14: ...listed for your TV in the able enter one at a time to determine which code works Example For a Samsung TV While holding down the POWER button use the number buttons to enter 00 15 16 17 and 40 4 If the TV turns off the setting is complete You can use the TV POWER VOLUME CHANNEL and Numeric buttons 0 9 The remote control may not work on some brands of TVs Also some operations may not be possible de...

Страница 15: ...14 remote control TOUR OF THE REMOTE CONTROL 2 1 15 14 13 12 11 10 9 8 7 6 5 4 3 18 17 16 33 32 31 30 29 28 27 26 25 24 23 22 21 20 19 34 35 HT X810_XAA_0303 indd 14 ...

Страница 16: ...O button 13 V SOUND Virtual Sound button 14 AUDIO UPSCALE P BASS button 15 SLEEP button 16 SLOW MO ST button 17 DVD DVD button TUNER button AUX button 33 32 31 30 29 28 27 26 12 11 10 9 8 7 6 5 4 3 2 1 Insert Remote Batteries 1 Remove the battery cover in the direction of the arrow 2 Insert two 1 5V AAA batteries paying attention to the correct polarities and 3 Replace the battery cover Follow the...

Страница 17: ...40 15 01 15 16 17 37 38 39 40 41 42 43 44 18 19 54 56 59 60 62 63 65 71 15 17 18 48 54 59 60 62 72 89 40 54 54 18 40 18 40 59 60 75 44 45 46 47 48 49 50 51 52 53 54 55 56 57 58 59 60 61 62 63 64 65 66 67 68 69 70 71 72 73 74 75 76 77 78 79 80 81 82 83 84 85 86 MTC NEC Nikei Onking Onwa Panasonic Penney Philco Philips Pioneer Portland Proton Quasar Radio Shack RCA Proscan Realistic Sampo Samsung Sa...

Страница 18: ...t 9 7 inches but may vary depending on your operating environment If a steel concrete wall or metallic wall is between the main unit and the wireless subwoofer the system may not operate at all because the radio wave cannot penetrate metal If the main unit doesn t make wireless connection the system needs ID Setting between the main unit and wireless subwoofer With the main unit turned off press t...

Страница 19: ...nting Studs installed into the corresponding hole of the wall mount bracket This is the completion of the wall mount installation 1 2 3 4 Mounting Studs 2EA supplied Secure the Home Theater firmly to the wall so that it does not fall off If the Home theater falls off it may result in an injury or damage to the product When the Home Theater is installed on wall please make sure that a child does not...

Страница 20: ...ed from the Component Video Output Pr Pb and Y jacks on the back of the DVD Player to the Component Video Input jacks on your TV METHOD 3 Composite Video GOOD QUALITY Connect the supplied Video cable from the VIDEO OUT jack on the back of the DVD Player to the VIDEO IN jack on your TV This product operates in Interlace scan mode 480i for Component output If you use an HDMI cable to connect a Samsu...

Страница 21: ...he DVD Home Theater or an analog to digital converter in the TV is required During this conversion the picture quality is degraded due to noise and signal loss HDMI technology is superior because it requires no D A conversion and is a pure digital signal from the player to your TV What is the HDCP HDCP High band width Digital Content Protection is a system for protecting DVD content outputted via ...

Страница 22: ...l Available TV buttons S T and W X buttons button If you select the TV Set the Anynet HDMI CEC to On by pressing the Anynet button on your TV remote control Receiver On You can listen to audio through the Home Theater Receiver Off You can listen to audio through the TV If you select the THEATER Select THEATER to connect and set the option of each item below View TV If Anynet HDMI CEC is set to on ...

Страница 23: ...nect AUX IN 1 Audio on the Home Theater to the Audio Out of the external component MP3 player Press the AUX button on the remote control to select AUX1 input You can also use the FUNCTION button on the main unit The mode switches as follows DVD CD D IN AUX 1 AUX 2 USB BT AUDIO FM 1 2 Audio Cable not supplied Audio OUT HT X810_XAA_0303 indd 22 ...

Страница 24: ...utput jacks of the VCR to this product OPTICAL Connecting an External Digital Component Digital signal components such as a Cable Box Satellite receiver Set Top Box Connect the Digital Input OPTICAL on the Home Theater to the Digital Output of the external digital component Press the AUX button on the remote control to select DIGITAL IN You can also use the FUNCTION button on the main unit The mod...

Страница 25: ...pplied to the FM 75Ω COAXIAL Jack Slowly move the antenna wire around until you find a location where reception is good then fasten it to a wall or other rigid surface This unit does not receive AM broadcasts 1 2 M HDMI OUT FM Antenna supplied HT X810_XAA_0303 indd 24 ...

Страница 26: ...Press the DVD RECEIVER button to switch to DVD RECEIVER mode to operate the DVD Home Theater Press the FUNCTION button on the main unit or DVD button on the remote to enable DVD CD playback Press the TV button to set the remote to TV mode Press the POWER button to turn on your Samsung TV with this remote Press the TV VIDEO button to select VIDEO mode on your TV 1 2 3 4 5 6 VIDEO 6 A A KPFF ...

Страница 27: ... If the PLAY button or ENTER button is pressed playback resumes from the stop position This function works only with DVDs If pressed twice STOP is displayed and if the PLAY button is pressed playback starts from the beginning To temporarily pause playback press the PAUSE button during playback To resume playback press the PLAY button Depending on the content of the disc the initial screen may appe...

Страница 28: ...tton to select another album in Stop mode and then press the ENTER button Press the STOP button to stop playback Depending on the recording mode some MP3 WMA CDs may not play Table of contents of a MP3 CD varies depending on the MP3 WMA track format recorded on the disc Press the Cursor S T W X button when it is in Stop mode and select a desired icon from the top part of the menu Music File Icon T...

Страница 29: ...ck The maximum resolutions supported by this product are 5120 x 3480 or 19 0 MPixel for standard JPEG files and 2048 x 1536 or 3 0 MPixel for progressive image files If a JPEG file is played when the HDMI output resolution is 720p 1080i 1080p the mode is automatically converted to 480p mode M button Rotate 90 Clockwise button Rotate 90 Counterclockwise button Flip Vertically button Flip Horizontally ...

Страница 30: ...ring playback press the Cursor W X button Playback skips 5 minutes forward whenever you press the Cursor X button Playback skips 5 minutes back whenever you press the Cursor W button Audio Display D Press the AUDIO button If there are multiple audio tracks on a disc you can toggle between them Each time you press the button your selection will toggle between AUDIO 1 N 2 N and is displayed when the...

Страница 31: ...re not supported the user may experience problems such as broken images or no sound Supported Video Formats Format AVI WMV Supported Versions DivX3 11 DivX5 1 XviD V1 V2 V3 V7 Supported Audio Formats Format MP3 WMA AC3 Bit Rate 80 384kbps 56 128kbps 128 384kbps Sampling Frequency 44 1khz 44 1 48khz Aspect Ratio Although the default DivX resolution is 640x480 pixels 4 3 this product supports up to ...

Страница 32: ...bol appears on the TV screen when pressing a button that operation is not possible with the disc currently being played Checking the Remaining Time BA Press the REMAIN button For checking the total and remaining time of a title or chapter being played Each time the Remain button is pressed DVD VIDEO TITLE ELAPSED TITLE REMAIN CHAPTER ELAPSED CHAPTER REMAIN DVD AUDIO GROUP ELAPSED GROUP REMAIN TRAC...

Страница 33: ...d 32x speeds Slow Playback D Press the SLOW button Each time the button is pressed during playback the playback speed changes as follows d 1 2 1 4 1 8 1 2 1 4 1 8 X PLAY D 1 2 1 4 1 8 X PLAY No sound is heard during slow playback Reverse slow playback does not work with DivX Skipping Scenes Songs A Press the button Each time the button is pressed during playback the previous or next chapter track ...

Страница 34: ...elected group RANDOM Plays tracks in random order A track that has already been played may be played again TRACK Repeatedly plays the selected track DIR Repeatedly plays all tracks in the selected folder DISC Repeatedly plays the entire disc OFF Cancels Repeat Playback To Select a Repeat Playback Mode in the Disc Information Screen B Press the INFO button twice Press the Cursor X button to move to...

Страница 35: ...is pressed the selected position will be stored in memory Press the ENTER button at the end of the desired segment The specified segment will be played repeatedly A B To return to normal playback press the Cursor S T button to select OFF The A B Repeat function does not operate with DivX MP3 or JPEG discs Step Function D Press the STEP button The picture moves forward one frame each time the button...

Страница 36: ... the angle changes as follows 1 3 2 3 3 3 1 3 The Angle function works only with discs on which multiple angles have been recorded Zoom Screen Enlarge Function This function allows you to enlarge a particular area of the displayed image Press the ZOOM button Press the Cursor button to move to ANGLE display Press the ENTER button Each time the button is pressed the zoom level changes as follows ZOO...

Страница 37: ...tton on the remote control You can select the desired image from a DVD Audio disc containing still images With some discs you may not be able to select images Audio Language Selection Function Press the INFO button twice Press the Cursor S T button or numeric buttons to select the desired audio language Depending on the number of languages on a DVD disc a different audio language ENGLISH SPANISH F...

Страница 38: ...en press the ENTER button Press the Cursor W X button to move to the Chapter display Press the Cursor S T button or numeric buttons to select the desired chapter and then press the ENTER button Press the Cursor W X button to move to time display Press the numeric buttons to select the desired time and then press the ENTER button AG Press the numeric buttons The selected file will be played When pla...

Страница 39: ...Cursor S T W X button to select the desired item Press the ENTER button Press the EXIT button to exit the setup screen The disc menu display may be different depending on the disc Using the Title Menu For DVDs containing multiple titles you can view the title of each movie Depending on the disc the availability of this feature may vary In Stop mode press the MENU button Press the Cursor S T button...

Отзывы: