background image

45

English

04

Advanced Featur

es

Menu

The menu changes depending on the type and status of the devices connected to the TV.

Menu

Description

View TV

Changes mode to TV broadcast mode.

Device List

Shows the device list.

(device_name) 

MENU

Shows the connected device menus. E.g. If a DVD recorder is connected, the disc menu of 
the DVD recorder will appear.

(device_name) 

INFO

Shows the play menu of the connected device. E.g. If a DVD recorder is connected, the 
play menu of the DVD recorder will appear.

Recording

: (*recorder)

Starts recording immediately using the recorder. (This is only available for devices that 
support the recording function.)

Stop Recording

: (*recorder)

Stops recording.

Receiver

Sound is played through the receiver.

If more than one recording device is connected, they are displayed as (*recorder) and if only one recording device is 
connected, it will be represented as (*device_name).


¦

Setting Up  


Setup
(HDMI-CEC) (Off / On)

: To use the Function, 

(HDMI-CEC)

 must be set to 

On

.


When the 

(HDMI-CEC)

 function is disabled, all the related operations are deactivated.

Auto Turn Off (No / Yes)

: Setting an Device to turn off automatically when the TV is turned off.


The active source on the TV must be set to TV to use the function.


Even if an external device is still recording, it may turn off.


¦

Switching between Devices 

1. 

devices connected to the TV are listed.


If you cannot find a device you want, press the Red button to refresh the list.

2. 

Select a device and press the 

ENTER

E

 button. You can switch to the selected device.


Only when you set 

(HDMI-CEC)

 to 

On

 in the 

Application

 menu, the 

Device List

 menu appears.


x

Switching to the selected device may take up to 2 minutes. You cannot cancel the operation during the switching 
operation.


x

If you have selected external input mode by pressing the 

SOURCE

 button, you cannot use the function. 

Make sure to switch to an device by using the 

Device List

.

[PC7000_UK]BN68-02696J-00Eng.indb   45

2010-03-26   오후 6:35:29

Содержание PS50C7000YK

Страница 1: ...ister your product at www samsung com register Model______________Serial No ______________ Contact SAMSUNG WORLDWIDE If you have any questions or comments relating to Samsung products please contact t...

Страница 2: ...d does not indicate any defect or operation failure of the product However children should be prevented from touching the upper part of the product The product is making a cracking noise A cracking no...

Страница 3: ...u 26 Support Menu Advanced Features 27 27 Connecting to a PC 28 Network Connection 35 Media Play 44 Anynet 48 Internet TV 51 AllShare Other Information 53 53 Analogue Channel Teletext Feature 54 Assem...

Страница 4: ...y Ferrite Core 2EA y y Ferrite Core 2EA Ferrite Core The ferrite cores are used to shield the cables from interference When connecting a cable open the ferrite core and clip it around the cable near...

Страница 5: ...creen menu the OSD on screen display of your TV s features Y Adjusts the volume In the OSD use the Y buttons as you would use the and buttons on the remote control z Changes the channels In the OSD us...

Страница 6: ...View which includes Guide 3D Internet TV Media Play and AllShare Returns to the previous menu Selects the on screen menu items and changes the values seen on the menu These buttons are for the Channe...

Страница 7: ...y Press the or button then press the ENTERE button Select the appropriate country 4 Selecting an antenna Press the or button then press the ENTERE button Select Air or Cable 5 Selecting a channel Pres...

Страница 8: ...quest an upgrade x x Samsung TVs support the HDMI 1 4 with 3D and Audio Return Channel However the ARC Audio Return Channel function is only supported on HDMI IN 2 ARC If 3D Auto View is On some funct...

Страница 9: ...hen the TV is receiving a DTV signal the TV will send 5 1 CH sound to the home theatre receiver When the source is a digital component such as a DVD Blu ray player cable box STB Set Top Box satellite...

Страница 10: ...CARD some channels will display the message Scrambled Signal y y The pairing information containing a telephone number the CI or CI CARD ID the Host ID and other information will be displayed in about...

Страница 11: ...ow Next guide shows daily TV programme information for each channel according to the broadcasting time y y Scroll to view information for a desired programme while watching the current channel y y Scr...

Страница 12: ...esired channels and press the Yellow button to set all the selected channels at the same time The c mark appears to the left of the selected channels x x Blue Sort Change the list ordered by channel n...

Страница 13: ...e Scans for a channel automatically and stores in the TV Automatically allocated programme numbers may not correspond to actual or desired programme numbers If a channel is locked using the Child Lock...

Страница 14: ...Manager menu options Lock Unlock Timer Viewing Timer Recording Sort Delete Select All Deselect All Option menu items may differ depending on the channel status 1 Select a channel and press the TOOLS...

Страница 15: ...es of the PAL system the Tint G R function is not available x x In PC mode you can only make changes to Cell Light Contrast and Brightness x x Settings can be adjusted and stored for each external dev...

Страница 16: ...image To adjust Colour Red Green Blue and Reset set Colour Space to Custom White Balance Adjust the colour temperature for a more natural picture R Offset G Offset B Offset Adjust each colour s red g...

Страница 17: ...sted and stored for each external device connected to an input of the TV x x After selecting Screen Fit in HDMI 1080i 1080p or Component 1080i 1080p mode Adjusts the Position or Size by using button x...

Страница 18: ...otosensitive Seizure Warning and Other Health Risks Some viewers may experience an epileptic seizure or stroke when exposed to certain flashing images or lights contained in certain television picture...

Страница 19: ...ined 3D Mode Select the 3D input format If you want to feel the 3D effect fully please wear the 3D Active Glasses first and then select 3D Mode from the list below that provides the best 3D viewing ex...

Страница 20: ...a smooth picture without judder Before using 3D function NOTE x x You may notice a small amount of screen flickering when watching 3D images in poor light conditions from a strobe light etc or under a...

Страница 21: ...box will appear 4 Navigate to the Settings tab on the display dialog box y y The correct size setting resolution Optimum 1920 X 1080 pixels y y If a vertical frequency option exists on your display se...

Страница 22: ...eaker x x TV Speaker Off External Speaker On When Speaker Select is set to TV Speaker x x TV Speaker On External Speaker On If there is no video signal both speakers will be mute Additional Setting di...

Страница 23: ...180 minutes To cancel Sleep Timer select Off Setting the On Off Timer Timer 1 Timer 2 Timer 3 Three different on off timer settings can be made You must set the clock first On Time Off Time Set the ho...

Страница 24: ...ailable in the broadcast Preference Primary Audio Language Secondary Audio Language Primary Subtitle Language Secondary Subtitle Language Primary Teletext Language Secondary Teletext Language Select a...

Страница 25: ...menu PC Card Application Info View information on the CAM inserted into the CI slot and on the CI or CI CARD which is inserted into the CAM You can install the CAM anytime whether the TV is on or off...

Страница 26: ...ll return to their default settings We advise you to to write down your settings so that you can easily reset them after the upgrade By Online Upgrade the software using the Internet First configure y...

Страница 27: ...00 1280 x 960 1360 x 768 1440 x 900 1440 x 900 1600 x 1200 1680 x 1050 31 469 37 861 37 500 37 879 48 077 46 875 48 363 56 476 60 023 67 500 63 981 79 976 45 000 49 702 62 795 60 000 47 712 55 935 70...

Страница 28: ...ter that supports Dynamic Host Configuration Protocol DHCP Modems and routers that support DHCP automatically provide the IP address subnet mask gateway and DNS values your TV needs to access the Inte...

Страница 29: ...o a network that requires a Static IP address Getting the Network Connection Values To get the Network connection values on most Windows computers follow these steps 1 Right click the Network icon on...

Страница 30: ...r is currently being used by another device nearby this will result in interference and communication failure x x If you apply a security system other than the systems listed blow it will not work wit...

Страница 31: ...AP a pop up window appears on the screen notifying you of the failure Reset the AP and then try again If the connection fails again choose one of the other connection setup methods PBC WPS auto or ma...

Страница 32: ...e AP is set to Hidden Invisible you have to select Add Network and enter the correct Network Name SSID and Security Key to establish the connection 5 If the Security PIN pop up appears go to Step 6 If...

Страница 33: ...not work you need to enter the Network setting values manually Getting the Network Connection Values To get the Network connection values on most Windows computers follow these steps 1 Right click th...

Страница 34: ...re information refer to the wireless network setup manual of the device to be connected 5 If the device is connected properly to the TV after starting count on message box then message box will be dis...

Страница 35: ...nded to locate both TV and PC in same subnet The first 3 parts of the subnet address of the TV and the PC IP addresses should be the same and only the last part the host address should be changed e g...

Страница 36: ...dicated port USB 1 HDD port x x Do not disconnect the USB device while it is loading x x The higher the resolution of the image the longer it takes to display on the screen x x The maximum supported J...

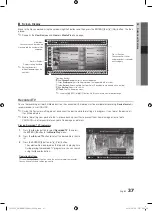
Страница 37: ...ons B Green Section Repeat You can set up the fuction to repeat some section You can also watch some section you want to Movie 01 avi 00 04 03 00 07 38 1 1 SUM B Section Repeat Play continuously E Pau...

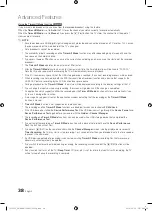
Страница 38: ...change the input source during recording the screen will go blank until the change is completed x x An application which supports neither the recording nor the Timeshift Mode function will close auto...

Страница 39: ...avi mkv AVI MKV Divx 3 11 4 x 5 1 6 0 1920x1080 6 30 8 MP3 AC3 LPCM ADPCM DTS Core XviD 1920x1080 6 30 8 H 264 BP MP HP 1920x1080 6 30 25 MPEG4 SP ASP 1920x1080 6 30 8 Motion JPEG 800x600 6 30 8 asf A...

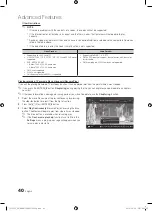
Страница 40: ...50Hz mono is not supported Playing recorded TV or movie file continuously Resume Play If you exit the playing Recorded TV or Videos function it can be played later from the point where it was stopped...

Страница 41: ...1 Press the or button to select Photos then press the ENTERE button in the Media Play menu 2 Press the button to select the desired file in the file list 3 Press the ENTERE button or Play button While...

Страница 42: ...It sorts and displays the file title in Symbol Number Alphabet Special order Preference It sorts and displays the file by preference You can change the file preference in the file list section using...

Страница 43: ...ects Background Music You can set and select background music when watching a slide show Zoom You can zoom into images in full screen mode Rotate You can rotate images in full screen mode Home Backgro...

Страница 44: ...t of sound using the HDMI IN 2 ARC port and can only be operated when the TV is connected to an audio receiver that supports the ARC function x x When following the connection above the Optical jack o...

Страница 45: ...g Up Anynet Setup Anynet HDMI CEC Off On To use the Anynet Function Anynet HDMI CEC must be set to On When the Anynet HDMI CEC function is disabled all the Anynet related operations are deactivated Au...

Страница 46: ...list The receiver will work when you have properly connected the optical in jack of the receiver to the DIGITAL AUDIO OUT OPTICAL jack of the TV When the receiver i e Home Theatre is set to On you ca...

Страница 47: ...nge the TV mode Note that the channel button operates only when a tuner embedded Anynet device is not connected The message Connecting to Anynet device appears on the screen You cannot use the remote...

Страница 48: ...vices directly from the web to your TV Login Mark as Favourite Sort by R Return My Applications Recommended by Date 1 1 Settings Samsung Apps Recommended Applications Displays the recommended service...

Страница 49: ...e watching TV Only available if supported by the broadcaster Change the Service Lock password The default password set is 0 0 0 0 If you forget the password press the following sequence of remote cont...

Страница 50: ...ous video media such as movies TV shows and short length videos y y Sports Displays various sports media such as match information images and short length video y y Lifestyle Includes various lifestyl...

Страница 51: ...ScreenShare function The Media function is available in all mobile devices which support AllShare Allowed Denied Allows Blocks the mobile phone Delete Deletes the mobile phone from the list This func...

Страница 52: ...nshare displays the same web page as provide in mobile Using ScreenShare you can open the various contents saved in a mobile phone For example the image below displays an access page for contents from...

Страница 53: ...pics on a Teletext page are colour coded and can be selected by pressing the coloured buttons Press the colour corresponding to the topic of your choice A new colour coded page is displayed Items can...

Страница 54: ...s in the Cable Tie so that the cables are not visible through the transparent stand 3 1 2 1 2 3 Wall Mount Type Do not pull the cables too hard when arranging them This may cause damage to the product...

Страница 55: ...omply with the VESA standard screw specifications x x Do not use screws that are longer than the standard dimension or do not comply with the VESA standard screw specifications Screws that are too lon...

Страница 56: ...ing 1 Put the screws into the clamps and firmly fasten them onto the wall Confirm that the screws have been firmly installed onto the wall You may need additional material such as an anchor depending...

Страница 57: ...creen Fit change it to 16 9 p 17 Change cable set top box resolution The picture is black and white If you are using an AV composite input connect the video cable yellow to the Green jack of component...

Страница 58: ...formatted when connected to the PC Connect the USB to the TV and format it Formatting may fail intermittently If a Device Performance Test or formatting failed it means that there is a problem with t...

Страница 59: ...nnels from an Antenna RF Coax connection p 26 The TV is tilted to the side Remove the base stand from the TV and reassemble it There are difficulties assembling the stand base Make sure the TV is plac...

Страница 60: ...istration code locate the DivX VOD section in the device setup menu Go to vod divx com with this code to complete the registration process and learn more about DivX VOD Pat 7 295 673 7 460 688 7 519 2...

Страница 61: ...ture indicates that the product and its electronic accessories e g charger headset USB cable should not be disposed of with other household waste at the end of their working life To prevent possible h...

Страница 62: ...Theatre 9 44 I Installation Space 56 Internet TV 48 L Language 24 Licence 60 Lock 14 M Media Play 35 Melody 25 Menu Transparency 25 Music 41 N Navigate 11 Network Connection 28 Network Setup 29 O ON...

Страница 63: ...g end adaptors and the point where they exit from the appliance y y To protect this apparatus from a lightning storm or when it is left unattended and unused for long periods of time unplug it from th...

Страница 64: ...Kingdom This Samsung product is warranted for a period of twelve 12 months from the original date of purchase against defective materials and workmanship In the event that warranty service is require...

Страница 65: ...This page is intentionally left blank PC7000_UK BN68 02696J 00Eng indb 65 2010 03 26 6 35 40...

Отзывы: